background image

6 Drying and curing

After you wash the object in isopropyl alcohol, we recommend rinsing it brie‘y under running 

water to remove the remnants of isopropyl alcohol. Then, dry it with a paper towel. Remove the tank 

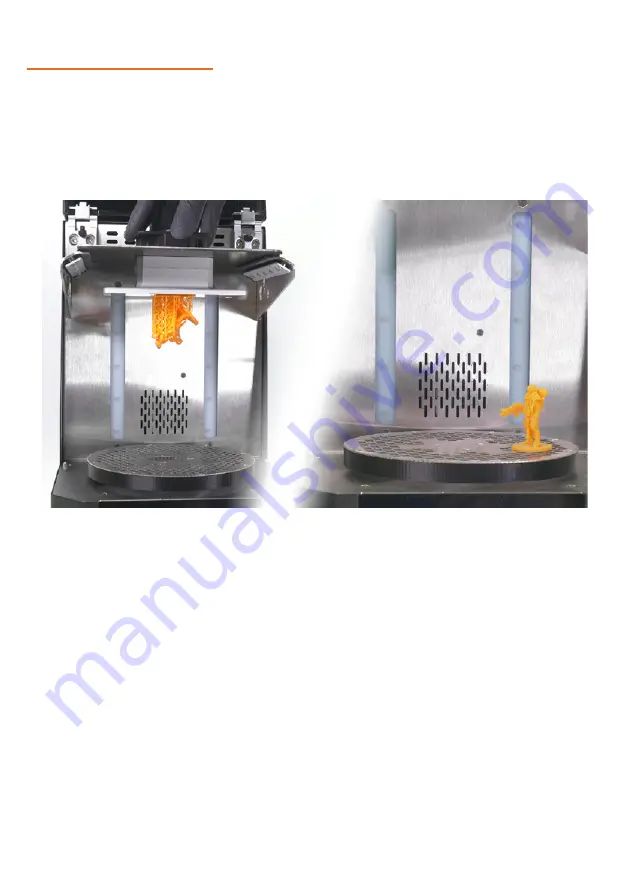
from the CW1 and place the object on the rotating platform. Don’t place it in the center, instead, 

place it near the edge of the platform. Another option is to insert the whole printing platform with 

the object still attached.

Two object placement options for drying and curing procedures. If you place the object on the rotating 

platform, place it near the edges, not in the center

Close the lid. The CW1 will recognize that the tank has been removed and oNer Drying and Curing 

modes on the XCD screen. Ilways keep the lid closed - there’s a safety switch in the lid that will 

stop the process in case you open the lid. Select QStart drying/curing’ on the LCD screen.

The drying and curing times are set to 3 minutes each. It’s a default value that works well for a 

majority of 3D printed objects. In case you would still Jnd the object a bit sticky, you can re-run 

the process until you reach the optimal result. …ou can set the run-times either via the Run-time 

menu or during the process itself by rotating the knob.

Once these actions Jnish, the CW1 will let you know with a beep (default settings, the sound 

notiJcation can be disabled).

14

Summary of Contents for PRUSA RESEARCH CW1

Page 1: ...USER MANUAL FORORIGINALPRUSACURINGANDWASHINGMACHINE ENG ORIGINAL INSTRUCTIONS ...

Page 2: ...he greatest importance either for user safety or for proper device service Product details Title Original Prusa CW1 Original Prusa Curing and Washing Machine Manufacturer Prusa Research a s Partyzánská 188 7A Prague 170 00 Czech Republic Contacts phone 420 222 263 718 e mail info prusa3d com EEE group 3 IT and or telecommunication equipment Device use indoor only Power supply Input 100 240VAC 50 6...

Page 3: ...fter washing 13 4 Drying and curing 17 Menu structure 1 5 CW1 Maintenance 14 8 1 Spilled isopropyl alcohol 16 8 2 Used IPA Recycling disposing 16 Firmware update 14 10 Troubleshooting 1 10 1 The liquid container is inserted but the Washing mode is not available 17 10 2 Cured prints have white residue on the surface 17 10 3 The device is not turning on 18 10 4 Xoud noises during washing in IPA 18 1...

Page 4: ... Prusa i3 MY3S is currently on the market It s an improved version of the original 3D printer s third iteration Prusa Research keeps expanding into new territories and the Original Prusa CW1 you just purchased is just one of the examples Bosef Prusa also organizes workshops for the public and participates in professional conferences dedicated to the popularization of 3D printing For example he lec...

Page 5: ...g or to the AC outlet 6 ever disassemble the external power supply it does not contain any parts that could be repaired by an unskilled worker All repairs must be performed by a qualiJed technician 7 Do not reach inside the device while it is still in operation 8 Prevent children from unsupervised access to the device even when it s not running 9 Do not leave the device unattended while it s still...

Page 6: ...ive gloves Resins and IPA have distinctive odors consider wearing a simple respirator in case you Jnd the odors irritating The Original Prusa CW1 should be placed in a well ventilated area 2 Package contents and Quick start info The Curing and Washing Machine comes with a number of additional tools that will help you cure and wash your printed models quickly and easily The package contains Stainle...

Page 7: ...7 ...

Page 8: ...he reset button needs to be pressed with an allen key or similar tool 7 Liquid container proximity sensor a proximity sensor used to detect whether the liquid container is inserted or not Depending on the status present not present the CW1 changes its operating modes automatically 8 UV LED panel the UV XED panel is used to cure models printed from liquid resins this hardens a rather soft surface i...

Page 9: ... Open the cardboard locks 4 and remove the foam protectors along with the protective wrap 5 Finally take the unpacked CW1 and place it on a stable surface 6 Open the CW1 s acrylic lid remove the top foam protector 1 then slide down the lower foam protector 2 and pull the liquid container along with the protector towards you 3 Remove the plastic wrap from the tank and take out the metal basket 9 ...

Page 10: ...g it into the power source To disconnect the cable push the connector s cover away from the CW1 to unlock the connector then pull it out Turn the device on by using the mechanical switch next to the power supply connector Connecting the power supply unit and turning on the machine Once you turn the CW1 on the display in the front will light up The knob next to the display is the main control devic...

Page 11: ...on t have the Original Prusa SX1 or if the initial washing did not remove some resin e g under dense supports you can use the metal basket to wash the object by itself Isopropyl alcohol is a volatile ammable liquid don t leave the lid closed when the liquid container is in the CW1 Washing an object attached to the SL1 printing platform After a print Jnishes open the acrylic lid of the SX1 and plac...

Page 12: ...d washing objects in isopropyl alcohol for more than 10 minutes tiny cracks may appear on the surface of printed objects even after more than 24 hours which is the result of a long exposure to IPA If you print a very tall object e g maximum print volume of the SX1 it s possible the object will collide with the propeller at the bottom of the tank Consider detaching the object from the printing plat...

Page 13: ...lecting Run time option before the print We do not recommend washing objects in isopropyl alcohol for more than 10 minutes tiny cracks may appear on the surface of printed objects even after more than 24 hours which is the result of a long exposure to IPA If you printed a large object that doesn t At the container wash it in two stages Jrst submerge it in IPA as usual and run the washing process T...

Page 14: ...s not in the center Close the lid The CW1 will recognize that the tank has been removed and oNer Drying and Curing modes on the XCD screen Ilways keep the lid closed there s a safety switch in the lid that will stop the process in case you open the lid Select QStart drying curing on the LCD screen The drying and curing times are set to 3 minutes each It s a default value that works well for a majo...

Page 15: ... 5BSHFU UFNQ 6OJU TZTUFN 4 NQFSJBM 64 4PVOE TFUUJOHT v 4PVOE SFTQPOTF ZFT OP v JOJTI CFFQ OPOF PODF DPOUJOVPVT OGPSNBUJPO Press the knob while any of the processes are running to open the options Pause Continue Stop Kack Default values for time and rotation speeds are factory tested and work well in a majority of scenarios Washing printed objects in IPA for more than 10 minutes is not recommended ...

Page 16: ...normal Only when you notice that the washing performance is decreased consider exchanging the IPA in the CW1 tank this usually happens after several months of use depending on the frequency of usage See your country s laws regarding safe and appropriate disposal methods of IPA in your location usually it should be treated as a hazardous liquid because it will also contain photoinitiators polymers ...

Page 17: ...the CW1 as possible ou can check the proximity sensor s functionality by covering it with your Jnger If the on screen option changes from Start Drying Curing to Start Washing then it works correctly If it doesn t please contact tech support or refer to the Helpdocs section at help prusa3d com 10 2 Cured prints have white residue on the surface This happens when you start curing a model that still ...

Page 18: ...PA are perfectly Jne and they will evaporate quickly However leftover IPA combined with liquid resin may create white stains on dried cured objects See chapter 9 2 Cured prints have white residue on the surface 2 How often do 6 need to replace the 6PI in the container8 A This depends on frequency of washing but from our experience the IPA loses its washing properties after around 2 months of frequ...

Reviews: