background image

P5417009-rev.6 

69

NOTICE

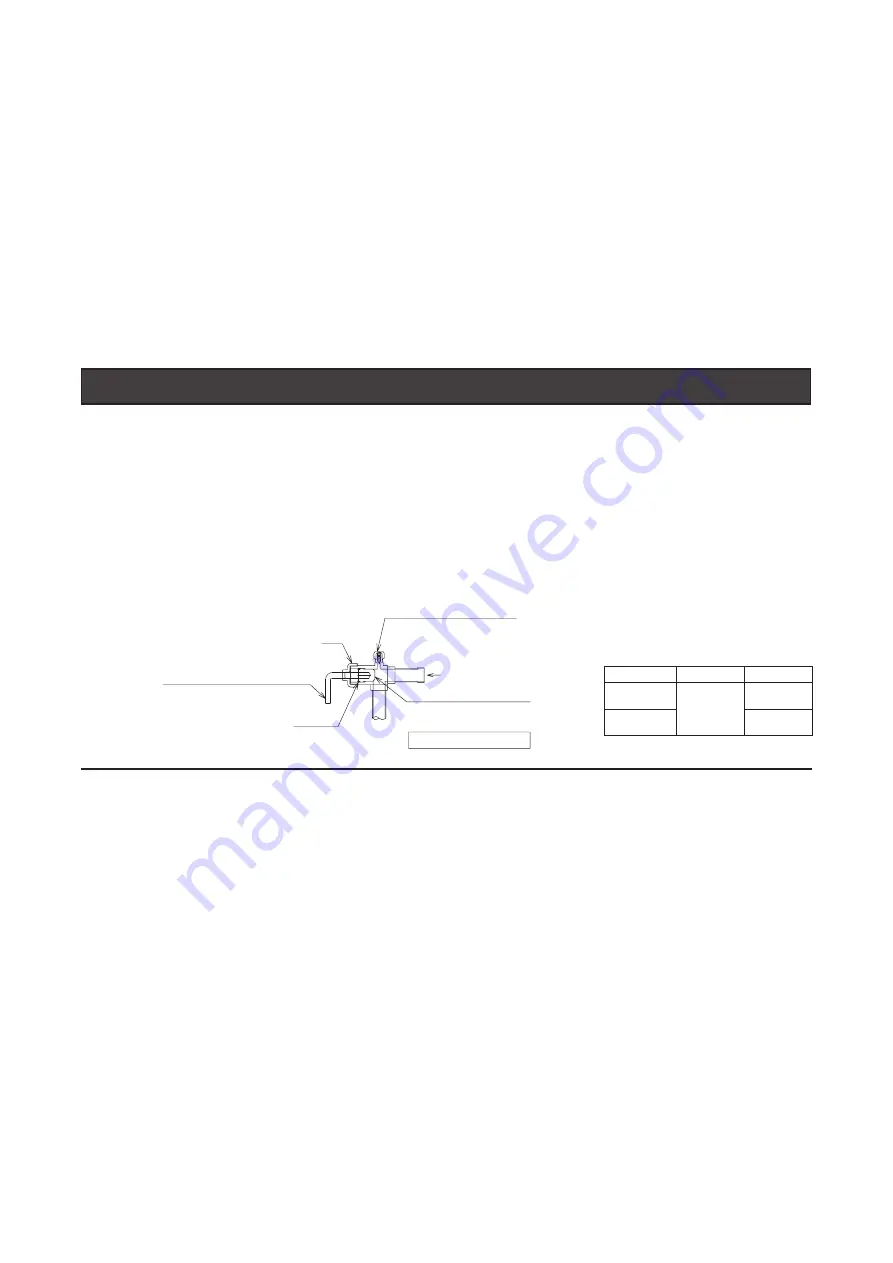
Do not apply excessive force to the stop valve after fully opening. Otherwise, the stop valve will blow out due 

to refrigerant pressure.  At the test run, fully open the stop valve. Otherwise, these devices will be damaged. (It 

is closed before shipment.)

Caution for Opening Stop Valve

1.  Do not apply an excessive force after fully opening the stop valve (Tightening Torque: < 3.7 ft·lbs 

(5.0 N·m)). (This valve does not have a hard stop when opening, and allows for the complete removal of 

the valve stem.)

2.  Securely tighten the caps according to the torque specs (Section 8.1-(2)-(d) after each stop valve is 

opened.

Hexagonal Wrench Size [inch (mm)]

Model 

Gas Valve

Liquid Valve

72 - 144

3/8

(10)

3/16

(4)

168, 192

3/16

(5)

8.3  Charging Work

(1)  An additional refrigerant charge is required according to total piping length. Refer to Table 8.1.
(2)  After vacuum pumping work, check that the high/low pressure gas valve, and liquid stop valve are fully 

closed. 

Charge the additional refrigerant from the access port of liquid stop valve (acceptable error must be 

within 1.1 lbs (0.5 kg)).

(3)  After refrigerant has been charged, fully open the liquid stop valve and gas stop valves. 

Gas remaining at the O-ring or screw component may emit a hissing sound when removing the stop 

valve cap. However, this is not leaking gas.

(4)  If it proves impossible to dispense the specified (charged) quantity of refrigerant, follow the procedure 

below.

(a)  Fully open the stop valve at the gas line side (both stop valves of high/low pressure and low 

pressure side).

O-ring
(Rubber)

Stop Valve
Counterclockwise...Open

Clockwise...............Close

Closed before shipment

Refrigerant Pressure

Cap

Hexagonal Wrench

(To open or close stop valve)

Access Port

(Only the charging hose for

R410A can be connected.)

Summary of Contents for YVAHR072B32S

Page 1: ... 460V H Y VAHR072B42S H Y VAHR096B42S H Y VAHR120B42S H Y VAHR144B42S H Y VAHR168B42S H Y VAHR192B42S H Y VAHR216B42S H Y VAHR240B42S H Y VAHR264B42S H Y VAHR288B42S H Y VAHR312B42S H Y VAHR336B42S H Y VAHR360B42S H Y VAHR384B42S H Y VAHR408B42S H Y VAHR432B42S IMPORTANT READ AND UNDERSTAND THIS MANUAL BEFORE INSTALLING THIS HEAT RECOVERY AIR CONDITIONER KEEP THIS MANUAL FOR FUTURE REFERENCE Insta...

Page 2: ......

Page 3: ... your distributor or contractor This manual provides common descriptions basic and advanced information to maintain and service this heat recovery air conditioning unit which you operate as well for other models This heat recovery air conditioning unit has been designed for a specific temperature range For optimum performance and long life operate this unit within the range limits according to the...

Page 4: ...e is 23o F 5o C or less during the outdoor unit cooling operation the minimum connectable indoor unit capacity is 18MBH In this case installing the snow protection hood optional part is required 5 When the outdoor air temperature is 14o F 10o C or less during the outdoor unit cooling operation the minimum connectable indoor unit capacity is 18MBH In this case installing the Low Ambient Kit optiona...

Page 5: ... Box and VRF Outdoor Unit Change Over Box Generation 1 Generation 2 Single Branch Type Multiple Branch Type Single Branch Type Multiple Branch Type COBS048B21S COBS096B21S COBS048B22S COBS096B22S COB04M132B22S COB08M264B22S COB12M264B22S VRF Outdoor Unit Heat Recovery Generation 1 208 230V Type H Y VAHR072B31S H Y VAHR096B31S H Y VAHR120B31S Available Not Available 460 Type H Y VAHR072B41S H Y VAH...

Page 6: ...Concrete Foundations 22 5 3 2 Condensate Treatment 24 6 Refrigerant Piping Work 26 6 1 Piping Materials 27 6 2 Piping Connection Work 30 6 2 1 Stop Valve 30 6 2 2 Piping Connection Method 32 6 3 Piping Work between Outdoor Units 35 6 4 Piping Sizes between Outdoor Units 38 6 5 Piping Size and Multi Kit Selection 40 6 6 Multi Kit Connection 51 7 Electrical Wiring 52 7 1 General Check 53 7 2 Electri...

Page 7: ... earthquake if the unit is not installed correctly injuries may occur due to a falling unit Use appropriate Personal Protective Equipment PPE such as gloves and protective goggles and where appropriate have a gas mask nearby Also use electrical protection equipment and tools suited for electrical operation purposes Keep heat shields fire blankets and a fire extinguisher nearby during brazing Use c...

Page 8: ...ain hose discharges water properly If connected incorrectly it may cause leaks Do not install the unit in any place where oil can seep onto the units such as table or seating areas in restaurants and so forth For these locations or social venues use specialized units with oil resistant features built into them In addition use a specialized ceiling fan designed for restaurant use These specialized ...

Page 9: ...ns refrigerant installed by Johnson Controls Johnson Controls uses only refrigerants that have been approved for use in the unit s intended home country or market Johnson Controls distributors similarly are only authorized to provide refrigerants that have been approved for use in the countries or markets they serve The refrigerant used in this unit is identified on the unit s faceplate and or in ...

Page 10: ...ions Take the following precautions to reduce the risk of electric shock fire or explosion resulting in serious injury or death Highly dangerous electrical voltages are used in this system Carefully refer to the wiring diagram and these instructions when wiring Improper connections and inadequate grounding can cause property damage serious injury or death Perform all electrical work in strict acco...

Page 11: ...mpting any maintenance for electrical parts Check to ensure that no residual voltage is present after disconnecting the power supply Do not clean with or pour water into the controller as it could cause electric shock and or damage the unit Do not use strong detergent such as a solvent Clean with a soft cloth Check that the ground wire is securely connected Do not connect ground wiring to gas pipi...

Page 12: ...7 8 22 2 ID 1 25 4 OD 1 1 8 28 6 ID 1 25 4 OD 1 1 8 28 6 Connection for Refrigerant Liquid Pipe OD 3 8 9 52 OD 1 2 12 7 OD 1 2 12 7 OD 5 8 15 88 90 Elbow for Refrigerant Gas Pipe ID 1 25 4 OD 1 25 4 ID 1 25 4 OD 1 25 4 ID 1 25 4 OD 1 25 4 Cable Clamp For Fixing Power Supply Wiring x 1 x 1 x 1 x 1 x 1 x 1 Cable Band For Fixing Power Supply Wiring 2 2 2 2 2 2 For Fixing PVC Tube 5 5 5 5 5 5 Screw On...

Page 13: ...utter 17 Gas Leak Detector 10 Brazing Kit 18 Level 3 Vacuum Pump 11 Hexagon Wrench 19 Crimper for Solderless Terminals 4 Refrigerant Gas Hose 12 Wrench 20 Hoist for Indoor Unit 5 Megohmmeter 13 Scale 21 Ammeter 6 Copper Pipe Bender 14 Charging Cylinder 22 Voltage Meter 7 Manual Water Pump for Indoor Unit 15 Gauge Manifold 23 Ratchet Wrench 3 2 Necessary Tools and Instrument List for Installation ...

Page 14: ...ict Control against Contamination Blow nitrogen during brazing Prevention from Oxidation during Brazing Lubrication Oil for Flare Surface l F Use a synthetic oil which is equivalent to the oil used in the refrigeration cycle Synthetic oil absorbs moisture quickly Applying Oil to the Flared Surface Vacuum Drying l Refrigerant Charge Refrigerant Cylinder l F Check refrigerant cylinder color H Liquid...

Page 15: ...ension B inch mm Diameter R410A 1 4 6 35 11 16 17 3 8 9 52 7 8 22 1 2 12 7 1 26 5 8 15 88 1 1 8 29 3 4 19 05 1 7 16 36 NOTES Do not use pipe that has allowable pressure less than 601 psi 4 15MPa The reference value of the refrigerant piping thickness is indicated in the table at left Do not use pipe that is considerably different from the reference value B Flare Nut Piping Thickness and Material U...

Page 16: ...2 7 8 D 12 1 2 D 5 8 5 16 8 0 002 0 018 0 05 0 45 12 D 16 5 8 D 1 3 8 10 16 D 25 1 D 1 3 8 1 2 12 0 002 0 022 0 05 0 55 25 D 35 1 3 8 D 1 3 4 9 16 14 35 D 45 Processing at Brazing Connection To prevent gas leakage at the brazing connection refer to the following table for the insertion depth and the gap for the joint pipe B D A ...

Page 17: ...B32S H Y VAHR144B32S H Y VAHR144B32S H Y VAHR168B32S Capacity MBH 384 408 432 Model H Y VAHR384B32S H Y VAHR408B32S H Y VAHR432B32S Combination H Y VAHR144B32S H Y VAHR144B32S H Y VAHR144B32S H Y VAHR120B32S H Y VAHR144B32S H Y VAHR144B32S H Y VAHR120B32S H Y VAHR120B32S H Y VAHR144B32S 460V Base Unit Capacity MBH 72 96 120 Model H Y VAHR072B42S H Y VAHR096B42S H Y VAHR120B42S Capacity MBH 144 168...

Page 18: ...iling Mounted 4 Way Cassette Mini H Y ICM_B21S Ceiling Mounted 2 Way Cassette H Y IC2_B21S Ceiling Mounted 1 Way Cassette H Y IC1_B21S Wall Mounted TIWM_B21S Ceiling Suspended H Y ICS_B21S Floor Exposed H Y IFE_B21S Floor Concealed H Y IFC_B21S Available NOTICE For connection to a Ducted EconoFresh see below Ducted EconoFresh only Total capacity of Ducted EconoFresh is 70 100 of the outdoor unit c...

Page 19: ...der the high heating load conditions the total indoor unit capacity should be less than 100 of the outdoor unit capacity and the total piping length should be less than 984 ft 300m 4 When the number of connected indoor unit I U is within the recommended the maximum connectable indoor unit capacity ratio is available up to 150 5 There are some limitations of the Height Difference between Outdoor Un...

Page 20: ...iping Connection Kit 1 Piping Connection Kit 1 Piping Connection Kit 2 Piping Connection Kit 2 Maintain a straight line distance of 19 11 16 inches 500mm or more for piping after installing the piping connection kit 144 MBH 144 MBH 120 MBH 120 MBH 144 MBH 144 MBH C B A C B A NOTICE If the arrangement for outdoor units is incorrect it may cause flowback of the refrigerant and result in failure of t...

Page 21: ...ulate such as near a hot tub or hot spring Where dense salt laden airflow is heavy such as in coastal regions Where the air quality is of high acidity Where harmful gases can be generated from decomposition During heating or defrosting operation drain water is discharged Provide adequate drainage around the foundation If installing the unit on a roof or a balcony provide the additional drainage ar...

Page 22: ...ns For walls on more than two sides secure adequate clearance for service access space as shown in the following illustrations If the space between the unit and an obstacle above the unit is less than 59 1 16 inches 1 500mm or the space above the unit is closed set up the duct at the air outlet side in order to prevent a short circuit Make sure there is enough space in case the unit needs to be se...

Page 23: ...ir outlet duct field supplied is adopted a minimum clearance of 2 inches 50mm is required Unit inch mm Min 3 8 10 Min 13 16 20 Min 13 16 20 Min 13 16 20 Min 13 16 20 Min 3 8 10 Min 11 13 16 300 h1 2 Min 3 8 10 Front Side Top View No limit for side wall height Unit inch mm Min 19 11 16 500 h2 2 Min 11 13 16 300 Min 3 8 10 Front Side Top View No limit for side wall height Min 15 3 4 400 Min 7 7 8 20...

Page 24: ...s on Four Sides Single Installation Installation in the Same Direction Rear to Rear Installation Multiple Serial Installation One Group Max Six Outdoor Units Min 3 3 ft Top View Front Side No limit for side wall height No limit for side wall height Min 19 11 16 500 h2 2 Min 7 7 8 200 Min 7 7 8 200 Front Side Min 35 7 16 900 Min 11 13 16 300 h1 2 Open Min 31 1 2 800 Open Min 31 1 2 800 Min 7 7 8 20...

Page 25: ...ng enough to resist rough handling Secure with two sling belts when hoisting the outdoor unit with a crane Transportation and Banding Wire To protect the unit do not remove any packing Do not stack or place any material on top of the product Apply banding wire to both sides of the packaged unit as shown at right Sling Belt Long Hole Sling Belt Position CORRECT INCORRECT Wooden Skid Base Sling Belt...

Page 26: ...ltage Model Net Weight Gross Weight 208 230V 72 527 239 567 257 96 598 271 642 291 120 730 331 774 351 144 732 332 776 352 168 192 860 390 911 413 460V 72 534 242 573 260 96 611 277 655 297 120 734 333 778 353 144 737 334 781 354 168 192 860 390 911 413 Sling Belt Sling Belt Slots Slots Sling Belt Position INCORRECT CORRECT Angle of sling belt is more than 60o Min 6 6 ft 2m Top corners Attach four...

Page 27: ...tact with the unit Sudden forward movement on the forklift can cause damage to the unit heat exchanger Wooden Skid Base Removal Method 1 Remove the hexagon head bolt using the ratchet wrench 2 Suspend the unit from the wooden skid base in its packing with two sling belts 3 Ensure safety while hoisting the unit gently to prevent the unit from tipping over as shown in Figure 5 3 Figure 5 3 Wooden Sk...

Page 28: ...outdoor unit may be deformed Make sure to install the concrete foundation at the center of the outdoor unit Correct Min 3 15 16 100 Min 3 15 16 100 Min 3 15 16 100 Min 3 15 16 100 Min 3 15 16 100 Center of Outdoor Unit Front Side of Unit Front Side of Unit Front Side of Unit Foot Foundation Foot Foundation Foot Foundation Correct Incorrect Unit inch mm Min 3 15 16 100 Min 3 15 16 100 Min 3 15 16 1...

Page 29: ...72 Model 168 and 192 Model Unit inch mm 96 120 and 144 Model Right Side and Left Side Front Side and Rear Side 28 11 16 729 7 8 23 7 8 22 27 1 16 688 5 3 8 136 5 3 8 136 Min 3 1 8 80 Min 3 1 8 80 4 1 1 2 38 x 9 16 15 Long Hole Hole for Anchor Bolt M12 Pitch for Anchor Bolts Pitch for Anchor Bolts Vibration Proof Mat 3 pieces of each front and rear 6 1 1 2 38 x 9 16 15 Long Hole Hole for Anchor Bol...

Page 30: ...ot Used Not Used Drain Hole φ1 26 x 2 Positions Drain Adaptor Position Optional Part Refrigerant Piping Outlet Low Pressure Gas Knockout Square Hole 4 1 2 115 28 3 8 720 15 1 16 382 3 1 8 80 5 127 3 7 16 87 9 7 16 239 Refrigerant Piping Outlet High Low Pressure Gas and Liquid Knockout Square Hole 2 7 8 73 14 3 4 374 96 120 and 144 Not Used Not Used Not Used Drain Hole φ1 26 x 4 Positions Drain Ada...

Page 31: ... Qty Application DBS TP10A Drain Adaptor PP Black 2 Connecting for Drain Piping Drain Cap PP Black 2 Cover for Drain Hole Rubber Cap CR Black 4 Sealing for Adaptor and Cap Drain Adaptor Optional Parts Use a drain adaptor as a condensation pipe connection Then use an outdoor unit bottom base as a condensation drainage pan ...

Page 32: ...o excessive refrigerant pressure Pay close attention to the pipe thickness when using copper refrigerant pipes The thickness of copper refrigerant pipe differs depending on its material Check to ensure that no pressure exists inside the stop valve before removing the flange Ensure that the corresponding pipe connections for the liquid low pressure gas and high low pressure gas piping are properly ...

Page 33: ...lator and compressor which can prevent the unit from operating properly Do not use the field supplied antioxidant which can corrode pipes and degrade the refrigerant oil NOTICE To avoid oxidation and scaling perform brazing at the appropriate temperature Make sure to use nitrogen Nitrogen gas pressure shall be 2 9 psi 0 02 MPa or less Make sure to use the pressure reducing valve Do not use field s...

Page 34: ...ening Torque 1 4 inch 6 35 mm 10 3 13 3 ft lbs 14 18 N m 3 8 inch 9 52 mm 25 1 31 0 ft lbs 34 42 N m 1 2 inch 12 7 mm 36 1 45 0 ft lbs 49 61 N m 5 8 inch 15 88 mm 50 2 60 5 ft lbs 68 82 N m 3 4 inch 19 05 mm 73 8 88 5 ft lbs 100 120 N m 4 When the temperature and humidity inside the ceiling exceed 80o F 27o C RH80 apply additional insulation of approximately 3 8 inch 10mm in thickness to the acces...

Page 35: ...pe Liquid Pipe High Low Pressure Gas Pipe Precaution for Installing and Securing Piping When assembling pipes onsite with hidden elbow or socket joints provide a service access door to facilitate close up examination of interconnecting components Table 6 1 Pipe Sizes of Outdoor Unit Table 6 2 Pipe Sizes of Indoor Unit inch mm Indoor Unit Capacity MBH Gas Liquid 6 15 1 2 12 7 1 4 6 35 18 54 5 8 15 ...

Page 36: ...h Please see close pipe drawing below 5 Remove the closing pipe from the brazing portion with a torch Be careful that the flame doesn t damage the stop valve Remove gas inside the closing pipe before the brazing work is performed If the brazing filler metal melts with residual gas inside the pipe will explode and injuries can result Do not expose surrounding parts and the oil return pipe of the co...

Page 37: ...lare Nut d 72 24 3 31 0 33 0 42 0 5 2 6 6 7 0 9 0 24 3 31 0 33 0 42 0 96 144 24 3 31 0 33 0 42 0 5 2 6 6 7 0 9 0 36 9 45 7 50 0 62 0 168 192 36 9 45 7 50 0 62 0 6 6 8 1 9 0 11 0 50 2 62 0 68 0 84 0 Model Tightening Torque ft lbs N m Valve 72 24 3 31 0 33 0 42 0 A 96 144 36 9 45 7 50 0 62 0 B 168 192 50 2 62 0 68 0 84 0 C Do not put wrenches here Flare Nut Flare Nut Flare Nut C B A Position both wr...

Page 38: ...he installation procedures in Section 6 2 1 3 Connect the piping in accordance with Figures 6 1 and 6 2 on the following page 4 Seal the gap between the bottom base or front piping cover and pipes with the insulation Firmly secure the pipe in order to avoid vibration excessive force on the valve and noise For Pipes from Bottom Base Liquid Pipe High Low Pressure Gas Pipe Seal this gap with insulati...

Page 39: ...16 177 9 7 16 239 12 11 16 322 10 3 16 259 6 5 16 160 6 7 16 163 5 3 16 132 6 152 6 153 5 13 16 147 3 5 8 92 5 3 16 132 8 3 8 212 192 f1 1 8 28 58 f7 8 22 2 f5 8 15 88 Square Hole of Piping Cover Knockout Hole D E 2 9 16 65 5 127 3 15 16 100 Q P N 9 3 4 248 9 15 16 253 M 3 5 8 92 Refrigerant High Low Pressure Gas Piping Connection B Refrigerant Liquid Piping Connection C K Refrigerant Low Pressure...

Page 40: ... Stop Valve for Liquid Liquid Pipe Field Supplied 90 Elbow B Field Supplied Accessory Pipe for High Low Pressure Gas Line 120 Model 144 Model Stop Valve for High Low Pressure Gas Stop Valve for Low Pressure Gas 90 Elbow B Accessory Accessory Pipe for Low Pressure Gas Line Flaring Stop Valve for Liquid Liquid Pipe Field Supplied 90 Elbow A Field Supplied Gas Pipe Field Supplied Stop Valve for High ...

Page 41: ...ection maintain a maximum clearance of 11 13 16 inches 300mm between the piping connection kit and the bottom of the outdoor unit Also install an oil trap minimum 7 7 8 inches 200mm between the piping connection kit and the outdoor unit 6 3 Piping Work between Outdoor Units Outdoor Unit B Outdoor Unit A Outdoor Unit C Piping Connection Kit 1 Piping Connection Kit 2 L L C A B L Indoor Unit Side Out...

Page 42: ...r servicing if the pipe is installed in front of the outdoor unit make sure a minimum clearance of 19 11 16 inches 500mm between the outdoor unit and each piping connection kit When the compressor is replaced ensure a minimum clearance of 19 11 16 inches 500mm The refrigerant system may be damaged if the slope of the piping connection kit exceeds 15o NOTICE Less than 6 6 ft 2m Less than 6 6 ft 2m ...

Page 43: ... L Shape Accesory Pipe L Shape Accesory Pipe Z Shape Accesory Pipe Z Shape High Low Pressure Gas Piping Field Supplied Liquid Piping Field Supplied Low Pressure Gas Piping Field Supplied Piping Connection Kit 1 Liquid Accessory Pipe Indoor Unit A Indoor Unit B Indoor Unit C Foundation Low Pressure Gas Piping Field Supplied High Low Pressure Gas Piping Field Supplied Liquid Piping Field Supplied Pi...

Page 44: ...on Kit MC NP21SX Piping Size a Low Pressure Gas 1 1 8 28 58 1 3 8 34 93 1 3 8 34 93 1 3 8 34 93 1 3 8 34 93 1 3 8 34 93 1 3 8 34 93 High Low Pressure Gas 7 8 22 2 1 1 8 28 58 1 1 8 28 58 1 1 8 28 58 1 1 8 28 58 1 1 8 28 58 1 1 8 28 58 Liquid 3 4 19 05 3 4 19 05 3 4 19 05 3 4 19 05 3 4 19 05 3 4 19 05 3 4 19 05 b Low Pressure Gas 1 1 8 28 58 1 1 8 28 58 1 1 8 28 58 1 1 8 28 58 1 1 8 28 58 1 1 8 28 ...

Page 45: ... 28 58 1 1 8 28 58 1 1 8 28 58 High Low Pressure Gas 7 8 22 2 7 8 22 2 7 8 22 2 Liquid 5 8 15 88 5 8 15 88 5 8 15 88 d Low Pressure Gas 1 1 8 28 58 1 1 8 28 58 1 1 8 28 58 High Low Pressure Gas 7 8 22 2 7 8 22 2 7 8 22 2 Liquid 1 2 12 7 5 8 15 88 5 8 15 88 e Low Pressure Gas 1 1 8 28 58 1 1 8 28 58 1 1 8 28 58 High Low Pressure Gas 7 8 22 2 7 8 22 2 7 8 22 2 Liquid 1 2 12 7 1 2 12 7 5 8 15 88 Inst...

Page 46: ...nit 7 Indoor Unit E E CH Low Pressure Gas Pipe High Low Pressure Gas Pipe Gas Pipe Liquid Pipe Two Pipes Portion NOTE Change over box single branch type is not connected to liquid pipe Three Pipes Portion CH M High Low Pressure Gas Pipe Low Pressure Gas Pipe Liquid Pipe Gas Pipe Liquid Pipe Two Pipes Portion Three Pipes Portion Liquid Pipe Gas Pipe Two Pipes Portion NOTE Refer to page 42 E Change ...

Page 47: ... 48 95 MW NP282X3 1 96 143 MW NP452X3 1 144 215 MW NP562X3 1 216 MW NP902X3 1 1 X2 type is to be used in place of X3 type The piping kits for X2 model number MW NP142X2 MW NP282X2 MW NP452X2 MW NP562X2 and MW NP902X2 are to be used in place of the piping kits for the X3 model numbers MW NP142X3 MW NP282X3 MW NP452X3 MW NP562X3 and MW NP902X3 as noted D Multi Kit after First Branch Two Pipes Portio...

Page 48: ...cted to the change over box within the Indoor Unit Maximum Connection Capacity shown in above table Make sure to increase the pipe connection size by using the appropriate accessory pipe Multiple Units for 1 Branch Model Indoor Unit Side Branch Number Maximum Number of Connected Indoor Units for 1 Branch Indoor Unit Maximum Connection Capacity Indoor Unit Maximum Connection Capacity for 1 Branch C...

Page 49: ...rst Branch to the same size as 3 Main Pipe Diameter 3 Main Pipe Diameter Base Unit or Piping Connection Kit 1 to First Branch Model H Y VAHR_B 3 4 2S Outdoor Unit Capacity MBH Low Pressure Gas High Low Pressure Gas Liquid Maximum Equivalent Piping Length 328 ft 100m 328 ft 100m 5 72 96 7 8 22 2 3 4 19 05 1 2 12 7 5 8 15 88 120 1 1 8 28 58 7 8 22 2 1 2 12 7 5 8 15 88 144 192 1 1 8 28 58 7 8 22 2 5 ...

Page 50: ... 9 52 72 95 7 8 22 2 3 4 19 05 3 8 9 52 96 119 7 8 22 2 3 4 19 05 1 2 12 7 120 143 1 1 8 28 58 7 8 22 2 1 2 12 7 144 215 1 1 8 28 58 7 8 22 2 5 8 15 88 216 264 1 3 8 34 93 1 1 8 28 58 3 4 19 05 7 If the number of connected indoor unit exceeds four the low pressure gas and high low pressure gas pipes need to change size in square bracket In addition the gas and liquid pipes of 6 Diameter of Pipe Tw...

Page 51: ...Indoor Unit Indoor Unit Indoor Unit Indoor Unit Exclusive Use of Cooling Operation First Branch Piping Connection Kit 1 Piping Connection Kit 2 Outdoor Unit A Outdoor Unit B Outdoor Unit C Indoor Unit Side For two and three units combination Upstream Side Indoor Unit Indoor Unit Indoor Unit Indoor Unit Indoor Unit Indoor Unit Terminal Indoor Unit Maintain a straight line distance of 19 11 16 inche...

Page 52: ...ts Total Piping Length 3 281 ft 1 000m 984 ft 300m Maximum Piping Length Actual Length L1 541 ft 165m 541 ft 165m Equivalent Length 623 ft 190m 623 ft 190m Maximum Piping Length between Multi kit of 1st Branch and Each Indoor Unit L2 295 ft 90m 131 ft 40m Maximum Piping Length between Each Multi kit Change Over Box Multiple Branch Type and Each Indoor Unit L3 13 131 ft 40m 98 ft 30m Total Piping L...

Page 53: ... to the terminal indoor unit exceeds 131 ft 40m refer to Piping Branch Restrictions Section 6 5 9 When completing on site piping install bent piping or horizontal loop piping to absorb any expansion or contraction due to changing temperatures 10 When the height difference is longer than 164 ft 50m and up to 360 ft 110m in case the outdoor unit is higher O U is Higher there are following restrictio...

Page 54: ... i j k h g Terminal Indoor Unit Terminal Indoor Unit Terminal Indoor Unit Piping Length from the Multi Kit at the first branch to the terminal Indoor Unit is within 131 2 295 3 ft 40 90m g h j b d 131 2 ft 40m The Closest Indoor Unit from the First Branchࠉ The Farthest Indoor Unit from the First Branchࠉ Terminal Indoor Unit The Farthest Indoor Unit from the First Branchࠉ Terminal Indoor Unit The F...

Page 55: ...o Pipes segment L2 Within 131 ft 40m L2 Within 131 ft 40m Indoor Unit CORRECT Change Over Box Change Over Box First Branch Multi Kit Change Over Box Multiple Branch Type Change Over Box Multiple Branch Type L2 L3 Line Branch Line Branch Indoor Unit CORRECT CORRECT CH CH CH M CH M Change Over Box Multiple Branch Type CH M Header Branch Header Branch Line Branch INCORRECT Header Branch Line Branch I...

Page 56: ... operating the outdoor unit in cold area with temperatures of 14o F 10o C or under the high heating load conditions the total indoor unit capacity should be 100 or less against the outdoor unit capacity and the total piping length should be 984 3ft 300m or less 4 The airflow volume for indoor units of 6 and 8 MBH is set higher than that for indoor units of 12 MBH or more Make sure to select approp...

Page 57: ...ght Length Min 1 6 ft 0 5m Main Pipe Branch Connection Branch Pipe Branch Pipe Main Pipe Branch Connection Branch Pipe Branch Pipe Bending Radius Min 1 6 ft 0 5m CORRECT CORRECT CORRECT INCORRECT Upper Side Upper Side Upper Side Upper Side Outdoor Unit Outdoor Unit Multi Kit Example Recommended From each Indoor Unit to Multi Kit use hard copper pipes that bend to prevent kinking Bending Pipe Conne...

Page 58: ... 17 0 ft lbs 18 0 to 23 0 N m Set DSW7 on the PCB1 according to each power supply shown in the figure below Use the specified cables for wiring between the outdoor unit and indoor units Selecting incorrect cables will cause an electric shock or a fire Communication cable shall be a minimum of AWG18 0 82mm2 2 Conductor Stranded Copper Shielded cable must be considered for applications and routing i...

Page 59: ...power supply voltage is within 10 of the rated voltage If the power supply voltage is too low the system cannot start due to the voltage drop 3 Check the size of the electrical wires 4 Communication cable must be a minimum of AWG18 0 82mm2 2 Conductor Stranded Copper Shielded cable must be considered for applications and routing in areas of high EMI and other sources of potentially excessive elect...

Page 60: ...he unit is not correctly grounded it may lead to an electrical shock Do not connect the ground wiring to gas piping water piping lighting conductor or telephone ground cables 1 Power Supply Wiring Supply the power supplies to each outdoor unit and indoor unit group respectively Using this method is a basic principle of power supply wiring Outdoor Unit A Outdoor Unit B Outdoor Unit Power Supply AC ...

Page 61: ...Y VAHR168B32S 60 208 230 253 188 65 59 80 80 80 80 28 6 28 6 50 50 H Y VAHR192B32S 60 208 230 253 188 76 68 90 90 90 90 33 4 33 4 50 50 Model Fan Motor 1 Fan Motor 2 Wiring Size Output Output Power Supply Wiring Ground Wiring Communication Cable kW kW AWG AWG AWG H Y VAHR072B32S 0 75 10 10 10 10 18 H Y VAHR096B32S 0 75 0 75 8 8 8 8 18 H Y VAHR120B32S 0 75 0 75 6 6 6 6 18 H Y VAHR144B32S 0 75 0 75 ...

Page 62: ...age Rated Voltage within 10 Starting Voltage Rated Voltage within 15 Operating Voltage Rated Voltage within 10 Imbalance between Phases within 3 3 Do not connect the ground wiring to gas piping water pipe or a lightening conductor Gas Piping An explosion and ignition may occur if there is escaping gas Water Piping There is no effective electrical ground provided when hard vinyl piping is used Ligh...

Page 63: ...t be considered per application and local code Communication cable must be a minimum of AWG18 0 82mm2 2 Conductor Stranded Copper 3 Insert the communication cables into the PVC tube VW 1 600V Accessory to separate from the power supply wirings and the communication cables in the outdoor unit Local codes need to be followed Then tighten both ends of the PVC tubing with the cable bands accessory in ...

Page 64: ... the wiring outlet for communication cable Hermetically seal the end of conduit tubing by using putty to seal against moisture Using a cutter knife and cut an X in the rubber bushing on site as shown below Attach insulation sleeve 460V 60Hz 1 Detail of Electrical Box Terminal Ground Wiring Terminal Connect cable securely Ground Wiring Terminal Connect cable securely Attach insulation sleeve For Co...

Page 65: ...ox group connected to the same outdoor unit Total operating current be less than 12A Connect an optional Ground Fault Circuit Interrupter GFCI fuse and main switch S to each indoor unit group 3 Connect the communication cable between indoor units change over boxes and outdoor units as shown in Figure 7 1 4 Connect the communication cables in the same refrigerant system unit If the refrigerant pipi...

Page 66: ...or unit and change over box between outdoor unit and outdoor unit in other refrigerant systems 9 Do not connect the power supply wiring to the terminal block for communication cable TB2 All the printed circuit boards in the same refrigerant system will be damaged 10 For a Heat Recovery System connect the communication cables from indoor unit exclusively used for cooling to the terminals 1 and 2 on...

Page 67: ... A B TB2 No 2 Indoor Unit TB1 1 2 A B TB2 No 3 Indoor Unit TB1 1 2 A B TB2 No 4 Indoor Unit Wired Controller Controller Cable Wired Controller Controller Cable Wired Controller Controller Cable Wired Controller Controller Cable Wired Controller Indoor Unit Group For Cooling Operation Only 1 2 3 4 Change Over Box 1 TB2 TB1 1 2 3 4 Change Over Box 2 TB2 TB1 1 2 3 4 Change Over Box 3 TB2 TB1 1 208 23...

Page 68: ...ystem Setting 208V 230V 460V Outdoor Unit No Setting DSW6 PCB1 Setting is required Setting is required No setting is required No setting is required No setting is required No setting is required Setting is required Setting is required Do not change DSW3 setting Otherwise it may cause abnormal operation IMPORTANT NOTICE Setting Item Pin No Test Cooling Operation Test Heating Operation External Inpu...

Page 69: ...refrigerant system number set RSW2 and DSW5 on the indoor unit PCB Base Unit Before Shipment Combination of Base Unit Unit A No 0 Unit B No 1 Unit C No 2 1 2 3 4 ON OFF 1 2 3 4 ON OFF 1 2 3 4 ON OFF 1 2 3 4 ON OFF Maximum Number of Connectable Outdoor Units and Indoor Units for H LINK II Outdoor Unit 64 Indoor Unit 160 For installing the outdoor unit and the indoor unit on the same communication c...

Page 70: ...same H LINK II set all DSW10 No 1 pins to the OFF position except the main outdoor unit A 1 2 1 2 ON OFF ON OFF Before Shipment Cancellation DSW10 Setting of End Terminal Resistance Voltage DSW7 Setting 208V 230V 460V 1 2 3 4 ON OFF 1 2 3 4 ON OFF 1 2 3 4 ON OFF 1 2 DSW10 1 2 DSW10 1 2 DSW10 Communication Line No Polarity H LINK II Outdoor Unit Unit Combination Indoor Unit Cancel the end terminal ...

Page 71: ...ng Operation Mode Operation Signal 2 Fixing Cooling Operation Mode Alarm Signal 3 Demand Stoppage Compressor ON Signal 4 Outdoor Fan Motor Start Stop Defrost Signal 5 Forced Stoppage 6 Demand Current Control 40 7 Demand Current Control 60 8 Demand Current Control 70 9 Demand Current Control 80 10 Demand Current Control 100 11 Low Noise Setting 1 12 Low Noise Setting 2 13 Low Noise Setting 3 14 Ext...

Page 72: ...ten the open close stop valve in the closing direction according to the following tightening torque Operation of Stop Valves Caution a Remove the stop valve caps before performing the airtight test after connecting the refrigerant piping Tighten the stop valve in clockwise direction b Perform the work after warming the stop valve with a hair dryer etc when controlling the stop valve in a cold area...

Page 73: ...sulation Work 1 Securely insulate the high low pressure and low pressure gas piping side and liquid piping side individually Make sure to insulate the union flare nut for the piping connection as well 2 Seal the gap between the bottom base or front piping cover and pipes with the insulation CAUTION If the gap is not sealed damage can occur from rain snow animals or insects that can gain entry CAUT...

Page 74: ...acuum until the pressure reaches 1000 microns 1 mmHg 2 Pressurize with nitrogen up to 50 PSIG 0 3 MPaG for 15 minutes 3 Release pressure to atmosphere level as less than 5 PSIG 0 03 MPaG Step 3 1 Vacuum until the pressure reaches 500 microns 0 5 mmHg 2 Stop vacuum pump 3 Check that the vacuum 500 microns 0 5 mmHg can maintain for one hour NOTICE 1 If tool or measuring instruments come into contact...

Page 75: ...ge is required according to total piping length Refer to Table 8 1 2 After vacuum pumping work check that the high low pressure gas valve and liquid stop valve are fully closed Charge the additional refrigerant from the access port of liquid stop valve acceptable error must be within 1 1 lbs 0 5 kg 3 After refrigerant has been charged fully open the liquid stop valve and gas stop valves Gas remain...

Page 76: ... access port of gas stop valve may lead to compressor failure Be sure to charge refrigerant from the access port of liquid stop valve Insulate the liquid piping and gas piping completely to avoid decreasing of performance and condensation on the surface of the pipe Insulate the flare nut and union of the piping connection with insulation Check to ensure that there is no gas leakage If a large refr...

Page 77: ...0 MBH or more unit 2 2 lbs 1 0kg unit lbs kg 4 W4 The Ratio of Indoor Unit Connection Capacity Indoor Unit Total Capacity Outdoor Unit Capacity Additional Charge W4 lbs kg Determine the ratio of indoor unit connection capacity Condition Additional Charge lbs kg I U Capacity Ratio is less than 100 0 0 0 0 I U Capacity Ratio is 100 or more 1 1 0 5 lbs kg 5 W5 Depending on connection of outdoor unit ...

Page 78: ... Charge WT lbs kg W0 lbs kg lbs kg When refrigerant is recovered or charged due to repairs operating or adjusting the unit record the refrigerant quantity again NOTICE 1 Emissions of the fluorocarbons without any reason are prohibited 2 For disposal and maintenance of this product recovery of fluorocarbons is required Special Attention Regarding Refrigerant Gas Leakage Make sure that the entire VR...

Page 79: ...details Do not impress the voltage on the terminals for communication lines Outdoor Unit TB2 1 2 3 4 Indoor Unit TB2 A B 1 2 Change Over Box TB2 1 2 3 4 Otherwise failure can result 3 Verify that each wire L1 L2 and L3 is correctly connected at the power supply If any one of those is incorrectly connected the unit will not operate and the wired controller will display the alarm code 05 In this cas...

Page 80: ...n the case of combined outdoor units check to ensure that all stop valves of the outdoor units are fully opened 2 Perform the test run of indoor units one by one sequentially and then check the accordance of the refrigerant piping system and the electrical wiring system If the multiple indoor units are operated simultaneously the system accordance cannot be inspected 3 Perform the test run accordi...

Page 81: ...door units on 7 segment displays g To finish the Test Run wait two hours as a default setting or press On Off switch again With the operation LED flashing two seconds ON and two seconds OFF this is an indication that the system is searching for irregularities in communication between indoor units and the wired controller This could result in loose or disconnected wires components and incorrect wir...

Page 82: ...e power supply for the outdoor unit is supplied and the outdoor unit is operated Turn all DIP switches of No 1 to 4 pins of DSW4 OFF when the test run operation is completed DSW4 Switch for Setting of Service Operation and Function 1 Test Run 2 COOL HEAT Setting ON Heating Operation 3 Not Used 4 Manual Compressor OFF 5 Function Setting 6 External Input Output Setting ON OFF 1 2 3 4 5 6 Setting of ...

Page 83: ...eled However the test run function of the outdoor unit is not canceled Check to ensure that the No 1 pin of DSW4 of the outdoor unit PCB is turned OFF If multiple indoor units are connected with one wired controller perform the test run operation individually for each refrigerant system one by one Then make sure to turn the power supply OFF for the indoor units in other refrigerant systems not sel...

Page 84: ...erature Inlet DB o F WB o F Outlet DB o F WB o F 7 Check Refrigerant Temperature Liquid Temperature o F Discharge Gas Temperature o F 8 Check Pressure Discharge Pressure Psi Suction Pressure Psi 9 Check Voltage Rated Voltage V Operating Voltage L1 L2 V L1 L3 V L2 L3 V Starting Voltage V V Vm 10 Check Compressor Input Running Current Input kW Running Current Comp No 1 A Comp No 2 A 11 Is the refrig...

Page 85: ... Duplication of Address Setting for Outdoor Units Sub Units in Same Refrigerant Cycle Number 0C Incorrect Outdoor Unit Main Unit Setting Two or more Outdoor Units Set as Main Unit Exist in Same Refrigerant Cycle Number 11 Sensor on Indoor Unit Abnormality of Inlet Air Thermistor Incorrect Wiring Disconnecting Wiring Breaking Wire Short Circuit 12 Abnormality of Outlet Air Thermistor 13 Abnormality...

Page 86: ...rter Error Signal Detection Driver IC Error Signal Detection Protection for Overcurrent Voltage Decrease Short Circuit Instantaneous Overcurrent 54 Abnormality of Inverter Fin Temperature Abnormal Inverter Fin Thermistor Heat Exchanger Clogging Fan Motor Failure 55 Inverter Failure Inverter PCB Failure 57 Fan Controller Activation of Fan Controller Protection Driver IC Error Signal Detection Prote...

Page 87: ... MPa 0 05 0 05 0 05 0 05 0 05 0 05 0 15 0 15 0 15 0 15 0 15 0 15 Cut In psi 464 21 464 21 464 21 464 21 464 21 464 21 MPa 3 20 0 15 3 20 0 15 3 20 0 15 3 20 0 15 3 20 0 15 3 20 0 15 For Inverter Compressor Automatic Reset Non Adjustable Over Current Inverter Current Protection Control A Fuse A Over Heat Automatic Reset Non Adjustable for 5sec o F o C for 10min o F o C For Fan Motor Automatic Reset...

Page 88: ...P5417009 rev 6 Code No LIT 12012492 Revised February 2019 2017 Johnson Controls Inc ...

Reviews: