20
10. Check for correct operation using the coarse feed
handle. If operating correctly, start drive motor and
engage power feed mechanism. Verify that power
feed lever correctly engages and disengages when
driven by drive motor.
10.6
Table lead screw backlash
adjustment
Refer to Figure 22.
The milling machine table is moved by a lead screw and
nut for each machine axis. For proper operation, there
must be clearance between lead screw and nut, which
results in backlash. A second lead screw nut is provided
to eliminate most of the backlash. The following
procedures provide instructions for obtaining acceptable
backlash.
10.6.1
Cross feed backlash adjustment
1. Use cross feed crank to move table to extreme rear
of its travel.
2. Remove pleated way cover.
3. Open the two chip guards enough to expose cross-
feed adjustment nut (the nut that is toward the rear
of the nut bracket is not adjustable – only the front
nut is adjustable).
4. Loosen the two nut locking screws.
5. Turn nut slightly to tighten it against opposing nut.
6. Tighten the two nut locking screws.
7. Using the cross-feed crank, move table to middle
position.
8. Set up a dial indicator to check cross-feed backlash.
Gently move cross feed crank back and forth while
watching dial indicator. Backlash should be between
0.003 inch and 0.005 inch.
9. If necessary, repeat the steps above to set backlash.
10. Install pleated way cover.
10.6.2
Longitudinal backlash adjustment
Refer to Figure 22.
1. Only one of the longitudinal lead screw nuts can be
adjusted. The other nut is fixed. The left hand nut is
typically adjustable. This can be determined by
looking at nut from underside of table.
2. Loosen the two nut locking screws.
3. Turn nut slightly to tighten it against opposing nut.
4. Tighten the two nut locking screws.
5. Using the longitudinal table crank, move table to
middle position.
6. Set up a dial indicator to check longitudinal backlash.
Gently move crank back and forth while watching dial
indicator. The backlash should be between 0.003
inch and 0.005 inch.
If necessary, repeat the steps above to set backlash.
Figure 22
Summary of Contents for JTM-1050EVS2
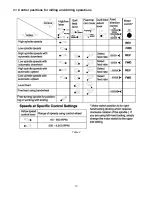
Page 13: ...13 9 3 Control positions for milling and drilling operations Table 2 ...
Page 23: ...23 13 1 1 JTM 949EVS JTM 1050EVS2 Upper Head Assembly Exploded View ...
Page 26: ...26 13 2 1 JTM 949EVS JTM 1050EVS2 Lower Head Assembly Exploded View ...
Page 30: ...30 13 3 1 JTM 949EVS Base Machine Exploded View ...
Page 33: ...33 13 4 1 JTM 1050EVS2 Base Machine Exploded View ...
Page 36: ...36 13 5 1 JTM 949EVS Table Assembly Exploded View ...
Page 38: ...38 13 6 1 JTM 1050EVS2 Table Assembly Exploded View ...
Page 46: ...46 14 0 Electrical Connections JTM 949EVS JTM 1050EVS2 ...
Page 47: ...47 This page intentionally left blank ...
Page 48: ...48 427 New Sanford Road LaVergne Tennessee 37086 Phone 800 274 6848 www jettools com ...


