10
Step6: Separately insert the four rods of safety teeth fixer into the four ends of cross beams.
Please refer to the diagram
of safety construction and insert along the inside surface of the post
’s blanking plate. Have an M20 nut screwed on the end of the
fixer which is to fix the rod of safety teeth fixer.
Step
7:
Elevate the post a bit and insert the bolt for fixing the safety teeth fixer into the diamond hole on the top of the
main post and tighten it with a M20 screw.
Then plug the post into the beam and adjust the post and beam to a proper
position. Pull the steel cable out and insert it through
the reserved Ф21 hole on the top of the post and then screw on the M20 nut.
Step8: Fit on 8 nylon sliders (see the following diagram)
Step9: Fix the ramps.
Align the end of the platform and the hole on the ramp and connect them with shaft and cotter pins.
Step10
:
Fit on four covers on top of the four post and four beam protectors at both ends of the two beams.
Step11: Mount the control box and hydraulic pump onto the main post.
Pull out the oil hose and air hose (if applicable) from the main platform and have them connected to the hydraulic block. Fix the
plate (on which the hydraulic pump will be fitted) on to the main platform by four M8*20 bolts
. (FourФ9 holes for the bolts are
previously reserved). Then fix the hydraulic pump on to the plate by M10*30 hex bolts, spring and flat washers.
Summary of Contents for JA5500F
Page 19: ...19 Annex2 Overall diagram...
Page 20: ...20 Annex3 Floor plan Annex 4 Steel cable connection...
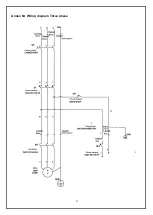
Page 22: ...22 Annex 6 Wiring diagram Three phase...
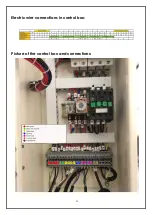
Page 23: ...23 Electric wire connections in control box Picture of the control box and connections...
Page 24: ...24...
Page 25: ...25...
Page 26: ...26...
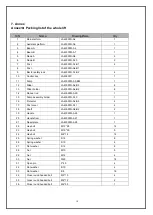
Page 27: ...27 Annex7 Separate diagrams for the lift JA5500F...
Page 35: ...35 Annex9 Size and weight requirements on vehicles...
Page 36: ...36...


