background image

34

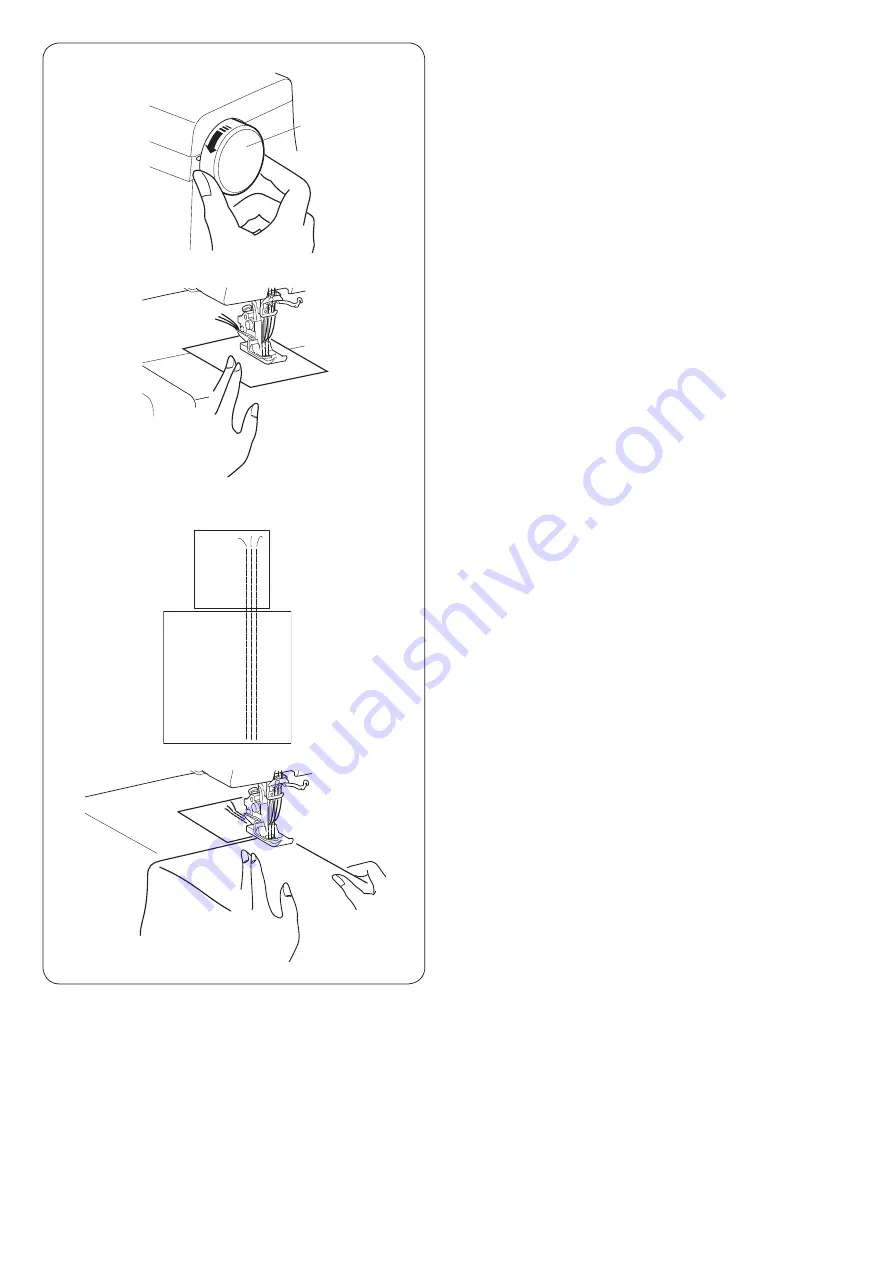
Beginning and End of the seam

At the beginning of the seam, use a piece of scrap fabric 

to achieve the best results.
At the end of the seam, you can choose either to end 

sewing with the thread chain or without thread chain (A 

thread chain is a chain of threads knit without fabric).

Beginning of the seam

z

 Turn the handwheel toward you to bring the needle to 

its highest position.

  Raise the presser foot lifter and insert a piece of scrap 

fabric under the foot.

  Lower the presser foot lifter.
  Depress the foot control to start sewing slowly.


Handwheel

x

 Stop sewing at the end of the scrap fabric.

  Insert the work fabric after the scrap as shown, then 

start sewing on the work fabric.
 

Scrap fabric


Work fabric

w

e

z

x

q

Summary of Contents for CoverPro 3000

Page 1: ...Janome CoverPro 3000 Coverstitch Machine View Buy Here https www thesewingstudio co uk janome coverpro 3000 professional coverstitch machine ir...

Page 2: ...Instruction Book...

Page 3: ...lug grasp the plug not the cord 10 Keep fingers away from all moving parts Special care is required around the sewing machine needle and or cutting blade 11 Always use the proper needle plate The wron...

Page 4: ...andy Needle Threader 21 Threading the Top Cover Stitch Guides and Spreader 22 STITCH TYPES AND TENSION SETTINGS Top Cover Stitch 26 Balancing the thread tension 27 Triple Cover Stitch 28 Balancing the...

Page 5: ...r Fine mode switching lever Power switch Machine socket Ventilation openings Needle threader lever Thread cutter Presser foot lifter Presser foot holder Extension table Needle plate Feed dogs Attachme...

Page 6: ...X 5 822020503 u Lint brush 802424004 i Tension release clip 797813005 o Needle threader 202024002 0 Clear view foot 778524007 1 Attachment screw for fixing optional accessories Refer to the instructio...

Page 7: ...WARNING While in operation always keep your eyes on the sewing area and do not touch any moving parts such as the thread take up lever loopers handwheel or needle Always turn off the power switch and...

Page 8: ...it will go then pull and open the looper cover toward you q Looper cover To close B Lift the looper cover and push it against the machine The looper cover snaps into its original position automaticall...

Page 9: ...hen inserting heavy fabrics under the presser foot Be sure to insert the fabric under the presser foot while supporting both sides of the fabric around the presser foot Same applies when sewing is fin...

Page 10: ...he Presser Foot Turn off the power switch Place the presser foot while lifting the presser foot lifter to the extra lifted position so that the pin on the foot lies just under the groove of the foot h...

Page 11: ...number when sewing fine fabrics that tend to pucker Set the dial at a higher number when sewing stretch fabrics such as knits jersey and tricot q Differential feed dial w Setting mark e To shrink r To...

Page 12: ...hing lever to STD for standard to heavy fabrics Turn the fine mode switching lever to FINE for fine fabrics r Fine mode switching lever t FINE for fine fabrics y STD for standard heavy fabrics r t y N...

Page 13: ...he needle holder of the end of the needle threader r Flat side t Stopper y Needle holder Tighten the needle clamp screw firmly while supporting the holder in place Pull the holder down to remove it Ch...

Page 14: ...d slips down from a spool cone during the threading and or sewing put the net over the spool cone as shown to prevent jamming q Spool cone w Spool holder e Net NOTE Be sure to snap both stoppers into...

Page 15: ...ower switch before threading the machine NOTE When threading the machine always raise the presser foot lifter x Raise the presser foot lifter o Presser foot lifter z Raise the needle to the highest po...

Page 16: ...the looper cover by sliding it to the right refer to page 5 Turn the handwheel toward you to align both guide holes with the eye of the looper thread take up lever as shown q Guide holes w Eye of loo...

Page 17: ...hrough the thread guide hole again as shown w Notch e Hole v Draw the thread down into looper thread guide A u Looper thread guide A NOTE Hold the thread at both ends and tug gently to ensure the thre...

Page 18: ...thread behind looper thread guide B from the right 0 Looper thread guide B m Pull the looper release knob and the looper will slant to the right for easy access 1 Looper release knob 2 Looper Pass th...

Page 19: ...ead guide from back to front as shown q Thread guide bar NOTE If the thread slips out from the thread guide notch pass the thread through the thread guide hole again as shown w Notch e Hole x Slide th...

Page 20: ...the thread at both ends and tug gently to ensure the thread is correctly inserted between the tension disks b Draw the thread to the left and pass it through thread guide B n Draw the thread up and sl...

Page 21: ...enter needle B Pass the thread behind the thread guide plate from the right Pass the thread between two inner prongs Right needle C Pass the thread behind the thread guide plate from the right Pass th...

Page 22: ...ifter c L Set the needle threader switch lever to L when threading the left needle M Set the needle threader switch lever to M when threading the center needle R Set the needle threader switch lever t...

Page 23: ...e thread along the guide on the needle threader lever from the left and under the hook u Guide i Hook n Slowly raise the threader lever so that a loop of the thread is pulled up through the needle y N...

Page 24: ...edle just above the needle eye c Slide the threader down along the needle while pushing it against the needle until the threader pin enters into the needle eye e V shaped notch r e t z v x c b q w v P...

Page 25: ...22 Threading the Top Cover Stitch Guides and Spreader...

Page 26: ...lifter Threading preparation q w e c Turn the fine mode switching lever to STD to sew the top cover stitch t Fine mode switching lever v Insert a piece of scrap fabric Lower the presser foot lifter a...

Page 27: ...ide notch pass the thread through the thread guide hole again as shown w Notch e Hole q z x r z Draw the thread through the right side thread guide from back to front as shown q Thread guide bar c Dra...

Page 28: ...ide E to the right while threading u Top cover stitch thread guide A i Top cover stitch thread guide B o Top cover stitch thread guide C 0 Top cover stitch thread guide D 1 Top cover stitch thread gui...

Page 29: ...ttaching elastics decorative stitches etc q Left needle w Center needle e Right needle NOTE Tighten the needle clamp screw that is not being used to prevent losing the screw Type of Fabric Needle Size...

Page 30: ...the right side of the fabric are straight and even The looper thread forms the dual rows of squares with diagonals q Wrong side of the fabric w Looper thread e Left needle thread r Center needle threa...

Page 31: ...e thread tension is too loose Tighten the needle thread tension and or loosen the looper thread tension to correct it B If the needle thread tension is too tight Loosen the needle thread tension and o...

Page 32: ...needles w Center needle e Right needle c Wide 6 mm Remove the center needle refer to page 10 Thread the looper right and left needles q Left needle e Right needle z Narrow 3 mm left Remove the right n...

Page 33: ...tension as necessary Balanced tension The rows of stitches on the right side of the fabric are straight and even The looper thread forms a row of squares with diagonals q Wrong side of the fabric w L...

Page 34: ...the right side of the fabric is straight and even The looper thread forms a chain q Wrong side of the fabric w Looper thread e Needle thread r Right side of the fabric Adjusting the needle thread tens...

Page 35: ...iple top cover stitch zxc 5 3 6 3 6 3 6 1 5 2 5 STD Narrow 3 mm Right xc 4 3 6 3 6 2 6 2 5 STD Wide 6 mm z c 4 3 6 3 6 1 5 2 5 STD Cover stitch Triple cover stitch zxc 4 3 6 3 6 3 6 2 5 STD Narrow 3 m...

Page 36: ...FINE Chain stitch Left needle z 2 2 5 1 4 FINE Center needle x 2 5 1 4 FINE Right needle c 2 5 1 4 FINE Stitch and Thread Tension Chart When having trouble in feeding fabrics turn the dial to larger...

Page 37: ...s knit without fabric Beginning of the seam z Turn the handwheel toward you to bring the needle to its highest position Raise the presser foot lifter and insert a piece of scrap fabric under the foot...

Page 38: ...produce approximately 5 12 cm of thread chain while gently pulling the thread chain to the back q Stitch length dial q 4 w z x NOTE Turn the stitch length dial to 4 when sewing the triple cover stitch...

Page 39: ...e the presser foot with the presser foot lifter w Presser foot lifter c Pull the needle threads before the needle eyes using the tweezers This prevents the threads get tangled when removing the fabric...

Page 40: ...Hold the seam tightly and pull the fabric to the rear then cut the looper thread with the thread cutter t Thread cutter NOTE Pull the fabric to the rear to prevent threads get tangled in needle holes...

Page 41: ...stitch thread turn the handwheel toward you for several times and sew 3 to 5 top cover stitches on a piece of scrap fabric Cut the loose top cover thread q Loose top cover stitch thread z At the end...

Page 42: ...refer to page 9 Turn the stitch length dial to adjust the stitch length to a higher length refer to page 8 Adjust the thread tension dials refer to pages 26 33 NOTE Check every threads are correctly...

Page 43: ...to the rear Draw the needle threads to the wrong side of the fabric and knot them together q Marked line w Left needle e Right needle r Right side of the fabric Free Arm Hemming The extension table ca...

Page 44: ...Waistline Attaching laces and tapes q Tape or lace w Right side of the fabric e Wrong side of the fabric Attaching elastics q Right side of the fabric w Wrong side of the fabric e Elastic Decorative...

Page 45: ...not dismantle the machine in any way other than what is explained in this section NOTE Machines with high use frequency tend to have lint or dust around areas beyond the reach and cause malfunctions...

Page 46: ...edle is bent or blunt 3 The tension is not adjusted correctly 4 The machine is not threaded correctly 5 Fabric is too heavy 6 The number of the needle is wrong Refer to page 10 Refer to page 10 Refer...

Page 47: ...1463 Hazama machi Hachioji shi Tokyo 193 0941 Japan This machine complies with the following regulations EN 60335 1 2012 A11 A13 A1 A14 A2 EN 60335 2 28 2003 A1 A11 EN 62233 2008 EN 55014 1 2017 A11 E...

Page 48: ......

Page 49: ...778 800 055 EN...

Reviews: