background image

22

i o

r t y u

!1

!7

!0

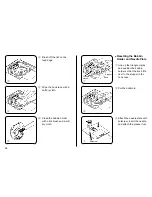
r

Attach the zipper foot with
the pin on the right hand
side.

t

Lower the zipper foot at
the bottom of the zipper so
that the needle pierces the
fold and the zipper tape.

y

Sew through the fold and
the zipper tape to the point
where the slider begins.

u

Lower the needle to hold
the fabric and raise the
presser foot.

i

Open the zipper.

o

Lower the presser foot and
stitch the rest of the seam.

Wrong side
of fabric

Wrong side
of fabric

Right
side
of fabric

Right
side
of fabric

Wrong
side
of fabric

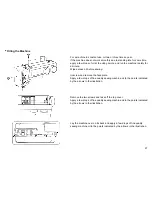
!1

Remove the zipper foot and
attach the zipper foot with
the pin on the left hand side.

!2

Stitch across the bottom of
zipper, below the zipper
end.

!3

Turn the corner and
continue to guide the foot
along the zipper teeth, as
shown. Stitch through the
fabric and zipper tape.

!4

Stop about 5 cm from the
top of the zipper.

!5

Lower the needle into the
fabric and raise the presser
foot.

!6

Remove the basting stitches
and open the zipper.

!7

Lower the foot and stitch the
rest of the seam. Make sure
the fold is even.

!2 !3 !4 !5 !6

!0

Close the zipper
and turn the
fabric right side
up.

Summary of Contents for 712T

Page 1: ...INSTRUCTION BOOK MODEL 712T...

Page 2: ...edle Thread Tension 12 Auto tension 12 Manual Needle Thread Tension 12 Pattern Selector Dial 13 Stitch Length Dial 13 Selecting Stitch Length 13 Selecting Stretch Stitch Patterns 13 TABLE OF CONTENTS...

Page 3: ...Thread tension dial Bobbin winder thread guide Upper thread guide Thread take up lever Face plate Thread cutter Presser bar Foot holder Thumb screw Feed dog Needle plate Bobbin Needle clamp Needle cla...

Page 4: ...el Stop motion knob Presser foot lifter 4 5 3 Standard Accessories Screwdriver Seam ripper Lint brush Bobbins Set of needles Oil J Sliding buttonhole foot G Blind stitch foot E Zipper foot D Hemmer fo...

Page 5: ...resser foot and needle follow the guides in the instruction book When setting up the machine for sewing test the stitches on a small piece of the fabric with the threads that will be used for actual s...

Page 6: ...needle which is bent or blunt BLUE TIPPED needle Stem When sewing stretch very fine fabric or synthetics use a BLUE TIPPED needle The blue tipped needle effectively prevents skipped stitches When sew...

Page 7: ...ot Loosen the needle clamp screw by turning it toward you Remove the needle from the clamp Insert the new needle into the needle clamp with the flat side facing to the back When inserting the needle i...

Page 8: ...n the presser bar Fit the thumb screw into the hole Tighten the thumb screw by turning it clockwise Red button q Press the red button on the back of the foot holder The presser foot will drop off q w...

Page 9: ...down and slide it toward you w Lift out the bobbin as shown Removing the Bobbin Setting Spool e Return the spool pin to its original position q Turn the spool pin w Set the spool from the bottom end o...

Page 10: ...chine when the bobbin has made a few turns and cut the thread close to the hole in the bobbin u Pedal the machine and wind the thread until the bobbin stops Move the bobbin winder spindle to its origi...

Page 11: ...e front side of the bobbin holder Draw the thread to the left sliding it between the tension spring blades r Close the slide plate Check the threading by referring to the chart shown on the slide plat...

Page 12: ...olding the thread near the spool draw the thread down into the tension area and then around the check spring holder e Firmly draw the thread from right to left over the take up lever and down into the...

Page 13: ...h your right hand until the needle goes down and continue to turn the handwheel until the take up lever is at its highest position Lightly pull on the needle thread to draw up a loop of the bobbin thr...

Page 14: ...s are drawn out correct it by turning the dial in the direction w so that the setting mark indicates S S to Selecting Stretch Stitch Patterns The higher the number the longer the stitch length You can...

Page 15: ...he feed dogs turn the stitch length dial to the mark Fabric is fed in reverse while the lever is pressed When it is released fabric is fed forward Reverse stitch lever Reverse Stitch Lever Dropping th...

Page 16: ...o the fabric where you wish to start sewing Lower the presser foot and then start sewing slowly Machine Setting Stitch Length 1 5 4 Changing Sewing Direction q Bring the needle down into the fabric an...

Page 17: ...3 4 A Zigzag Foot Zigzag width can be adjusted within the range illustrated by the symbol Zigzag Stitch Securing Seams q For fastening the end of seams press the reverse stitch lever and sew several...

Page 18: ...revents skipped stitches or Edge of fabric Guide C Overedge Foot Machine Setting Stitch Length Machine Setting Stitch Length A Zigzag Foot This stitch is formed with two stitches forward and one stitc...

Page 19: ...lded edge Sew the folded edge guiding along the sliding guide Needle Guide screw Sliding guide On heavy weight fabrics that ravel the raw edge should be overcast first On lightweight fabrics the raw e...

Page 20: ...left side and raise the needle t Set the pattern selector dial at and sew 5 stitches of bartack then raise the needle from the fabric q Set the pattern selector dial at w Lead both threads to the left...

Page 21: ...ric from the machine and cut the sewing threads Pierce a pin inside the bartack Then cut the opening with a seam ripper Be careful not to cut the stitches u i Machine Setting Stitch Length 0 5 2 A Zig...

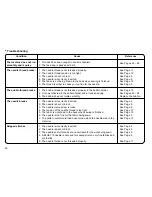
Page 22: ...h the zipper foot To sew on the left side of the zipper attach the zipper foot with the pin on the right hand side To sew on the right side of the zipper attach the zipper foot with the pin on the lef...

Page 23: ...of fabric Right side of fabric Right side of fabric Wrong side of fabric 1 Remove the zipper foot and attach the zipper foot with the pin on the left hand side 2 Stitch across the bottom of zipper be...

Page 24: ...o the needle catches the folded edge on each side Machine Setting Stitch Length A Zigzag Foot When forward and reverse feeds become unbalanced due to the type of fabric correct the balance by turning...

Page 25: ...edge of the fabric to keep it feeding smoothly and evenly To reduce bulk trim about 0 7 cm 1 4 from corners as illustrated Lower the needle into the fabric at the point where sewing is to begin then l...

Page 26: ...late w Take out the bobbin e Lift up the front end of bobbin holder to remove it q While pushing the front end of slide plate slide it toward you as far as it will go w Take out the bobbin and remove...

Page 27: ...brush and a soft dry cloth Setscrew q Line up the triangle marks and position the bobbin holder so that the knob fits next to the stopper in the hook race w Put the bobbin in e Attach the needle plate...

Page 28: ...nd remove the face plate Apply a few drops of fine quality sewing machine oil to the points indicated by the arrows in the illustration Oiling the Machine Remove the two screws and take off the top co...

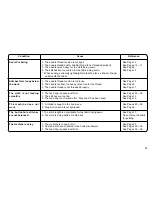
Page 29: ...5 The fabric is not drawn to the back when sewing is finished 6 The needle is too fine for the fabric being sewn 7 The pattern selector dial had been turned while the needle was in the material 1 The...

Page 30: ...ter Drop feed has been used 1 A thread is caught in the hook race 2 Stop motion knob is not tightened 1 The stitch length is not suitable for the fabric being sewn 2 The work is being pulled or held b...

Page 31: ...749 800 011 E N Printed in Taiwan...

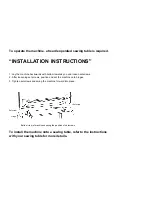
Page 32: ...he machine onto hinges 3 Tighten setscrews and swing the machine forward into place Setscrew Bottom view of machine showing the position of setscrews Hinge Setscrew Hinge To operate the machine a trea...

Reviews: