


19
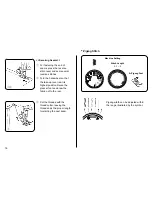
The symbol “ ” (red zone) on the stitch
length dial indicates the range of adjustment
for the buttonhole.
To adjust for coaser stitch for the buttonhole,
turn the dial toward "1". For denser stitch for
the buttonhole, turn the dial toward "0".
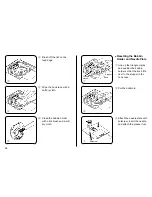
y
Set the pattern selector dial
at “ ”. Sew the right side
of the buttonhole. Stop the
machine when you are
directly opposite the first
stitch on the left side, and
raise the needle.
t
Set the pattern selector dial
at “ ”, and sew 5 stitches
of bartack, then raise the
needle from the fabric.
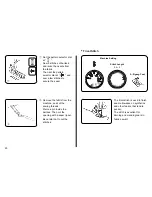
q
Set the pattern selector dial
at “ ”.
w
Lead both threads to the left.
e
Lower the needle into the
fabric, where the buttonhole
is to start, and lower the foot.
q w e
r
y
t
J: Sliding buttonhole
foot
Machine Setting
Stitch Length
Always make a practice buttonhole on a scrap of fabric you plan
to use. Try the buttonhole with the button you will use.
Red zone
(0.3 – 1)
r
Sew down the left side of the
buttonhole to the bottom
end. Raise the needle.
•
Buttonhole
Summary of Contents for 712T
Page 1: ...INSTRUCTION BOOK MODEL 712T...


