manualshive.com logo in svg
background image

1

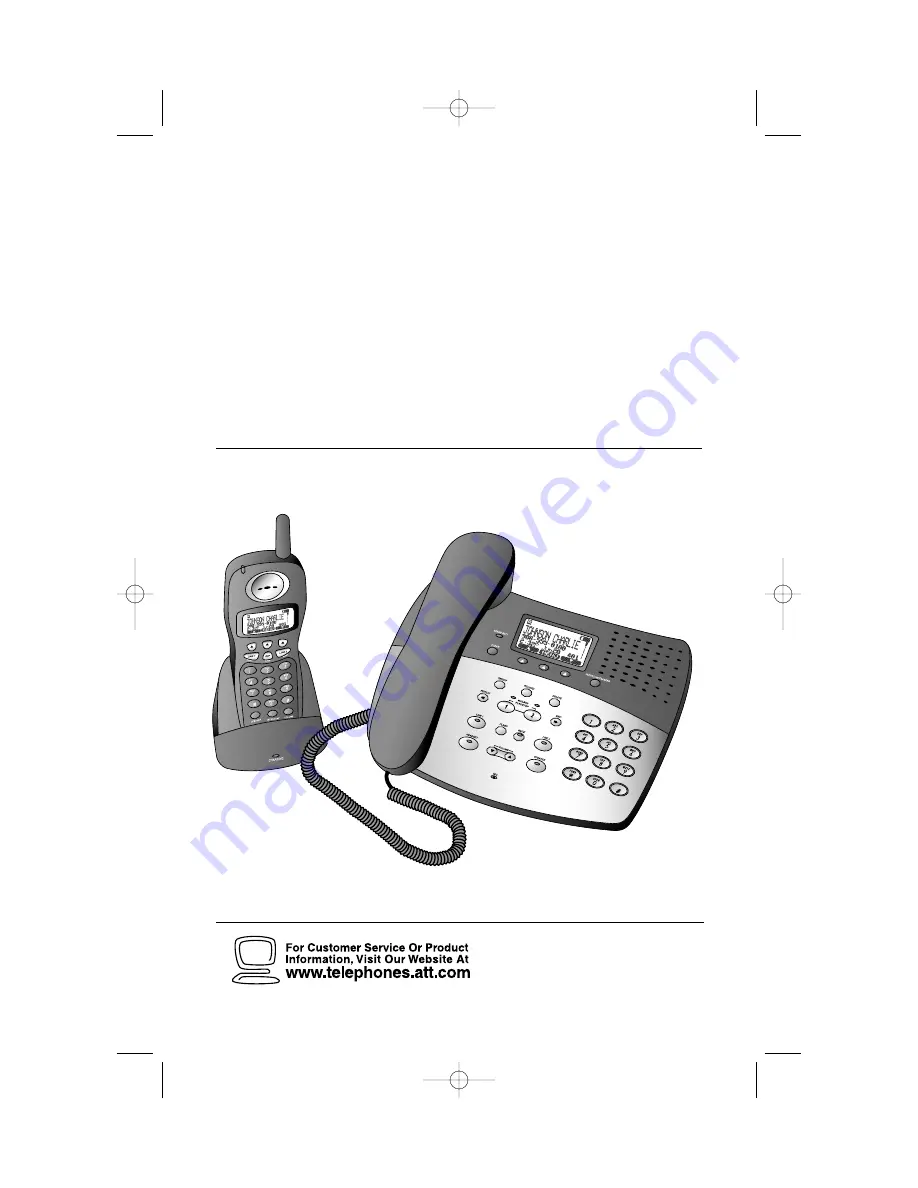
2.4 GHz 2-Line Corded/Cordless 

Answering System 2462 

with Caller ID/Call Waiting

1

Please also read

Part 1 — Important 

Product Information

USER’S MANUAL 

Part 2

AT&T and the globe symbol are registered trademarks of AT&T Corp. licensed to Advanced American Telephones.

DRAFT

1/28/02

2462_00_1 ATT CIB 1/28  1/28/02  9:52 AM  Page ii

Содержание 2462

Страница 1: ...ller ID Call Waiting 1 Please also read Part 1 Important Product Information USER S MANUAL Part 2 AT T and the globe symbol are registered trademarks of AT T Corp licensed to Advanced AmericanTelephones DRAFT 1 28 02 2462_00_1 ATT CIB 1 28 1 28 02 9 52 AM Page ii ...

Страница 2: ... 2002 Advanced American Telephones All rights reserved Printed in China Issue 1AT T 02 02 2462_00_1 ATT CIB 1 28 1 28 02 9 52 AM Page iii ...

Страница 3: ...y 22 View a Memory Number 23 Dial a Memory Number 23 Edit a Memory Number 24 Delete a Memory Number 25 INTERCOM OPERATION 26 Intercom 26 Global Page 26 Transfer a Call 27 Blind Transfer Call 27 Announced Transfer Call 27 Conference Calls 27 CALLER ID OPERATION 28 View Call History 28 Dial Displayed Call Record 28 Delete Call Records 29 Store Call Record in Telephone Memory 29 Play a Message Associ...

Страница 4: ...stall the base on the highest floor of your home About Mailboxes This answering system has two voice mailboxes Mailbox 1 is used for Line 1 and Mailbox 2 is used for Line 2 Some answering system features are set independently for Mailbox 1 Line 1 and Mailbox 2 line 2 About Caller ID with Call Waiting This product has a Caller ID with Call Waiting feature that works with service from your local pho...

Страница 5: ...t each handset If you make changes to call records in one location other history lists are not affected Using an Optional Spare Battery Purchased separately This phone is equipped with a built in spare battery charger in the base unit The spare battery charger allows you to always have a charged battery available should the cordless handset battery charge become low A fully charged spare battery i...

Страница 6: ...nto the jack labeled on the underside of the base as shown below Plug the other end into the handset 3 Connect the telephone line cord s If you have a two line jack use only the black line cord Insert one end into the jack labeled LINE 1 L1 L2 on the underside of the base Insert the free end into the two line modular jack Make sure the cord snaps firmly into place INSTALLATION 3 Standard electrica...

Страница 7: ...ection of this manual for detailed instructions INSTALLATION 4 Standard electrical outlet Modular jack for Line 2 Modular jack for Line 1 Clear line cord Black line cord If you have two separate one line jacks use both line cords Insert one end of the clear cord into the jack labeled LINE1 L1 L2 on the underside of the base Insert the other end of this cord into the modular jack for Line 1 Insert ...

Страница 8: ... the cord into an electrical outlet not controlled by a wall switch INSTALLATION b Place the battery pack in the handset Match the metal contacts on the battery with the contacts in the battery compartment c Replace cover by sliding it on its track up over battery case until it snaps firmly into place a Remove battery compartment cover by pressing on indentation and sliding downward CHARGING Light...

Страница 9: ... to the cordless handset optional 6 INSTALLATION a Slide down into grooves to attach b To remove lift one side with your thumbnail and push back Headset You can use this telephone with any industry standard 2 5 mm headset purchased separately For best results use an AT T 2 5 mm headset Plug the headset into the jack located on the left side of the handset under the small rubber flap or into the ja...

Страница 10: ...reen display Press the softkey below the operation displayed on the screen to select that operation For example to enter the menu press the center softkey Press O CLEAR on the handset or on the base at any time to return to the previous screen Press and hold O CLEAR on the handset or on the base to return to the idle screen FEATURE SETTINGS Softkeys Screen display of operations to be selected with...

Страница 11: ...a volume sample each time you change the setting and the screen displays the volume level Press to save Melody You can choose from six different ringer tones for Line 1 and Line 2 Use the softkeys to hear the different ringers Press to save the last ringer tone heard Call Screening Turn this feature on to hear messages as they are left Base only in either answering system mailbox Use the softkeys ...

Страница 12: ...e are 15 contrast levels Use the softkeys to adjust the contrast then press Rename You can assign a name to the base or any registered handset instead of BASE or HANDSET1 etc Use the dial pad and the chart on page 22 to enter the new location name then press to confirm the new name Range Extender Set this feature to ON or AUTO to moderately increase the operating range or sound quality of your reg...

Страница 13: ...t MAILBOXES then press 4 Select MAILBOX 1 SETUP or MAILBOX 2 SETUP then press The screen displays a list of the feature settings OK OK MENU 5 Press until the feature you want to set is highlighted 6 Press 7 Follow the directions for each feature as described in Answering System ITAD Features 8 Press O CLEAR on the handset or on the base to return to the Setup menu OR Press and hold O CLEAR on the ...

Страница 14: ...the security code you will use to access answering system features and functions from a touch tone phone The system comes preset to 5000 but you can change the code to any four digit combination not beginning with 1 or 2 Setting the security code for one mailbox sets the code for both mailboxes 1 Press or to select SEC CODE then press The screen displays SET OK SECURITY CODE 5000 SAVE L1 MAILBOX I...

Страница 15: ...desired day is highlighted press to confirm your selection Time Changing this setting for either mailbox changes the time for both mailboxes 1 Press or to select the time displayed then press The screen displays SETTING TIME and the current setting 2 Enter the new time with the keypad You can use or to move the cursor between digits 3 To change between AM or PM move the cursor under the A or P Pre...

Страница 16: ...call End a Call Replace the base handset or press K or h TELEPHONE OPERATION AT THE BASE Light within button On steadily when base speakerphone is in use Light within button On steadily when base headset is in use LINE lights On steadily when line is in use Flash quickly when line is ringing Flash slowly when line is on hold Volume Adjust volume of what you hear through the handset or speakerphone...

Страница 17: ...en Redial 1 Press the softkey under The screen displays the last five numbers dialed from the base 2 Use the softkeys to highlight the number you want to call 3 Lift the receiver press K or press h The call will be dialed automatically NOTE This feature can only be accessed before you lift the receiver or press K or h RDL 2462_00_1 ATT CIB 1 28 1 28 02 9 52 AM Page 14 ...

Страница 18: ...again to return to your conversation Hold When you put a call on hold you cannot hear your caller and your caller cannot hear you 1 Press The screen displays CALL ON HOLD 2 Press the appropriate LINE button K or h to return to the call NOTE The base rings to remind you that the call is being held If you don t answer the ring the call is disconnected Line in Use When the line is in use at the base ...

Страница 19: ... Note If you switch lines without placing the current call on hold you will drop the current call Conference Calls You can use both lines at the same time to set up a three party call 1 Make or answer a call 2 Press to place the call on hold 3 Make a call on the other line 4 When the call is answered press The conference call begins immediately 5 To end a conference call hang up All parties will b...

Страница 20: ... 0 is in use Intercom On steadily with one or more numbers next to it to show which handset or base 0 is in use B B Base in Use H H Hold On steadily next to Line In Use icon above when line is on hold M M Mute 1 1 8 8 Handset Indicator Shows which handset is in use NOTE Although up to eight handsets can be registered to the base only four can be used at one time 2462_00_1 ATT CIB 1 28 1 28 02 9 52...

Страница 21: ...d on the screen then press a LINE button to call Flash Use the LINE FLASH button for the appropriate line to access telephone company subscriber services while on a call End a Call Answer a Call Press a LINE button Handsfree Operation You can stand the handset on a desk or table and use it as a speakerphone by pressing K instead of a LINE button to make redial or answer a call OR You can install a...

Страница 22: ...hear your caller and your caller cannot hear you 1 Press The screen displays CALL ON HOLD 2 Press the appropriate LINE button K or h to return to the call NOTE The handset rings to remind you that the call is being held If you don t answer the ring the call is disconnected Line in Use When the line is in use at the handset the handset screen display is similar to When the line is in use by another...

Страница 23: ...u can use both lines at the same time to set up a three party call 1 Make or answer a call 2 Press the other LINE button and make a second call The first call is automatically placed on hold 3 Press The conference call begins immediately 4 To end a conference call press O All parties will be disconnected To drop one line 1 Press Then use and to select the line you wish to drop 2 Press The selected...

Страница 24: ...charging Flashes when battery is low E E Range Extender Indicator On steadily in top left corner of screen when handset is in use and in Range Extender mode H H Hold On steadily next to Line In Use icon above when line is on hold M M Mute Handset Registration On steadily when a handset is not registered to the base 1 1 8 8 Handset Indicator Shows which handset is in use NOTE Although up to eight h...

Страница 25: ...hed 3 The screen displays 4 Use the chart below to enter a name to be stored with this number Press to enter a space press if you make a mistake Presses Dial Key 1 2 3 4 5 6 7 8 9 1 1 2 A B C a b c 2 3 D E F d e f 3 4 G H I g h i 4 5 J K L j k l 5 6 M N O m n o 6 7 P Q R S p q r s 7 8 T U V t u v 8 9 W X Y Z w x y z 9 0 0 5 Press The entry is stored and the screen returns to the idle screen NOTE I...

Страница 26: ...h alphabetically is displayed Dial a Memory Number 1 Follow Steps 1 3 under View a Memory Number 2 To dial the call press a LINE button on the handset OR Lift the base handset or press K or h at the base FIND FIND MEM TELEPHONE MEMORY AT THE BASE OR HANDSET FIND RALPH 555 1234 EDIT SEARCH FOR RAL CLR FIND RALPH 555 1234 EDIT BASE RDL MENU MEM HANDSET 1 RDL MENU MEM CAROL 555 1738 EDIT or 2462_00_1...

Страница 27: ...position the cursor 6 Press to save the edits The screen displays Repeat Steps 4 6 if you need to edit the name or number for this entry 7 Press and hold O CLEAR on the handset or press on the base to exit and save edits SAVE BACK PAUSE DEL MORE NUM NAME EDIT EDIT TELEPHONE MEMORY AT THE BASE OR HANDSET MANUEL 555 0013 SAVE MORE MANUEL 555 0013 DEL EDIT MANUEL 555 0013 EDIT MANUEL 555 00 DEL BACK ...

Страница 28: ...elete the entire memory 5 If you pressed the screen displays ARE YOU SURE Press to delete the memory OR Press to exit without deleting NO YES ALL ALL THIS DEL EDIT TELEPHONE DIRECTORY AT THE BASE OR HANDSET ARE YOU SURE NO YES RALPH 555 1234 DEL EDIT RALPH 555 1234 THIS ALL RALPH 555 1234 EDIT 2462_00_1 ATT CIB 1 28 1 28 02 9 52 AM Page 25 ...

Страница 29: ... to call or 0 for the base 3 Respond at the signaled location by pressing I 4 To end the intercom connection press O on the handset OR Press I on the base Global Page A global page signals all handsets from the base or the base and all other handsets from a handset The global page can then be answered at any location by pressing I 1 Press I 2 Use the softkeys to select GLOBAL PAGE then press 3 To ...

Страница 30: ...ht the desired destination then press Announced Transfer Call 1 Place current call on hold 2 Press I 3 Press or to highlight the desired destination then press 4 Announce the transfer call 5 End the intercom call The receiving party must take the call off hold to speak with the caller Conference Calls 1 Place the current call on hold 2 Make a new call on Line 1 or Line 2 OR Make an intercom call 3...

Страница 31: ...changes to call records at one location other call history lists are not affected Dial Displayed Call Record 1 Follow the directions to View Call History 2 When the number you want to call is displayed press a LINE button on the base or handset or K or h on the base to place the call The number will be dialed exactly as it is displayed To change the display format press until the number appears as...

Страница 32: ... History 2 When the record you wish to delete is displayed press 4 OR Press Use or to highlight DELETE CID then press 3 Press to delete only the current record OR Press to delete all records in the call history Store Call Record in Telephone Memory NOTE Only call records with telephone numbers will be stored in the telephone memory 1 Follow the directions to View Call History 2 When the record you...

Страница 33: ...ss 2 Select PLAY MESSAGE and press The system plays the message once and changes the message status on the answering system to old You can stop message play back see ANSWERING SYSTEM OPERATION but no other answering system features are available while in Caller ID mode OK MENU CALLER ID OPERATION Caller s name Line of call Time of call Date of call Position of call in call history Caller s telepho...

Страница 34: ...or each line one for normal answering and one for when you ve set the system to play the announcement only Use Answer Record when you want the system to record callers messages Use Answer Only when you want to give information to callers without accepting messages If you choose not to record an announcement the system answers with a pre recorded announcement The normal answering pre recorded annou...

Страница 35: ... to exit the setup menu and save new announcement To review your announcement at any time 1 Follow Step 1 under Record your Announcement 2 Select LISTEN TO OGA then press To delete your announcement 1 Follow Step 1 under Record your Announcement 2 Select DELETE OGA then press Incoming Messages The system automatically saves your messages until you delete them and can store approximately 25 minutes...

Страница 36: ... the previous message to delete this message or After pressing you can press or to next message using the softkeys or the dial pad key indicated next to each option Delete a Message Press while the message you wish to delete is playing Adjust Playback Volume Press VOLUME or on the base during message playback ERASE SKIP PAUSE RESUME PLAY MENU MENU ERASE BACK OK MENU ANSWERING SYSTEM OPERATION 2462...

Страница 37: ...x you wish to clear The screen displays a menu 3 Press to delete all messages in the selected mailbox ERASE Turn answering system on or off Press to play all messages in a mailbox Press while a message is playing to stop message playback Press to select a mailbox when both Mailbox lights are flashing Press or to adjust volume during message playback Press while a message is playing to replay the c...

Страница 38: ...he memo Record a Phone Conversation You can record up to four minutes of a telephone conversation to be stored as an old message While on a call 1 Press r 2 Press P or r again to stop recording the conversation before the four minutes are up If only one line is in use the conversation will be automatically stored in the mailbox for that line If the call involves both lines or is an intercom call t...

Страница 39: ...tem Remote Access Commands Function Command Play messages in Press 1 then the mailbox a mailbox number 1 or 2 The system plays all messages in the selected mailbox Play only new messages Press 2 then the mailbox number in a mailbox 1 or 2 The system plays only new messages in the selected mailbox Repeat a message Press 4 while message is playing each press backs up another message Skip a message P...

Страница 40: ...ntly selected announcement for the mailbox Record announcement Press 8 then mailbox number After system prompt record new announcement for the currently selected mailbox Press 5 to stop System plays back announcement Change Answer Mode Press 9 then the mailbox number the system announces current answer mode Answer Record or Answer Only for the selected line Press 9 again to change the answer mode ...

Страница 41: ...OW BATTERY when idle Place the handset in the handset charger so the CHARGING light goes on The battery pack is typically charged in eight hours For best results the initial charge should be twelve hours You can keep the battery fully charged by returning the handset to the handset charger after each use If you repeatedly get a Low Battery indicator even after eight hours of charging the battery s...

Страница 42: ...eration for details NOTE Do not switch the battery while on a call 1 Press the release button on the left side of the base unit to open the spare battery compartment drawer 2 Place the battery pack AT T Accessory Battery Model 2401 SKU 91077 purchased separately in the drawer with the charge contacts facing up and toward the phone 3 Push the drawer closed 4 The spare battery takes 24 hours to full...

Страница 43: ...nd sliding downward 2 Charge the handset battery Place the handset in the handset charger Charge the battery at least 12 hours After the first charge the battery will typically charge in only eight hours Power Fail Operation You can use your cordless phone during a power outage if a fully charged battery is installed in the base unit see Spare Battery This battery will provide enough power for you...

Страница 44: ...you receive a call while you are out of range the handset might not ring or if it does ring the call might not connect when you press a LINE button Move closer to the base then press a LINE button to answer the call If you move out of range during a phone conversation you might hear noise or interference To improve reception move closer to the base If you move out of range without pressing O your ...

Страница 45: ...ializing the handset and base see To re initialize the handset and base below If you have no dial tone Check all the previous suggestions If you still do not hear a dial tone disconnect the phone and try another phone in the same jack If there is no dial tone on that phone either the problem is probably in your wiring or local service If you hear a two beep signal when you try to use the handset T...

Страница 46: ...als If you have dial pulse rotary service you ll need to set the Dial Mode to PULSE Follow the instructions to Set Pulse Tone under Telephone Features in the FEATURE SETTINGS section of this manual If you have touch tone service and you hear clicks while you are dialing you ll need to set the Dial Mode to DTMF Follow the instructions to Set Pulse Tone under Telephone Features in the FEATURE SETTIN...

Страница 47: ...ompany If the memory is full or the system is off the system answers after 10 rings If the system does not respond to commands from a remote touch tone phone Make sure you are calling from a touch tone phone When you dial a number you should hear tones If you hear clicks instead the phone is not a touch tone telephone The answering system may not detect the Security Code while your announcement is...

Страница 48: ...ct with your answering system 1 Dial your telephone number from a touch tone phone 2 When the system answers then enter your Security Code preset to 5000 3 After the announcement enter a remote command from inside this card 2002 Advanced American Telephones All rights reserved Printed in China 02 02 fold 2002 Advanced American Telephones All rights reserved Printed in China 02 02 Answering System ...

Страница 49: ...swer Mode 9 then mailbox number after announcement press 9 again to change mode Remote Command Press Voice Help menu 5 Play all messages 1 then mailbox number Play only new messages 2 then mailbox number Repeat message 4 while messages plays Skip message 6 while messages plays Stop Save messages Hang up Delete current message 3 while message plays Delete all messages 3 then mailbox number After pr...

Страница 50: ...representatives are here to help you with any questions concerning the operation of this product available accessories or any other related issues Call Toll Free 1 800 360 4121 or visit our website at www telephones att com 2462_00_1 ATT CIB 1 28 1 28 02 9 52 AM Page 47 ...

Отзывы: