9
2
7
1
6
3
4
5
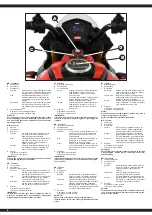
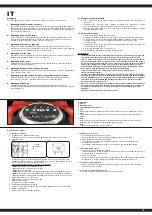
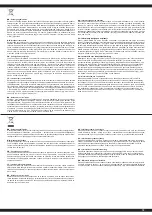
Soundboard
1 „Stories“
2 Music Mode
3 Voltage display
4 VOL-
Short press to play the last channel, long press to lower the volumen
5 VOL+
Short press to play the next channel, long press to increase the volume.
6 USB
After inserting a USB stick, the soundboard starts playing the tracks one after the other. Only
files with the extension .mp3 can be played back.
7 Aux
Connect MP3 device / mobile
Troubleshooting
1. The vehicle does not run
● The battery may low on power.
After each use, or once a month minimum, charge the battery. Do not leave the battery on the
charger for more than 12 hours.
● Thermal fuse has tripped.
The vehicle is equipped with a self-resetting fuse. When the vehicle is overloaded or operated
incorrectly; the self-resetting fuse will be cut off for 5 - 10 seconds before becoming
operational again. The self-resetting fuse is under the seat
Cut off the power, follow these guidelines:
-
DO NOT
overload the vehicle, Maximum weight allowed: 25 kg
-
DO NOT
tow anything behind the vehicle.
-
DO NOT
drive up steep slopes.
-
DO NOT
drive into fixed objects, which may cause the wheels to spin, causing the motor
to overheat.
-
DO NOT
drive in very hot weather, components may overheat.
-
DO NOT
tamper with the electric system, Doing so may create a short circuit, causing the
fuse to trip.
● Battery connector or wires are loose.
Make Sure the battery connectors are firmly plugged in to each other.
● Battery is dead.
Have you properly maintained the battery according to the directions? Is the battery old?
Your battery may need to be replaced.
● Electric system is damaged.
Water may have corroded the system, or loose dirt, gravel or sand might have jammed the
switch.
● Motor is damaged.
The motor needs professional repair.
2. The battery will not recharge
● Battery connector or adapter connector is loose.
Make sure the battery connector and adapter connector are firmly plugged together.
● Charger is not plugged in.
Make sure the charger is plugged into the wall outlet and the power flow to the outlet is on.
● Charger is not working.
Is the charger warm while charging? If not, the charger may.
3. The vehicle does not run very long.
● Battery may be undercharged.
You may not be charging the battery long enough. After each use, or once a month minimum,
charge the battery. Do not leave the battery on the charger for more than 12 hours.
● Battery is old.
The battery will eventually lose the ability to hold a charge. Depending on the amount of use,
and varying conditions, the battery should operate for one to three years. Replace the battery
with a new one.
4. Battery buzzes or gurgles when charging.
● This is normal and not a cause for concern. It may also be silent when charging, which is also
normal.
5. Charger feels warm when recharging battery.
● This is normal and not a cause for concern.
GB
Assembly
For the assembly you need a screwdriver (cross) and a 10 mm open-end spanner.
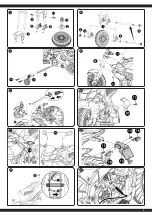
1. Mounting the front guard
Slide the front guard (7) onto the fork. Then screw the front guard to the fork with the
corresponding screws (13). Slide the brake caliper bats (6) onto the fork after the front guard.
Screw the „washers“ (2) to the left and right of the wheel with the corresponding screws (13).
2. Mounting of the front wheel
Fasten a nut (4) on the front axle and slide a washer (3) on it from the other side. Then slide
the front axle through the fork and the front wheel. Finally, slide a washer (3) onto the front axle
and fasten the whole thing with a nut (4).
3. Mounting the support wheels
Push the holder (16) through the body of the model. Then place a support wheel (15) on the
holder (16) and fasten it with the screws (14). Place the last support wheel (15) on the holder
(16) and fasten it with the corresponding screws (14).
4. Assembly of the handlebar
Place the assembled handlebar (8) as shown in the figure. Then push the handlebar (11)
through from above. Finally, fasten it from below with a lock nut (12).
5. Mounting the „head“
Connect the cables of the „head“ (9) to those of the model. Then fasten the „head“ (9) to the
recesses provided with the corresponding screws (7).
6. Mounting the body guard
Place the body guard (20) in the recesses provided on the left and right of the motorcycle and
fasten them with the screws (13).
7. Mounting the rear view mirrors and turn signal banners
Attach the turn signal banners (18) to the front sides of the motorcycle. Insert the rearview
mirrors (10) into the recesses on the handlebars until they are firmly seated.
8. Mounting the license plate
Place the license plate holder (19) on the rear part of the model. Fasten it with the
corresponding screws (13). Then attach the two turn signal brackets (18) to the left and right of
the license plate holder (19).
9. Battery connection
•
Use a screwdriver to loosen the screw on the seat (13) and open it. Here you will find the
battery and all connections.
•
Connect all connectors as shown. Only connect plug connections that fit into each other
and take care not to reverse the polarity.
•
Make sure that the red cable (plus) and the black cable (minus) are connected to the
respective connectors of the same colour.
10. Charging procedure
•
The vehicle must be switched off during charging.
•
Connect the charger (22) to the charging socket and plug the charger into the socket.
The charging socket is located above the accelerator pedal. During charging, the LED on
the charger lights up red. As soon as the charging process is finished,
the LED lights up green
•
The charging time is 12 hours. To prevent the charger from overheating,do not charge
for longer then recommended.
•
Do not charge the battery more than once in 24 hours.
•
The charger and battery heat up during the charging process.
Warning!
•
Your vehicle displays the total voltage of the two batteries in volts immediately after
switching on. The fully charged batteries will usually display a total voltage of approx.
12.6 - 13 volts (green)unloaded. The display is load dependent. This means that the
displayed voltage will drop under load. If a voltage of less than approx. 11.8 V (red)is
displayed in the unloaded state, you should switch off the Ride-on and charge the
battery (see charging procedure). Otherwise the battery may be deeply discharged and
irretrievably damaged. A deeply discharged battery is not covered by the warranty and
must be replaced at a charge.
green = full battery, blue = half full battery, red = empty battery (charge immediately!)
•
Let the model cool off sufficiently after each use before putting it back into operation.
When using an additional batteries let it cool off for minimum 15 minutes until the
model is operated again. Overheating can damage the electronics or may result in fire.
•
Always disconnect the model from the charger immediately after charging. Always
disconnect the charger from the power supply immediately after disconnecting the
model. Inserting the rechargeable model or charger after charging will result in damage
tothe model, charger or the power supply (fire hazard).
• Use the charger only in dry rooms.
self-resetting
fuse
9


