


7
DE
-
Batteriehinweis:
Nicht wiederaufladbare Batterien dürfen nicht aufgeladen werden!
Nicht öffnen!
Nicht ins Feuer werfen!
Alte und neue Batterien nicht mischen!
Keine alkalischen, Standard-(Kohlenstoff-Zink) oder wiederaufladbare Batterien mischen!
Aufladbare Batterien sind aus dem Spielzeug herauszunehmen,
bevor sie geladen werden!
Aufladbare Batterien dürfen nur unter Aufsicht Erwachsener geladen werden!
Die Anschlussklemmen dürfen nicht kurzgeschlossen werden!
GB
-
Battery warning:
Non-rechargeable batteries are not to be recharged!
Do not open!
Do not dispose of in fire!
Do not mix old and new batteries!
Do not mix alkaline batteries, standard (carbon-zinc) or rechargeable batteries!
Rechargeable batteries are to be removed from the toy before being charged!
Rechargeable batteries are only to be charged under adult supervision!
The supply terminals are not to be short-circuited!
FR
-
Informations concernant l‘accumulateur:
Les batteries non rechargeables ne doivent pas être rechargées!
Ne pas ouvrir!
Ne pas jeter au feu!
Ne pas utiliser des piles neuves et usées à la fois!
Ne pas utiliser en même temps des piles alcalines, standard (zinc-charbon) et des accumulateurs!
Les piles rechargeables doivent être retirées du jouet!
Les batteries rechargeables ne peuvent être rechargées que sous la surveillance d‘un adulte!
Les connexions ne doivent pas être court-circuitées!
IT
-
Informazioni relative alle pile:
Le batterie non ricaricabili non devono essere caricate!
Non aprire!
Non gettare nel fuoco!
Non usare contemporaneamente pile nuove e pile usate!
Non usare contemporaneamente pile alcaline, standard (zinco-carbone) e ricaricabili!
Le batterie ricaricabili devono essere rimosse dal giocattolo!
Le batterie ricaricabili possono essere ricaricate solo sotto la supervisione di un adulto!
I morsetti di collegamento don devono essere cortocircuitati!
ES
-
Advertencia sobre las baterías:
Las baterías no recargables no se pueden cargar!
No abrir!
No arrojar al fuego!
No mezcle baterías nueva y viejas!
No mezcle baterías alcalinas, estándar (carbono-zinc) o baterías recargables!
Las baterías recargables deben retirarse del juguete!
Las baterías recargables sólo pueden cargarse bajo la supervisión de un adulto!
Los conectores de conexión no deben estar en cortocircuito!
NL
- Informatie over de batterij:
Laad geen wegwerpbatterij op!
Niet openen!
Gooi niet op het vuur!
Gebruik geen oude en nieuwe batterijen tegelijk!
Gebruik geen alkaline, standaard (zink-koolstof) batterijen tegelijk!
Verwijder de batterijen uit het speelgoed voordat het wordt opgeladen!
Laad de batterijen op enkel onder toezicht van een volwassene!
Voorkom kortsluiting van de aansluitingsklemmen!
CZ
-
Informace o akumulátoru:
Nenabíjejte jednorázové baterie!
Neotvírejte!
Nevhazujte do ohně!
Nepoužívejte staré a nové baterie současně!
Nepoužívejte alkalické, standardní (zinkovo-uhlíkové) baterie a akumulátory současně!
Před nabíjením vyjměte nabíjecí baterie z hračky!
Nabíjecí baterie lze nabíjet pouze pod dohledem dospělé osoby!
Nezkratujte připojovací svorky!
PL
- Informacja dotycząca akumulatora:
Nie ładować baterii jednorazowego użytku!
Nie otwierać!
Nie wrzucać do ognia!
Nie mieszać starych i nowych baterii.
Nie mieszać baterii alkalicznych, zwykłych (węglowo-cynkowych) lub akumulatorowych/
ładowalnych – używać baterii jednego rodzaju.
Przed rozpoczęciem ładowania należy wyjąć akumulatorki z zabawki!
Akumulatorki można ładować tylko pod nadzorem osoby dorosłej!
Nie wolno zwierać zacisków przyłączeniowych!
6
DE
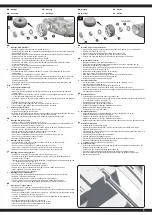
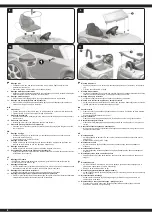
6. Akku anschließen
•
Verbinden Sie den Akku mit den Stecverbindungen wie abgebildet.
•
Die Stecker müssen sich ohne großen Kraftaufwand zusammen stecken lassen. Verbinden
Sie nur ineinanderpassende Steckverbindungen (A zu A, B zu B, usw.) und achten Sie
darauf nichts zu verpolen.
•
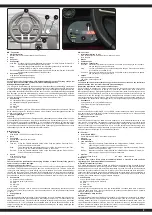
Der Motor ist mit einer aktiven Sicherung versehen. Bei einer Überlastung stellt die
Sicherung den Strom ab. In dem Fall schalten Sie das Fahrzeug ab und warten für ca.
5-20 Sekunden die Sicherung stellt den Strom wieder an.
Achtung: Die Sicherung darf nicht überbrückt werden. Feuergefahr!
7. Montage der Motorhalterung
•
Positionieren Sie die Motorhalterungen am Getriebe und schrauben sie mit je vier Ø4 x 12
Schrauben fest.
GB
6. Connect the Power Supply
•
Plug the block connector on the end of battery leads in to the corresponding block connector
on the car wiring.
•
The plugs must be put together without much effort. Only connect mating connectors (A to
A, B to B, etc.), being careful not to reverse polarity.
•
The engine is equipped with an active protection. In case of a voltage overload the engine
is switched off. In this case switch off the vehicle, wait for about 5-20 seconds and the fuse
should switch the electricity supply on.
Attention! The fuse must not be bridged. Fire hazard!
7. Attach the Motor Hood
•
Fit the Motor hood on the motor. Tighten four Ø4 x 12 screws to secure it. Reapeat the
abouve for the other motor hood.
FR
6. Branchement de l’accu
•
Branchez l’accu sur la prise comme indiqué sur l’illustration
•
Les connecteurs doivent se mettre en place sans avoir à forcer. Veillez à ne pas inverser la
polarité en branchant les différentes prises (A à A, B à B, etc.).
•
Le moteur est équipé d’une sécurité active. Lors d’une surcharge celle-ci coupe le courant.
Dans ce cas éteignez votre véhicule et attendez environ 5-20 secondes afin que la sécurité
permette à nouveau le passage de courant.
Attention: La sécurité ne doit pas être écrasée. Danger d’incendie!
7. Montage des Support de moteur
•
Positionner les supports du moteur sur sur le boitier et visser chacun de 4 vis Ø4 x 12mm.
IT
6. Collegare la batteria
•
Collegare la batteria con i connettori come indicato.
•
Le spine si devono facilmente senza sforzo collegare tra loro. Collegare solo spine adatte
tra loro (da A ad A, da B a B, ecc.) e fare attenzione di non invertire la polarità.
•
Il motore è predisposto con una sicurezza. In caso di sovratensione, la protezione spegne
la vettura. In questo caso, spegnere la vettura e aspettare ca. 5-20 secondi.
Attenzione! È proibito di cortocircuitare la batteria. Pericolo di fuoco.
7. Montaggio dei Supporto motore
•
Posizionare i supporti motore sul ingranaggio e avvitare con quattro viti Ø4 x 12.
ES
6. Montaje de la batería
•
Conectar la batería con los conectores como se muestra.
•
Los enchufes se deben conectar sin mucho esfuerzo. Conecte sólo conectores adaptado
(A a A, B a B, etc.) y asegúrese de que no se inverte la polaridad.
•
El motor cuenta con un fusible activo. En el caso de sobre tensión, este fusible corta la
corriente. En este caso, apague el vehículo y espere unos 5-20 segundos, el mismo fusible
vuelve a conectar la corriente.
Atención! No se debe puentear el fusible. Peligro de incendio
7. Montaje del soporte motor
•
Posiciónar los soportes del motor en el engranaje y atornillarlo con cuatro tornillos Ø4 x 12.
NL
6. Accu aansluiten
•
Sluit de batterij met de aansluitstekkers aan zoals op de afbeelding.
•
De stekkers moeten bij elkaar passen zonder te veel kracht te gebruiken. Sluit alleen stek
kers aan die bij elkaar passen (A tot A, B tot B, etc.) en wees voorzichtig om de polariteit niet
om te keren.
•
De motor is voorzien van een actieve beveiliging. Bij overbelasting schakelt de zekering de
stroom uit. Schakel in dit geval het voertuig uit en wacht ca. 5-20 seconden tot de zekering
de stroom weer inschakelt.
Let op: De zekering mag niet worden overbrugd. Brandgevaar!
7. Motorhouder monteren
•
Plaats de motorhouder op de versnelling en draai met vier schroeven Ø4 x 12 vast.
CZ
6. Připojte akumulátor
•
Připojte akumulátor pomocí zástrčných konektorů tak,jak je znázorněno na obrázku.
•
Zástrčky musí do sebe pasovat bez použití přílišné síly. Připojujte pouze konektory, které do
sebe pasují (A do A, B do B, atd.) a dávejte pozor, abyste nezměnili polaritu.
•
Motor je vybaven aktivní ochranou. V případě přetížení pojistka vypne proud. V takovém
případě vypněte vozidlo a počkejte cca. 5-20 vteřin, dokud pojistka znovu nezapne
napájení.
Upozornění: Pojistka nemůže být přemostěna. Hrozí nebezpečí požáru!
7. Montáž držáku motoru
•
Umístěte držáky motoru na převodovku a přišroubujte jej čtyřmi šrouby Ø4 x 12.
PL
6. Podłączanie akumulatora
•
Podłączyć akumulator za pomocą złączy wtykowych w sposób pokazany na ilustracji.
•
Wtyczki muszą pasować do siebie bez używania zbyt dużej siły. Podłączać tylko złącza
pasujące do siebie i uważać, aby nie zamienić biegunów.
•
Silnik jest wyposażony w aktywne zabezpieczenie. W przypadku przeciążenia bezpiecznik
wyłącza prąd. W takim przypadku należy wyłączyć pojazd i odczekać ok. 5-20 sekund do
momentu, aż bezpiecznik ponownie włączy zasilanie.
Uwaga: Bezpiecznik nie może zostać zmostkowany. Niebezpieczeństwo pożaru!
7. Montaż uchwytu silnika
•
Umieścić uchwyty silnika na przekładni i przykręcić je czterema śrubami Ø4 x 12.
7