


5
DE
- Montage
GB
- Assembly
FR
- Montage
IT
- Montaggio
ES
- Montaje
NL
- Montage
CZ
- Montáž
PL
- Montaż
1
2
DE
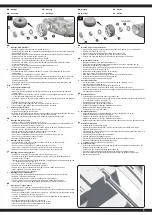
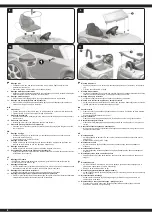
1. Montage der Hinterräder.
•
Stellen Sie die Karosserie mit der Unterseite nach oben.
•
Achten Sie darauf, dass das Vierkantteil der Hinterachse genau im Ausschnitt der Karosserie
platziert ist (Bild unten)
•
Das Getriebe
(1)
wird auf die Hinterachse aufgesteckt das linke Getriebe ist mit einem “L”
gekennzeichnet, das rechte Getriebe mit einem “R” ).
•
Stecken Sie jetzt ein Antriebsrad
(2)
auf das Getriebe.
•
Schieben Sie eine Unterlegscheibe (Ø10)
(3)
auf die Hinterachse.
•
Fixieren Sie das Ganze mit einer Sicherungsmutter
(4).
Ziehen Sie die Mutter mit dem
Schraubenschlüssel an.
•
Stecken Sie zum Schluss eine Abdeckung
(10)
auf die Muttern auf.
•
Wiederholen Sie dies auf der anderen Seite.
2.
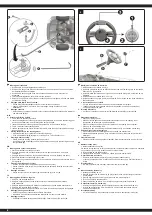
Montage der Vorderräder
•
Für die Montage der Vorderräder schieben Sie eine Ø 10 Unterlegscheibe
(1)
auf die
Vorderachse.
•
Schieben Sie die Lagerbuchse
(2)
auf die Achse,
•
Ziehen Sie ein Rad
(3)
auf und schieben Sie eine Unterlegscheibe (Ø10)
(4)
auf die Achse.
•
Fixieren Sie das Ganze mit einer Sicherungsmutter
(5)
. Ziehen Sie die Mutter mit dem
Schraubenschlüssel an.
•
Stecken Sie zum Schluss eine Abdeckung
(6)
auf. Wiederholen Sie die Schritte um das
andere Rad zu montieren.
GB
1. Attach the left Rear Wheel
•
Turn the body over
•
Make sure that the square part of the rear axle fits exactly in the cutout of the bodywork.
(picture below)
•
Slide the gear box
(1)
onto the rear axle (Left Side). (The left-hand transmission is marked
„L“, the right-hand transmission is marked „R“).
•
Slide the driving wheel
(2)
onto the rear axle. And keep the driving wheel match with the gear
box.
•
Slide the Ø10 Washer
(3)
onto the rear axle.
•
Tighten a Ø10 Locknut
(4)
to the end of the rear axle with a spanner.
•
Fit the hubcaps
(10)
to the wheel cover. Repeat for the other side.
2. Attach the Front Wheels
•
Slide a Ø10 washer
(1)
onto the front axle.
•
Slide a bushing
(2)
onto the front axle.
•
Slide the normal wheel
(3)
onto the front axle and slide a Ø10 washer
(4)
onto the front axle.
•
Tight a Ø10 Locknut
(5)
to the end of the front axle with a spanner.
•
“Snap” the hubcap
(6)
to the wheel cover. Repeat this step for the other side.
FR
1. Montage des roues arrière
•
Placez la carrosserie avec le dessous vers le haut.
•
Assurez-vous que la partie carrée de l‘essieu arrière soit positionnée exactement dans la
découpe de la carrosserie (image ci-dessous).
•
La boîte de vitesses
(1)
est montée sur l‘essieu arrière (la boîte de vitesses gauche est
marquée d‘un „L“, la boîte de vitesses droite d‘un „R“).
•
Montez maintenant sur la boîte de vitesses une roue motrice
(2)
.
•
Glissez une rondelle (Ø10)
(3)
sur l‘essieu arrière.
•
Fixez le tout à l‘aide d‘un contre-écrou
(4)
. Serrez l‘écrou à l‘aide d‘une clé.
•
Enfin, fixez un recouvrement
(10)
aux écrous
•
Répétez l‘opération de l‘autre côté.
2. Montage des roues avant
•
Pour monter les roues avant, glisser une rondelle Ø 10
(1)
sur l‘essieu avant.
•
Glissez le roulement
(2)
sur l‘axe,
•
Posez une roue
(3)
et glissez une rondelle (Ø10)
(4)
sur l‘essieu.
•
Fixez le tout à l‘aide d‘un contre-écrou
(5)
. Serrer l‘écrou à l‘aide d‘une clé.
•
Enfin, fixez un couvercle
(6)
. Répétez les étapes pour monter l‘autre roue.
IT
1. Montaggio delle ruote posteriori
•
Posizionare la carrozzeria con la parte inferiore rivolta verso l‘alto.
•
Assicurarsi che la parte quadrata dell’asse posteriore si inserisca perfettamente nella
carrozzeria (figura sotto).
•
Inserire la trazione motore
(1)
sull’asse posteriore. (L’ingranaggio di sinistra é indicato da una
“L”, l’ingranaggio destro con una “R”).
•
Fissare una ruota motrice
(2)
sulla trazione motore.
•
Spingere una rondella (Ø10)
(3)
sull´asse posteriore.
•
Fissare con un dado autobloccante (Ø10)
(4)
e serrare il dado con una chiave.
•
Infine, applicare il coperchio
(10)
sui dadi.
•
Ripetere l’operazione per l´altro lato.
2. Montaggio delle ruote anteriori
•
Per il montaggio delle ruote anteriori spingete una rondella
(1)
sull´asse anteriore.
•
Spingere il cuscinetto
(2)
sull’asse,
•
Tirare una ruota
(3)
e far scorrere una rondella (Ø10)
(4)
sull‘asse.
•
Fissare il tutto con un dado di bloccaggio
(5)
. Serrare il dado con una chiave.
•
Infine, applicare il coperchio
(6)
. Ripetere l’operazione per montare l‘altra ruota.
ES
1. Montaje de la ruedas trasera
•
Posicionar la carrocería con la parte inferior hacia arriba
•
Asegúrese de que la parte cuadrada del eje trasero se encaja a la perfección el la carrocería
(Imagen debajo)
•
Poner el accionamiento de motor
(1)
en el eje trasero. (el engranaje izquierdo está marcado
con una “L”, el engranaje derecho con una “R”).
•
Fijar una rueda motriz
(2)
en el accionamiento de motor. Adaptarlo en la grabación de
engranajes.
•
Deslizar una arandela (Ø10)
(3)
en el eje trasero.
•
Fijar las tuercas (Ø10)
(4)
y apretar la tuerca con la llave.
•
Inserir en ambos lados una cobertura
(10)
en las tuercas.
•
Repetir la operación para el otro lado.
ES
2. Montaje de las ruedas delanteras
•
Para el montaje de las ruedas delanteras, deslizar una arandela (1) en el eje delanter.
•
Deslizar el cojinete
(2)
en el eje,
•
Inserir la rueda
(3)
y desliczar una arandela (Ø10)
(4)
en el eje.
•
Fijar con una tuerca de bloqueo
(5)
. Apriete la tuerca con a llave.
•
Enchufe una cobertura
(6)
. Repetir la operación para montar la otra rueda.
NL
1. Achterwielen monteren.
•
Plaats het chassis met de onderkant naar boven.
•
Zorg ervoor dat het vierkante deel van de achteras precies in de uitsparing van de
carrosserie zit geplaatst (foto hieronder)
•
De versnelling
(1)
is op de achteras gemonteerd (linker versnelling is met de letter „L“ en
rechter met de letter „R“ gemarkeerd).
•
Installeer het aandrijvingswiel
(2)
op de versnelling.
•
Schuif de sluitring (Ø10)
(3)
op de achteras.
•
Draai alles met de borgmoer vast
(5)
. Draai de moer met een sleutel vast.
•
Bescherm tenslotte de moeren met de doppen
(6)
.
•
Herhaal deze stappen aan de andere zijde.
2. Voorwielen monteren
•
Om de voorwielen te monteren: schuif op het vooras de sluitring Ø 10
(1)
.
•
Schuif de lagerbuis
(2)
op de as.
•
Zet het wiel
(3)
en schuif de sluitring (Ø10)
(4)
op de as.
•
Draai alles met de borgmoer vast
(5)
. Draai de moer met een sleutel vast.
•
Bescherm tenslotte de moeren met een dop
(6)
. Herhaal omschreven werkzaamheden om
een ander wiel te monteren.
CZ
1. Montáž zadních kol.
•
Položte karoserii dolní stranou nahoru (obrázek níže).
•
Převodovka
(1)
je namontována na zadní nápravě (levá převodovka je označena písmenem
„L“, a pravá převodovka s písmenem „R“)
•
Namontujte hnací kolo
(2)
na převodovku
•
Vložte podložku (Ø10)
(3)
na zadní nápravu..
•
Zajistěte vše pojistnou maticí
(4)
. Utáhněte matici klíčem.
•
Nakonec zajistěte matice čepičkami
(10)
.
•
Opakujte tyto kroky na druhé straně.
2. Montáž předních kol
•
K montáži předních kol na přední nápravu je nutné vložit podložku Ø 10
(1)
.
•
Nasunout ložiskové pouzdro
(2)
na nápravu.
•
Vložte kolo
(3)
a vložte podložku (Ø10)
(4)
na nápravu
•
Zajistěte vše pojistnou maticí
(5)
. Utáhněte matici klíčem.
•
Nakonec zajistěte matice čepičkami
(6)
. Opakujte popsané kroky při montáži druhého kola
PL
1. Montaż kół przednich
•
Ustawić karosię dolną stroną w górę.
•
Upewnij się, że kwadratowa część tylnej osi jest umieszczona dokładnie w wycięciu
nadwozia (zdjęcie poniżej).
•
Przekładnia
(1)
jest zamontowana na osi tylnej (przekładnia lewa jest oznaczona literą „L“, a
przekładnia prawa literą „R“ ).
•
Zamontować koło napędowe
(2)
na przekładni..
•
Wsunąć podkładkę (Ø10)
(3)
na tylną oś.
•
Przykręcić całość nakrętką zabezpieczającą
(4)
. Dokręcić nakrętkę kluczem.
•
Na koniec zabezpieczyć nakrętki kapturkami
(10).
•
Powtórzyć opisane czynności z drugiej strony.
2.
Montaż kół tylnych.
• W celu zamontowania przednich kół na poś przednią należy wsunąć podkładkę Ø 10
(1)
.
• Nasunąć tuleję łożyskową
(2)
na oś.
• Założyć koło
(3)
i wsunąć podkładkę (Ø10)
(4)
na oś.
• Przykręcić całość nakrętką zabezpieczającą
(5)
. Dokręcić nakrętkę kluczem.
• Na koniec zabezpieczyć nakrętki kapturkiem
(6)
. Powtórzyć opisane czynności aby
zamontować drugie koło.