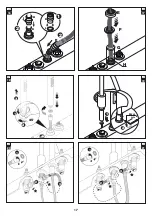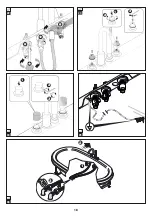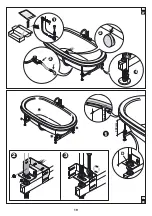
9
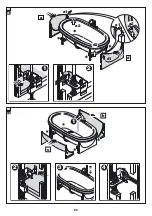
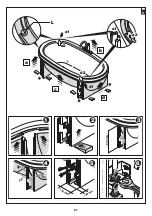
Also raise the front panels
b
and
c
, in the same way.
(
detail 4-5
) Check that:
- the panels are perpendicular to the wood skirt.
- the respective vertical sides are parallel to one another and
that the indicated distances are complied with.
- the lower edges of the panels are aligned.
Any adjustments should be made via the slots of the brackets.
(
detail 6
) Lock the panels in the final location using the indicat-
ed nuts.
Do the same for panel
d
.
Finally, remove the spacers from below the panels
Final steps
(
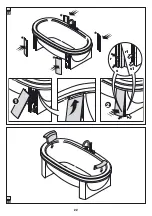
3
2, detail1
) Install the covering panels by inserting them in
the groove under the tub edge; (
detail 2
) check that, in the lower
part, the pegs (r1) are inside the unloaded parts (r).
Note:
the covering panels can be mounted on any side, even
upside down.
Check coupling with the front and side panels. Also make sure
that the lower edge of the covering is aligned with that of the pan-
els. Use the brackets as needed to make adjustments.
(
detail 2
) Then fasten the covering panels using the fastening
system (s-s1).
(
33
) Position the headrest (included) on the edge of the tub
as indicated.
Summary of Contents for AnimaDesign
Page 2: ......
Page 3: ...Italiano 4 English 7 Fran ais 10 Deutsch 23 Espa ol 26 29 AnimaDesign Index...
Page 13: ...13 189 190 99 100 60 1 99 189 60 1a...
Page 14: ...14 50 cm G G 2 60 cm G G 2a 2 1 4 5 3 3...
Page 15: ...15 7 8 1 2 3 9 1 2 6 1 3 2 A B C 4 5...
Page 16: ...16 1 2 10 2 1 3 4 H I F G E J K L M 11 12 L M 2 1 13 14 1 J J 2 15...
Page 17: ...17 1 2 3 1 2 3 20 21 1 M5x5 mm 2 19 45 1 3 2 18 H H I K J H I 2 2 1 16 G H F E 17...
Page 18: ...18 1 2 3 22 23 1 2 3 24 25 3 2 1 26...
Page 19: ...19 333 mm D 1 2 3 28 2 3 4 1 27...
Page 20: ...20 a a1 d1 a2 d 1 2 d2 a1 a2 29 3 b c 2 1 4 30...
Page 21: ...21 150 mm 48 mm 90 c b a d a1 a2 d2 d1 493 mm 1 2 4 5 6 3 a1 a2 90 90 L 31...
Page 22: ...22 1 2 r s s1 r1 32 33...
Page 31: ...31 1 d 30 1 2 b 3 31 1 2 5 a2 a1 L 2 3 b c 4 5 6 d 32 1 2 r1 r 2 s s1 33...


