background image

Inspection and Shipping Claim

Check for shipping damage upon receipt of the spa.

Jacuzzi Whirlpool Bath is not responsible for damage to
the spa sustained during shipment.  If damage is evident
before unpacking, refer to instructions regarding ship-
ping claims on the outside of the carton and immediately
file a claim with the carrier.

Once the spa has been removed from the carton

and before it is permanently installed, check the spa
completely for damage.  Fill the shell with water and
operate the system (refer to Operating Instructions) to
check for leaks which may have resulted from improper
shipping or handling.  All Jacuzzi Whirlpool Bath spas
are factory tested for proper operation and water tight
connections prior to shipment.  If leaks or other problems
are detected, immediately notify your Jacuzzi Whirlpool
Bath dealer, Authorized Service Agent, or call Jacuzzi
Whirlpool Bath, (800) 288-4002 for Warranty Service.

NOTE:  Damage or defects which could have been
discovered and repaired prior to installation and
which are claimed after final installation of the spa,
are excluded from our warranty.

5

Positioning Your Spa

Because your spa is portable, you can locate it just

about anywhere you wish—on a deck, patio, or even
indoors.  Just be sure to position it above ground in an
area with good drainage and on a level, continuous
surface which can support the weight of the spa when
filled with water and people.  You must also provide
access to the spa's equipment for service and general
maintenance.  See specifications sheet for minimum
service access requirements.

Electrical Requirements

Your Select (except Alexa) Series spa requires a

230 VAC, 50 AMP, 4-wire, grounded type GFCI pro-
tected electrical service with copper conductors, and
must be in a separate circuit having no other appliance
connected in that circuit.  If you do not have this kind of
circuit, a qualified electrician should install the neces-
sary wiring.  A wiring diagram is provided on the inside
cover of the electrical control box.  Inadequately sized
wiring may cause the unit to malfunction and bring about
permanent damage to the spa’s electrical system.  The
circuit must also have a ground wire in order to take
advantage of the designed-in safety features of the spa.
A bond wire must also be used.  Bond according to
procedure described on the next page.

WARNING:  Without proper grounding and bonding,
a system malfunction may cause fatal shock.

INSTALLATION

Summary of Contents for Aero Select

Page 1: ...Select Series Spas WHIRLPOOL BATH R Owner s Manual ...

Page 2: ...ment metal water pipe or conduit within 5 feet 1 5 m of the spa Do not use electrically connected devices such as televi sion radio or stereo speakers lights cooking devices or telephones within 5 feet 1 5 m of the spa while the spa is being used Lighting fixtures must not be located directly above or within 5 feet 1 5 m of the spa If located within 10 feet 3 0 m of the spa they must be on a circu...

Page 3: ...lent Air Induction _______________________________________________________ 16 Water Rainbow _________________________________________________________ 16 Maintenance Water Quality and Water Chemistry __________________________________________ 17 Filtration _______________________________________________________________ 17 Water Chemistry _________________________________________________________ 17 ...

Page 4: ... L 60 1524 mm W 29 1 2 749mm H PRODUCT WEIGHT 349 lb 159 kg OPERATING GALLONAGE 158 U S gal 586 liters TOTAL WEIGHT FLOOR LOADING 1965 lb 889 kg 65 5 lb sq ft 320 kg m2 ELECTRICAL REQUIREMENTS 115 VAC 20 AMP 60 Hz Equipped with GFCI Incorporated in Line Cord Requires Dedicated Separate Circuit Alexa Select 2 SELECT SERIES SPECIFICATIONS 84 76 ACCESS AREA 30 30 TO GAIN ACCESS FOR SERVICE OR MAINTEN...

Page 5: ... IS LOCATED BEHIND PANEL 3 SELECT SERIES SPECIFICATIONS Product specifications are subject to change without notice DIMENSIONS 84 2134 mm L 84 2134 mm W 36 914 mm H PRODUCT WEIGHT 562 lb 255 kg ELECTRICAL REQUIREMENTS 230 VAC 4 Wire 50 AMP 60 Hz GFCI Protected Dedicated Separate Circuit OPERATING GALLONAGE 375 U S gal 1419 liters TOTAL WEIGHT FLOOR LOADING 4738 lb 2154 kg 105 lb sq ft 512 kg m2 Sa...

Page 6: ...RETAINING Product specifications are subject to change without notice DIMENSIONS 78 1981 mm L 72 1829 mm W 32 813 mm H PRODUCT WEIGHT 428 lb 194 kg ELECTRICAL REQUIREMENTS 230 VAC 4 Wire 50 AMP 60 Hz GFCI Protected Dedicated Separate Circuit OPERATING GALLONAGE 249 U S gal 943 liters TOTAL WEIGHT FLOOR LOADING 3102 lb 1410 kg 80 lb sq ft 390 kg m2 ...

Page 7: ...Your Spa Because your spa is portable you can locate it just about anywhere you wish on a deck patio or even indoors Just be sure to position it above ground in an area with good drainage and on a level continuous surface which can support the weight of the spa when filled with water and people You must also provide access to the spa s equipment for service and general maintenance See specificatio...

Page 8: ...w Outdoor Installation If you install the spa outdoors we recommend that you provide a concrete pad for it to rest on To do this construct forms for a 4 thick level pad Install a 10 gauge wire mesh 6 x 6 steel reinforced grid Attach a 8solidcopperwiretothegridwithagroundclamp This wire should be long enough to reach the bond bar on the spaelectricalcabinet minimum36 butshould NOTbe located under t...

Page 9: ...ve the optional cover OFF the spa during this procedure DO NOT use the spa during this procedure Drain the spa immediately afterward 6 Close the drain valve and fill the spa with water through the skimmer to the water line indicator mark on the skimmer frame 7 Turn ON circuit breakers at the main panel 8 Test the spa for proper operation Refer to Operat ing Instructions 9 Add 4 tablespoons of chlo...

Page 10: ...ned OFF whenever either the high speed jets or the air blower is activated To convert to 230 VAC 30 AMP operation 1 Turn OFF breaker at main electrical power 2 Open the skirt door access panel 3 Loosen and remove 4 screws securing the electrical cabinet cover and set them aside 4 Move the jumper at circuit board location J8 from the 50A position to the 20A position Refer to Figures 1 and 2 5 Repla...

Page 11: ...s is possible including having the heater on when the whirlpool mode is activated Also the heat up rate will be approximately four times greater To convert to 230 VAC 50 AMP operation 1 Turn OFF 20 AMP breaker at main electrical panel 2 Open the skirt door access panel 3 Loosen and remove 4 screws securing the electrical cabinet cover and set them aside 4 Loosen screws at bottom side of terminal b...

Page 12: ...access to the plumbing 3 Cut off and discard the PVC caps at the end of each length of flexible vinyl tubing as shown in Figure 1 4 Insert Injector fitting into flexible vinyl tubing and secure with hose clamps 2 Do NOT change the length of the flexible vinyl tubing downstream of the red ozone injector Observe the proper orientation of the red ozone injector make sure the molded in arrow symbol po...

Page 13: ... 2 thick plywood board to the spa just above the electrical cabinet using the 6 screws provided Several commer cially available ozone generators will fit easily in this location Attach the ozone generator to the board using the 10 screws provided See Figure 3 7 Refill spa with water to fill mark on skimmer frame Check for leaks 8 Plug the ozone generator power cord plug into the socket labeled ozo...

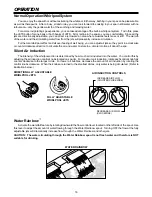
Page 14: ...e panel turn ON the circuit breaker or switch that controls the electrical service to your spa Make sure there is no other appliance on that 12 circuit Spa Designed for 230VAC Circuit Your spa must be installed in an electrical circuit protected with a Ground Fault Circuit Interrupter GFCI refer to Electrical Requirements At initial start up and before each use thereafter with power ON push the GF...

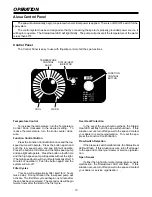
Page 15: ... successive press will change the set temperature in the same direction If the opposite direction is desired release the button and let the display revert to the actual water temperature Press the pad to display the set tempera ture and again to make the temperature change in the desired direction Temperatures from 80 to 104 F can be set Jets Control Press the button once to activate the low speed...

Page 16: ...some of the messages you will see on the center display Message Meaning Overheat Protection Spa is deactivated If a malfunction occurs and the spa water reaches 112 F the system will completely shut down Danger DO NOT ENTER THE WATER Turn off all power to the spa and contact your dealer or service organization Press any panel button to reset Flow Switch A pressure switch has malfunctioned Contact ...

Page 17: ... the first cycle STATUS HEAT WARM STATUS HEAT INDICATOR COOL FUNCTION CONTROL BUTTON OFF LOW LOW LT HIGH HIGH LT TEMPERATURE CONTROL KNOB Over Heat Protection In the event the spa should overheat the Status Heat LED will flash and the spa will shut down If this situation occurs turn off all power to the spa and contact your dealer or service organization To reset the spa press the Function Control...

Page 18: ... motion all about the spa Silent Air Induction The intensity of the whirlpool action is determined by how much air is inducted into the water You control this by adjusting the air induction control knobs located on spa rim For maximum air induction rotate each control knob fully counter clockwise to the largest circle For fewer air bubbles decrease the amount of air induction by rotating the contr...

Page 19: ...lity conditions These conditions can be corrected with the use of spa treatment chemicals which are available from your Jacuzzi Whirlpool Bath dealer Such conditions include the following Foaming A defoamer is available to minimize foaming of the water This condition is usually caused by the addition of soaps or oils or other fatty substances to the spa water The interaction of these with hot wate...

Page 20: ...h 150 gallons of spa water Scrub the spa surfaces with this solution to remove any oily deposits This will ensure that any bacteria or algae which are resistant to the normal disinfectant level are killed After adding the disinfectant run the filter system and allow the free chlorine level to return to the 2 0 to 5 0 ppm range before using the spa again Do not install a cover until the disinfectan...

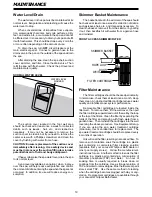
Page 21: ...d at least once a week for collection of debris such as leaves hair etc and cleaned as necessary To clean the basket remove it from the skimmer by pulling it out then backflush it with water from a garden hose and reinstall NORMAL WATER LEVEL WATER LEVEL MARKER 19 MAINTENANCE SKIMMER BASKET WEIR DOOR FILTER CARTRIDGE ROPE LOOP FRONT ACCESS SKIMMER FILTER Filter Maintenance The filter cartridges sh...

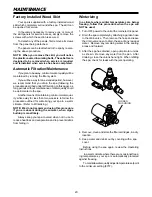
Page 22: ...edure outlined for winterizing your spa in a warm climate Refer to Winterizing NOTE We do not recommend using this procedure if you are absent during the summer when algae buildup is most likely Always keep your spa covered when not in use to reduce heat loss and evaporation and to prevent debris from falling in 20 Winterizing In a climate where winter temperatures are below freezing follow this p...

Page 23: ...he normal lens Two replacement bulbs are also included Put them in a safe place for future use When a bulb burns out replace it from the back of the light fitting on the rear surface of the shell by pulling out the bulb receptacle Covering Your Spa An optional spa cover for your spa is available from yourJacuzziWhirlpoolBathdealer Useofthiscoverwill help to reduce energy costs by minimizing heat l...

Page 24: ...gh content of solids in water F Filter motor plug not connected to the electrical cabinet A Leak in suction line discharge line or connections B Excessive evaporation and or splashing A Low water level B Clogged or blocked suction strainer or skimmer basket C Dirty filter D Adjustable jet partially closed E Suction or discharge line partially plugged F Pump running at subnormal speed G Worn or dam...

Page 25: ...d clean strainer See page x A Clogged strainer s B Leakage of air into suction line C Vibrating parts attached to motor or support brackets D Low water level E Damaged or worn motor bear ings F Impeller rubbing inside case G Debris inside pump A Worn or damaged pump seal A Power OFF B House circuit breaker tripped or in OFF position C GFCI tripped D Subnormal voltage E Improper or defective wiring...

Page 26: ...T SPA SHELL SAVE FOR LATER REINSTALLATION IF DESIRED CUT PIPE HERE INSTALL AND CEMENT 3 4 PVC CAP HERE TEE LOCATED ON DISCHARGE PIPING SUGGESTED MODIFICATION REFER TO LOCAL CODES FOR REQUIREMENTS 1 1 2 to 2 24 PRODUCT SPECIFICATIONS ARE SUBJECT TO CHANGE WITHOUT NOTICE USE INSTALLATION INSTRUCTIONS SUPPLIED WITH PRODUCT Printed in the U S A Jacuzzi Whirlpool Bath National Headquarters P O Drawer J...

Page 27: ...e supply or unauthorized electrical modification misuse incorrect operation or lack of proper routine maintenance operation of the unit without specified minimum amount of water or at inappropriate water temperature failure to maintain proper water chemistry and chemical balance improper storage of chemicals failure to properly winterize against freezing use of abrasive or improper cleaners or act...

Page 28: ... manufactured and supplied by the Company call or write the above Provide a description of the problem and proof of purchase You will be instructed how to obtain replacements and where to return at your expense the failed component s option s or accessory ies All replacement parts equipment and repairs shall assume the remaining warranty period of the part s replaced The Company s warranty obligat...

Reviews: