conMIG 400/445/545
Operating manual
Page 43
33. Operation / welding
- Installation of the welding unit
When installing the machine, allow for sufficient space for inlet and outlet cooling air so that the rated duty cycle
will be attained.
The machine should not be exposed to moisture, welding spatter or spark rays caused by grinding work.
- Mains connection (if not mounted)
To be carried out only by a qualified electrician!
Connect mains plug to mains cable as specified on the rating plate. The yellow-green lead is provided for PE
earth conductor. The three phases (black, brown, blue) may be con-nected to L1, L2, and L3 at random.
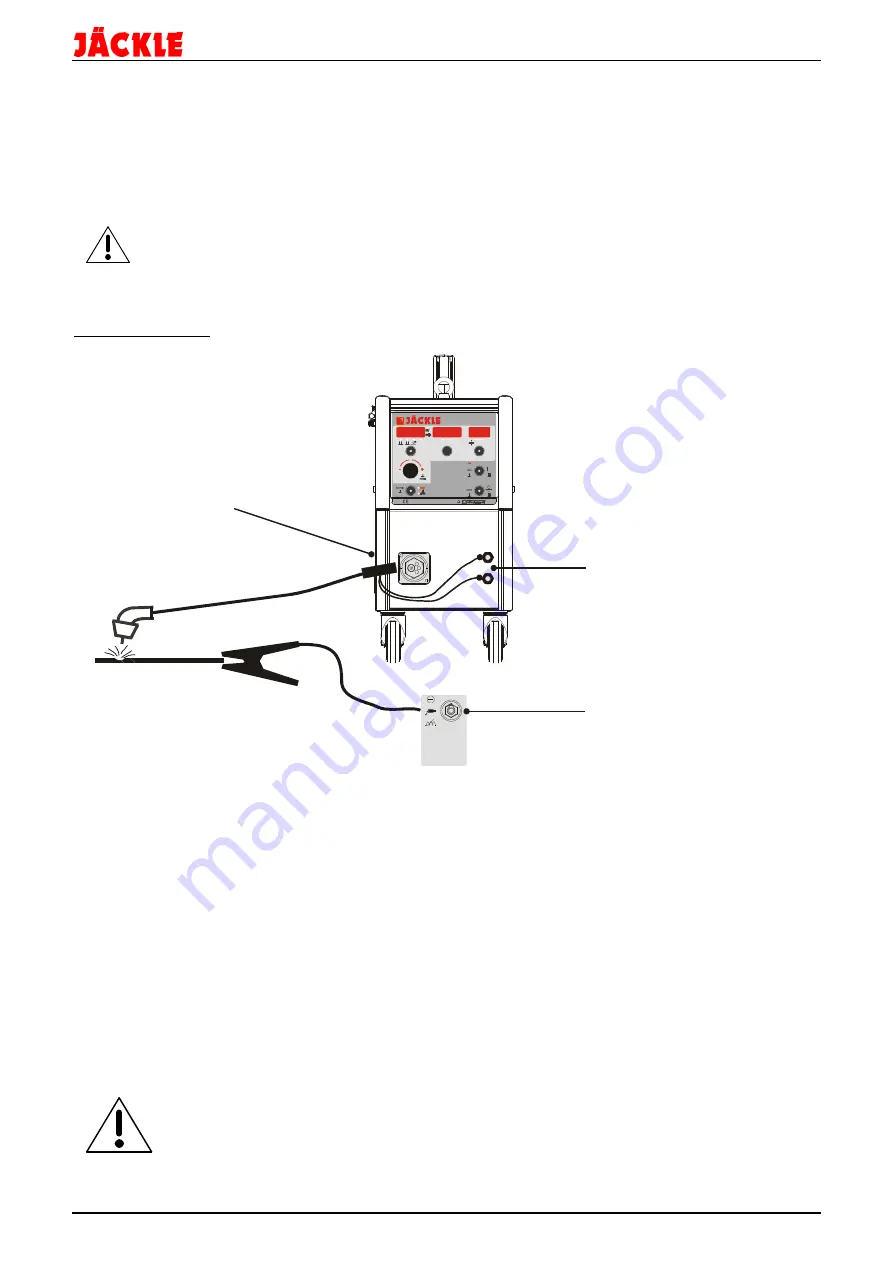
MIG / MAG welding
Connection of the MIG/MAG Torch
Connect the welding torch as shown in the picture to the central connection socket, the water connections and
maybe the up/down cable. Observe the colours of the water connections.
Pin assignment of the up / down port, see the schematic.
Connection of shielding gas cylinder
Put the Gas cylinder at the back of the bottle cart and secure it with the chains. Connect cylinder pressure reducer
and check that all connections are tightly sealed. Set the shielding gas flow rate at the pressure reducer on cylinder
(6- 18 l/min). The gas flow rate depends chiefly on the welding amperage.
Connection of work piece cable
When clamping the work piece into its holder, choose an appropriate spot without paint or rust for good
conductivity.
Starting the welding process
Set the MC control box to the MIG/MAG mode, adjust the parameters for the welding job and start welding
process by pressing the torch trigger
Ensure excellent contact between all connections within the welding circuit,
i.e. work piece, torch connection and contact tip nozzle. Bad contact causes high transition
resistance which leads to overheating and poor quality of the weld.
Brenner
Zentralanschluss
Central
torch connection
Massebuchse
Workpiece socket
S
%
sec
l/min
TE ST
mm
V
A
MC 3
F
X
LADEN
SPEICHERN
Wasservorlauf ‘blau-kalt’ DN 5
water flow ‘blue-cold’ DN 5
Wasserrücklauf ‘rot-heiß’ DN 5
water runback ‘red-hot’ DN 5
Summary of Contents for conMIG 400
Page 2: ......
Page 28: ...conMIG 400 445 545 Operating manual Page 25...
Page 54: ...conMIG 400 445 545 Operating manual Page 51 Seitenansicht links sideview left...
Page 56: ...conMIG 400 445 545 Operating manual Page 53 Seitenansicht rechts sideview right...
Page 58: ...conMIG 400 445 545 Operating manual Page 55 Koffer wire feed case DVK 3 2010...
Page 61: ...conMIG 400 445 545 Operating manual Page 58 Koffer wire feed case DVK 4 2010...
Page 71: ......


