background image


HIL


1


USER


MANUAL


16 


Chapter


3


Getting


Started


This


chapter


provides


a


general


overview


of


your


HIL1


and


some


basicsbefore


using


your


HIL1.


Some


of


the


features


described


in


this


manual


may


not


function


properly


if


you


use


an


operating


system


that


was


not


pre

installed


by


Ipteq.


Check


the


components


Check


to


make


sure


you


have


all


of


the


following


items:


Hardware


Ipteq


HIL


1


AC


adaptor


(2

pin


or


3

pin)


Power


cable


Documentation


Quickstart


Guide


User


Manual


Warranty


information


If


any


of


the


items


is


missing


or


damaged,


contact


your


dealer


immediately.


Grand


tour


Please


handle


your


product


carefully


to


avoid


scratching


or


damaging


thesurface.


The


following


figure


shows


each


important


part


of


your


HIL


1.


Summary of Contents for HIL1

Page 1: ......

Page 2: ...quency Radiation 9 Working environment 9 Additional environments not related to EMC 10 REACH Compliance Statement 10 Following Information is only valid for EU member States 10 Disposal of products 10 Disposal of batteries and or accumulators 11 Following information is only for India 11 Canadian regulatory information Canada only 11 Canada Industry Canada IC 12 Following information is only for T...

Page 3: ... Location Setup 29 Date Time Setup 32 Operating HIL 1 34 Home Page 35 Notification Area 37 Digital Clock Area 39 Alarms Alerts 39 Enjoined Prayer Alarms 40 Optional Prayer Alerts 43 Wake Up Alerts 45 Query Prayer Page 46 Calendar Page 47 Adages Page 48 Settings Menu 50 Firmware Upgrade Reset 58 Software Updates 58 Factory Settings Reset 59 Factory Software Reset 59 Troubleshooting 60 Problem solvi...
Page 4: ...ements 65 Power Requirements 66 Information For Wireless Devices 67 Wireless LAN interoperability 67 Bluetooth wireless technology interoperability 67 CAUTION about Wireless Devices 68 Wireless Devices and your health 68 Radio Regulatory Information 68 Europe 69 Canada Industry Canada IC 69 USA Federal Communications Commission FCC 70 Caution Exposure to Radio Frequency Radiation 70 ...

Page 5: ... at stated times Each prayer occurs at a particular time of the day and these times differ for every day of the year depending upon daily changes in sunrise and sunset timings The God Almighty has also ordered that every Muslim when performing his prayers must face towards the Ka aba the Inviolable Place of worship in Mecca Saudi Arabia The HIL1 prayer clock based upon audio video alarms for each ...

Page 6: ...SERVICES AND MAY PROVIDE LINKS TO EXTERNAL LOCATIONS OPERATED BY THIRD PARTIES ALL COMMUNICATION EXPRESSED OR MADE AVAILABLE BY THIRD PARTIES WHATSOEVER INCLUDING WITHOUT LIMITATION BY OTHER USERS IS SOLELY MADE BY THE RESPECTIVE AUTHOR S OR DISTRIBUTOR S AND THE Ipteq PARTIES DO NOT GUARANTEE THE ACCURACY COMPLETENESS OR USEFULNESS THEREOF OR ITS MERCHANTABILITY OR FITNESS FOR ANY PARTICULAR PURP...

Page 7: ... used by Ipteq S A under license Wi Fi is a registered trademark of the Wi Fi Alliance Secure Digital and SD are trademarks of SD Card Association TouchSense is a trademark of Immersion Corporation Other trademarks and registered trademarks not listed above may be used in this manual Third Party Software Notice Ipteq may use application programming libraries or other open source software develop b...

Page 8: ...t to part 15 of the FCC rules These limits are designed to provide reasonable protection against harmful interference in a residential installation This equipment generates uses and can radiate radio frequency energy and if not installed and used in accordance with the instructions may cause harmful interference to radio communications However there is no guarantee that interference will not occur...

Page 9: ...ipteq com Caution Exposure to Radio Frequency Radiation The SAR limit of USA FCC is 1 6 W kg averaged over one gram of tissue Device types HIL 1 FCC ID PVIHIL1IPTEQ has also been tested against this SAR limit The highest SAR value reported under this standard during product certification when properly worn on the body is 0 212 W kg This device was tested for typical body worn operations with the b...

Page 10: ...n its assembly The use of accessories that do not satisfy these requirements may not comply with RF exposure requirements and should be avoided Working environment The Electromagnetic Compliance EMC of this product has been verifiedtypically for this product category for a so called Residential Commercial Light Industry Environment Any other working environment has not been verified by Ipteq and t...

Page 11: ...ormation is only valid for EU member States REACH Compliance Statement The new European Union EU chemical regulation REACH Registration Evaluation Authorization and Restriction of Chemicals entered into force on 1 June 2007 Ipteq will meet all REACH requirements and is committed to provide our customers with information about the chemical substances in our products according to REACH regulation Fo...

Page 12: ...fely Following information is only for India The use of this symbol indicates that this product may notbe treated as household waste By ensuring this product is disposed of correctly you will help prevent potential negative consequences for the environment and human health which could otherwise be caused by inappropriate waste handling of this product These symbols may not stick depending on the c...

Page 13: ...Following information is only for Turkey Compliant with EEE Regulations Ipteq meets all requirements ofTurkish regulation 26891 Restriction of the use of certain hazardous substances in electrical and electronic equipment The number of possible pixel failures of your display is defined according to ISO 9241 307 standards If the number of pixel failures is less than this standard they will not be c...

Page 14: ...described in this section In order to avoid malfunction or damage of the product please carefullyfollow the precautions listed below General Information The rating of the equipment is o Input AC 100 240V 50 60Hz 1A o Output DC 5V The maximum operating ambient temperature of the equipment declared by the manufacturer is 50 The socket outlet shall be installed near the equipment and shall be easily ...

Page 15: ...0 bus powered types use other AC DC adaptors than the one bundled with your device as otherwise your device may be damaged disconnect cables while operating expose the product to temperatures outside the range of 5 C 50 C while operating and temperatures of 20 C 60 C while switched off expose the product to wet or damp conditions cover the product during operation as it may become overheated place...

Page 16: ...L 15 DISPOSE OF USED BATTERIES ACCORDING TO THE INSTRUCTIONS If the product behaves not as expected or you have doubts about the electrical safety please contact immediately the Ipteq hotline or an authorized reseller ...

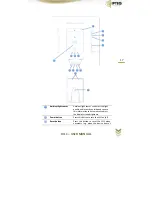
Page 17: ... not pre installed by Ipteq Check the components Check to make sure you have all of the following items Hardware Ipteq HIL 1 AC adaptor 2 pin or 3 pin Power cable Documentation Quickstart Guide User Manual Warranty information If any of the items is missing or damaged contact your dealer immediately Grand tour Please handle your product carefully to avoid scratching or damaging thesurface The foll...

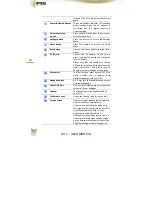
Page 18: ...ct the light quality and intensity outside and can use this information to automatically adjust the display screen brightness Power button Press this button to turn the HIL1 on off Reset button Press this button to reset the HIL1 when necessary e g when the device doesn t ...

Page 19: ...e at the time of purchase using the wrong AC adaptor can cause damage to the device SDcard slot This slot lets you insert a micro SD Card which enables you to transfer data software updates into your HIL1 Headphone jack A 3 5 mm jack that enables connection to a stereo headphone Micro USB Port Service micro USB port used to recover the system in case of damages Speaker The speakers emit sound gene...

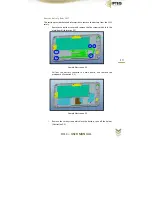
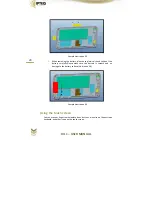
Page 20: ... safely 1 Remove the bottom cover and remove the five screws which lock the main board illustration 3 1 Sample Illustration 3 1 2 Pull out the battery connector on main board and remove the mainboard illustration 3 2 Sample Illustration 3 2 3 Remove the three screws which lock the battery take off the holder illustration 3 3 ...

Page 21: ...k and take out the battery carefully Please make sure the battery is smooth and no damage to the battery surface illustration 3 4 Sample Illustration 3 4 Using the touch screen You can use your finger to manipulate icons buttons menu items theonscreen keyboard and other items on the touch screen ...

Page 22: ...use a soft and clean cloth with the following recommended solventto wipe the touch screen Isopropyl alcohol Ethyl alcohol Trichlorotriflorothane Do not wipe the touch screen using the following solvent with dry or hardmaterials which may damage the touch screen Water Ketone Aromatics Using the HIL1 for the first time This section provides basic information about how to start using your HIL 1 It co...

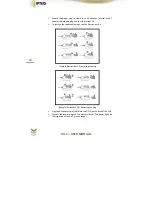
Page 23: ...ons 3 5 To remove the replaceable plugs see the illustrations 3 6 Sample Illustrations 3 5 Installing the plug Sample Illustrations 3 6 Removing the plug Plug the AC adaptor cord cable into the DC IN on the back of the HIL1 Connect the power plug to a live electrical outlet The power light on the right side of the HIL1 glows orange ...

Page 24: ...as described below Connecting the plug to a live electrical outlet should be the last step Otherwise the DC output plug could hold an electrical charge and cause an electrical shock or minor bodily injury when touched As a general safety precaution avoid touching any metal parts Never place your HIL1 or AC adaptor on a wooden surface furniture or any other surface that could be marred by exposure ...

Page 25: ...o the Step by step Setup section at the end of this Chapter to get more details Turning off the power If you are not going to use your HIL1 for a long time shut it down The HIL1 will bootto the operating system s main screen the next time it is turned on Press the Power button The system will ask to confirm the shutdown operation Select OK to turn off the HIL1 Important Notice Never turn off the p...

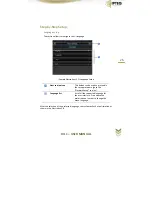
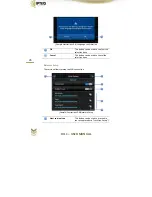
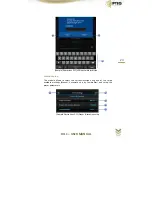
Page 26: ...ction icon This button can be used to proceed in the setup procedure go to the Network Setup section Language list List of all the supported language for the user interface Press above the preferred one in order to change the menu language After the selection of the preferred language the system will ask a confirmation as shown in the illustration 3 8 ...

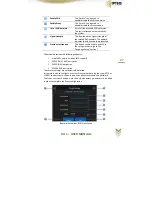
Page 27: ...be used to confirm the selection done Cancel This button can be used to cancel the selection done Network Setup This section allows tosetup theWiFi connection Sample Illustrations 3 9 Network Setup Next section icon This button can be used to proceed in the setup procedure Location Setup ...

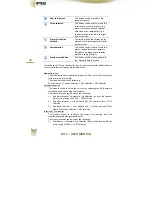
Page 28: ...ious section icon This button can be used to go back in the setup procedure go to the Language Setup section This module provides the following supports Visible APs only no hidden SSID support WPA1 TKIP AES encryption WPA2 AES encryption WEP 64 128 encryption The security settings are automatically detected It is possible also to configure a custom Proxy server defining the type HTTP or SOCKS the ...

Page 29: ...be used to cancel the proxy setup configuration Previous section icon This button can be used to go back to the Language Setup section Touch above the preferred WiFi network in order to establish a connection the system will show if needed the form to insert the WiFi password Press then the Connect button to confirm the typed password the system will show step by step the status of the connection ...

Page 30: ...1 WiFi password insertion Location Setup This module allows to select the current location using one of the three available methods Manual Automatic and by Coordinates and setup the prayer parameters Sample Illustrations 3 12 Prayer Location setup ...

Page 31: ...l Location This module allows to choose the current city from a pre built set of cities included in the Internal DB The tree of selection is the following Zone Selection Country Selection City Selection DST Selection Automatic location This module allows to setup the current city exploitingthe Wi Fi network information and the Google services data The tree of selection can be one of the following ...

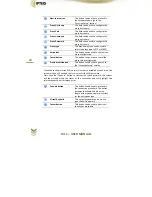
Page 32: ...one of the AWQAF cities in the Internal DB the AWQAF prayer times are used otherwise the system relies on the Formula In the latter case the Prayer Location setup appear as shown in the illustration 3 13 Sample Illustrations 3 13 Prayer Location setup Formula Prayer Time Parameters This button can be used to access the prayer parameters configuration Available only when the calculation method is s...

Page 33: ...Factor This button can be used to set the Maghrib safety factor in minutes Asr Calculation Method This button can be used to set the Asr Calculation Method Shafi Hanafi Fajr Calculation Method This button can be used to set the Fajr Calculation Method Twilight Angle Time Before Shurukh Isha Calculation Method This button can be used to set the Isha Calculation Method Twilight Angle Time After Magh...

Page 34: ...e Automatic Mode is disabled Time This section can be used to configure the current time available only when the Automatic Mode is disabled Time Zone This field indicates the Time Zone associated to the current location DST This switch can be used to enable disable the DST System time and prayer time can be affected if you enable disable this option Date Format This section can be used to choose t...

Page 35: ... this smart prayer clock Some of the features described in this manual may not function properly if you use an operating system that was not pre installed by Ipteq Thesubsequent sections cover with specific details the following topic Home Page Notification Area Digital Clock Area Alarms and Alerts Query Prayer Page Calendar Page Adages Page Settings Menu ...

Page 36: ...lable features onyour HIL1 and will be the first screen displayed once completed the Initial Setup Sample Illustrations 4 1 Home Page Power supply icon This icon indicates to the user when the power supplier is connected disconnected For further details please see the Notification Area section ...

Page 37: ... the graphical countdown for the enjoined prayer and the Nawafel Prohibited period see the section Alert to get more details Digital Clock This is the area reserved for the digital clock that displays during the normal operation the following information using the fade in fade out effects endless slideshow current time current date and current location see the section Digital Clock to get more det...

Page 38: ...yer icon This button can be used to access the Query Prayer Page Current Prayer Item of the prayer carousel that indicates the current prayer Notification Area The Notification Area located in the top side of the screen manages and displays all the asynchronous events Power supply events When the power supply is connected the related icon power plug is displayed for few seconds in the notification...

Page 39: ...rver is not reachable the related blinking icon WiFi signal covered by an exclamation mark is displayed until a usable connection is established again WiFi Signal Icon Strikethrough WiFi Signal Icon WiFi Signal Exclamation mark Update events The system automatically checks for new software updates one time at day When a new software is available the related icon is shown in the notification area t...

Page 40: ...ion Sample Illustrations 4 2 Digital Clock Slideshow Normal Operation During the prayer alerts enjoined and optional prayer in this area are displayed alternatively the current time and the current prayer name using the fade in fade out effects Sample Illustrations 4 3 Digital Clock Slideshow Prayer Alert Alarms Alerts The Prayer Clock HIL 1 is able to manage the following kind of alarms Enjoined ...

Page 41: ...Before the Event Display a numerical countdown to the Fajr is displayed in the main carousel Audio none At start of the graphical countdown set by the user Display a numerical countdown to the Fajr is displayed in the main carousel Display a graphical countdown to the Fajr white arc is displayed in the Analog Clock Audio none At occurrence Display prayer name prayer time flashing for 3 seconds Aud...

Page 42: ...alog Clock Audio none At occurrence Display prayer name prayer time flashing for 3 seconds Audio 1 beep Event in progress Display Athan text synchronized with the audio Audio Athan After Athan completion Display Duaa text Audio Duaa After Duaa completion Display prayer name prayer time for 5 minutes Audio none Asr Alert The Asr Alert consists of the following steps Before the Event Display a numer...

Page 43: ...one Maghrib Alert The Maghrib Alert consists of the following steps Before the Event Display a numerical countdown to the Maghrib is displayed in the main carousel Audio none At start of the graphical countdown set by the user Display a numerical countdown to the Maghrib is displayed in the main carousel Display a graphical countdown to the Maghrib white arc is displayed in the Analog Clock Audio ...

Page 44: ...og Clock Audio none At occurrence Display prayer name prayer time flashing for 3 seconds Audio 1 beep Event in progress Display Athan text synchronized with the audio Audio Athan After Athan completion Display Duaa text Audio Duaa After Duaa completion Display prayer name prayer time for 5 minutes Audio none Optional Prayer Alerts In addition to performing the stated enjoined prayers some Muslims ...

Page 45: ...riod during sunrise SHURUKH which is the period of time between 15 to 30 minutes from Shurukh until the Sun is up a certain distance above the horizon This period is referred to as NAWAFEL PROHIBITION PERIOD Tahajud Alert The Tahajud Alert consists of the following steps At occurrence Display prayer name prayer time flashing for 3 seconds Audio 5 beep Event in progress Display Tahajud Verse text A...

Page 46: ...completion Display Nawafel Resumption time for 5 minutes Audio none Wake Up Alerts The HIL 1 allows to set customized Wake up alarms no more than 10 alarms providing the option to configure the alert tone the alert type single shot daily weekly the snooze repetition and the snooze interval In the Settings menu you can choose whether enable disable the WakeUp sound during the prayer event When this...

Page 47: ...revious and next days Previous day icon This button can be used to switch the current view to the previous day of the year Current date The prayer times exposed in the list are related to this specific date Next day icon This button can be used to switch the current view to the next day of the year Disabled alert This icon informs that the alert for that specific prayer is disabled Active Alert Th...

Page 48: ...e year The HIL 1 calendar supports The Gregorian Calendar Format The Hijri Calendar Format The possibility to define a custom offset for the Hijri calendar 2 days in order to align the calendar to the lunar phases The possibility to consult the prayer times for each day of the year Previous month icon This button can be used to switch the current view to the previous month of the year ...

Page 49: ...tch the current view to the next month of the year Current day The current day is highlighted as shown in the following figure Sample Illustrations 4 6 Calendar Page Adages Page Unique religious adages are displayed on the display unit for every day of the lunar year in one of the selected languages Arabic Urdu French or English ...

Page 50: ...gle page adages Single adage spanning two pages Single adage spanning three pages In each of the above situations adages are displayed alternatively page by page in a fade in fade out fashion In the case of single adages two different adages are displayed for a particular day While for two or three page adage a single adage is displayed with each page displayed alternatively The dots at the bottom...

Page 51: ...s to configure all the relevant parameters that will be used to calculate the prayer times day by day and customize the HIL 1 experience Sample Illustrations 4 7 Settings Menu Alert Audio Settings Menu to configure Alerts Prayer Countdown Athan Call audio Volume ...

Page 52: ... s also a smart Help Alerts Audio Alerts Tahajud Allows to enable disable Tahajud Alert and its offset from Fajr Emsak Allows to enable disable Emsak Alert Al Goudwa Allowsto enable disable Al Goudwa Alert and its offset from Shurukh Shurukh Allows to enable disable Shurukh Alert Nawafel Resumption Allows to enable disable Nawafel Resumption Alert and its offset The Nawafel Resumption section is a...

Page 53: ...g the prayer event If disabled the system will prompt a warning message to inform that if an overlap of events occurs Prayer Alert and Wakeup Alert the Wakeup audio won t be reproduced List Of Alarms List of the wake up alarms configured by the user A single WakeUp alarm can be edited or deleted by pressing above it and following the instruction on the screen Create New Alarm Allows to create cust...

Page 54: ...ocation Location Setup Allows the user to select the current location using one of the three available methods Manual Automatic and by Coordinates Manual Location Allows the user to select the current city from a pre built set of cities included in the Internal DB The tree of selection is the following Zone Selection Country Selection City Selection DST Selection Automatic location Allows the user...

Page 55: ...ws to set all the Formula parameters in order to increase the accuracy of the calculation method This section is available only when the calculation method is set to Formula Duhr Safety Factor Allows to set the Duhr safety factor ASR Calculation Method Allows to set the ASR calculation method Maghrib Safety Factor Allows to set the Maghrib safety factor Isha Calculation Method Allows to set the Is...

Page 56: ...Brightness Allows to enable disable the automatic brightness control Brightness Slider Allowsto set the preferred brightness value Network This section allows tosetup theWiFi connection This module provides the following supports Visible APs only no hidden SSID support WPA1 TKIP AES encryption WPA2 AES encryption WEP 64 128 encryption The security settings are automatically detected It is possible...

Page 57: ...d holding the Settings icon for 20 seconds in the main control bar after the confirmation the factory settings will be restored Enable Allows to enable disable the pass code feature Set Code Allows to set a new pass code Device Software Updates Checks for a new software and if available update the system to the latest version Internet Update This module contacts an IPTEQ s Server to understand if ...

Page 58: ...ice will appear as just bought in terms of software The system asks a confirmation before proceed Info Product Information Software Version Web Site Contacts and Copyright Help Smart Help menu to explain the basic features of the device Battery Status Indication of the charge level of the internal battery ...

Page 59: ...ttings Device Software Updates 2 Choose one of the two available options a Internet Update b SDcard Update 3 Follow the on screen instruction to complete the installation Note To update the firmware using the SD card please visit the website www ipteq com to get the last firmware and then 1 Copy the new firmware in the SD card 2 Connect the SD card into the HIL 1 3 Start the upgrade procedure from...

Page 60: ...low 1 Tap Settings Device Restore Factory Settings 2 The Settings Reset will be done Please note that the following data will be erased System settings and application settings Data in the removable media will not be erased Factory Software Reset The HIL 1 provides you with the function to reset it and restore the original factory software To perform the factory reset please follow the steps below...

Page 61: ...stroy valuable information which is helpful in resolving this problem Observe what is happening write down what the system is doing and what actions you performed immediately before the problem occurred Make a screenshot of the current display Please also be aware that the questions and procedures described in this chapter are meant only as a guide they are not definitive problem solving technique...

Page 62: ...ors forloose pins Always try to make detailed notes of your observations and keep them in apermanent error log this will help you to describe your problems to Ipteq Support In addition if a problem recurs the log you have made will help to identify the problem faster Hardware and system checklist This section discusses problems caused by your HIL1 s hardware orattached peripherals Basic problems m...

Page 63: ... your audio device Problem Procedure No sound is heard Adjust the volume Check the software volume settings Please check to see if system sound is muted Check to make sure the headphone connection is secure Wireless LAN If the following procedures do not restore LAN access consult your LAN administrator Problem Procedure Cannot access Wireless LAN Make sure the HIL1 s Wireless communication functi...

Page 64: ... a problem occurs when you are running software applications consult the software documentation for troubleshooting suggestions and consider calling the software company s technical support department for assistance Consult the reseller or dealer from where you purchased your HIL1 and or software they are your best resource for current informationand support Ipteq technical support If you are stil...

Page 65: ... Cortex A8 Frequency 1GHz System OS System OS Android 2 3 OSD Default language English Multi Language English French Arabic Urdu RAM Capacity 512MB NAND Flash Capacity 4GB LCD Panel LCD Size 7 Digital Resolution 800 480 BackLighting TFT LED Touch Panel Touch Capacitive WiFi Module Standard 802 11 b g Bluetooth Module Standard BT 2 1 USB OTG 1 Sensor Light Sensor 1 ...

Page 66: ...s support Format OGG Picture Format JPEG BMP Resolution Up to 8000 8000 Standard Accessories AC Adapter User Manual Warranty Card Other Clean cloth Certifications CE RoHS SASO GOST ETL Physical Dimensions Size 200 h x 120 w x 60 d millimeters not including parts that extend beyond the main body Weight 400g Environmental Requirements Condition Ambient Temperature Relative Humidity Operating 5 C 41 ...

Page 67: ...L 66 temperature Condition Altitude from sea level Operating 0 to 6 561 feet 2 000 meters Non Operating 0 to 40 000 feet 12 192 meters Power Requirements AC Adaptor 100 240V AC 50 or 60 Hz cycles per second HIL 1 5V DC ...

Page 68: ...ification mark of the Wi Fi Alliance Bluetooth wireless technology interoperability Bluetooth Cards are designed to be interoperable with Bluetooth wirelesstechnology that is based on Frequency Hopping Spread Spectrum FHSS radio technology and is compliant to Bluetooth Specification depending on the model you purchased asdefined and approved by the Bluetooth Special Interest Group Logo certificati...

Page 69: ...mmendations Ipteq believes Wireless products is safe for use by consumers These standards andrecommendations reflect the consensus of the scientific community andresult from deliberations of panels and committees of scientists who continually review and interpret the extensive research literature In some situations or environments the use of wireless products may be restricted by the proprietor of...

Page 70: ...Federation Only for indoor applications To remain in conformance with European spectrum usage laws for Wireless LAN operation the above 2 4GHz channel limitations applies for outdoor usage The user should use the wireless LAN utility to check the current channel of operation If operation is occurring outside of the allowable frequencies for outdoor use as listed above the user must contact the app...

Page 71: ...formation Caution Exposure to Radio Frequency Radiation The radiated output power of the wireless device is far below the FCC radiofrequency exposure limits Nevertheless the wireless device shall be used in such a manner that the potential for human contact during normal operation is minimized The installer of this radio equipment must ensure that the antenna is located or pointed in such a way th...

Reviews: