background image


QUICKSTART GUIDE


Make sure that the items listed below are included in the box: 

  Quick Start Guide 

  Safety Instructions and Warranty Information Booklet 

  EZ Vinyl/Tape Converter Software CD 

 Pre-Mounted 

Needle 

 Pre-Mounted 

Slipmat 

  45 RPM Adapter 

  USB Cable  

  USB-to-AC Power Supply 


READ SAFETY INSTRUCTION BOOKLET BEFORE USING THE PRODUCT 

Go to 

http://www.ionaudio.com

 for product registration. 


 INTRODUCTION 

 
You should install EZ Vinyl/Tape Converter to take advantage of computer 
recording. EZ Vinyl/Tape Converter is the quickest and easiest way to turn your 
recordings into digital media. EZ Vinyl/Tape Converter conveniently saves your 
recordings in your iTunes* library. We have included a handy software Quickstart 
Guide with step-by-step instructions on software installation and operation. 
 
To install the software: simply insert the included CD into your computer and follow 
the on-screen instructions. After you finish converting your vinyl, you can then burn to CD or load onto portable media devices.  
 
Visit 

www.ionaudio.com/computer-optimization

 for more information on optimizing your computer for audio. 


* iTunes is a trademark of Apple, Inc., registered in the U.S.A. and other countries.


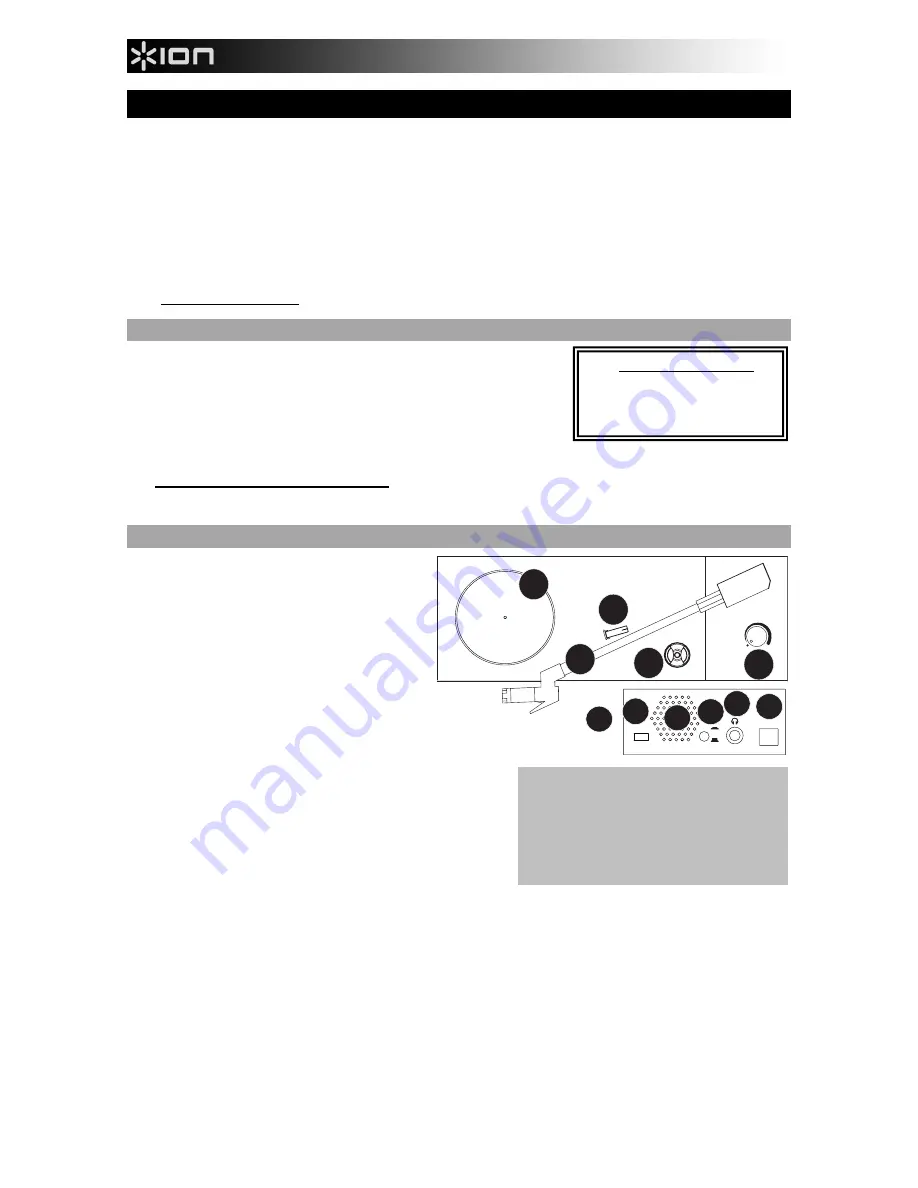
FEATURES


1. 

PLATTER – 

Place your record here. 


2. 

TONEARM –

 LP2GO comes with a ready to use 

pre-balanced tonearm and cartridge.  

3. 

ARM CLIP – 

This specially designed arm clip 

secures the tonearm while at rest or when not in 
use. The arm clip has been designed to remain in 
the up position while unlocked. When a record is 
on the platter, place the arm clip down to avoid 
scratching your vinyl.  

4. 

45 RPM ADAPTER HOLDER – 

Holds the 

included 45 RPM adapter. When not using the 
adapter, please place it in this holder.  

5. 

VOLUME/POWER KNOB – 

To power on LP2GO, turn this knob clockwise 

until it clicks. When powered on, use this knob to adjust the 
volume. To turn off LP2GO, turn this knob counterclockwise until 
it clicks. 

6. 

33 / 45 SWITCH – 

This switch controls the RPM of the turntable 

platter. 

7. 

SPEAKER – 

The record's audio will be played through this built-

in speaker. 

8. 

USB/BATTERY SWITCH – 

When the switch is in the “down” 

position, the turntable will be powered through a USB connection 
– the USB AUDIO OUTPUT connected to either (A) your computer or (B) wall power, using the included USB-to-AC 
power supply. When the switch is in the “up” position, the turntable will be powered by batteries (if batteries are installed). 

9. 

HEADPHONE OUTPUT – 

Connect 1/8" stereo headphones here (not included). The speaker output stops playing audio 

once headphones are connected.   

10. 

USB PORT –

 Use the included USB cable to connect your turntable to your computer. The USB connection will provide 

power to the turntable as well as the audio from the turntable to your computer. You can also power the turntable by 
using the included USB cable and USB-to-AC power supply to connect your turntable to wall power. 

Note:

 LP2GO may appear as “

USB Microphone

” or “

USB Composite Device

” in your computer’s sound control panel 

(even though the included EZ Vinyl/Tape Converter manual says it appears as “

USB Audio Codec

”). 

11. 

BATTERY COMPARTMENT – 

Remove the cover and place 4 AA batteries into this compartment. Be sure the positive 

and negative poles of the batteries are facing the proper direction.


IMPORTANT: 

Make sure that the slipmat is 

always placed on top of the platter while using 
the turntable.  Failure to use the slipmat may 
cause damage to your media as well as damage 
to the turntable. 

Remove the plastic cartridge cover (needle 
cover) before operating the turntable. 

Visit 

www.ionaudio.com/ezvc

 to 

download the latest version of EZ 
Vinyl/Tape Converter software or for 
helpful troubleshooting guide and 
additional support.   

c

ON

ON
OFF

OFF

1

2

3

4

5

33/45

USB

USB

BATT

7 8

9 10

11

6

Summary of Contents for LP2GO

Page 1: ...1 QUICKSTART GUIDE ENGLISH 2 4 GU A DE INICIO R PIDO ESPA OL 5 7 GUIDE D UTILISATION RAPIDE FRAN AIS 8 10 GUIDA RAPIDA ITALIANO 11 13 KURZANLEITUNG DEUTSCH 14 16 SNELSTARTGIDS NEDERLANDS 17 19...

Page 2: ...ntil it clicks When powered on use this knob to adjust the volume To turn off LP2GO turn this knob counterclockwise until it clicks 6 33 45 SWITCH This switch controls the RPM of the turntable platter...

Page 3: ...Place the record on the platter 4 Select speed 33 45 RPM use the included 45 RPM adapter if needed 5 Lower the tonearm onto record the record will begin playing 6 Adjust volume with ON OFF knob 7 Whe...

Page 4: ...mono instead of stereo Recording input properties in Vista not set to stereo In Vista you may need to manually specify stereo for the recording input Go to Start X Control Panel X Sound in Classic Vi...

Page 5: ...ndida use esta perilla para ajustar el volumen Para apagar el LP2GO gire esta perilla en sentido antihorario hasta que se escuche un clic 6 CONMUTADOR DE 33 45 RPM Este conmutador controla las RPM del...

Page 6: ...o sobre el plato 4 Seleccione la velocidad 33 45 RPM use el adaptador para 45 RPM incluido si es necesario 5 Baje el brazo sobre el disco ste comenzar a reproducirse 6 Ajuste el volumen con la perilla...

Page 7: ...ecesario especificar manualmente stereo para la entrada de grabaci n Vaya a Start X Control Panel X Sound Inicio Panel de Control Sonido en la vista cl sica Luego haga clic en la pesta a Recording Gra...

Page 8: ...entendre Lorsqu il est sous tension utilisez ce bouton pour r gler le volume Afin de mettre le LP2GO hors tension veuillez tourner ce bouton dans le sens antihoraire jusqu ce qu un clic se fasse ente...

Page 9: ...sur le plateau 4 S lectionnez la vitesse de lecture 33 45 tr min utilisez l adaptateur si n cessaire 5 Abaissez le bras de lecture sur le disque La lecture devrait d buter 6 Vous pouvez ajuster le vo...

Page 10: ...r o Les param tres d entr e pour l enregistrement ne sont pas r gl s st r o Dans Vista il se peut que vous deviez r gler manuellement l entr e d enregistrement st r o Allez D marrer X Panneau de conf...

Page 11: ...allo scatto Una volta acceso l apparecchio servirsi di questa manopola per regolare il volume Per spegnere l LP2GO girare questa manopola in senso antiorario fino allo scatto 6 INTERRUTTORE 33 45 GIR...

Page 12: ...ul piatto 4 Selezionare la velocit 33 45 giri servirsi dell adattatore a 45 giri se necessario 5 Abbassare il braccio poggiandolo sul disco il disco inizier a suonare 6 Regolare il volume servendosi d...

Page 13: ...trazione in Vista non sono impostate su stereo In Vista va specificato stereo per l ingresso di registrazione Recarsi su Start X Pannello di controllo X Suono in Visuale Classica Quindi cliccare sulla...

Page 14: ...ltet ist verwenden Sie diesen Regler um die Lautst rke einzustellen Um LP2GO abzuschalten drehen Sie diesen Regler gegen den Uhrzeigersinn bis er einrastet 6 33 45 RPM SCHALTER Regelt die Geschwindigk...

Page 15: ...den Teller 4 W hlen Sie die Geschwindigkeit 33 45 RPM Verwenden Sie den beiliegenden 45 RPM Adapter wenn n tig 5 Senken Sie den Tonarm auf die Platte Die Platte wird nun abgespielt 6 Stellen Sie die L...

Page 16: ...in Vista stehen nicht auf Stereo In Vista m ssen Sie m glicherweise f r die Aufnahme den Stereo Mode manuell ausw hlen Gehen Sie auf Start f Systemsteuerung f Sound in der klassischen Ansicht Klicken...

Page 17: ...het luidsprekervolume aan te passen wanneer het apparaat aanstaat Draai deze knop naar links tot hij klikt om de LP2GO uit te zetten 6 SCHAKELAAR 33 45 TOEREN deze schakelaar controleert het toerental...

Page 18: ...de plaat op de draaitafel 4 Selecteer snelheid 33 45 tpm gebruik indien nodig de meegeleverde 45 toerenadapter 5 Laat de toonarm op de plaat zakken de plaat begint te spelen 6 Pas het volume aan met d...

Page 19: ...eo Ingangseigenschappen voor opname onder Vista zijn niet ingesteld op stereo In Vista kan het nodig zijn handmatig stereo te selecteren voor opnemen Ga naar Start X Configuratiescherm X Geluid in Kla...

Page 20: ...www ionaudio com MANUAL VERSION 1 0...

Reviews: