This
Quick Start Guide
shows how to assemble and setup the Ioline
I/S, SC-40 and SC-48 model cutters. Consult the
SmarTrac User
Guide
on the CD-ROM for more detailed information about installa-
tion and operation. The
User Guide
may be printed from the pro-
vided Adobe
®
Acrobat
®
viewer if necessary.
Step 1: Unpack
Remove the cutter, stand parts, and
Accessory Kit
from the box.
Check the
Packing List
. Always use two people when lifting the cut-
ter, one person at each end. Save all of the packing materials.
Required tools
n
Phillips screw driver
n
7
/
16
-in wrench
Step 2: Assemble the Stand
(Optional for I/S 60 model)
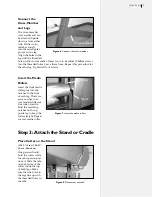
Attach the Feet
Attach one foot to
each leg using three
1.5-in (long) Phillips
screws and three
7
/
16
-
in hex nuts. Repeat
this procedure for
the other leg. Screw
all of the leg level-
ers halfway into the
ends of the stand
feet. Thread all four
levelers in equally to
ensure your cutter is
level and stable.
Figure 5.
Attach the feet.
Leveler
Leg
Foot
Caution: The SmarTrac
is heavy and could cause
injury if it falls. A minimum
of two people are required to
safely unpack the plotter and at-
tach it to the stand or cradle. One
person should hold the machine
while the second person screws it
to the legs.
Caution
Figure 4.
Proper lifting pro-
cedure. Requires two people.
Quick
Setup


