background image

82

Installing Heatsinks on High-Power Drives

If you plan to use SCSI drives whose power exceeds 15 watts, you must install heatsinks on those
drives.

CAUTION

If you install high-power drives, you must also install additional system
fans.  This requires that you work inside the chassis and that you are a
technically qualified service technician.  See “Installing Fans for High-
Power Drives” (page 106) in part two of this document, “Service
Technician’s Guide.”

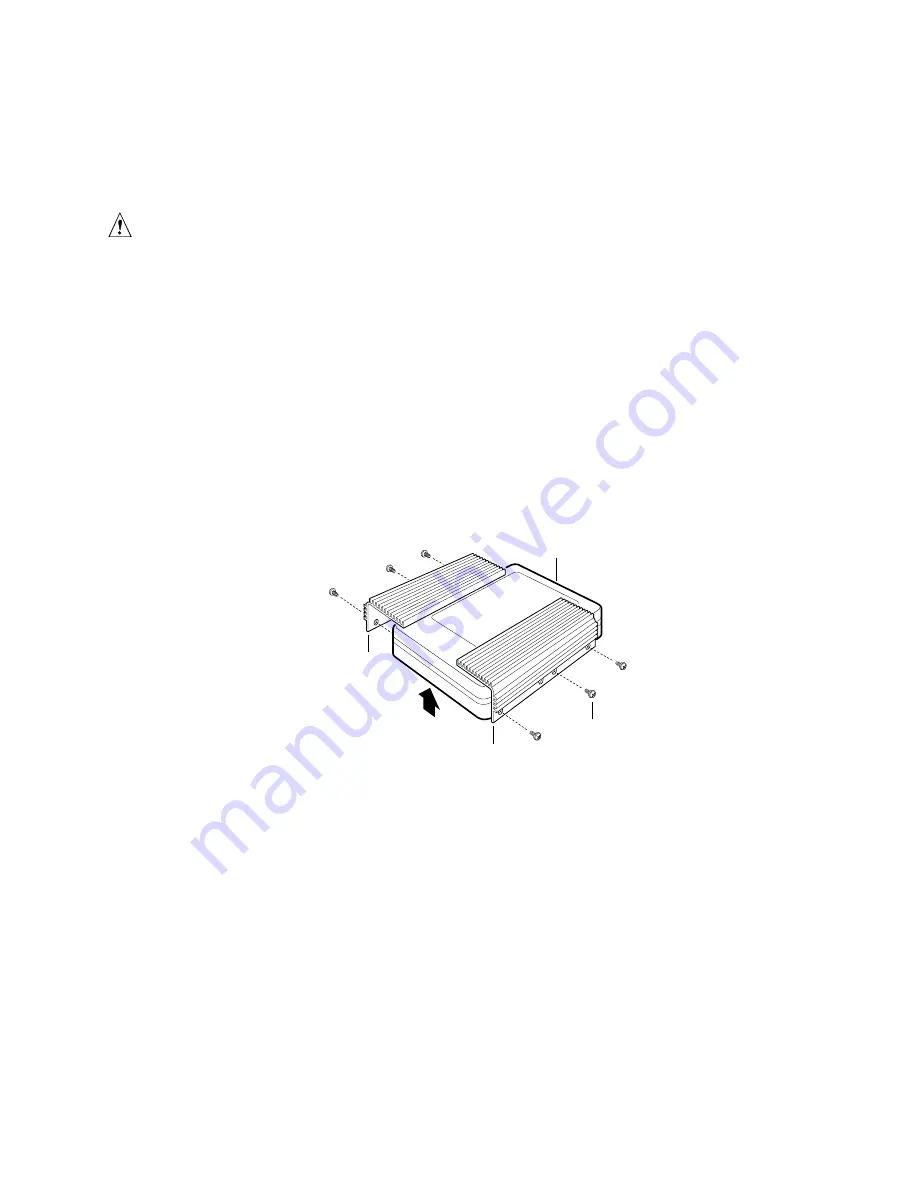
1.  Position each heatsink (B in Figure 21) so that the three screw holes in the heatsink align with

their corresponding holes in the hard drive.  The holes are spaced apart so that you can position
the heatsink in only one way:  with the fins extending along the side and the top of the hard
drive.  The “top” of the drive has the label (C in Figure 21); the “bottom” has the exposed
circuit board (A).

2.  Use three screws (D) to attach each heatsink to the drive.
3.  To insert the drive into the hot-docking bay, you must attach a carrier to the drive.  See

“Mounting a SCSI Hard Disk Drive in a Plastic Carrier” on page 79.

OM07168

C

B

A

B

D

Figure 21.  Installing Two Heatsinks

Summary of Contents for SC450NX - Server Platform - 0 MB RAM

Page 1: ...SC450NX MP Server System Product Guide Order Number 700059 002 ...

Page 2: ...ent may be copied or reproduced in any form or by any means without prior written consent of Intel An Intel product when used in accordance with its associated documentation is Year 2000 Capable when upon installation it accurately stores displays processes provides and or receives date data from into and between the twentieth and twenty first centuries including leap year calculations provided th...

Page 3: ...s 19 Baseboard Connector and Component Locations 20 Processor 21 Memory 22 Peripherals 24 Super I O Chip 24 Add in Board Slots 24 Video 25 SCSI Controller 25 IDE Controller 26 Keyboard and Mouse 26 Server Management 27 Baseboard Management Controller BMC 27 System Security 28 Mechanical Locks and Monitoring 28 Software Locks via the SSU or BIOS Setup 28 3 Configuration Software and Utilities Hot K...

Page 4: ...r Control Operations 63 Phonebook 65 Management Plug ins 66 FRU and SDR Load Utility 69 When to Run the FRUSDR Load Utility 69 What You Need to Do 69 How You Use the FRUSDR Load Utility 69 Cleaning Up and Exiting 73 Upgrading the BIOS 74 Preparing for the Upgrade 74 Upgrading the BIOS 75 Recovering the BIOS 76 Changing the BIOS Language 76 Using the Firmware Update Utility 76 Running the Firmware ...

Page 5: ... Peripheral Drives 97 Drive Cabling Considerations 97 Installing a 5 25 inch Peripheral in the Front Bay 98 Removing a 5 25 inch Peripheral from the Front Bay 101 Fans 102 Removing the System Fan Assembly 102 Installing the System Fan Assembly 103 Removing an Individual System Fan 103 Installing an Individual System Fan 105 Installing Fans for High Power Drives 106 6 Upgrading Baseboard Components...

Page 6: ...racters Are Distorted or Incorrect 128 System Cooling Fans Do Not Rotate Properly 128 Diskette Drive Activity Light Does Not Light 128 Hard Disk Drive Activity Light Does Not Light 129 CD ROM Drive Activity Light Does Not Light 129 Network Problems 129 PCI Installation Tips 129 Problems with Application Software 130 Bootable CD ROM Is Not Detected 130 Error and Informational Messages 130 POST Code...

Page 7: ...and Configuration Worksheets Equipment Log 163 Configuration Worksheets 165 Current Usage 165 SSU Worksheets 166 B Regulatory Specifications Regulatory and Environmental Specifications 177 Environmental Specifications 177 Declaration of the Manufacturer or Importer 177 Safety Compliance 177 Electromagnetic Compatibility EMC 178 C Warnings WARNING English US 182 AVERTISSEMENT Français 184 WARNUNG D...

Page 8: ...viii ...

Page 9: ...9 Part I User s Guide 1 Chassis Description 2 Baseboard Description 3 Configuration Software and Utilities 4 Exchanging SCSI Hard Drives and Power Supplies ...

Page 10: ...10 blank page ...

Page 11: ... MP Server System Rack Pedestal Kit Installation Guide accompanying your kit Table 1 SC450NX MP Server Physical Specifications Specification Pedestal Mode Rack Mode Height 48 26 cm 19 inches 7u Width 31 12 cm 12 25 inches 19 inch rack Depth 63 5 cm 25 inches 25 inches Weight 38 25 kg 85 lbs minimum configuration 45 kg 100 lbs maximum configuration 38 25 kg 85 lbs minimum configuration 45 kg 100 lb...

Page 12: ... inch wide bays that are externally accessible designed to hold half height standard removable media devices the bays can be converted into a single full height bay Also one externally accessible bay can hold up to six one inch drives with an optional SCSI backplane or up to two drives without the backplane Expansion slot covers Up to eight slot covers can be used every slot opening that does not ...

Page 13: ... for LESS THAN four seconds enters sleep mode which requires an ACPI compliant OS holding it down for MORE THAN four seconds enters service mode which powers down the electronics bay but leaves hot swap and peripheral bays running E Reset button F Front panel LEDs Top to bottom top five are power on disk bay power on HDU activity fan failure power supply failure bottom six are hard drive activity ...

Page 14: ...monitor connector C Serial port A COM1 D Serial port B COM2 E Mouse connector F Keyboard connector G Universal serial bus connector H Expansion slot covers six slot connectors provided on baseboard I Power supply bay J AC input power connector K Power supply fan L Power supply LED M Power supply failure LED LED not lit means failure ...

Page 15: ...gure 5 Chassis Side View A Front swing out subchassis B Diskette drive C Main chassis D Power backplane E Power supply s F Baseboard G Lift out electronics bay H 5 25 device bay I SCSI hard drive bay J Foam cover K Foam fan housing L Foam fan housing cover ...

Page 16: ...rmation on how and when to install heatsinks see Installing Heatsinks on High Power Drives on page 82 For information on how and when to install extra fans see Installing Fans for High Power Drives on page 106 A single metal EMI shield and plastic door cover the drive bays A hot docking bay is provided for drives that are 3 5 inches wide and 1 inch high Drives can consume up to 22 watts of power a...

Page 17: ...24 V at 50mA 12 V at 0 5 A 5 V standby 1 5 A Power is sourced through the power cable to the 20 pin main connectors on the baseboard Remote sensing signals are provided through the cable to the 14 pin auxiliary connector on the baseboard System Cooling The minimum chassis configuration includes three fans for cooling and airflow and can accept up to five more The number of additional fans depends ...

Page 18: ...18 Blank page ...

Page 19: ...oller Cirrus Logic GD5480 PCI narrow SCSI controller Symbios SYM53C810AE PCI B Four expansion connectors one physically shared with the ISA slot and one embedded device Wide Ultra Ultra II SCSI controller Symbios SYM53C896 ISA bus One expansion slot for add in boards shared with a PCI B slot Embedded PC compatible support serial parallel mouse keyboard diskette Server Management Thermal voltage mo...

Page 20: ...nnector J8E1 H PCI slots B4 closest to ISA B3 B2 B1 A3 and A2 farthest from ISA BB Processor 4 Slot 2 connector J9E1 I Memory module connector J3G1 CC IDE connector J9E2 J ICMB connector J1E1 DD Diskette drive connector J9E3 K PCI slot A1 J2D1 EE Auxiliary power connector J9E4 L Video and parallel port connectors J1C1 FF USB internal header JC9F14 M Serial port connector J1B2 GG SMBus connector J9...

Page 21: ...rations and complies with ANSI IEEE standard 754 1985 Each S E C cartridge connects to the baseboard through a 330 pin Slot 2 edge connector The cartridge is secured by a retention module attached to the baseboard Depending on configuration your system has one to four processors The processor external interface is MP ready and operates at 100 MHz The processor contains a local APIC unit for interr...

Page 22: ...e The 16 slots are divided into four banks of four slots each labeled A through D These banks support 4 1 interleaving The memory controller supports EDO DRAMs The ECC used for the memory module is capable of correcting single bit errors SBEs and detecting 100 percent of double bit errors over one code word Nibble error detection is also provided J16 J15 J12 J11 J8 J7 J3 J4 J14 J13 J10 J9 J6 J5 J1...

Page 23: ...and UNIX MS DOS does not use extended memory however some MS DOS utility programs like RAM disks disk caches print spoolers and windowing environments use extended memory for better performance BIOS automatically detects sizes and initializes the memory array depending on the type size and speed of the installed DIMMs and reports memory size and allocation to the system via configuration registers...

Page 24: ...address and interrupt When disabled the interrupt is available to add in boards Add in Board Slots The baseboard has one ISA slot that is full length if the wide SCSI B slot is not used and half length if the wide SCSI B slot is used the ISA slot supports slave only boards and is shared with PCI B slot 4 The ISA has three embedded devices the Super I O chip Baseboard Management Controller BMC and ...

Page 25: ... mode It provides programmable active negation PCI zero wait state bursts of faster than 110 MB sec at 33 MHz and SCSI transfer rates from 5 to 10 MB sec The narrow SCSI comes in a 100 pin rectangular plastic quad flat pack PQFP and provides an AND tree structure for testing component connectivity The Sym53C896 wide contains a high performance SCSI bus interface It supports SE mode with 8 bit 10 o...

Page 26: ...cable can support two devices one at the end of the cable and one six inches from the end Keyboard and Mouse The PS 2 compatible keyboard and mouse connectors are mounted in a single stacked housing with the mouse connector over the keyboard External to the system they appear as two connectors The user can plug in the keyboard and mouse to either connector before powering up the system BIOS detect...

Page 27: ... for analysis by field service personnel using system management tools like Intel LANDesk Server Manager Because the BMC is powered by 5V_Standby SEL and SDRR information is also available via the interperipheral management bus IPMB An emergency management board like the Intel LANDesk SMM board can obtain the SEL and make it remotely accessible using a LAN or telephone line connection During monit...

Page 28: ...e to prevent keyboard or mouse input and to prevent use of the front panel reset and power switches Activate a hot key combination to enter secure mode quickly Disable writing to the diskette drive when secure mode is set Using Passwords If you set and enable a user password but not an administrator password enter the user password to boot the system and run the SSU If you set and enable both a us...

Page 29: ... the system boots from CD or diskette and disables the secure mode If you have not yet installed a CD ROM drive if there is no CD in the drive or diskette in drive A the system boots from drive C and automatically goes into secure mode All enabled secure mode features go into effect at boot time To leave secure mode Enter the correct password s Disable writing to diskette In secure mode the system...

Page 30: ...enable Password on Boot through Setup or the SSU Once set passwords can be disabled by setting the password to a null string or by changing the Clear Password jumper See Security Menu page 41 or to change a jumper see Baseboard Jumpers page 151 Boot without keyboard The system can boot with or without a keyboard Before the system boots during POST BIOS automatically detects and tests the keyboard ...

Page 31: ...ware CD or from a set DOS bootable diskettes See the printed Quick Start Guide to make a set of SSU diskettes Information entered via the SSU overrides information entered via Setup 46 Emergency Management Port EMP Console Use to access and monitor the server remotely 57 FRUSDR Load Utility Use to update the Field Replacement Unit FRU Sensor Data Record SDR and Desktop Management Interface DMI fla...

Page 32: ...tinues and this message appears Press Ctrl C to enter SCSI Utility 4 Press Ctrl C if SCSI devices are installed When the utility opens follow the displayed instructions to configure the onboard SCSI host adapter settings and to run the SCSI utilities Also see Using the Symbios SCSI Utility on page 77 If you do not enter the SCSI utility the boot process continues 5 Press Esc during POST to access ...

Page 33: ...on about a board Alter system resources e g interrupts memory addresses I O assignments to user selected choices instead of choices selected by the BIOS resource manager Record Your Setup Settings If the default values ever need to be restored after a CMOS clear for example you must run Setup again Referring to the worksheets could make your task easier If You Cannot Access Setup If the diskette d...

Page 34: ... menus and several submenus 1 Main Menu Primary IDE Master and Slave Keyboard Features 2 Advanced Menu PCI Configuration PCI Device Embedded SCSI PCI Devices I O Device Configuration Advanced Chipset Control 3 Security Menu 4 Server Menu System Management Console Redirection 5 Boot Menu Boot Device Priority Hard Drive 6 Exit Menu To Press Get general help F1 or Alt H Move between menus Go to the p...

Page 35: ...e 8 lists the selections you can make on the Main Menu itself Use the submenus for other selections Default values are in bold Table 8 Main Menu Feature Choices Description System Time HH MM SS Sets the system time System Date MM DD YYYY Sets the system date Legacy Diskette A Disabled 360 KB 720 KB 1 44 MB 2 88 MB Selects the diskette type Legacy Diskette B Disabled 360 KB 720 KB 1 44 MB 2 88 MB S...

Page 36: ...per track This field is available only for Type User This field is informational only for Type Auto Maximum Capacity N A Computed size of drive from cylinders heads and sectors entered This field is available only for Type User This field is informational only for Type Auto Multi Sector Transfers Disabled 2 4 8 or 16 sectors Determines the number of sectors per block for multisector transfers This...

Page 37: ...Yes Select Yes if you are booting a Plug and Play capable OS Reset Configuration Data No Yes Select Yes if you want to clear the system configuration data during next boot System automatically resets to No in next boot PCI Configuration N A Enters submenu I O Device Configuration N A Enters submenu Use Multiprocessor Specification 1 1 1 4 Selects the version of multiprocessor specification to use ...

Page 38: ...ime in units of PCI bus clocks that a device can be master on a PCI bus Typically option ROM code overwrites the value set by the BIOS PCI Devices Submenu Table 13 PCI Devices Submenu Feature Choices Description Option ROM Scan Enabled Disabled Enables option ROM scan of all devices other than the onboard SCSI controllers Enable Master Enabled Disabled Enables all devices other than the onboard SC...

Page 39: ...COM port B Interrupt IRQ 4 IRQ 3 Selects the interrupt for COM port B Parallel Port Disabled Enabled Auto OS Controlled Auto forces BIOS to configure the port OS Controlled displays when OS controls the port Mode ECP Output only Bidirectional EPP Selects mode for parallel port Base I O Address 378 278 Selects the base I O address for parallel port Interrupt IRQ 5 IRQ 7 Selects the interrupt for pa...

Page 40: ... For Core Clock Frequency to System Bus ratios equal to two BIOS automatically disables the L2 cache ISA Expansion Aliasing Enabled Disabled When enabled every I O access with an address in the range x100 x3FFh x500 x7FFh x900 xBFF and xD00 xFFFh is internally aliased to the range 0100 03FFh before any other address range checking is performed Memory Scrubbing Disabled Enabled When enabled BIOS au...

Page 41: ...et the system prompts the user for a password before the system boots Fixed Disk Boot Sector Normal Write Protect Write protects boot sector on hard disk to protect against viruses System Backup Reminder Disabled Daily Weekly Monthly Displays system backup reminder message at boot Virus Check Reminder Disabled Daily Weekly Monthly Displays virus check reminder message at boot Secure Mode Timer Dis...

Page 42: ... Event Logging Disabled Enabled Enabled forces BIOS and BMC to log system events Clear Event Log Disabled Enabled Enabled clears the system event log Assert NMI on AERR Disabled Enabled Enabled generates a nonmaskable interrupt NMI on an address parity error AERR Assert NMI on BERR Disabled Enabled Enabled generates an NMI on a bus error BERR Assert NMI on PERR Disabled Enabled Enabled generates a...

Page 43: ...d Flow Control No flow control CTS RTS XON XOFF CTS RTS CD None disallows flow control CTS RTS is hardware flow control XON XOFF is software flow control CTS RTS CD is hardware plus carrier detect flow control Boot Menu You can make the following selections on the Boot Menu itself Table 20 Boot Menu Feature Choices Description Floppy Check Disabled Enabled If Enabled system verifies diskette type ...

Page 44: ...e Attempts to boot from a hard drive device 4 ATAPI CD ROM Drive Attempts to boot from an ATAPI CD ROM drive Hard Drive Submenu For options on this menu use the up or down arrow keys to select a device Press the or keys to move the device higher or lower in the boot priority list Table 22 Hard Drive Submenu Option Description 1 Drive 1 or actual drive string N A 2 Other bootable cards additional e...

Page 45: ...inues POST User is prompted if any of the Setup fields were modified Load Setup Defaults Loads default values for all Setup items Load Custom Defaults Loads settings from custom defaults Save Custom Defaults Saves present Setup values to custom defaults These settings override the standard BIOS defaults BIOS loads these values when CMOS is corrupted or when the Clear CMOS jumper is in the clear po...

Page 46: ...or remove an ISA add in board you must run the SSU to reconfigure the server Running the SSU is optional for PCI and Plug and Play ISA add in boards The SSU is PCI aware and complies with the ISA Plug and Play specifications it works with any compliant configuration CFG files supplied by the peripheral device manufacturer The baseboard comes with a CFG file describing the characteristics of the bo...

Page 47: ...able media user preference settings like screen colors cannot be saved The SSU supports the ROM DOS V6 22 OS It can run on other ROM DOS compatible OSs but they are not supported The SSU will not operate from a DOS window running under an OS like Windows Running the SSU Remotely To run the SSU remotely you must invoke the SSU BAT file with the t switch and redirect the text mode output via BIOS co...

Page 48: ... mouse driver loads if it is available press Enter to continue This message appears Please wait while the Application Framework loads When the main window of the SSU appears you can customize the UI before continuing See Customizing the SSU on page 49 Figure 8 SSU Main Window ...

Page 49: ...e effect you must exit the SSU and restart it Other lets you change other miscellaneous options in the SSU The changes are immediate To change the interface default values Use the mouse to click on the proper button in the Preferences section of the SSU Main window OR Use the tab and arrow keys to highlight the desired button and press the spacebar or Enter OR Access the menu bar with the mouse or...

Page 50: ...lose the RCA window and return to the AF by clicking on the Close button Any changes made will be kept in memory for use by the RCA when it is rerun 5 Save all changes by clicking Save Saving writes your current configuration to nonvolatile storage where it will be available to the system after every reboot 6 Closing the window by clicking on the system menu the dash in the upper left corner disca...

Page 51: ...es and the resources associated with those choices To make a modification 1 Highlight the function in the Configuration window 2 Press the spacebar or Enter or double click on the entry this updates the choice and resource lists 3 Press the tab key to get to the choice list and press Enter 4 Use the arrow keys to select a proper choice and press Enter again 5 If the choice allows multiple possible...

Page 52: ...rd by entering it again in the second field or leave blank to clear Security Options In this window you can set the other security options Hot Key sets a key sequence that puts the server into secure mode when the key is pressed Lock Out Timer sets an interval that puts the server into secure mode when no activity occurs during the interval Secure Boot Mode forces the server to boot directly into ...

Page 53: ...4 SEL Viewer Menus Menu Options File Open SEL Views data from previously saved SEL file Save SEL Saves the currently loaded SEL data to a file Clear SEL Clears the SEL data from the BMC Exit Quits the SEL Viewer View SEL Info Displays information about the SEL display only All Events Displays the current SEL data from the BMC By Sensor Displays a pop up menu allowing you to view the data from a ce...

Page 54: ... either text or binary form The SDR Manager can display SDR records in either raw form hexadecimal or in an interpreted easy to understand textual form verbose The SDR Manager s main window provides access to features of the add in through menus Each option included on the main menu supports an accelerator key Accelerator keys are indicated by an underlined letter in the text listing the option Fi...

Page 55: ... format Help About Displays SDR Manager version information Field Replaceable Unit FRU Manager Add In In this window you can Examine all FRU Inventory areas on the server in either Hex or Verbose mode Examine individual FRU Inventory areas in either Hex or Verbose mode Examine FRU Inventory areas from a previously stored binary file in either Hex or Verbose mode Save the FRU Inventory areas to a f...

Page 56: ...56 Figure 11 shows the FRU Manager main window Table 26 lists the window s menus and options Figure 11 FRU Manager Main Window ...

Page 57: ...t the SSU by opening the menu bar item File in the SSU Main window 2 Click Exit or Highlight Exit and press Enter Emergency Management Port EMP Console The EMP console provides an interface called the console manager to the EMP This interface allows remote server management via a modem or direct connection The following server control operations are available with the console manager Connecting to...

Page 58: ... allowing the client to remotely reset or power the server up or down The client can also view the server s SEL FRU information or SDR table Redirect state the EMP console serves as a PC ANSI terminal window for BIOS console redirection Commands typed in this terminal window are transmitted through BIOS to the server s console and text displayed on the server console is displayed on the EMP consol...

Page 59: ...ff During POST After OS boots Disabled Redirect window appears but is blank Redirect window Redirect window Pre boot EMP commands available Redirect window Redirect window Always Active EMP commands available Redirect window EMP commands available You can modify the operation mode by selections in the POST reset and POST power up dialogs These are server control dialogs available with the EMP Cons...

Page 60: ...the other into a port on the client machine Modem Configuration On the client the EMP console uses the Windows application program interface API to determine if a modem is connected and available The EMP Console does not configure the modem it should be preconfigured through Windows For modem support the server must use a Hayes compatible 14400 bps modem The modem must be on the NT hardware compat...

Page 61: ... enabled mode the EMP console s server control options Power On Off and Reset are NOT available In disabled mode these options ARE available EMP Direct Connect Modem Mode Select Direct Connect if a null modem serial cable directly connects the server s COM2 port to the EMP console client machine If they are connected via a modem select Modem Mode Console Redirection Submenu To use the EMP you must...

Page 62: ...Either redirect or EMP depending on whether the EMP has control of the COM2 port Line Status Gives status information on the server connection For example if a server is connected the status bar says Connected Otherwise the line is blank EMP Console Main Menu File Exit Exits the EMP console Connect Disconnect Disconnects the server connection Re Connect Raises the connect dialog A list of the five...

Page 63: ...ection is attempted Figure 14 Connect Dialog Options available in the dialog are Line Selection Allows distinction between direct or dial up modem connection to the server Dial up Connects to a selected server with a modem Direct connect Serial Line Connects to the selected server directly using a null modem serial cable Server Displays a list of available servers in a dropdown edit list box You c...

Page 64: ...vailable in the dialog are Power ON Powers on the server Power OFF Powers off the server This option is not allowed if the server is configured in restricted mode for EMP operations Post power up option Sets the server mode EMP active or BIOS redirection The setting is effective at the next power up The default selection is EMP active Cancel Exits the dialog with no action taken Help Displays dial...

Page 65: ... EMP operations Option Group Sets the POST reset option that will be effective after reset The options are EMP active or BIOS redirection The default selection is EMP active Cancel Exits the dialog with no action taken Help Displays dialog level help information Phonebook The EMP console provides a phonebook a support plug in that stores names and numbers of servers in a list that can be updated b...

Page 66: ...t select an existing server from the Server dropdown edit box before selecting this option Click Save to delete the entry Save Saves a new or modified phonebook entry or deletes an entry if you have already selected the Delete radio button Connect Raises the Connect dialog with the server from the phonebook s Server dropdown edit box already populating the Connect dialog s Server dropdown edit box...

Page 67: ...ed by a specific sensor type e g voltage temperature etc By Event Displays all events in the SEL of a particular type e g by memory or threshold A pop up menu lets you select the event type to display This menu displays all event types that can be generated by the particular hardware Settings Lets you change several operating parameters for the SEL viewer This menu displays the following suboption...

Page 68: ...MP console Field Replaceable Unit FRU Viewer The FRU viewer lets you view data from the server s baseboard FRU information area Options available with the FRU viewer are View all FRU records View FRU summary information Set FRU display mode to either Hex or verbose mode Close the FRU viewer Exit the EMP console FRU Viewer Menu Options The following menu options are on the FRU viewer menu bar File ...

Page 69: ... monitored for server management Because the utility must be reloaded to properly initialize the sensors after programming turn the server off and remove the AC power cords from the server Wait approximately 30 seconds then reconnect the power cords and turn on the server What You Need to Do You can run the utility directly from the configuration software CD or from diskettes you create from the C...

Page 70: ... flags can be used in conjunction with any of the other options Displaying Usage Information When the utility is run with the or h command line flags the following message is displayed when the verbose flag v is added to the help command FRU SDR Load Utility Version 2 1 Revision R 1 1 Usage frusdr or h Displays usage information d dmi fru sdr Only displays requested area cfg filename cfg Uses cust...

Page 71: ... utility is run with the d DMI d FRU or d SDR command line flag the indicated area is displayed Each area represents one sensor for each instrumented device in the server If the given display function fails because of an inability to parse the data present or a hardware failure the utility displays an error message and exits Displaying DMI Area Each DMI area displayed is headed with the DMI area d...

Page 72: ...ation File The configuration file is in ASCII text The utility executes commands formed by the strings present in the configuration file These commands cause the utility to run tasks needed to load the proper SDRs into the nonvolatile storage of the BMC and possibly generic FRU devices Some of the commands may be interactive and require you to make a choice Prompting for Product Level FRU Informat...

Page 73: ...t reads the product area out of the specified FRU file then the area is programmed into the FRU nonvolatile storage All areas are also written to the FRU TMP file Updating DMI FRU Nonvolatile Storage Area After programming the BMC FRU area the utility programs chassis board and product FRU information to the DMI fields if the DMI flag follows each FRUAREA command in the configuration file Cleaning...

Page 74: ... upgrade to a new version of the BIOS using the new BIOS files and the BIOS upgrade utility iFLASH EXE You can obtain the BIOS upgrade file and the iFLASH EXE utility through your computer supplier or from the Intel World Wide Web site http www intel com NOTE Please review the instructions distributed with the upgrade utility before attempting a BIOS upgrade This upgrade utility lets you Upgrade t...

Page 75: ...ade and recovery files Upgrading the BIOS 1 Boot the computer with the diskette in drive A The BIOS upgrade utility screen appears 2 Select Update Flash Memory From a File 3 Select Update System BIOS Press Enter 4 Use the arrow keys to select the correct bio file Press Enter 5 When the utility asks for confirmation that you want to flash the new BIOS into memory select Continue with Programming Pr...

Page 76: ...se the BIOS upgrade utility to change the language BIOS displays Use a bootable diskette containing the Intel flash utility and language files see page 75 1 Boot the computer with the bootable diskette in drive A The BIOS upgrade utility screen appears 2 Select Update Flash Memory From a File 3 Select Update Language Set Press Enter 4 Select drive A and use the arrow keys to select the correct lng...

Page 77: ... any diskettes in the system 11 Disconnect all AC power cords from the system and wait 60 seconds 12 Reconnect the AC power cords and power up the system Installing Video Drivers After configuring the system you need to install video drivers to take full advantage of the features of the onboard CL GD5480 super VGA video controller The configuration software CD includes video drivers for use with D...

Page 78: ...78 BLANK PAGE ...

Page 79: ...g all procedures in this manual only at an ESD protected workstation If one is not available you can provide some ESD protection by wearing an antistatic wrist strap attached to chassis ground of the server any unpainted metal surface when handling components Mounting a SCSI Hard Disk Drive in a Plastic Carrier 1 Remove the 3 5 inch hard drive from its wrapper and place it on an antistatic surface...

Page 80: ...ng the metal door to the chassis and open the door 4 Check the bank of yellow LEDs on the front panel to determine which drive is bad 5 Press the rounded tab on the right of the carrier to the left toward the center of the drive B in Figure 19 while gently pulling straight down on the carrier handle A in Figure 19 This disengages the latch that secures the carrier to the chassis 6 Grasp the plasti...

Page 81: ... C in Figure 20 to lock the notches onto the pegs and press the rounded tab on the right of the carrier to the left until it clears the edge of the bay and snaps into place 10 Close the metal door and secure it to the chassis with the plastic latch 11 For security and to prevent unauthorized access to the bays insert a padlock through the metal loop protruding through the door 12 Close the front b...

Page 82: ... 1 Position each heatsink B in Figure 21 so that the three screw holes in the heatsink align with their corresponding holes in the hard drive The holes are spaced apart so that you can position the heatsink in only one way with the fins extending along the side and the top of the hard drive The top of the drive has the label C in Figure 21 the bottom has the exposed circuit board A 2 Use three scr...

Page 83: ...e system 2 Remove the four screws B in Figure 22 holding the power supply to the back of the chassis 3 Using the flared vertical edges as handles slide the supply straight back from its bay C in Figure 22 CAUTION You might feel initial resistance in sliding the power supply from its bay Do not tilt or twist the supply this can damage components Resistance is caused by the supply disengaging from i...

Page 84: ...is and the supply engages its connector 3 Install and tighten the four screws holding the supply to the back of the chassis 4 Install the access cover 5 Connect the AC power cable You must slide the cover on the AC connector to access the connector itself A in Figure 22 6 Run the FRUSDR load utility to properly configure the system after adding new components See FRU and SDR Load Utility on page 6...

Page 85: ...Service Technician s Guide 5 Working Inside the System 6 Upgrading Baseboard Components 7 Solving Problems 8 Technical Reference A Equipment Log and Configuration Worksheets B Regulatory Specifications C Warnings ...

Page 86: ...86 ...

Page 87: ...information when running the SSU Safety Before You Remove the Access Cover Before removing the access cover at any time to work inside the system observe these safety guidelines 1 Turn off all peripheral devices connected to the system 2 Turn off the system by using the push button on off power switch on the front of the system 3 Unplug the AC power cords from the system or wall outlet 4 Label and...

Page 88: ...y or equipment damage can result CAUTIONS Electrostatic discharge ESD and ESD protection ESD can damage disk drives boards and other parts We recommend that you do all procedures in this chapter only at an ESD protected workstation If one is not available provide some ESD protection by wearing an antistatic wrist strap attached to chassis ground any unpainted metal surface on your system when hand...

Page 89: ...lug all AC power cords 4 Label and disconnect all peripheral cables attached to the I O panel on the back of the system 5 Remove and save the two screws from the back of the access cover you will need them later to reattach the cover 6 Place the fingertips of your right hand under the built in handle on the back of the cover A rounded rectangular depression in the front middle of the access cover ...

Page 90: ...rear To access components in some instances you must swing away and or completely remove the subchassis and electronics bay 1 Observe the safety and ESD precautions at the beginning of this chapter 2 Turn off all peripheral devices connected to the system 3 Turn off the system power by using the power on off switch on the front panel AND unplug all AC power cords 4 Label and disconnect all periphe...

Page 91: ... edge of the electronics bay as a handle rotate the bay right away from the main chassis until it stops C in Figure 24 11 If necessary completely remove the subchassis and electronics bay rotate the bays outward until the two pins that function as hinges for the bays slide out of their slots Set the bays aside OM08024a B A C D Figure 24 Opening the Subchassis and Electronics Bay ...

Page 92: ...omponent side up on an antistatic surface 3 Record the serial number of the add in board in your equipment log 4 Set jumpers or switches according to the manufacturer s instructions 5 Remove and save the screw that attaches the existing board or expansion slot cover to the chassis 6 Remove and save the expansion slot cover 7 Hold the add in board by its top edge or upper corners Firmly press it in...

Page 93: ...ny cables attached to the board you are removing 3 Remove and save the screw that attaches the existing board retaining bracket to the chassis 4 Holding the board by its top edge or upper corners carefully pull it out Do not scrape the board against other components 5 Store board in an antistatic protective wrapper 6 If you are not reinstalling a board in the same slot install a slot cover over th...

Page 94: ... system until it pops off the snap on standoff 7 Disconnect the front panel board signal cable from the front panel board 8 Remove the front panel board from the system Place it on an antistatic foam pad or a grounded workstation OM08004a B C A D Figure 26 Removing the Front Panel Board A Chassis slot C Ribbon cable connector B Snap on standoff D Wire connector Installing the Front Panel Board 1 R...

Page 95: ...ve bay OM08011a A B Figure 27 Removing the Diskette Drive from the Chassis A Power cable B Signal cable 5 Slide the carrier toward the back of the chassis to disengage the tabs from the slots in the bottom of the 5 25 inch drive bay 6 Remove the carrier drive from the chassis and place it component side up on an antistatic surface 7 Remove the three screws that hold the carrier to the drive and se...

Page 96: ...d 6 0 inch pounds 5 Position the carrier so that the two protruding notches fit into the corresponding slits in the frame Slide the assembly toward the front of the system to engage the notches Make sure the front of the drive fits correctly in the front opening of the system When properly positioned the carrier notches extend slightly into the interior of the 5 25 inch drive bays and the threaded...

Page 97: ...on an IDE channel the cable must be removed If only one drive is installed it must be connected at the end of the cable 12 6 18 OM05093 Baseboard Drive 1 Drive 0 Figure 29 IDE Cable Dimensions NOTE To disable the IDE controller If you plan to disable the IDE controller to reuse the interrupt for that controller you must physically unplug the IDE cable from the board connector if a cable is present...

Page 98: ...tes EMI and is therefore more susceptible to ESD in this location NOTES Save the filler panels and EMI shields System EMI integrity and cooling are both protected by having drives installed in the bays or filler panels and EMI shields covering the bays When you install a drive save the panel and shield to reinstall in case you should later remove the drive and not reinstall one in the same bay Bus...

Page 99: ...disengage it from the chassis Save the shield OM08016 A Figure 30 Removing EMI Shields 4 Remove the drive from its protective wrapper and place it on an antistatic surface 5 Record the drive model and serial numbers in your equipment log page 163 6 Set any jumpers or switches on the drive according to the drive manufacturer s instructions 7 Using two screws of the appropriate size and length not s...

Page 100: ...lock in place 9 Connect a power cable to the drive The connectors are keyed and can be inserted in only one way 10 Connect a signal cable to the drive The connectors are keyed and can be inserted in only one way SCSI drive Attach connectors on the cable to the SCSI device or devices you are installing IDE drive The baseboard has one IDE connector It can support an IDE signal cable up to 18 inches ...

Page 101: ... surface 5 Remove and save the four screws and two slide rails 6 If you leave the bay empty install a stainless steel EMI shield on the bay for proper cooling and airflow 7 If you do not replace the device with another SCSI device and it was installed at the end of the SCSI signal cable modify the cable and termination arrangement so that a proper termination exists at the end of the cable it can ...

Page 102: ... the Fan Assembly 1 Observe the safety and ESD precautions at the beginning this chapter 2 Remove the access cover see page 89 3 Remove the foam cover from the front subchassis by pulling it straight out Figure 33 4 For better access to the individual fan cables on the front panel board carefully rotate the right edge of the foam fan assembly outward into the opening where the foam cover was 5 Lab...

Page 103: ...rectional arrows indicating airflow direction Always note the direction of the arrows on a fan before removing it You will need this information later when you install a different fan 1 Observe the safety and ESD precautions at the beginning this chapter 2 Remove the access cover see page 89 3 Remove the foam cover from the front subchassis by pulling it straight out see Figure 33 on page 102 Be c...

Page 104: ... of foam the piece with a crescent shaped hole that extends perpendicularly from the front of the fans in Figure 34 it is the rectangle between the round faces of fans 6 and 7 You must remove this piece to access the two fans it separates pull it straight out 1 3 5 7 2 4 6 8 1 OM08021a 1 7 5 3 2 4 6 8 Figure 34 Fan Cabling ...

Page 105: ... Observe the safety and ESD precautions at the beginning this chapter 3 Slide the fan into its correct receptacle in the foam fan assembly 4 Attach the cable to the foam at the correct places if you are REPLACING a bad fan you should have recorded where each cable attaches to the foam if you are ADDING a fan see Figure 34 on page 104 5 Position the fan assembly inside the chassis so that the indiv...

Page 106: ... that the fan s label faces the plate 4 Insert the fan grill plate assembly into the power supply bay so that the cable points downward D in Figure 35 from the fan toward the other two power supplies and so the fan s label faces out the back of the chassis This alignment is important to ensure correct airflow direction OM07167 D C E F A B G A Plate covering power supply bay B Screws attaching plat...

Page 107: ...UTION The two fans you MUST install are numbered 6 and 7 in Figure 34 page 104 7 Connect the cable D in Figure 35 page 106 from the fan you installed in the upper power supply bay to the connector on the power share board The connector is next to the secondary main power connector and is labeled AUX FAN ...

Page 108: ...108 ...

Page 109: ...cords from the wall outlet Hazardous conditions devices and cables Hazardous electrical conditions may be present on power telephone and communication cables Turn off the system and disconnect all power cords telecommunications systems networks and modems attached to the system before opening it Otherwise personal injury or equipment damage can result CAUTIONS Electrostatic discharge ESD ESD prote...

Page 110: ...ving it from the system place it component side UP on a nonconductive static free surface to prevent shorting out the battery leads If you place the board on a conductive surface the battery leads may short out This will result in a loss of CMOS data and will drain the battery Do not slide the baseboard over any surface 1 Observe the safety and ESD precautions at the beginning of this chapter 2 Re...

Page 111: ...k panel 4 Press the board onto the snap in standoffs then insert one screw through one of the mounting holes of the board and into a threaded standoff Do not tighten the screw until the next step 5 Insert the remaining screws through the mounting holes and into the threaded standoffs Make sure the board is properly seated then tighten all the screws firmly 6 0 inch pounds 6 Connect all internal ca...

Page 112: ...cess cover see page 89 3 Remove the rear foam cover over the electronics bay It might be easier to do this if you also remove the front foam cover over the front subchassis 4 Remove the memory module from the baseboard Pull the module toward you slightly to disengage it from the baseboard connector Slide the module straight away from the baseboard until it clears the guide rails Place the module c...

Page 113: ...afety and ESD precautions at the beginning of this chapter 2 Remove the memory module and place it component side up on a nonconductive static free surface see Removing the Memory Module on page 112 3 Gently push the plastic ejector levers out and down to eject a DIMM from its socket 4 Hold the DIMM only by its edges being careful not to touch its components or gold edge connectors Carefully lift ...

Page 114: ...inserted in only one way Mixing dissimilar metals might cause memory failures later resulting in data corruption Install DIMMs with gold plated edge connectors only in gold plated sockets NOTE DIMM slots on the memory module must be installed only in certain configurations See Memory on page 22 for requirements OM08010 Figure 38 Installing DIMMs ...

Page 115: ...own firmly on the DIMM until it seats correctly 4 Gently push the plastic ejector levers on the socket ends to the upright position 5 Repeat the steps to install each DIMM 6 Reinstall the memory module 7 Reinstall the foam cover s 8 Reinstall the access cover using the original screws 9 Connect all external cables and the power cords to the system 10 Turn on the monitor and then the system 11 Run ...

Page 116: ...dditional cautions given here 2 Remove the access cover see page 89 and the rear foam cover over the electronics bay 3 As you work place processors on a grounded static free surface or conductive foam pad 4 With your right thumb on the face of the retention module bracket A in Figure 39 wrap your right index finger around the tab B in Figure 39 protruding from the right edge of the bracket 5 Use y...

Page 117: ...re 40 straight away from the baseboard As you do the cartridge disengages from its connector on the baseboard 9 Slide the S E C cartridge straight away from the baseboard out of the retention module Put it on a piece of conductive foam and store it in an antistatic package OM08039 B B C D C A Figure 40 Removing a Processor A S E C cartridge B Retention module guide rails C Tabs on S E C cartridge ...

Page 118: ...ving a Processor on page 116 If you plan to reduce the number of processors in your system then you must replace a processor with a termination board The procedure for installing a termination board is the same for installing a processor 1 Observe the safety and ESD precautions at the beginning of this chapter and the additional cautions on page 116 2 Remove the new processor from its antistatic p...

Page 119: ... the back of the tab As you open the latch on the back of the tab slide the right edge of the bracket onto the retention module and release the tab If done correctly the bracket will be securely latched 7 Reinstall the foam cover 8 Reinstall the access cover using the original screws Installing Processor Tabs Depending on your configuration the tabs on the processor s S E C cartridge C in Figure 4...

Page 120: ...or removing the RTC WARNING Danger of explosion if battery is incorrectly replaced Replace only with the same or equivalent type recommended by the equipment manufacturer Discard used batteries according to manufacturer s instructions ADVARSEL Lithiumbatteri Eksplosionsfare ved fejlagtig håndtering Udskiftning må kun ske med batteri af samme fabrikat og type Levér det brugte batteri tilbage til le...

Page 121: ...n the snap on plastic retainer 4 Gently push down on the screwdriver to lift the battery 5 Remove the battery from its socket 6 Dispose of the battery according to local ordinance 7 Remove the new lithium battery from its package and being careful to observe the correct polarity insert it in the battery socket 8 Reinstall the plastic retainer on the lithium battery socket 9 Reinstall the access co...

Page 122: ...122 ...

Page 123: ...umper settings on the baseboard correct Are all jumper and switch settings on add in boards and peripheral devices correct To check these settings refer to the manufacturer s documentation that comes with them If applicable ensure that there are no conflicts for example two add in boards sharing the same interrupt Are all DIMMs installed correctly Are all peripheral devices installed correctly If ...

Page 124: ...roblem stems from changes made to the system such as hardware or software that has been added or removed Checklist If you are running the software from a diskette try a new copy of the software If you are running the software from a CD ROM disk try a different disk to see if the problem occurs on all disks If you are running the software from a hard disk drive try running it from a diskette If the...

Page 125: ...ystem files in drive A 5 Turn on the system If the power LED does not light see Power Light Does Not Light on page 127 Using PCDiagnostics A diagnostics package for the system is contained on the configuration software CD that comes with the system For documentation about the test modules see the Diagnostic help disks that end with the extension HLP They are ASCII files that you can print to form ...

Page 126: ...ght Does Not Light on page 129 Confirming Loading of the Operating System Once the system boots up the operating system prompt appears on the screen The prompt varies according to the operating system If the operating system prompt does not appear see Initial System Startup on page 123 Specific Problems and Corrective Actions This section provides possible solutions for these specific problems Pow...

Page 127: ...ng Is the video monitor plugged in and turned on Many modern video monitors shut down when inactive and may require a moment to warm up when activated Are the brightness and contrast controls on the video monitor properly adjusted Are the video monitor switch settings correct Is the video monitor signal cable properly installed Is the onboard video controller enabled If you are using an add in vid...

Page 128: ... cable from the front panel board connected to the baseboard Are the power supply cables properly connected to the baseboard Are there any shorted wires caused by pinched cables or power connector plugs forced into power connector sockets the wrong way If the switches and connections are correct and AC power is available at the wall outlet contact your service representative or authorized dealer f...

Page 129: ... Is the drive properly configured Is the onboard IDE controller enabled NOTE Front panel hard disk LED indicates IDE and SCSI devices the hard disk drive activity light on the front panel lights when either an IDE hard disk drive or a SCSI device controlled by the onboard SCSI host controller is in use This LED does not display CD ROM activity Network Problems If you have network problems consult ...

Page 130: ...be the first bootable device Error and Informational Messages When you turn on the system POST displays messages that provide information about the system If a failure occurs POST emits beep codes that indicate errors in hardware software or firmware If POST can display a message on the video display screen it causes the speaker to beep twice as the message appears POST Codes and Countdown Codes T...

Page 131: ... xxxx 2E 1 3 4 3 RAM failure on data bits xxxx of low byte of memory bus 30 1 4 1 1 RAM failure on data bits xxxx of high byte of memory bus 32 Test processor bus clock frequency 34 Test CMOS 35 RAM Initialize alternate chipset registers 36 Warm start shut down 37 Reinitialize the chipset MB only 38 Shadow system BIOS ROM 39 Reinitialize the cache MB only 3A Autosize cache 3C Configure advanced ch...

Page 132: ...w message 6E Display non disposable segments 70 Display error messages 72 Check for configuration errors 74 Test real time clock 76 Check for keyboard errors 7A Test for key lock on 74 Test real time clock 76 Check for keyboard errors 7A Test for key lock on 7C Set up hardware interrupt vectors 7E Test coprocessor if present 80 Detect and install external RS232 ports 82 Detect and install external...

Page 133: ...4 Initialize typematic rate A8 Erase F2 prompt AA Scan for F2 key stroke AC Enter SETUP AE Clear in POST flag B0 Check for errors B2 POST done prepare to boot Operating System B4 1 One short beep before boot B5 Display MultiBoot menu B6 Check password optional B8 Clear global descriptor table BC Clear parity checkers BE Clear screen optional BF Check virus and backup reminders C0 Try to boot with ...

Page 134: ...0 System RAM Failed at offset 0231 Shadow RAM Failed at offset 0232 Extended RAM Failed at offset 0250 System battery is dead Replace and run SETUP 0251 System CMOS checksum bad Default configuration used 0260 System timer error 0270 Real time clock error 0297 ECC Memory error in base extended memory test in Bank xx 02B2 Incorrect Drive A type run SETUP 02B3 Incorrect Drive B type run SETUP 02D0 S...

Page 135: ...led on last boot BSP switched 810A Processor 1 failed initialization on last boot 810B Processor 0 failed initialization on last boot 810C Processor 0 disabled system in uniprocessor mode 810D Processor 1 disabled system in uniprocessor mode 810E Processor 0 failed FRB Level 3 timer 810F Processor 1 failed FRB Level 3 timer 8110 Server Management Interface failed to function 8120 IOP subsystem is ...

Page 136: ...136 blank page ...

Page 137: ...7 8 Technical Reference This section includes Connectors pinouts and baseboard locations Information on baseboard jumpers System I O Addresses System memory map addresses Baseboard interrupts Video modes ...

Page 138: ...1J1 AA Front panel connector J8E1 H PCI slots B4 closest to ISA B3 B2 B1 A3 and A2 farthest from ISA BB Processor 4 Slot 2 connector J9E1 I Memory module connector J3G1 CC IDE connector J9E2 J ICMB connector J1E1 DD Diskette drive connector J9E3 K PCI slot A1 J2D1 EE Auxiliary power connector J9E4 L Video and parallel port connectors J1C1 FF USB internal header JC9F14 M Serial port connector J1B2 ...

Page 139: ...3 VDC Orange 4 COM Black 14 COM Black 5 COM Black 15 COM Black 6 COM Black 16 COM Black 7 COM Black 17 5V Standby Purple 8 12 VDC Yellow 18 5 VDC Red 9 12 VDC Yellow 19 5 VDC Red 10 12 VDC Yellow 20 5 VDC Red Auxiliary Power OM08033 14 13 2 1 Table 33 Auxiliary Power Connector Pinout Pin Signal 1 RTN_RS 2 5V_RS 3 3 3V_RS 4 FAN_SPEED 5 I2CSCL 6 I2CSDA 7 GND 8 SYS_PGOOD 9 PS_ON 10 GND 11 12VCC 12 Ke...

Page 140: ... FD_DENSEL 19 GND 3 GND 20 FD_STEP_L 4 N C 21 GND 5 Key 22 FD_WDATA_L 6 FD_DRATE0 23 GND 7 GND 24 FD_WGATE_L 8 FD_INDEX_L 25 GND 9 GND 26 FD_TRK0_L 10 FD_MTR0_L 27 FD_MSEN0 11 GND 28 FD_WPROT_L 12 FD_DR1_L 29 GND 13 GND 30 FD_RDATA_L 14 FD_DR0_L 31 GND 15 GND 32 FD_HDSEL_L 16 FD_MTR1_L 33 GND 17 FD_MSEN1 34 FD_DSKCHG_L ...

Page 141: ...or Pinout Pin Signal Pin Signal 1 SPEAKER_OUT 16 PWR_CNTRL_FP_L 2 GND 17 FP_ISOL 3 CHASSIS_INTRUSION 18 GND 4 FP_HD_ACT_L 19 FAN_TACH 0 5 5V 20 FAN_TACH 1 6 SLEEP_CNTRL_l 21 FAN_TACH 2 7 FAN_FAILED_L 22 FAN_TACH 3 8 POWER_LED_L 23 FAN_TACH 4 9 POWER_FAULT_L 24 FAN_TACH 5 10 GND 25 FAN_TACH 6 11 I2C_SDA 26 FAN_TACH 7 12 NMI_FP_L 27 CLUSTER_LED 13 I2C_SCL 28 reserved 14 RST_FP_L 29 reserved 15 5V st...

Page 142: ...y indication power OK 8 KEYLOCK_SFC_L Keyboard lock signal 9 CPU_NMI Nonmaskable interrupt indication 10 VCC3 3 3V power supply status input 11 RST_SFC_L Baseboard reset signal from Server Monitor Module 12 GND Ground 13 GND Ground 14 Reserved N A 15 SECURE_MODE_BMC Secure mode indication 16 GND Ground 17 SFC_CHASSIS_INSTRUSION_L Chassis intrusion indication 18 Reserved N A 19 Reserved N A 20 GND ...

Page 143: ... Pin Signal 1 LOCAL_I2C_SCL 2 GND 3 LOCAL_I2C_SDA VGA Video Port 5 OM04417 1 15 11 6 10 Table 38 Video Port Connector Pinout Pin Signal Pin Signal 1 Red 9 N C 2 Green 10 GND 3 Blue 11 NC 4 N C 12 DDCDAT 5 GND 13 HSYNC 6 GND 14 VSYNC 7 GND 15 DDCCLK 8 GND ...

Page 144: ...se signal 1 KEYDAT 1 MSEDAT 2 NC 2 NC 3 GND 3 GND 4 FUSED_VCC 5 V 4 FUSED_VCC 5 V 5 KEYCLK 5 MSECLK 6 NC 6 NC Parallel Port 13 OM04416 1 25 14 Table 40 Parallel Port Connector Pinout Pin Signal Pin Signal 1 STROBE_L 10 ACK_L 2 Data bit 0 11 Busy 3 Data bit 1 12 PE 4 Data bit 2 13 SLCT 5 Data bit 3 14 AUFDXT_L 6 Data bit 4 15 ERROR_L 7 Data bit 5 16 INIT_L 8 Data bit 6 17 SLCTIN_L 9 Data bit 7 18 2...

Page 145: ... external Universal Serial Bus USB connector at the back panel and an internal header to be used with device bay expansion Table 42 lists the pinout for the external USB connector Table 43 lists the pinout for the internal USB header OM08036 4 1 Table 42 USB External Connector Pinout Pin Signal Notes 1 VCC Cable power 2 Data Data differential pair negative 3 Data Data differential pair positive 4 ...

Page 146: ...D1_L 29 GND 5 GND 30 GND 6 SCD2_L 31 GND 7 GND 32 SATN_L 8 SCD3_L 33 GND 9 GND 34 GND 10 SCD4_L 35 GND 11 GND 36 SBSY_L 12 SCD5_L 37 GND 13 GND 38 SACK_L 14 SCD6_L 39 GND 15 GND 40 SRESET_L 16 SCD7_L 41 GND 17 GND 42 SMSG_L 18 SCDP_L 43 GND 19 GND 44 SSEL_L 20 GND 45 GND 21 GND 46 SCD_L 22 GND 47 GND 23 RESERVED 48 SREQ_L 24 RESERVED 49 GND 25 NC 50 SIO_L ...

Page 147: ...ERMPWR 18 TERMPWR 52 TERMPWR 19 Reserved 53 Reserved 20 34 GND 54 GND 35 DB12_L 55 ATN_L 36 DB13_L 56 GND 37 DB14_L 57 BSY_L 38 DB15_L 58 ACK_L 39 DBP1_L 59 RST_L 40 DB0_L 60 MSG_L 41 DB1_L 61 SEL_L 42 DB2_L 62 C D_L 43 DB3_L 63 REQ_L 44 DB4_L 64 I O_L 45 DB5_L 65 DB8_L 46 DB6_L 66 DB9_L 47 DB7_L 67 DB10_L 48 DBP _L 68 DB11_L ...

Page 148: ...IDEIRQ 12 DD12 32 Reserved N C 13 DD2 33 IDESA1 14 DD13 34 PDIAG_L tied to GND 15 DD1 35 IDESA0 16 DD14 36 IDESA2 17 DD0 37 IDECS1_L 18 DD15 38 IDECS3_L 19 GND 39 IDEHDACT_L 20 Keyed 40 GND If no IDE drives are present no IDE cable should be connected If only one IDE drive is installed it must be connected at the end of the cable Hard Drive LED OM08037 1 4 Table 47 Hard Drive LED connector Pinout ...

Page 149: ...OCHRDY B10 GND C3 LA22 D3 IRQ10 A11 AEN B11 SMEMW_L C4 LA21 D4 IRQ11 A12 SA19 B12 SMEMR_L C5 LA20 D5 IRQ12 A13 SA18 B13 IOW_L C6 LA19 D6 IRQ15 A14 SA17 B14 IOR_L C7 LA18 D7 IRQ14 A15 SA16 B15 DACK3_L C8 LA17 D8 DACK0_L A16 SA15 B16 DRQ3 C9 MEMR_L D9 DRQ0 A17 SA14 B17 DACK1_L C10 MEMW_L D10 DACK5_L A18 SA13 B18 DRQ1 C11 SD8 D11 DRQ5 A19 SA12 B19 REFRESH_L C12 SD9 D12 DACK6_L A20 SA11 B20 BCLK C13 S...

Page 150: ...A45 3 3 V B45 AD14 A15 RST_L B15 GND A46 AD13 B46 GND A16 5 V B16 PCICLK A47 AD11 B47 AD12 A17 GNT_L B17 GND A48 GND B48 AD10 A18 GND B18 REQ_L A49 AD9 B49 GND A19 Reserved B19 5 V A50 KEY B50 KEY A20 AD30 B20 AD31 A51 KEY B51 KEY A21 3 3 V B21 AD29 A52 C BE0_L B52 AD8 A22 AD28 B22 GND A53 3 3 V B53 AD7 A23 AD26 B23 AD27 A54 AD6 B54 3 3 V A24 GND B24 AD25 A55 AD4 B55 AD5 A25 AD24 B25 3 3 V A56 GND...

Page 151: ...ins default in bold What it does at system reset CMOS clear 1 2 BMC Control Preserves the contents of NVRAM 2 3 Force Erase Replaces the contents of NVRAM with the manufacturing default settings Password clear 5 6 Protect Maintains the current system password 6 7 Erase Clears the password Recovery Boot 9 10 Normal System attempts to boot using the BIOS stored in flash memory 10 11 Recovery BIOS at...

Page 152: ...1 2 and 3 controls whether settings stored in CMOS nonvolatile memory NVRAM are retained during a system reset Procedure to restore the system s CMOS and RTC to default values 1 See General Procedure to Change Jumper Setting on page 152 2 Move the CMOS jumper from pins 1 and 2 to pins 2 and 3 the Clear CMOS memory position 3 Reinstall the access cover for your safety using the original screws and ...

Page 153: ...overy boot jumper from pins 9 and 10 to pins 10 and 11 3 Reinstall the access cover for your safety using the original screws then connect the power cords to the system 4 Turn the system on and insert the Flash Memory Update Utility diskette in drive A After the system boots the speaker emits a single beep and the recovery process starts This takes about three minutes When the recovery process com...

Page 154: ...rom 0020h 0021h 0036h 0037h 0038h 0039h Interrupt Controller 1 PIIX4E Aliased from 0020h 0021h 003Ah 003Bh 003Ch 003Dh Interrupt Controller 1 PIIX4E Aliased from 0020h 0021h 003Eh 003Fh 0040h 0043h Programmable Timers PIIX4E 0044h 004Fh 0050h 0053h Programmable Timers PIIX4E Aliased from 0040h 0043h 0054h 005Fh 0060h 0064h Keyboard Controller Keyboard chip select from 87307 0061h NMI Status Contro...

Page 155: ...t Control PIIX4E 00B3h Advanced Power Management Status PIIX4E 00B4h 00B5h Interrupt Controller 2 aliased PIIX4E 00B8h 00B9h Interrupt Controller 2 aliased PIIX4E 00BCh 00BDh Interrupt Controller 2 aliased PIIX4E 00C0h 00DFh DMA Controller 2 PIIX4E 00F0h Clear NPX error Resets IRQ13 00F8h 00FFh x87 Numeric Coprocessor 0102h Video Display Controller 0170h 0177h Secondary Fixed Disk Controller IDE P...

Page 156: ...lel Port ECP 0778h 077Ah Parallel Port ECP 07BCh 07BEh Parallel Port ECP 0CA0 CA3h BMC Registers 0CF8h PCI CONFIG_ADDRESS Register Located in 450NX 0CF9h NBX Turbo and Reset control PIIX4E 0CFCh PCI CONFIG_DATA Register Located in 450NX 46E8h Video Display Controller Memory Map Table 52 Memory Map Address Range hex Amount Function 0 to 07FFFFh 640 KB DOS region base system memory 0A0000h to 0BFFFF...

Page 157: ...d connector IDE0 if a cable is present Simply disabling the drive by configuring the SSU option does not make the interrupt available Table 53 Interrupts Interrupt I O APIC level Description INTR INT0 Processor interrupt NMI N A NMI from PIC to processor IRQ1 INT1 Keyboard interrupt Cascade INT2 Interrupt signal from second 8259 in PIIX4E IRQ3 INT3 Serial port A or B interrupt from SIO device user...

Page 158: ...uencies Table 54 Standard VGA Modes Mode s in Hex Bits per pixel Colors no per palette size Resolution Pixel Freq MHz Horizontal Freq kHz Vertical Freq Hz 0 1 4 16 256K 360 X 400 14 31 5 70 2 3 4 16 256K 720 X 400 28 31 5 70 4 5 4 4 256K 320 X 200 12 5 31 5 70 6 4 2 256K 640 X 200 25 31 5 70 7 4 Mono 720 X 400 28 31 5 70 D 4 16 256K 320 X 200 12 5 31 5 70 E 4 16 256K 640 X 200 25 31 5 70 F 4 Mono ...

Page 159: ...68 78 7 60 75 1MB 5E 8 256 256K 640 X 400 25 31 5 70 1MB 5F 8 256 256K 640 X 480 25 31 5 60 1MB 5F 8 256 256K 640 X 480 31 5 37 9 72 1MB 5F 8 256 256K 640 X 480 31 5 37 5 75 1MB 5F 8 256 256K 640 X 480 36 43 3 85 1MB 5F 8 256 256K 640 X 480 43 2 50 9 100 1MB 60 8 256 256K interlaced 1024 X 768 44 9 35 5 43 1MB 60 8 256 256K 1024 X 768 65 48 3 60 1MB 60 8 256 256K 1024 X 768 75 56 70 1MB 60 8 256 2...

Page 160: ...interlaced 1024 X 768 44 9 35 5 43 2MB 68 16 32K 1024 X 768 65 48 3 60 2MB 68 16 32K 1024 X 768 75 56 70 2MB 68 16 32K 1024 X 768 78 7 60 75 2MB 68 16 32K 1024 X 768 94 5 68 3 85 2MB 68 16 32K 1024 X 768 113 3 81 4 100 2MB 6C 8 16 256K interlaced 1280 X 1024 75 48 43 1MB 6D 8 256 256K interlaced 1280 X 1024 75 48 43 2MB 6D 8 256 256K 1280 X 1024 108 65 60 2MB 6D 8 256 256K 1280 X 1024 135 80 75 2M...

Page 161: ... 1MB 78 24 16M 800 X 600 40 37 8 60 2MB 78 24 16M 800 X 600 50 48 1 72 2MB 78 24 16M 800 X 600 49 5 46 9 75 2MB 78 24 16M 800 X 600 56 25 53 7 85 2MB 78 24 16M 800 X 600 68 2 63 6 100 2MB 7B 8 256 256K interlaced 1600 X 1200 135 62 5 48 2MB 7B 8 256 256K 1600 X 1200 162 75 60 2MB 7C 8 256 256K 1152 X 864 94 5 63 9 70 1MB 7C 8 256 256K 1152 X 864 108 67 5 75 1MB 7C 8 256 256K 1152 X 864 121 5 76 7 ...

Page 162: ...162 BLANK PAGE ...

Page 163: ... of this information when you run the SSU Item Manufacturer Name and Model Number Serial Number Date Installed System Baseboard Processor speed and cache Video display Keyboard Mouse Diskette drive A Diskette drive B Tape drive CD ROMdrive Hard disk drive 1 Hard disk drive 2 Hard disk drive 3 Hard disk drive 4 Hard disk drive 5 SCSI host adapter board 1 continued ...

Page 164: ...164 Equipment Log continued Item Manufacturer Name and Model Number Serial Number Date Installed ...

Page 165: ...st be less than 400 watts Use the two worksheets in this section to calculate the total used by your system For current and voltage requirements of add in boards and peripherals see your vendor documents Worksheet Calculating DC Power Usage 1 List the current for each board and device in the appropriate voltage level column 2 Add the currents in each column Then go to the next worksheet Worksheet ...

Page 166: ...pply Worksheet 2 Power Usage Worksheet 2 Voltage level and total current V X A W Total Watts for each voltage level 3 3 V X ______ A ________ W 5 V X ______ A ________ W 5 V X ______ A ________ W 12 V X ______ A ________ W 12 V X ______ A ________ W Total Combined Wattage ________ W SSU Worksheets Add and Remove Boards Worksheet 3 Add Remove Boards Baseboard PCI Host Bridge Device Bus 0 Dev 0 PCI ...

Page 167: ...rd Name Manufacturer Board Type Video Board Memory Board Multifunction Board Keyboard Mass Storage Device Numeric Coprocessor Network Board Operating System Communications Board CPU Board Parallel Port Joystick Board Pointing Device Other Board Slot 16 Bit 8 Bit 8 or 16 Bit DMA Channel Size Byte Word Timing Default Type A Type B IRQ Level Trigger Edge Level Ports ISA Port Definition Start End Size...

Page 168: ...Communication Devices Enable Disable Worksheet 7 Onboard Disk Controllers Onboard Diskette Controller Enable Disable Primary Onboard IDE Controller Enable Disable Secondary Onboard IDE Controller Enable Disable Worksheet 8 Onboard Communications Devices Serial Port 1 Configuration Serial Port 2 Configuration Serial Port 2 Mode Parallel Port Configuration Parallel Port Mode Worksheet 9 Diskette Dri...

Page 169: ...Standard CHS Logical Block Addressing Transfer Mode Primary Slave PIO 1 PIO 2 PIO 3 PIO 4 Worksheet 11 Multiboot Group Boot Device Priority Diskette Drive Removable Devices Hard Drive ATAPI CD ROM Drive Diagnostic Boot Worksheet 12 Keyboard and Mouse Subsystem Group Typematic Delay 250 ms delay 500 ms delay 750 ms delay 1000 ms delay Typematic Speed 30 CPS other Mouse Control option Mouse Enabled ...

Page 170: ... Enable Diskette Writes Disable Enable Reset Power Switch Locking Disable Enable Worksheet 15 SCSI ROM BIOS Options Group Onboard SCSI ROM BIOS scan Enable Disable Worksheet 16 Management Subsystem Group System Sensor Control Write your selections on the separate Management Subsystem System Sensor Control Worksheet on page 171 SMM Enable Enable Disable Event Logging Enable Disable PCI System Error...

Page 171: ...Disable Enable Disable Enable Upper Fatal Upper Fatal Upper Warning Upper Warning Lower Warning Lower Warning Lower Fatal Lower Fatal Item Item Disable Enable Disable Enable Upper Fatal Upper Fatal Upper Warning Upper Warning Lower Warning Lower Warning Lower Fatal Lower Fatal Item Item Disable Enable Disable Enable Upper Fatal Upper Fatal Upper Warning Upper Warning Lower Warning Lower Warning Lo...

Page 172: ...able Upper Fatal Upper Fatal Upper Warning Upper Warning Lower Warning Lower Warning Lower Fatal Lower Fatal BIOS Setup Worksheets Worksheet 17 Main Menu System Date System Time Legacy Diskette A Disabled 360 KB 720 KB 1 44 MB 2 88 MB Legacy Diskette B Disabled 360 KB 720 KB 1 44 MB 2 88 MB Hard Disk Pre delay Disabled 3 6 9 12 15 21 30 Language English Spanish Italian French German ...

Page 173: ... Num Lock Auto On Off Key Click Disabled Enabled Keyboard auto repeat rate 30 26 7 21 8 18 5 13 3 10 6 2 Keyboard auto repeat delay 1 Worksheet 20 Advanced Menu Plug and Play OS Yes No Reset Configuration Data Yes No Use Multiprocessor Specification 1 1 1 4 Large Disk Access Mode LBA CHS Pause Before Boot Enabled Disabled Worksheet 21 PCI Device Embedded SCSI Submenu Option ROM Scan Disabled Enabl...

Page 174: ...et 24 Advanced Chipset Control Submenu Address Bit Permuting Disabled Auto Base RAM Step 1 MB 1 KB Every location Extended RAM Step 1 MB 1 KB Every location L2 Cache Enabled Disabled ISA Expansion Aliasing Enabled Disabled Memory Scrubbing Enabled Disabled Restreaming Buffer Enabled Disabled Worksheet 25 Security Menu Administrator Password is Clear Set User Password is Clear Set Password on Boot ...

Page 175: ...ion Submenu COM Port Address Disabled 3F8 2F8 3E8 IRQ None 3 4 Baud Rate 9600 19 2k 38 4k 115 2k Flow Control None CTS RTS XON XOFF CTS RTS CD Worksheet 29 Boot Menu Floppy Check Disabled Enabled Multi boot Support Disabled Enabled Maximum No of I2O Drives 1 4 Message Timeout Multiplier 1 2 8 10 50 100 1000 Worksheet 30 Boot Device Priority Submenu Boot Priority 1 Diskette Drive other Boot Priorit...

Page 176: ...176 blank page ...

Page 177: ...ower supplies at 28 C 2 C Electrostatic discharge ESD Tested to 20 kilovolts kV per Intel environmental test specifications no component damage AC Input Power 100 120 V 200 240 V 100 120 V 7 6 A 50 60 Hz 200 240 V 3 8 A 50 60 Hz Declaration of the Manufacturer or Importer We hereby certify that this product is in compliance with European Union EMC Directive 89 336 EEC using standards EN55022 Class...

Page 178: ...ged to try to correct the interference by one or more of the following measures Reorient or relocate the receiving antenna Increase the separation between the equipment and the receiver Connect the equipment into an outlet on a circuit different from that to which the receiver is connected Consult the dealer or an experienced radio TV technician for help Any changes or modifications not expressly ...

Page 179: ...terference VCCI from Information Technology Equipment If this is used near a radio or television receiver in a domestic environment it may cause radio interference Install and use the equipment according to the instruction manual This equipment has been tested for radio frequency emissions and has been verified to meet CISPR 22 EN55022 Class B Cet appareil numérique respecte les limites bruits rad...

Page 180: ...180 blank page ...

Page 181: ...181 C Warnings WARNING English US AVERTISSEMENT Français WARNUNG Deutsch AVVERTENZA Italiano ADVERTENCIAS Español ...

Page 182: ...ts on the back of the system 5 Provide some electrostatic discharge ESD protection by wearing an antistatic wrist strap attached to chassis ground of the system any unpainted metal surface when handling components 6 Do not operate the system with the chassis covers removed After you have completed the six SAFETY steps above you can remove the system covers To do this 1 Unlock and remove the padloc...

Page 183: ...operate in a typical office environment Choose a site that is Clean and free of airborne particles other than normal room dust Well ventilated and away from sources of heat including direct sunlight Away from sources of vibration or physical shock Isolated from strong electromagnetic fields produced by electrical devices In regions that are susceptible to electrical storms we recommend you plug yo...

Page 184: ... derrière le système 5 Pour prévenir les décharges électrostatiques lorsque vous touchez aux composants portez une bande antistatique pour poignet et reliez la à la masse du système toute surface métallique non peinte du boîtier 6 Ne faites pas fonctionner le système tandis que le boîtier est ouvert Une fois TOUTES les étapes précédentes accomplies vous pouvez retirer les panneaux du système Procé...

Page 185: ...ctionner dans un cadre de travail normal L emplacement choisi doit être Propre et dépourvu de poussière en suspension sauf la poussière normale Bien aéré et loin des sources de chaleur y compris du soleil direct A l abri des chocs et des sources de vibrations Isolé de forts champs électromagnétiques géenérés par des appareils électriques Dans les régions sujettes aux orages magnétiques il est reco...

Page 186: ... um elektrostatische Ladungen ESD über blanke Metallstellen bei der Handhabung der Komponenten zu vermeiden 6 Schalten Sie das System niemals ohne ordnungsgemäß montiertes Gehäuse ein Nachdem Sie die oben erwähnten ersten sechs SICHERHEITSSCHRITTE durchgeführt haben können Sie die Abdeckung abnehmen indem Sie 1 Öffnen und entfernen Sie die Verschlußeinrichtung Padlock auf der Rückseite des Systems...

Page 187: ... System wurde für den Betrieb in einer normalen Büroumgebung entwickelt Der Standort sollte sauber und staubfrei sein Hausstaub ausgenommen gut gelüftet und keinen Heizquellen ausgesetzt sein einschließlich direkter Sonneneinstrahlung keinen Erschütterungen ausgesetzt sein keine starken von elektrischen Geräten erzeugten elektromagnetischen Felder aufweisen in Regionen in denen elektrische Stürme ...

Page 188: ...a si tocchino i componenti proteggersi dallo scarico elettrostatico SES portando un cinghia anti statica da polso che è attaccata alla presa a terra del telaio del sistema qualsiasi superficie non dipinta 6 Non far operare il sistema quando il telaio è senza le coperture Dopo aver seguito i sei passi di SICUREZZA sopracitati togliere le coperture del telaio del sistema come seque 1 Aprire e rimuov...

Page 189: ...istema è progettato per funzionare in un ambiente di lavoro tipo Scegliere una postazione che sia Pulita e libera da particelle in sospensione a parte la normale polvere presente nell ambiente Ben ventilata e lontana da fonti di calore compresa la luce solare diretta Al riparo da urti e lontana da fonti di vibrazione Isolata dai forti campi magnetici prodotti da dispositivi elettrici In aree sogge...

Page 190: ...s puertos situados en la parte posterior del sistema 5 Cuando manipule los componentes es importante protegerse contra la descarga electrostática ESD Puede hacerlo si utiliza una muñequera antiestática sujetada a la toma de tierra del chasis o a cualquier tipo de superficie de metal sin pintar 6 No ponga en marcha el sistema si se han extraído las tapas del chasis Después de completar las seis ins...

Page 191: ...iones del fabricante El sistema está diseñado para funcionar en un entorno de trabajo normal Escoja un lugar Limpio y libre de partículas en suspensión salvo el polvo normal Bien ventilado y alejado de fuentes de calor incluida la luz solar directa Alejado de fuentes de vibración Aislado de campos electromagnéticos fuertes producidos por dispositivos eléctricos En regiones con frecuentes tormentas...

Page 192: ...192 Blank page ...

Page 193: ... 151 diskette drive connector 140 form factor 12 19 front panel connector 141 installing 111 ISA connector 149 parallel port 144 password jumper 153 PCI connectors 150 recovery boot settings jumper 153 removing 110 serial ports 145 Server Management Module connector 142 video port connector 143 battery disposing of safely 120 installing 121 removing 120 beep codes 32 BIOS changing the language 76 ...

Page 194: ... ports 145 Server Management Module 142 VGA video port 143 Console Redirection submenu configuring in Setup 43 controller baseboard management BMC 27 diskette floppy 26 IDE 26 keyboard mouse 26 video 19 25 cooling do not use hard drives in external bays 98 fans 12 filler panels removable media bays 98 installing all covers for correct airflow 88 110 installing fan for correct airflow 105 installin...

Page 195: ...g 163 error codes and messages 134 messages 32 130 ESD 79 177 add in boards 88 92 109 avoiding damage to product 109 baseboard sensitive to 110 do not touch processor pins 116 grounding clip removable media drives 99 hot swapping SCSI hard disk drives 79 limit use of 5 25 inch hard drives 98 EU directive compliance 177 Exit menu configuring Setup 45 expanded video memory 25 expansion slot installi...

Page 196: ...7 installing termination board 118 internal bay size and capacity 16 interrupt mapping 157 must disconnect IDE cable to reuse interrupt 97 intrusion detection 27 28 IPMB for monitoring status 27 ISA connectors on baseboard 149 embedded device support 19 expansion slots 19 feature summary 24 installing add in board 92 removing add in board 93 run SSU after installing or removing add in board 93 J K...

Page 197: ...iguring in Setup 38 physical memory 23 port I O ports provided 19 POST bootable media required 32 countdown codes 130 error codes and messages 134 error messages 32 memory amount tested 32 power button 13 power cords AC input connector 14 disconnect all before opening system 88 109 power on off locking on off switch Setup 29 switch does not turn off AC power 87 88 109 power supply 400 watt 12 AC i...

Page 198: ... SCI files 46 SCSI bus termination requirements 25 97 98 cable type 97 hard disk drive 79 hot swapping 80 plastic carrier 79 LVD devices 79 singled ended devices 79 single ended only 98 Symbios SCSI utility 77 type of devices supported 25 using fans for high power drives 106 using heatsinks on high power drives 82 wide input connector 147 secure mode 28 affects boot sequence 30 enter by setting pa...

Page 199: ...r console redirection 175 worksheet server menu 175 worksheet system management submenu 175 sleep service button 13 soft boot 123 SSU See system setup utility changing configuration 31 diskette drive required to run SSU 31 subchassis removing 90 switches alarm 28 DC power 109 123 locking reset and power on off Setup 29 power on off 87 88 reset 123 Symbios SCSI boot time message 32 System Managemen...

Page 200: ... components might be hot 120 disconnect power cords cables 88 109 dispose of lithium battery safely 120 ESD can damage product 109 no user serviceable parts power supply 83 88 power on off switch 87 88 109 Warnings translations English 182 French 184 German 186 Italian 188 Spanish 190 worksheet adding removing boards SSU 166 Advanced menu Setup 173 boot device priority Setup 175 boot hard drive Se...

Reviews: