Insignia NS-DPF10 User Manual Download Page 4

2

Insignia NS-DPF8/NS-DPF10 Digital Picture Frame

www.insignia-products.com

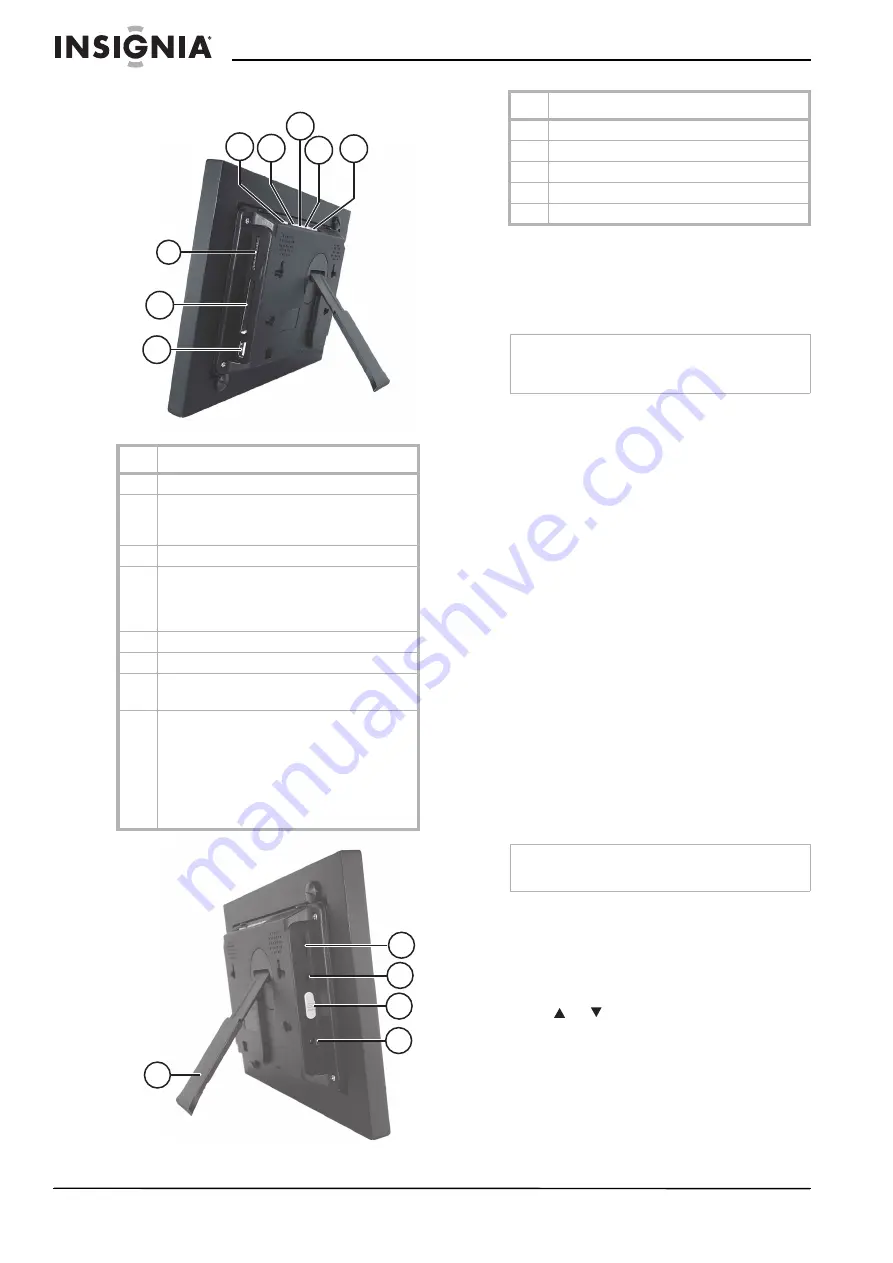
Identifying components

Setting up your digital 
picture frame

Setting up the remote control

To install and replace the remote control 
battery:

1

Hold the remote control with the control 
buttons facing downward.

2

While pressing down on the ridged area of 
the battery cover, pull the tray out.

3

Place a CR2025 lithium battery on the tray 
with the positive 

+

 end facing toward you.

4

Close the tray.

Setting up the digital picture frame

This section describes the steps needed to 
display your first slide show.

To set up the digital picture frame:

1

Extend the stand from the back of the digital 
picture frame.

2

Place the digital picture frame on a flat 
surface.

3

Plug one end of the AC power adapter into 
the digital picture frame.

4

Plug the other end of the AC power adapter 
into a wall outlet.

5

Insert a memory card into the appropriate 
slot.

6

Move the power switch on the left side of the 
digital picture frame to the 

ON

 position. The 

digital picture frame automatically starts a 
slide show of the photos on the card.

To display photos individually:

1

Press 

EXIT

 to open the 

Thumbnails

 screen.

2

Press 

 or 

 to choose a photo.

3

Press 

ENTER

 on the top of the digital picture 

frame or 

ENTER

 on the remote control.

To restart the slide show:

Press 

ENTER

 on the digital picture frame or 

press 

SLIDE SHOW

 on the remote control.

Item Description

A

SETUP—Display the Setup menu

B

EXIT:

• Exit the current display
• Go back a screen

C

Right arrow—Move the selection right

D

ENTER:

• Select the highlighted option
• Pause
• Play

E

Left arrow—Move the selection left

F

USB host port

G

Memory card slot:

• Compact Flash™

H

Memory card slot:

• Memory Stick™
• Memory Stick Duo™
• Memory Stick Pro™
• Memory Stick Pro Duo™
• MultiMedia Card™
• Secure Digital™ 
• xD  Memory  Card™

H

G

F

C

B

A

D E

A

B

C

D

E

Item Description

A

Brightness

B

Line  Out

C

Power switch

D

AC  power

E

Stand

Note

Pull the plastic tab sticking out of the remote 
control. It protects the battery. The remote control 
cannot work unless it is removed.

Note

The card only fits in one direction. Do not force it. 
The card should fit snugly when correctly inserted.

Summary of Contents for NS-DPF10

Page 1: ...Digital Picture Frame NS DPF8 NS DPF10 User Guide ...

Page 2: ......

Page 3: ... with the digital picture frame Using any other power adapter will void your warranty Unplug the power cord from the outlet when the digital picture frame is not in use Features The digital picture frame includes these key features Displays digital photos JPEG without a computer Insert a compatible memory card into the digital frame to show photos or play MP3 music memory card not included Compati...

Page 4: ... picture frame to the ON position The digital picture frame automatically starts a slide show of the photos on the card To display photos individually 1 Press EXIT to open the Thumbnails screen 2 Press or to choose a photo 3 Press ENTER on the top of the digital picture frame or ENTER on the remote control To restart the slide show Press ENTER on the digital picture frame or press SLIDE SHOW on th...

Page 5: ...emory card The Mode Selection screen opens after you choose a memory source Note You can open the Setup menu at any time by pressing and holding EXIT Button Action Move the selection up or left Display the previous photo Select the previous file ENTER Select the highlighted option Start a slide show Pause Play Move the selection down or right Display the next photo Select the next file EXIT Exit t...

Page 6: ...is in enlarged use the arrow buttons to move the photo so you can see portions that aren t currently visible Setting up the slide show The digital picture frame lets you set up a slide show using either all of the photos or selected photos in the selected memory source You can also add music to your slide show Setting up a slide show of all photos in the memory To set up a slide show of all photos...

Page 7: ...u opens 7 Press or to select Copy File 8 Press ENTER A submenu appears offering three options One Selected All 9 Select One then press ENTER to copy the highlighted photo from memory card to built in memory 10 Press EXIT to return to the Thumbnails screen Copying multiple photos Use the remote control to copy more than one photo from a memory card to the built in memory To copy multiple photos 1 P...

Page 8: ...2 Press ENTER to select the option A second menu opens listing the available settings A blue highlight shows the current setting 3 Use or to choose a setting 4 Press ENTER to select the setting The second menu closes 5 You can make as many changes as you wish in the same manner When you are finished press the EXIT button to close the Setup menu and return to the previous screen The following table...

Page 9: ...alarm 1 With the Clock Calendar View screen displayed press ENTER to open the Setup menu 2 Choose Set Alarm then press Enter to open a submenu 3 Choose Set Alarm Time option to open another submenu for changing alarm time 4 When the alarm time settings are completed press ENTER to set the alarm and return to the normal Clock Calendar View screen Rotate Rotate the displayed photo 90 counterclockwis...

Page 10: ...ess EXIT to save them and return to the Calendar Clock page Turning scheduled slide shows on or off After you create slide show schedules you need to turn slide show scheduling on to use the schedules To turn scheduled slide shows on or off 1 With the Calendar Clock displayed press SETUP 2 Choose Start Scheduled ON OFF to turn the scheduling on or off Changing the decorative frame The digital pict...

Page 11: ... screen gently The screen is made of glass and can be scratched or broken To clean fingerprints or dust from the LCD screen we recommend using the cloth provided or a soft non abrasive cloth such as a camera lens cloth If you use a commercial LCD cleaning kit do not apply the cleaning liquid directly to the LCD screen Clean the LCD screen with the cleaning cloth moistened with the liquid Cleaning ...

Page 12: ...uct names are trademarks or registered trademarks of their respective holders Specifications and features are subject to change without notice or obligation For service and support call 877 467 4289 Image Use Restrictions Use of the images pre loaded on the digital picture frame is limited to personal non commercial use Consumer may not modify duplicate distribute retransmit republish reproduce or...

Page 13: ...t of protection as the original packaging To obtain in home warranty service for a television with a screen 25 inches or larger call 1 888 BESTBUY Call agents will diagnose and correct the issue over the phone or will have an Insignia approved repair person dispatched to your home Where is the warranty valid This warranty is valid only to the original purchaser of the product in the United States ...

Page 14: ... South Richfield MN USA 55423 3645 2007 Best Buy Enterprise Services Inc Tous droits réservés INSIGNIA est une marque déposée de Best Buy Enterprise Services Inc Tous les autres produits ou noms de marques sont des marques de commerce qui appartiennent à leurs propriétaires respectifs Distribuido por Best Buy Purchasing LLC 7601 Penn Avenue South Richfield MN USA 55423 3645 2007 Best Buy Enterpris...

Reviews: