


© Copyright 2016
Innovience International BV
Al rights reserved. Whole or partial reproduction is not permitted
without the written authorization of the copyright owner.
User manual OptoXS
TM
Wifi module OXS-W11-EU
V 1.0, December 2016
Confidential
26
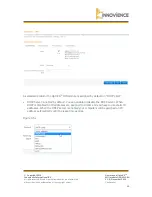
4.6 URL block
You can block access to some websites from particular PC
’
s by entering a full URL address or
just keywords of the website.
•
Enable: URL Blocking Enable/Disable URL Blocking
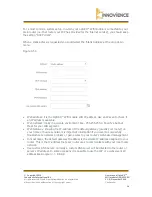
•
Add URL/keyword: f
ill in “URL/Keyword” and then click “Add”. You can enter the full URL
address or the keyword of the website you want to block.
•
Remove URL/keyword: if you want to remove some URL keywords from the "Current URL
Blocking Table", select the URL keyword you want to remove in the table and then click
"Delete Selected". If you want to remove all URL keywords from the table, just click
"Delete All" button. If you want to clear the selection and re-select again, just click
“Reset”.
•
Click
“
Save & Apply
”
at the bottom of the screen to save the above configuration.
4.7 Virtual server
Use the Virtual Server function when you want different servers/clients in your LAN to handle
different service/internet application type (e.g. email, FTP, webserver, etc.) from the
internet. Computers use numbers called port numbers to recognize a particular
service/internet application type. The Virtual Server allows you to re-direct a particular
service port number (from the internet/WAN port) to a particular LAN private IP-address and
it
’
s service port number.
•
Enable Virtual Server: Enable Virtual Server.
•
Local IP: this is the LAN client/host IP-address that the Public Port number packet will be
sent to.
•
Local Port: this is the port number (of the above Private IP-host) that the below Public
Port number will be changed to when the packet enters your LAN (to the LAN
Server/Client IP).
•
Type: select the port number protocol type (TCP, UDP or both). If you are unsure, then
leave it to the default “Both” setting.
•
Public Port: enter the service (service/internet application) port number from the internet
that will be re-directed to the above Private IP-address host in your LAN
•
Comment: the description of this setting.
•
Add: f
ill in the "Private IP", "Private Port", "Type", “Public Port” and "Comment" of the
setting to be added and then click the + sign. Then this Virtual Server setting will be
added to the "Current Virtual Server Table" below.
•
Reset: if you want to remove Virtual Server settings from the "Current Virtual Server
Table", select the Virtual Server settings you want to remove in the table and then click
"Delete Selected". If you want to remove all Virtual Server settings from the table, just
click the "Delete All" button. Click "Reset" will clear your current selections.
•
Click
“
Save & Apply
”
at the bottom of the screen to save the above configuration.


