Inline IN1401 Operation Manual Download Page 15

14 

IN1401 Operation Manual  -  v1.5   7/12/02 11:18 AM 

© 2002  -  INLINE, Inc. 

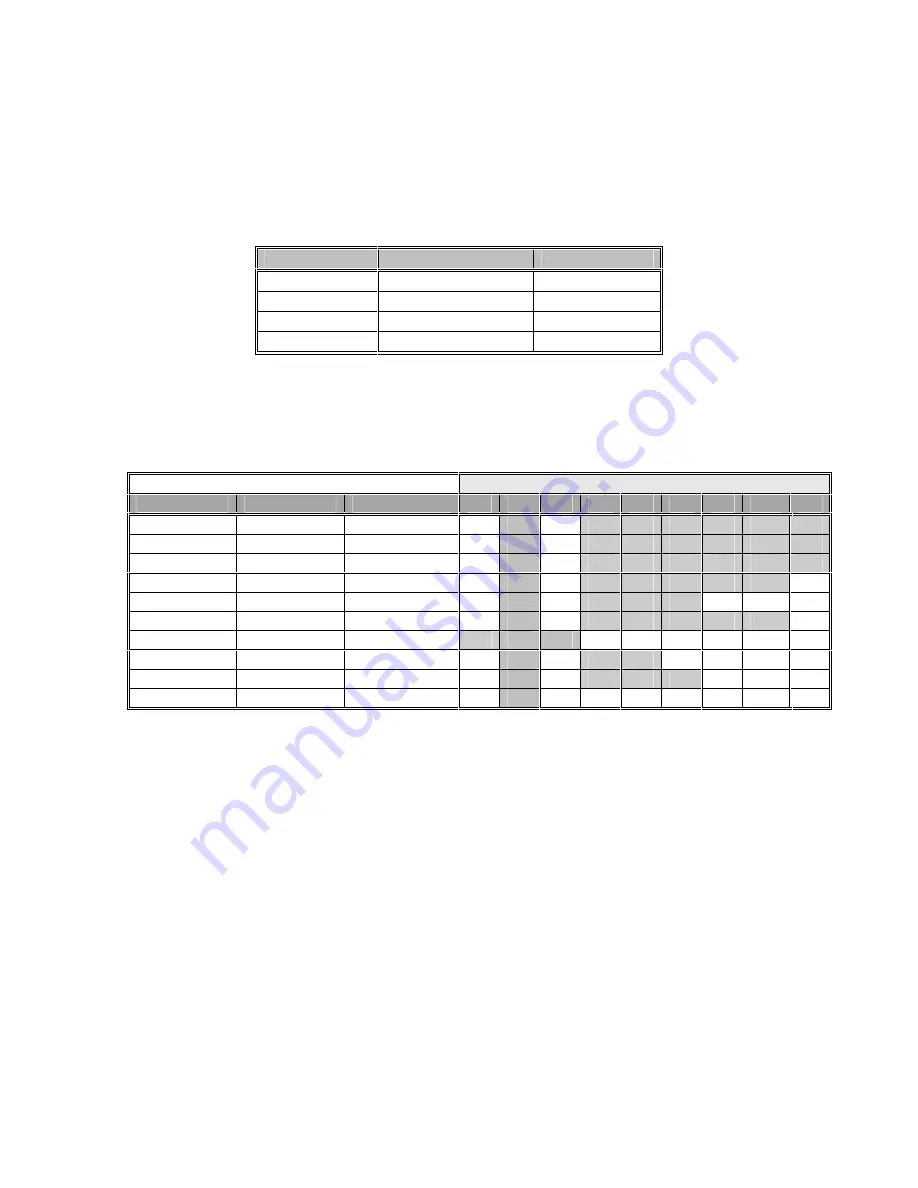
VERY SLOW INPUT SIGNALS 
 

If the input signal is very slow (pixel clock is less than 12 MHz), the IN1401 may display a poor 
image as it is only designed for signals above 12 MHz.  To improve the quality of the image, 
simply increase the sampling rate by doubling the number of active pixels and total pixels by 
using the on screen menu.  The number of active lines remains the same.  For example: 


Parameter 

Actual Input Signal  IN1401 Settings 

Active Pixels 

380 

760 

Active Lines 

286 

286 

Total Pixels 

482 

964 

Pixel Clock 

7.512 MHz 

15.024 MHz 


OUTPUT MODES 


The IN1401 supports the following Output Modes: 


Refresh Rate (Hz) 

Resolution 

Mode 

Aspect Ratio* 

56 

60 

65 

72 

75 

85 

96 

100 

120 

640 x 480 

VGA 

4:3 


800 x 600 

SVGA 

4:3 


852 x 480 

HDTV - 480p 

16:9 


1024 x 768 

XGA 

4:3 


1152 x 864 


4:3 


1280 x 720 

HDTV – 720p 

16:9 


1280 x 768 


16:9 


1280 x 1024 

SXGA 

5:4 


1365 x 768 

Wide XGA 

16:9 


1365 x 1024 


4:3 


DEFAULT POWER-UP BUTTONS 


An output mode or a factory reset may be selected without the use of the IN1401 menu.  This is 
particularly useful if the monitor does not display an image or if the image is scrambled.  Simply 
hold down the front panel button while turning on the IN1401.  To select both an output mode 
and factory reset, hold down both buttons simultaneously while turning the scaler on. 
 

MENU:   640 x 480 @ 60 Hz 

DOWN:   1152 x 864 @ 60 Hz 

LEFT:     800 x 600 @ 60 Hz 

RIGHT:   1280 x 1024 @ 60 Hz 

UP:          1024 x 768 @ 60 Hz 

ENTER:   Factory Reset 


OUTPUT POSITIONING 


The output may be adjusted without entering the main menu sequence.  Pressing the arrow keys 
selects the output position controls if the menu is not on.  Afterwards, press enter to save the 
output position, or press menu to exit without saving the output position. 

Summary of Contents for IN1401

Page 1: ...IN1401 RGB VIDEO SCALER IN 1 40 1 OPERATION MANUAL...

Page 2: ...een Menu 5 IN1401 On Screen Display Menu System 6 Video Menu 7 Input Menu 7 Output Menu 8 Options Menu 8 Input Settings 10 Very Slow Input Signals 14 Output Modes 14 Default Power Buttons 14 Output Po...

Page 3: ...he INLINE IN1402 IN1403 IN1404 IN1404XT and IN1408 Video Scalers are recommended for applications requiring superb video scaling for composite video S video component video and RGB video signals conta...

Page 4: ...ns to match the optimum or native resolution of virtually any display device The output refresh rate is also selectable as desired When used with LCD or DMD displays the 60 Hz output setting as recomm...

Page 5: ...he monitor The scaler has been factory pre set to support plug and play operation with most display devices If it becomes necessary to manually adjust fine tune the video image refer to the INPUT SETT...

Page 6: ...maneuver around within the menu display s Press ENTER to select a command and press MENU to exit The MAIN MENU commands and their functions are VIDEO Changes input signal video parameters INPUT Chang...

Page 7: ...king 800 x 600 No Blue 852 x 480 Active Area 1024 x 768 Auto Detect Active Pixels 1152 x 864 Auto Detect On Active Lines 1280 x 720 Auto Detect Off 1280 x 768 User Defined Sync Type 1280 x 1024 Redete...

Page 8: ...input area ACTIVE LINES The number of lines per frame inside the input active area For interlaced input signals this number refers to the lines per frame after de interlacing not the number of lines p...

Page 9: ...n and refresh rate AUTO DETECT Four options are available Auto Detect On The default mode at power up that allows the IN1401 to automatically detect new input modes and adjust accordingly Auto Detect...

Page 10: ...nly the input horizontal scan rate and input vertical refresh rate are measured by the IN1401 If the input signal includes extra pulses such as equalization or serration pulses the input vertical refr...

Page 11: ...ed The input settings are shown in Figure 1 and the formulas and figures listed on the following pages will assist in the adjustment of these settings Blanking Area Active Area H Blanking Active Pixel...

Page 12: ...the output position The input blanking adjusts where the electronic scaling process takes effect which may add blank borders or crop the active area if set incorrectly The input blanking and active a...

Page 13: ...following input modes may have the same horizontal scan rate and vertical refresh rate The differences between these input modes will not be detected The input aspect ratio will automatically be main...

Page 14: ...hat may be seen within the image as shown below in Figure 4 The total pixels may be adjusted to move the lines closer together or further apart Adjust the total pixels until the lines are furthest apa...

Page 15: ...3 852 x 480 HDTV 480p 16 9 1024 x 768 XGA 4 3 1152 x 864 4 3 1280 x 720 HDTV 720p 16 9 1280 x 768 16 9 1280 x 1024 SXGA 5 4 1365 x 768 Wide XGA 16 9 1365 x 1024 4 3 DEFAULT POWER UP BUTTONS An output...

Page 16: ...MHz After De Interlacing 4 Intermediate Pixel Clock 95 MHz After Frame Rate Conversion 5 Output Pixel Clock 135 MHz After Image Scaling 6 Input Pixel Clock 95 1 8 95 Bandwidth Formula LIMITATIONS OF...

Page 17: ...o the unit must contain a leading code the command code and an ending code Each command must be completely executed before the unit will accept a new command INLINE scalers can be set to recognize six...

Page 18: ...to absolute value 0 255 BLU Return blue gain BLS0 blue screen ON BLS1 blue screen OFF BV increase input vertical blanking BV decrease input vertical blanking BV set input vertical blanking to normal...

Page 19: ...e valu COMMAND DESCRIPTION PV return current horizontal position RED increase red gain RED decrease red gain RED set red gain to normal 128 REDxxx set red gain to absolute value 0 255 RED return red g...

Page 20: ...3 Pin Phoenix Power Supply Internal Switch Mode 90 260 VAC 47 63 Hz Power Consumption 15 Watts Shipping Weight 4 lbs 2 Kg Product Weight 2 lbs 0 9 Kg Dimensions 1 65 x 8 5 x 7 3 4 2 cm x 21 6 cm x 18...

Page 21: ...reloaded If the menu is available select Options Auto Detect and Redetect Now to reload these settings Solution 7 The output resolution may be less that the input the IN1401 can only scale up Select a...

Page 22: ...ped on the bottom Solution 1 Increase the Input V Blanking to match the input signal Solution 2 Reduce the Output V Position to line up the image on the monitor Use the blue screen Solution 3 Adjust t...

Page 23: ...he Total Pixels setting to match the input signal Refer to the input settings on pages 10 13 to make this adjustment Solution 2 The Input H Blanking may be set too high Reduce the Input H Blanking to...

Page 24: ...the Buyer This warranty is in lieu of all other warranties expressed or implied including without limitation any implied warranty or merchantability or fitness for any particular purpose all of which...

Reviews: