background image


Page 29


Move/5000 User Guide


Copyright© 2018 Ingenico 


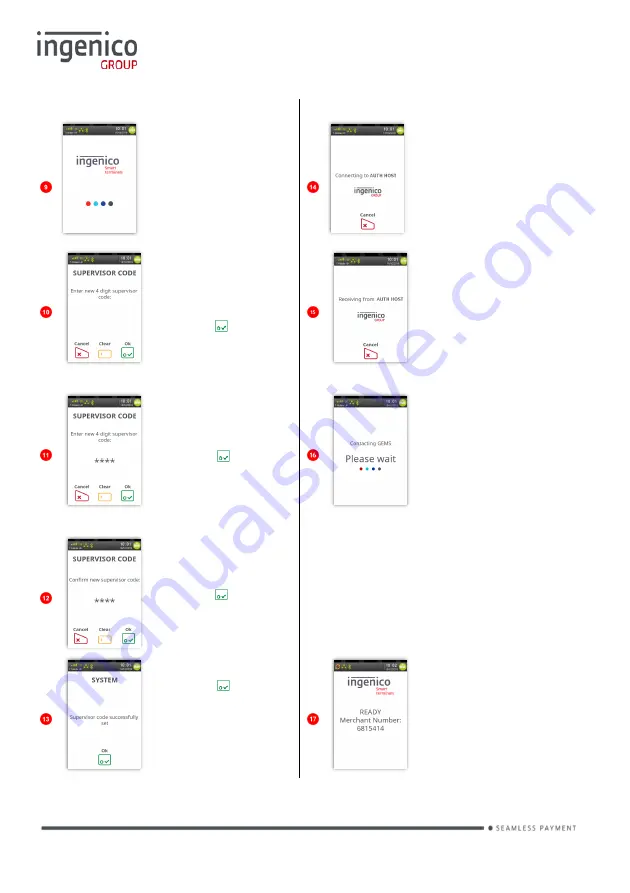
The terminal will 
power cycle.


The terminal may 
then contact any/all 
of the acquirers for 
verification.


Type in your 
preferred 
‘Supervisor 
Code’ and then 
press   


The ‘Logo’ and 
text ‘AUTH 
HOST’ will differ 
for each Acquirer 


Asterisks will 
appear as you 
type in the code. 

Press   to save 
the code. 


The terminal will 
contact the 
configuration 
host. 


Re-type your 
new ‘Supervisor 
Code’ and then 
press   to 
confirm it. 


The terminal will upload the 
status of its applications and print 
a list of card types that will be 
accepted. 


Press   to 
acknowledge the 
change. 


Terminal will 
return to the ‘Idle 
Screen’ if 
installation is 
successful. 


Summary of Contents for Telium TETRA Move/5000

Page 1: ...Move 5000 Telium TETRA ...

Page 2: ...e 5000 9 Operating Condition 9 Battery Charging Conditions 9 Storage Conditions 9 Terminal Connections 10 µUSB 10 µSD Memory Card 10 Opening the back cover 11 SAMs SIMs 11 Battery 12 Main Characteristics 12 Installing the battery 12 Charging the battery 13 Replacing the battery 14 R40 Paper Roll 15 Installing a Paper Roll 16 Terminal Base Overview 17 Display Icons 19 Terminal Operation Icons 19 GP...

Page 3: ...Mode 27 Terminal Configuration 28 Card Reading 30 Chip Card 30 Contactless Card 30 Magnetic Stripe Card 30 Transaction Selection 31 Data Input 32 Sale Card Details Keyed 33 Sale Swiped Card 35 Sale Inserted Card 36 Sale Contactless 38 Contactless High Value Payment HVP Wallet Payments 39 Sale with Gratuity 40 Refund 41 Refund with Gratuity 42 Purchase with Cashback PWCB 44 PWCB Swiped Card 44 PWCB...

Page 4: ...ication 55 Account Verification Swipe Card 55 Account Verification Insert Card 56 Force Transaction 57 Sample Receipts 59 End of Day Report 59 Not Authorised Receipts 60 Cancelled Receipts 61 Waiter Setup Receipts 61 Gratuity Verified by PIN Receipts 62 Gratuity Verified by Signature Receipts 63 Sale Verified by Signature Receipts 63 Sale Verified by PIN Receipts 64 Refund Verified by Signature Re...

Page 5: ...es 74 Selecting Function Codes 74 Function 34 System Security 75 Function 91 Mobile Network Selection 76 Function 40 Waiter Setup 77 Add Waiter 77 Delete Waiter 78 Print Waiters 78 Change Name 79 Delete All 80 Create Defaults 80 Function 30 Set Date and Time 81 Recommendations 82 Safety 82 Security of the Terminal 85 Standards 86 Troubleshooting 87 Notes 88 ...

Page 6: ...ormation about safety precautions unpacking installation and maintenance of your terminal This symbol indicates an important warning This symbol indicates a piece of advice Contents of box The power supply unit provided with this equipment is specially designed for Ingenico terminals Do not use any other power supply Move 5000 terminal with a paper roll Battery User Guide Power Supply Terminal Bas...

Page 7: ...set up as many methods as possible at the self install stage Please refer to the section Terminal Installation for the relevant screens Mobile 2G or 3G GPRS Bluetooth Ethernet via a Bluetooth Base WiFi Wireless local area networking Weight w o paper roll or battery 320g Dimensions L x w x h 169x78x57 mm Electrical mains network 100 240VAC 50 60 Hz Class II equipment Terminal Connections Micro USB ...

Page 8: ...t will just restart Before using the terminal always check the paper roll is present Some keys can have other functions depending on the applications on the terminal Red key cancels the procedure in progress Yellow key cancels the last character Green key validates input selections and information It also switches the terminal on Paper feed long press This is the Menu button used to navigate the v...

Page 9: ...t zones protect it from vibrations dust damp and electromagnetic radiation computer screen anti theft barrier etc Operating Condition Ambient temperature 10 C to 50 C 14 F to 122 F Max relative humidity 85 non condensing at 40 C 104 F Max altitude 2000m Battery Charging Conditions Ambient temperature 0 C to 45 C Storage Conditions Ambient temperature 20 C to 55 C 4 F to 131 F Max relative humidity...

Page 10: ...d with a USB adapter refer to accessories section µSD Memory Card There is a MicroSD connector on the left side of the Move 5000 wireless terminal see picture Insert the MicroSD memory card into the connector slot shown on the picture The terminal supports MicroSD cards up to 32GB NOTE The above slots are NOT currently supported in the terminal applications They are currently only used during prod...

Page 11: ... the direction of the arrows in the picture SAMs SIMs The connector modules security SAM SIM are located inside the terminal in a closed compartment SAMs SIMs are identified by the engraved marks on the lower housing When introducing a SAM SIM in its slot be sure to put the cut corner as indicated on the engraved markings SIM 2 connector or SAM 3 connector SIM 1 connector SAM 1 connector SAM 2 con...

Page 12: ... and its use Installing the battery Check that the terminal is not connected to the mains electricity network Turn the terminal over and unclip the back cover by pushing on the clip Take the battery pack included in the box Locate the battery pack connector beside the battery compartment Plug the battery pack into the battery pack connector Verify that it locks Place the battery pack in its compar...

Page 13: ...utomatically begin Using the terminal power supply Connect the terminal power supply unit to the terminal charging port on the left of the terminal The battery symbols are Battery charge greater than 80 Battery charge greater than 60 and less than 80 Battery charge greater than 40 and less than 60 Battery charge greater than 20 and less than 40 Battery charge less than 20 Terminal powered by exter...

Page 14: ...ase traction on it as soon as the connector comes unclipped b Finish extracting connector by tilting it slightly F3 arrow to bring it away from the terminal housing Initialise the terminal for a replacement battery by placing it on its base or connecting the terminal to a power supply without a battery installed Connect and install the new battery by following the instructions in Installing the ba...

Page 15: ...e avoided Storage in hot wet places near air conditioners humidity above 85 Exposure to sunlight or ultraviolet for long periods Contact with organic solvents solvent type adhesives Direct contact with materials containing plasticizers PVC transparent folders or envelopes Direct contact with diazo papers Direct contact with water Rubbing or pressing the paper too strongly For best performance use ...

Page 16: ...ert the paper roll in the compartment following the directions shown in the picture Pull the paper up to the top of the terminal Hold the paper and close the lid Press simultaneously on both upper corners of the paper flap as shown by arrows on picture until it clips into position When a new paper roll is inserted tear off the first length one complete turn to avoid printing on the residue of the ...

Page 17: ...re NO ports on the base unit You should set up your base unit in a convenient location close to a power source To open the base unit cover located on the bottom of the base unit you must unclip an access clip and lift the cover from the base unit To replace the cover reverse these instructions being sure to engage all the retaining pins before the access clips Terminal guides Terminal charging poi...

Page 18: ...e LAN to connect to remote host You should set up your base unit in a convenient location close to a power source and network point To open the base unit cover located on the bottom of the base unit you must unclip an access clip and lift the cover from the base unit To replace the cover reverse these instructions being sure to engage all the retaining pins before the access clips Terminal guides ...

Page 19: ...tion and may be pressed in place of the physical button This is the Ok button and is used primarily to confirm or submit data for verification during a Transaction Processing or Function Code It is also used to select a highlighted item from a menu This is the Cancel button and is used to delete all of the data typed in during a transaction to cancel a transaction at specific times and in some adm...

Page 20: ...g for a mobile network but has not yet connected to a network The terminal is connected to a mobile network but the GPRS session has not yet been established The terminal is connected to a mobile network and the GPRS session has been established Maximum reception level 100 High reception level 75 Medium reception level 50 Low reception level 25 Very low reception level 5 Network provider name is d...

Page 21: ...ppear from the display The GPRS Date Time and battery icons are described in previous sections This is the Bluetooth Icon when the terminal is NOT assigned to a base unit This is the Bluetooth Icon when the terminal IS assigned to a base unit This is the WiFi Icon when the terminal is NOT connected to a WiFi network This is the WiFi Icon when the terminal is connected to a WiFi network This is the...

Page 22: ...ric code of four digits i e 1234 4567 etc or four digits the same i e 1111 3333 9999 etc If you know your password but wish to change it you may do this by performing a Function 34 please refer to the section on Function Codes later in this user guide If your terminal is lost or stolen you should contact the terminal Helpdesk immediately You are strongly advised to ensure that privileged access to...

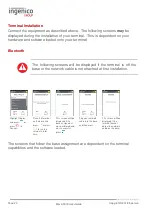
Page 23: ...the base or the network cable is not attached at first installation Highlight Region and press or press to Cancel Place the terminal on the base and press or press to run the setup at a later time This screen willl be displayed if the base assignment was performed and was successful press Plug your network cable into the base and then press This screen willl be displayed if the terminal cannot det...

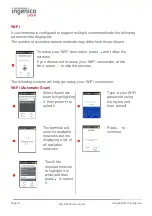
Page 24: ... If you choose not to setup your WiFi connection at this time press to skip the process The following screens will help you setup your WiFi connection Wi Fi Automatic Scan Select Automatic scan by highlighting it then press to select it Type in your WiFi password using the stylus and then press The terminal will scan for available networks before displaying a list of all available networks Press t...

Page 25: ...ID using the stylus and then press Select Yes if your access point is hidden or No if it is not and then press Type in your WiFi password using the stylus and then press Type in your SSID using the stylus and then press This screen will be displayed if the terminal successfully assigns to the network Press to continue Continue from Terminal Configuration ...

Page 26: ... connection at this time press to skip the process The following screens will show you the progress of your Mobile connection The terminal will attempt to obtain a GPRS connection Terminal requires a reboot press The terminal will perform a reboot Your terminal will automatically pick up the best available network however if required you may manually select a preferred network This will ensure tha...

Page 27: ...highlight the required network in from the menu and then press to select it The terminal will scan for available networks Terminal will register with the selected network Press to confirm The terminal will now remain in Manual Mode until you re select Automatic Mode Please ensure that you leave your terminal powered on at all times in order that it may receive any automatic updates scheduled for i...

Page 28: ... made various files will be downloaded to the terminal Type in your merchant number provided in your suppliers welcome letter and then press Various file names will be displayed before the terminal disconnects from the configuration host The terminal will attempt to get a GPRS Signal If prompted confirm the date by pressing if it is correct or type in correct date and then press The terminal will ...

Page 29: ...UTH HOST will differ for each Acquirer Asterisks will appear as you type in the code Press to save the code The terminal will contact the configuration host Re type your new Supervisor Code and then press to confirm it The terminal will upload the status of its applications and print a list of card types that will be accepted Press to acknowledge the change Terminal will return to the Idle Screen ...

Page 30: ... active zone above the contactless logo located on the paper trapdoor Keep the card close to the contactless logo during the transaction The 4 virtual LEDs will light sequentially during the transaction and the terminal will beep when the card is successfully read Magnetic Stripe Card The card can be read either from bottom to top or from top to bottom with the stripe facing the terminal Use a reg...

Page 31: ... will change to the Amount Entry screen as soon as you start typing in the amount The icons displayed are dependent on the transaction amount entered and pressed You may then be given the option to Present Insert Swipe the customer s card Alternatively pressing will display the Transaction Menu Touch the screen to highlight the required transaction type from the menu and then press to select it Th...

Page 32: ...ncil Take care NOT to press too hard on the display when selecting characters to prevent damaging the display Note Change case or symbols in the same way you would on your mobile telephone i e press the shift button and the terminal will change to lower case characters or press the Sym button and the terminal will display the special characters Pressing any of the following buttons during data ent...

Page 33: ...d option Sale The screen will change to the following as you type in the amount Type in the security code from the back of the customer s card and then press Press to confirm amount or press to clear all digits or press to clear one digit at a time and type in new value The terminal will check the card If it is OK the transaction will progress as follows Start to type in the card number and the sc...

Page 34: ... receipt Tear off the customer receipt and press if it is readable or press to reprint the receipt The terminal will contact the Auth Host for authorisation The terminal will print a merchant receipt Tear off the merchant receipt and press if it is readable or press to reprint the receipt The terminal will display the acquirer result The merchant should press to accept the transaction or to declin...

Page 35: ...ansaction amount it will change to This screen will only be displayed if the terminal attempted to connect to the acquirer Press to confirm amount or press to clear all digits or press to clear one digit at a time and type in new value A response to the Sale request is returned by the acquirer The terminal will print the merchant receipt Swipe the customer s card Tear off the merchant receipt and ...

Page 36: ... at the Idle Screen to display the Transaction Menu and highlight Sale as described earlier and press Insert the cardholder s card as described previously This screen will be displayed if Sale is selected from the above menu As you type in the transaction amount it will change to Terminal will check the card Press to confirm amount or press to clear all digits or press to clear one digit at a time...

Page 37: ...etwork Tear off the cardholder receipt and press if it is readable or press to reprint the receipt The terminal will print the merchant receipt A response to the Sale request is returned by the acquirer The terminal will print the cardholder receipt Tear off the merchant receipt and press if it is readable or press to reprint the receipt ...

Page 38: ...This screen will only be displayed if the terminal went online for approval Press to confirm amount or press to clear all digits or press to clear one digit at a time and type in new value Terminal will display the result of the request i e Approved or Not Authorised Present the contactless card to the terminal as described previously Terminal will print the merchant receipt Contactless read is su...

Page 39: ...less logo will be displayed on your terminal for all transactions rather than just those under the contactless card limit e g 30 00 Acceptance of normal contactless cards for transactions below the 30 limit will continue as normal and if a cardholder taps a contactless card for a transaction above the 30 limit the terminal will instruct them to complete the transaction using chip and PIN In some c...

Page 40: ...atuity Press if you do not wish to add a Gratuity Press to cancel the transaction Type in the Gratuity Amount and then press to submit it Press to clear one digit at a time or press to clear all digits Touch the screen to highlight the gratuity percentage you wish to add and then press to select it Press to confirm amount or press to reject the amount and go back to the above screen Press to cance...

Page 41: ...fund from the acquirer will be displayed Terminal will print the merchant receipt Press to confirm amount or press to clear all digits or press to clear one digit at a time and type in new value Tear off the merchant receipt and then press if it is readable or press to reprint the receipt Present Insert Swipe the customer s card on the terminal Remove the card from the terminal Check the customer ...

Page 42: ...d previously in this manual Press to submit TOTAL amount Press to change one digit at time or press to clear the entire amount and enter the correct amount Type in your Supervisor Code and then press Press or to correct mistakes Present Insert Swipe the customer s card or press to cancel the transaction Press if transaction had a Gratuity added or press if no Gratuity was added or press to cancel ...

Page 43: ...hant receipt Tear off the merchant receipt and press if it is readable or press to reprint the receipt Terminal will print the customer s receipt Tear off the cardholder receipt and press if it is readable or press to reprint the receipt Remove the customer s card from the terminal Terminal returns to the Idle Screen Note If the card used for the refund does NOT require signature verification the ...

Page 44: ...rch with Cashback as described earlier and then press Swipe the customer s card or press to Cancel the transaction As the transaction amount is being typed in the screen will change to Terminal will check the card to ensure it is valid You may be asked to enter the last four digits of the card number Press to confirm amount or press to clear all digits or press to clear one digit at a time and typ...

Page 45: ...ode and then press to confirm the PIN Press to confirm amount or press to clear all digits or press to clear one digit at a time and type in new value Terminal displays asterisks as PIN is typed Press to confirm PIN and Total Amount Insert the customer s card or press to Cancel the transaction Cardholder advised to return terminal to merchant after PIN is verified Do NOT remove card Type in the am...

Page 46: ...ash Advance Cash Advance Swipe Card Press at the Idle Screen Highlight Cash Advance as described earlier and then press Swipe the customer s card or press to Cancel the transaction Press to confirm amount or press to clear all digits or press to clear one digit at a time and type in new value The terminal will check the customer s card to ensure it supports the transaction type The transaction wil...

Page 47: ...ode and then press to confirm the PIN and Amount Press to confirm amount or press to clear all digits or press to clear one digit at a time and type in new value The terminal will check the customer s card to verify the PIN and to ensure it supports the transaction type Insert the customer s card or press to Cancel the transaction The transaction will now continue as a normal Sale transaction ...

Page 48: ... to reverse the transaction Press if the printout is readable else press to print the cardholder receipt again The acquirer will send a response to the reversal request The terminal will print a merchant receipt Press if the printout is readable else press to print the merchant receipt again If a reversal is attempted after the 30 second window this screen will be displayed Press to confirm failur...

Page 49: ...ction for the expected value may be made If following a Pre Authorisation transaction the value of the transaction increases e g as a result of an extended stay at a hotel an additional Pre Authorisation transaction may be required Press at the Idle Screen Highlight Pre Auth as described earlier and then press Insert Swipe card The Pre Auth menu screen will be displayed Enter the amount and then p...

Page 50: ...tion will be required If your terminal is not configured to automatically perform the additional Pre Authorisation you may have to perform a Top Up as follows Press at the Idle Screen Highlight Top Up and then press Terminal will check the card The Top Up menu screen will be displayed Enter the additional amount and then press Type in the Txn ID and then press Insert Swipe card Type in the PIN and...

Page 51: ...orisation transaction will be required If your terminal is not configured to automatically perform the additional Pre Authorisation you may have to perform a Top Up as follows Press at the Idle Screen Highlight Top Up and then press Terminal will check the card The Top Up menu screen will be displayed Enter the additional amount and then press Type in the Txn ID and then press Insert Swipe Card No...

Page 52: ...l amount is confirmed with the customer Completion Swipe Card Press at the Idle Screen Highlight Completion as described earlier and then press Enter first pre auth code and then press Enter the code as described previously in Data Input Enter the final amount and then press You may be asked to enter first Txn ID and then press Enter the code as described previously in Data Input Swipe the cardhol...

Page 53: ...if the printout is readable else press the button to print the merchant receipt again Terminal will print a cardholder receipt Press if the printout is readable else press to print the cardholder receipt again Completion Insert Card Press at the Idle Screen Highlight Completion as described earlier and then press Insert the customer s card into the terminal Enter the final amount and then press Te...

Page 54: ...e cardholder receipt again You may be asked to enter first Txn ID and then press Enter the code as described previously in Data Input Press at the Idle Screen Highlight Completion as described earlier and then press Press if the printout is readable else press the button to print the merchant receipt again Enter first pre auth code and then press Cardholder to sign the receipt Check if they match ...

Page 55: ...card Press if the printout is readable or press to print the cardholder receipt again The terminal will check the card Check Signature press if OK Press if not OK Press to Cancel Terminal will connect to the host Press if the printout is readable or press button to print the merchant receipt again Terminal will receive a response from the host Note If the account is not valid a screen similar to t...

Page 56: ...er s card Press if the printout is readable or press to print the cardholder receipt again The terminal will check the card Remove the card from the terminal Terminal will print the merchant receipt Cardholder to enter the PIN code and then press Press if the printout is readable or press to print the cardholder receipt again Terminal will connect to the host Note If the account is not valid a scr...

Page 57: ...terminal i e If SALE and REFUND are the only two transaction types enabled you will only see Force SALE and Force Refund transactions available Select Force Sale from the transaction menu The terminal will check the card The Force Sale menu screen will be displayed Enter the sale amount and then press The terminal will request the auth code from the original transaction Type in the code and then t...

Page 58: ... the printout is readable or press to print the cardholder receipt again Press if the printout is readable or press to print the merchant receipt again All Force transaction types will behave in the same manner as their original transaction except they will NOT go online to the acquirer for authorisation as they have already been authorised ...

Page 59: ...Page 59 Move 5000 User Guide Copyright 2018 Ingenico Sample Receipts End of Day Report ...

Page 60: ...Page 60 Move 5000 User Guide Copyright 2018 Ingenico Not Authorised Receipts ...

Page 61: ...Page 61 Move 5000 User Guide Copyright 2018 Ingenico Cancelled Receipts Waiter Setup Receipts ...

Page 62: ...Page 62 Move 5000 User Guide Copyright 2018 Ingenico Gratuity Verified by PIN Receipts ...

Page 63: ...Page 63 Move 5000 User Guide Copyright 2018 Ingenico Gratuity Verified by Signature Receipts Sale Verified by Signature Receipts ...

Page 64: ...Page 64 Move 5000 User Guide Copyright 2018 Ingenico Sale Verified by PIN Receipts ...

Page 65: ...Page 65 Move 5000 User Guide Copyright 2018 Ingenico Refund Verified by Signature Receipts ...

Page 66: ...Page 66 Move 5000 User Guide Copyright 2018 Ingenico Self Install Receipt ...

Page 67: ... shown is in your favour the value shown will be debited from the customer CR indicates that the value of transactions shown is NOT in your favour the value shown will be credited to the customer The number of transactions that add up to the total shown will always be shown on the left of the value Any gratuity and cashback amounts are included in the TOTAL and SUB TOTAL as well as in the breakdow...

Page 68: ...the Ready Screen Z Totals are not connected to your Banking totals X Z Totals Report Merchant ID Terminal ID Report for receipt numbers 0001 0026 Number and value of debit transactions sales Number and value of credit transactions Refunds Card Scheme Name Card Scheme Name Number and value of debit transactions sales Number and value of credit transactions Refunds Indication if totals were reset or...

Page 69: ... copy of the transaction receipts Waiter ID has a range from 1 to 99 Waiter ID 00 is the Shared Waiter ID normally used for seasonal or part time employees or if you do not wish to specify individual waiters If you are looking to set up waiter ID please refer to Purchase with Gratuity section of this manual The terminal will either print the message WAITER TOTALS RESET or WAITER TOTALS NOT RESET d...

Page 70: ...or Waiter ID 03 SHARMILA Number and value of debit transactions sales Number and value of credit transactions Refunds Gratuity amount for SHARMILA Number and value of debit transactions sales Number and value of credit transactions Refunds Total Amount of GRATUITY received Time Date report printed Indication if totals were reset or not WAITER TOTALS Merchant Name Merchant Address1 Merchant Address...

Page 71: ...Reports the following screens will be displayed Press to perform your End of Day Banking or press to return to the Idle Screen The terminal will contact each acquirer selected and print a short report Press to bank ALL card schemes Press to select card scheme to be banked Press to go to Waiter Totals This screen will be displayed if Waiters are configured Press to print report or to return to the ...

Page 72: ... Time date of banking Session indication diagnostic code Receipt number if host session changes a session number will be populated i e 40IF1 76 if field is blank the session has not changed BANKING TOTALS Merchant Name Merchant Address1 Merchant Address2 Merchant No 6815414 Terminal ID 32870069 ACQUIRER NAME TOTALS AGREED PREVIOUS TOTALS FOR RECEIPTS 0027 0032 5 301 63DR 0 00CR TOTAL 5 301 63DR MA...

Page 73: ...arison Time date of banking Session indication diagnostic code Receipt number if host session changes a session number will be populated i e 40IF1 76 if field is blank the session has not changed BANKING TOTALS Merchant Name Merchant Address1 Merchant Address2 Merchant No 6815414 Terminal ID 32870069 ACQUIRER NAME TOTALS NOT AGREED PREVIOUS TOTALS FOR RECEIPTS 0027 0032 5 301 63DR 0 00CR TOTAL 5 3...

Page 74: ...es other than the following should only be used on the advice of the Helpdesk Selecting Function Codes To access the Function Codes Menu press the button until the System Menu is displayed Touch Select Function on the screen to select it Type in the Function Code required and then press to select it Press to select the highlighted option This screen will only be displayed if a Supervisor Code is r...

Page 75: ...34 as described in Selecting Function Codes above The following screens will be displayed Press to change Supervisor Code or press to return to the Idle Screen Re enter new code and then press to submit code Use or to correct mistakes Enter current code and then press to confirm Use or to correct mistakes Press to confirm code change Enter new code and then press to submit code Use or to correct m...

Page 76: ...onnect to your preferred provider Press to change to Manual Mode Touch the screen to highlight the required network and then press to select it The terminal will scan for and list all the available networks The terminal will register with the selected network Press to confirm The terminal will now remain in Manual Mode until you re select Automatic Mode Note A scroll bar will be visible on the rig...

Page 77: ...Menu is displayed and enter the Function Code 40 as described in Selecting Function Codes above Add Waiter Press to setup waiters or press or to return to the Idle Prompt Press when you have typed in the waiter s name The details will be printed Touch the screen to highlight the required option and then press to select it or press to exit The details will be printed before returning to the Waiter ...

Page 78: ...s to confirm waiter to be deleted or press or to return to the Waiter Setup Menu Type in Waiter Code and then press If was pressed the details of the waiter being deleted will be printed Print Waiters Return to the Waiter Setup Menu as described above Touch Print on the screen to highlight it and then press A list of waiters that have been setup in the terminal will be printed ...

Page 79: ... Press to delete the last character of the name or press to delete the entire name Type in Waiter Code of name to be changed and then press Type in the new name as described previously and then press when completed Press to confirm waiter name to be changed or press or to return to the Waiter Setup Menu The details will be printed before returning to the Waiter Setup Menu ...

Page 80: ...to exit back to the Waiter Setup Menu without deleting the waiters Create Defaults Return to the Waiter Setup Menu as described above Touch Create Defaults on the screen to highlight it and then press The terminal will print confirmation that Waiter Defaults have been created Press to Create Defaults Press or press to exit back to the Waiter Setup Menu without creating the defaults Create Defaults...

Page 81: ...l will automatically adjust for Daylight Saving However if you have a need to amend either of them this is achieved as follows Press the button until the System Menu is displayed and enter the Function Code 30 as described in Selecting Function Codes above Press if the date is correct or type in the correct date ddmmyy and then press Press if the time is correct or type in the correct time hhmm an...

Page 82: ...h a battery specifically designed for this terminal Only use appropriate chargers and batteries listed in the Ingenico catalogue Do not short circuit the battery Do not attempt to open the battery container Used batteries must be disposed of at appropriate sites There is a risk of explosion if the battery is incorrectly inserted or placed in a fire Electrical power outlet The electrical power outl...

Page 83: ...urged to comply with these regulations The terminal is protected by a specially fitted and certified cover enabling use in proximity to a fuel pump Electronic health appliances The handset is a radio transmitter which may interfere with health appliances such as hearing aids pacemakers hospital equipment etc Your doctor or the equipment manufacturer will be able to provide you with appropriate adv...

Page 84: ...is labelled in accordance with European Directives 2002 96 EC concerning Waste Electrical and Electronic Equipment WEEE and 2006 66 EC concerning Batteries and Accumulators These provisions require producers and manufacturers to become liable for take back treatment and recycling upon end of life of equipment and batteries The associated symbol means that WEEE and waste batteries must not be throw...

Page 85: ...ard reader or any other part of the terminal has not been modified These checks should provide warning of any unauthorised modifications to the terminal and any suspicious behaviour of individuals that have access to your terminal The terminal detects any tampered state and will repeatedly flash the message Alert Irruption and further use of the terminal will not be possible If the Alert Irruption...

Page 86: ...otection requirements with respect to electromagnetic compatibility EU Directives According to harmonised EU standards Product Product Type Standards Issue date 1999 5 EC R TTE Directive Move 5000 All product type EN 60950 1 2006 2009 A11 2010 A1 2011 A12 Contactless EN 302 291 1 2 EN301 489 1 EN 301 489 3 EN 50357 EN 50364 2005 2008 2002 2001 2001 GSM GPRS UMTS EN 301 489 1 EN 301 489 7 EN 301 48...

Page 87: ... correctly with magnetic strip facing the side of the terminal Swipe the card again with a continuous and fluid movement Verify that the magnetic strip is not damaged grooved or cracked Make sure you have correctly inserted the smart card into the smart card reader and only removed it when prompted to do so The receipt is not printed Check the presence and proper positioning of the paper roll Adju...

Page 88: ...Page 88 Move 5000 User Guide Copyright 2018 Ingenico Notes ...

Page 89: ...Page 89 Move 5000 User Guide Copyright 2018 Ingenico ...

Page 90: ...Page 90 Move 5000 User Guide Copyright 2018 Ingenico ...

Page 91: ...Page 91 Move 5000 User Guide Copyright 2018 Ingenico ...

Page 92: ... for any loss damage or injury that may be incurred as a result of any errors or inaccuracies The product is varied to suit requirements and as such some features may vary or be disabled This document should be accepted as a guide only to the use of the product In the effort for continued improvements in design and quality products features and information regarding setting up installation and use...

Reviews: