


Copyright ©2018, Infoblox, Inc.All right reserved.
5.
6.
7.
8.
9.
1.
2.
1.
Lift the appliance and position it in front of the equipment rack.
Align the chassis slide rails on the appliance with the rack rail assemblies on the posts of the equipment rack.
Slide the appliance into the rack rail assembly.
Secure the rack ears to the rack with three (3) 10-32 screws on each side of the rack.
Powering the Appliance
The Infoblox 4005 Series appliances ship with two (2) hot-swappable AC power supply modules (PS1 and PS2) and matching AC power cables.
Infoblox also offers optional DC power supply modules. Infoblox recommends using the power cables that ship with the appliances to connect
each power supply to separate power circuits. In the event of a power failure on one circuit, the appliances can then operate on the other circuit.
To power the appliance:
For each power supply, connect a power cable between the power connector on the back of the appliance and a properly grounded and
rated power circuit that meets the provisions of the current edition of the National Electrical Code, or other wiring rules that apply to your
location. Make sure that the outlet is near the appliance and is accessible.
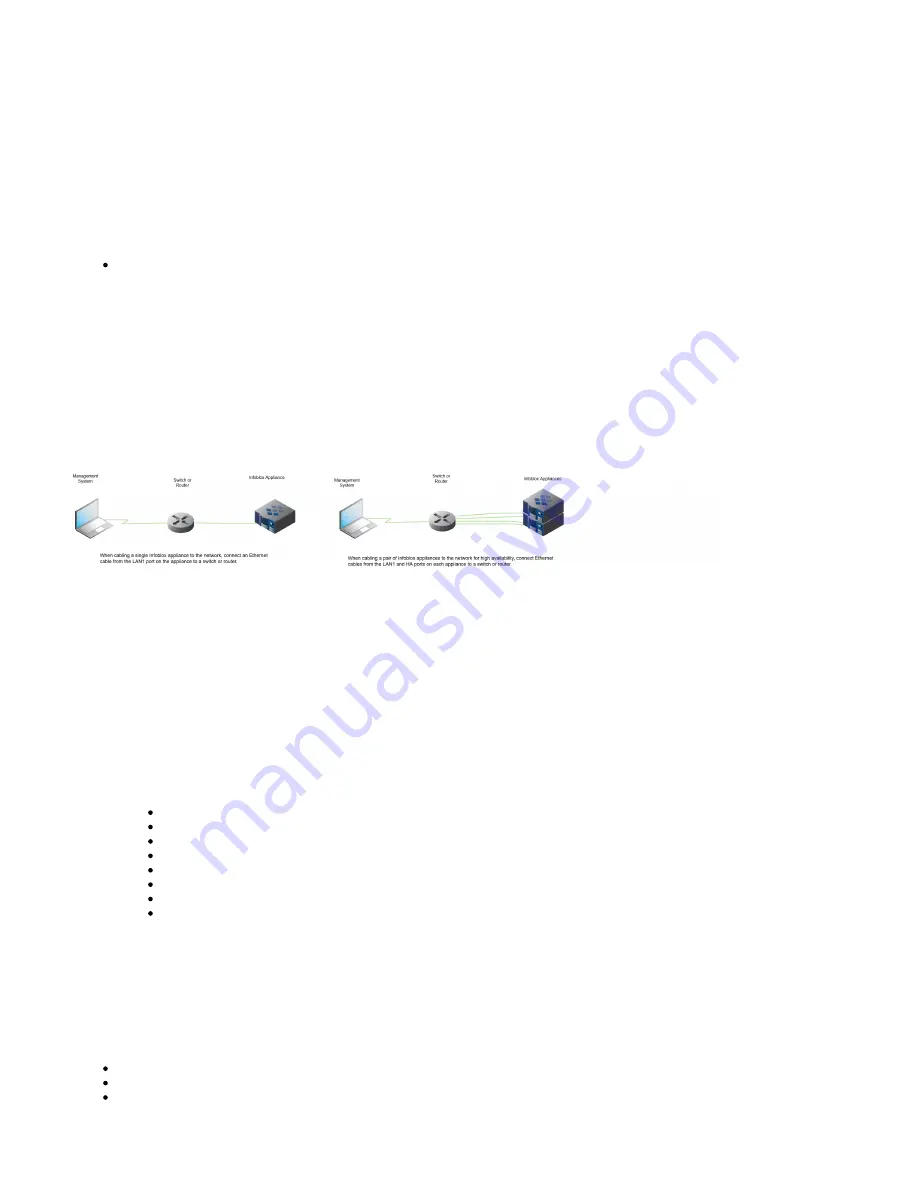
Cabling the Appliance to a Network
Use one or more Category 5/6 Ethernet cables to connect the appliance to the network.
Connect an Ethernet cable from the LAN1 port on the appliance to your network switch or router.
(Infoblox IB-4015 and IB-4025 appliances only) If you want to connect your appliance for HA (high availability), connect the HA ports on
both appliances to a switch on your network. The VIP (Virtual IP), LAN1, and HA port addresses must be on the same subnet and must
be unique for that subnet.
Cabling a Single Appliance and an HA Pair to a Network
Appliance–Network Connectivity
By default, an Infoblox appliance automatically negotiates the optimal connection speed and transmission type (full or half duplex) on the physical
links between its LAN1, LAN2, HA, and MGMT ports and the Ethernet ports on a connecting switch.
Occasionally, the Infoblox appliances may fail to auto-negotiate that speed and type, and instead connect at lower speeds of either 100 or 10
Mbps using potentially mismatched full- and half-duplex transmissions. If this occurs, begin by determining whether there is a firmware upgrade
available for the switch. If so, apply the firmware upgrade to the switch and test the connection. If that does not resolve the issue, manually set the
ports on the Infoblox appliance and on the switch to make 1000-Mbps full-duplex connections. See the section
in
Modifying Ethernet Port Settings
the
for the steps to resolve the problem.
Infoblox NIOS Administrator Guide
(Applies only to Infoblox IB-4015 and IB-4025 appliances) To ensure that VRRP (Virtual Router Redundancy Protocol) works properly,
configure the following settings at the port level for all the connecting switch ports (HA, LAN1, and LAN2):
Spanning Tree Protocol: Disable. For vendor specific information, search for “HA” in the Infoblox
Knowledge Base system at
http://www.infoblox.com/en/support/support-center-login.html
Trunking: Disable
EtherChannel: Disable
IGMP Snooping: Disable
Port Channeling: Disable
Speed and Duplex settings: Match these settings on both the Infoblox appliance and switch
Disable other dynamic and proprietary protocols that might interrupt the forwarding of packets
Use the Grid Manager from a management system to access, set up and administer the Infoblox appliance. For management system
requirements and access instructions, see
.
Accessing the Infoblox 4005 Series Appliance
Field Replaceable Units
The Infoblox 4005 Series appliances provide for several replaceable units in the system:
Hard disk drives
Fan modules
AC power supplies


