background image

Copyright ©2018, Infoblox, Inc.All right reserved.

On/Off Switch

A power switch to turn the power supply of the appliance on and off. The switch is hidden. Usea small blunt object,
such as a paper clip, to gently push the switch.

Power LED

An LED that glows green when there is power to the appliance. When it is dark, the appliance is not receiving power,
even if the power cable is plugged in. When it glows red, there is an error. Ensure that you power on the appliance
through the On/Off switch using a small blunt object, such as a paper clip.

USB Port

Reserved for future use.

IPMI Port

Dedicated Ethernet port used for LOM (Lights Out Management) with specific releases of NIOS.The IPMI/LOM Port
supports 10/100/1000 Mbps operations. Ensure that the IPMI port is properly connected to the network before you
configure LOM through the Grid Manager for remote management. The IPMI port auto-negotiates up to Fast Ethernet
100BASE-TX speeds; ensure that the switch port to which the IPMI port connects will auto-negotiate to 100Mbps
operation.Follow best practices for IPMI usage in the network by not allowing the IPMI port to connect to the
general-use data center network or to 1 Gbps/10 Gbps switch interfaces.

MGMT Port

A 10/100/1000-Mbps gigabit Ethernet port for appliance management, or for appliance services on the network. You
enable the MGMT port and define its use through the Grid Manager after the initial setup.

LAN1 Port

A 10/100/1000-Mbps gigabit Ethernet port that connects the appliance to the network. You use the LAN1 port for
initial appliance setup. The LAN1 port carries all traffic if you do not enable the MGMT and LAN2 ports. The passive
node in an HA pair (supported in the Trinzic2210 and 2220 appliances) uses this port to synchronize the database
with the active node.

Console Port

A male DB-9 serial port for a console connection to change basic configuration settings and view basic system
functions through the CLI (command line interface). If your system lacks a DB-9 serial port, use a properly grounded
USB-to-Serial dongle for connection to the serial console port. If the dongle is connected to a laptop, the laptop also
must be properly grounded. Failure to do so may cause damage to the serial console port of the Infoblox appliance.
Infoblox is not responsible for such damage. For DB-9 pin assignments, see 

DB-9 Console Port and RJ-45 Port

.

Pinouts

HA Port (Active for high
availability in the
IB-4015 and IB-4025
appliances)

A 10/100/1000-Mbps gigabit Ethernet port through which the active node in an HA (high availability) pair connects to
the network using a VIP (virtual IP) address. HA pair nodes also use their HA ports for VRRP (Virtual Router
Redundancy Protocol) advertisements. ND-4005 and TR-4005 Reporting Models: The HA Port is inactive and
reserved for future use. See 

 for appliance support details.

SFP/SFP+ Interfaces Support Summary

LAN2 Port

A 10/100/1000-Mbps gigabit Ethernet port that connects the appliance to the network. The LAN2 port is disabled by
default. You enable the LAN2 port and define its use through the Grid Manager after initial setup.

UID Button

The unit identification button. In a rack environment, the UID feature enables easier location of a server when moving
between the front and rear of the rack. You can also identify the appliance through the Grid Manager and CLI
command.

Ethernet 


Port LEDs

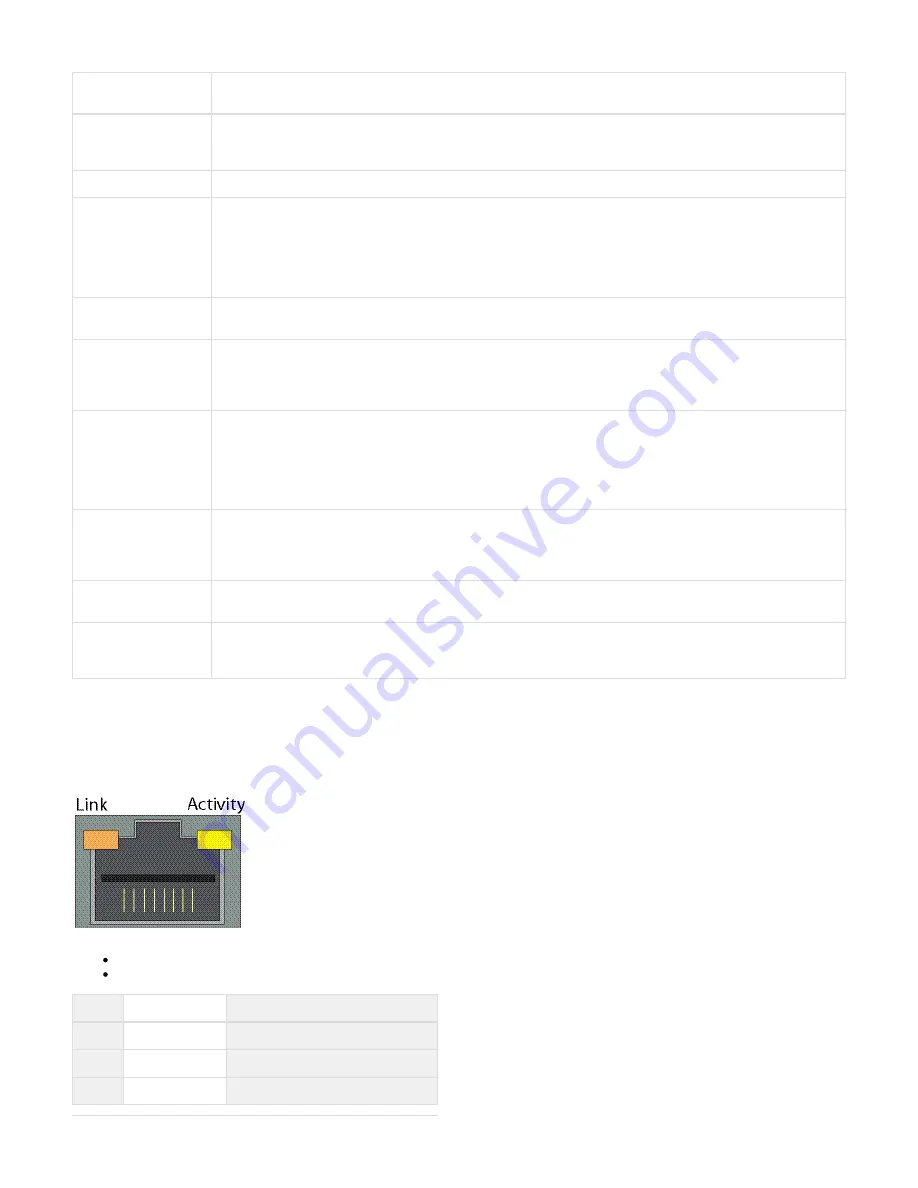
To see the link activity and connection speed of an Ethernet port, you can look at its Activity and Link LEDs. The 

 shows the status

 below

figure

the LEDs convey through their color and illumination (steady glow or blinking).


Ethernet Port LEDs (inc. SFP+ interfaces where noted)

Category 5 Cable: Up to 100 Mbps
Category 5e/6 Cable: Up to 1Gbps

Label

Color

Port Status

Activity

Blinking Green

Link is Up and Active (SFP+ only)

Steady Yellow

Link is up but inactive

Blinking Yellow

Link is up and active

Summary of Contents for IB-4015

Page 1: ...Infoblox Installation Guide 4005 Series Appliances Infoblox IB 4015 and IB 4025 Network Insight ND 4005 Trinzic Reporting TR 4005 ...

Page 2: ...foblox 4005 Series Appliance 12 2 1 Connecting To The Appliance 14 2 2 Auto Provisioning NIOS Appliances 14 2 3 Specifying Appliance Settings 15 2 4 Infoblox NIOS CLI 16 3 Installing the Infoblox 4005 Series Appliance 17 3 1 Rack Mounting Procedures 17 3 2 Powering the Appliance 21 3 3 Cabling the Appliance to a Network 21 4 Field Replaceable Units 21 4 1 Managing the Disk Subsystem 22 4 2 Hard Di...

Page 3: ... 4025 include the following Support for Grid management and all administrative features for Infoblox IPAM DNS DDNS and DHCP Optional 10GbE or 1GBE SFP SFP system configurations for fiber or copper support High availability support LOM Lights Out Management support Field replaceable hard disk drives and fan modules Hot swappable AC supplies Optional DC power supplies CC and FIPS for IB 4015 IB 4025...

Page 4: ...rved Install a sticker on both of the back corners of the top cover as shown in this picture Install stickers for each of the fans into the chassis as shown in this picture Install a sticker for each power supply module as shown in this picture ...

Page 5: ...E or 1GBE SFP SFP system configurations for fiber or copper support Management through the Infoblox Grid LOM Lights Out Management support Replaceable hard disk drives and fan modules Hot swappable AC or DC power supplies in a redundant 1 1 configuration Note The Network Insight ND 4005 does not support HA operation and acts only as a Grid member Infoblox Reporting TR 4005 Product Overview The Inf...

Page 6: ...below The hard disk drives are concealed under a removable drive bay door You must remove the door to access the hard disk drives as shown in the For more information see and figure Ethernet port LEDs Interface Connector Pin Assignments Table below describes the Infoblox 4005 Series front panel components Front Panel Components Component Description Hard Disk Drives Four hot swappable Infoblox dat...

Page 7: ...ort for a console connection to change basic configuration settings and view basic system functions through the CLI command line interface If your system lacks a DB 9 serial port use a properly grounded USB to Serial dongle for connection to the serial console port If the dongle is connected to a laptop the laptop also must be properly grounded Failure to do so may cause damage to the serial conso...

Page 8: ...use the internal Ethernet ports the Infoblox 1GbE SFP or 10GbE SFP ports replace the functionality in the original system MGMT LAN1 HA and LAN2 ports thereby disabling the built in MGMT LAN1 HA and LAN2 ports 10GbE support accepts Infoblox provided SFP 10GbE Short Range and Long Range transceivers Cisco SFP Direct Attach 10GSFP Cu or HP HPJ9283B SFP Direct Attach 10GSFP Cu transceivers You may mix...

Page 9: ...net ports are auto sensing and automatically adjust to standard straight through and cross over Ethernet cables DB 9 Console Port and RJ 45 Port Pinouts DB 9 Connector Pin Assignments Pin Signal Direction 1 not used 2 Receive Input 3 Transmit Output 4 DTE Ready Output 5 Ground 6 DCE Ready Input 7 RTS Request to Send Output 8 CTS Clear to Send Input 9 not used RJ 45 Connector Pin Assignments Pin 10...

Page 10: ...affic Appliance Rear Panel The Infoblox 4005 Series appliances ship with dual AC power supplies and six fan modules The power supplies and fan modules are field replaceable The power supplies are also hot swappable so you can replace any one of them at a time without disrupting the operations of the appliance Infoblox 4005 Series Rear View Rear Panel Components Component Description Fan Modules Si...

Page 11: ...ectrical power budgets include the following Use of a single power supply or 1 1 redundant PSU power supply unit configuration see Appliance Rear Panel 1 GbE SFP network interface card see SFP SFP Interface Support 10 GbE SFP network interface card see SFP SFP Interface Support You may choose to order a field replaceable power supply to upgrade your appliance to a 1 1 redundant configuration Doing...

Page 12: ...he Infoblox 4005 Series Appliance The management system is the computer from which you configure and monitor the Infoblox appliance You access the appliance from the management system remotely across an Ethernet network or directly through a serial cable After completing the steps in Cabling the Appliance you can open an HTTPS connection to the appliance and access the Infoblox Grid Manager using ...

Page 13: ...0 x 9 x and 8 x Mozilla Firefox 32 x 31 x 25 x 21 x 16 x and 10 x Google Chrome 37 x 36 x 30 x 27 x 22 x and 16 x Microsoft Windows XP SP2 Microsoft Internet Explorer 7 x and 8 x Mozilla Firefox 32 x 31 x 25 x 21 x 16 x and 10 x Google Chrome 37 x 36 x 30 x 27 x 22 x and 16 x Red Hat Enterprise Linux 7 x Mozilla Firefox 32 x 31 x 25 x 21 x 16 x and 10 x Google Chrome 37 x 36 x 30 x 27 x 22 x and 1...

Page 14: ... using the NIOS CLI Note For serial port connections use only a properly grounded USB to Serial dongle If the dongle is connected to a laptop the laptop also must be properly grounded Failure to do so may result in damage to the serial console port of the Infoblox appliance Infoblox is not responsible for such damage Connect a console cable from the console port of the management system to the con...

Page 15: ...pliance and you can join the appliance to the Grid through the remote console You can login to the remote console using the user name and the Grid shared secret as the password admin Note When auto provisioning is disabled for an appliance and the network address is not preserved auto provisioning will be re enabled and a DHCP lease request is sent to the DHCP server if you reset the appliance usi...

Page 16: ...in Password Local Date Time and Time Zone or NTP Server IP Address On the last screen of the wizard click The Grid Manager application restarts If you have configured an HA pair use the VIP address Finish when you make an HTTPS connection to the HA pair Infoblox NIOS CLI The NIOS CLI allows you to configure and monitor the appliance using a small set of Infoblox commands Some tasks such as resetti...

Page 17: ...all the appliance in an environment that allows open air to the front and back of the appliance Do not obstruct the appliance or block air flow going from the front to the back of the appliance Rack Mounting Procedures The Infoblox 4005 Series appliances mount into a standard 19 48 cm equipment rack The appliances ship with accessory kits that contain the following a pair of rack slide brackets an...

Page 18: ...extend through the entire depth of the equipment rack Exercise caution when withdrawing the appliance from its position in the equipment rack For a four post rack mount you combine the bundled pair of rack ears with a pair of chassis rack rails providing up to 600mm depth in a four post rack The chassis rack rail assembly is bundled with the appliance at time of purchase This kit also is provided ...

Page 19: ...s kit is provided as a field replaceable unit For more information see International AC Power Cords The adjustable rail kit is designed for tight vertical spaces on the interior of a four post rack allowing for appliance installation in restricted rack spaces including 2U of available rack space The figure below shows a rail assembly Sliding Rack Rail assembly The adjustable rack rail kit includes...

Page 20: ...of designated space Extend the rack rail assembly backwards align the mounting holes on the chassis slide rails with the required cage nuts and fasten the back end of the rack rail to the two cage nuts on the rear post of the designated space As noted the rack rail assembly has an extension range from the minimum of 600mm to a maximum of 900mm Perform Steps 2 and 3 for the second rack rail assembl...

Page 21: ...work Connectivity By default an Infoblox appliance automatically negotiates the optimal connection speed and transmission type full or half duplex on the physical links between its LAN1 LAN2 HA and MGMT ports and the Ethernet ports on a connecting switch Occasionally the Infoblox appliances may fail to auto negotiate that speed and type and instead connect at lower speeds of either 100 or 10 Mbps ...

Page 22: ... monitor the disk subsystem through the Grid Manager and the front panel LEDs for the disk drives You can also view disk status by using the CLI command show hardware_status To see a detailed status report log in to the Grid Manager and from the tab select the appliance and then click the Grid Grid Manager Detailed Status icon For more information on the panel refer to the Detailed Status Infoblox...

Page 23: ... Manager Detailed Status Installing disks that are not qualified and shipped from Infoblox could cause failures in the appliance You can access the disk drives from the front of the appliance Each disk drive weighs about 2 pounds 90 kg You can remove or replace a defective drive without interrupting appliance operations or network services To remove a disk drive Identify and verify the failed driv...

Page 24: ...t a time You can remove a second disk only after you replace the first disk and the array completes its rebuilding process Do not remove a disk drive if the array is rebuilding This could result in an appliance failure Verify the status of the array before removing a disk drive You can hot swap a drive while the appliance remains in production Some conditions may require powering down the applianc...

Page 25: ...trator Guide Replacing Fan Modules The Infoblox 4005 series appliances ship with five hot swappable fan modules so you can replace a fan module without interrupting appliance operations Each fan has an air vent that allows warm air to flow out of the appliance If a fan stops operating due to removal or a failure the appliance continues to run and generates an SNMP trap You can also monitor the sta...

Page 26: ...ick into place Reconnect the power cable If the power supply is fully seated powered on and operating properly the LED glows steady green Changing DC Power Supplies In DC power configurations the Infoblox 4005 series appliances ship with two redundant hot swappable auto switching DC power supplies To replace an Infoblox 4005 series DC power supply do the following Disconnect the DC power cable fro...

Page 27: ... its original AC power supplies RMA shipment before back to Infoblox Keep your DC power supplies in your facility until you receive your replacement appliance International AC Power Cords Infoblox offers replacement AC power cords for international markets as listed For availability contact your Infoblox sales representative below International AC Power Cords Infoblox Part Number International Ite...

Reviews: