background image

4.2 System   

Click the navigation bar [System] and it displays the following 
three option tabs: System, Time and Advanced, as shown in Figure 
4-3.  
 

4.2.1 System Information 

The initial interface of System Settings displays related system 
information, such as basic information, network settings, alarm 
settings, NTP settings, H.264/MJPEG video settings. 
 

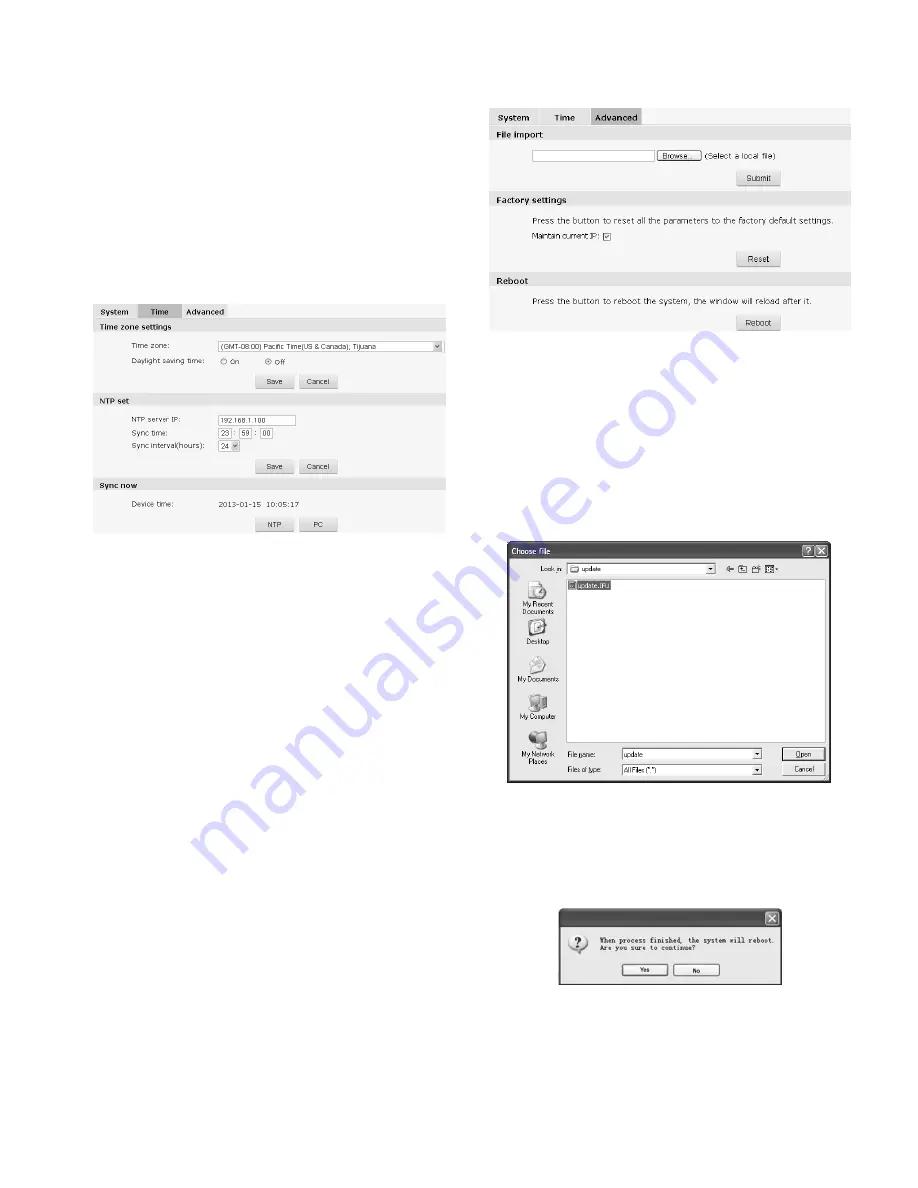
4.2.2 Time Settings 


Fig. 4-4 “Time” Settings 


Time Zone Settings 

Time Zone: Select the desired time zone in the scroll box, and then 
click “Save” to save it.   
There are 33 time zones for your selection: 
GMT-12:00~GMT~GMT+13:00. 
If Daylight Saving Time is applied in your region, please enable 
daylight saving time. 
After settings completed, please click the button “Save”. 

 
NTP Settings 

Set the NTP server’s IP address, synchronization interval, etc.   
After completed, please click the button “Save”. 
 

Sync now 

There are two sync modes: local sync and NTP sync.   
Local Sync means the system time is consistent with that of local 
PC. In the NTP Sync mode, the system will automatically adjust 
time to the same as that of NTP Server. 


4.2.3 Advanced Settings 


Fig. 4-5 “Advanced” Settings 


Software Update 

Free software update is provided for V1492MR-T series PTZ 
camera.  
As required by the user, we will send an update letter to confirm the 
product version, provide the latest software link for downloading, 
and assist user in updating the software. 

 
Follow the steps below to update software: 

Click “Browse” button in the interface and the file selection dialog 
box will pop up. 


Fig. 4-6 

 
Select the update file, and press “Open” button. The selected update 
file will be displayed in the Software Update box. 
After that, click “Submit” button to update software. 
After update is finished successfully, the following information will 
appear: 


Fig. 4-7 


Click “Yes” to update. The update time required varies with the 
different program. During update, do not power off. Otherwise, it 
may cause update failure or program damage. 
Interface below appears during waiting for update.   

Summary of Contents for V1492MR-18TH

Page 1: ...use Infinova s V1492MR T series HD 1MP and 2MP Integrated IP PTZ Camera with IR Illuminators Based on the network technology this camera system can be very convenient for you to realize network transmission and control of digital videos and provide you with professional remote video service which is highly reliable and economical for various applications ...

Page 2: ...eir respective proprietors FCC Warning The HD 1MP and 2MP Integrated IP PTZ Cameras with IR Illuminators comply with the FCC rules Operation is subject to the following two conditions This device may not cause harmful interference This device must accept any interference received including interference that may cause undesired operation The HD 1MP and 2MP Integrated IP PTZ Cameras with IR Illumina...

Page 3: ...ended by manufacturer Position power source and related wires to assure they will be kept away from ground and access way Refer all service matters to qualified personnel Save product packaging to ensure availability of proper shipping containers for future transportation Indicates that the un insulated components within the product may carry a voltage harmful to humans Indicates operations that s...

Page 4: ...gs 12 4 3 9 MDA Settings 12 4 3 10 DDNS Settings 12 4 3 11 UPnP Settings 12 4 4 Camera Settings 13 4 4 1 V1492MR 20TH Camera Settings 13 4 4 2 V1492MR 18TH Camera Settings 13 4 5 Audio Video Settings 14 4 5 1 Video Settings 14 4 5 2 OSD 15 4 5 3 Motion Detection 15 4 5 4 Saving Path 16 4 5 5 Audio Settings 16 4 6 PTZ Functions 16 4 6 1 Presets 16 4 6 2 Autopans 16 4 6 3 Patterns 17 4 6 4 Home Retu...

Page 5: ... 30fps or 1280 720 30fps Built in imported high efficiency IR LED wavelength 850 nm for super night vision with IR effective range up to 330ft 100 m The power consumption of the IR LED can be automatically adjusted as per the zoom level of the camera so as to deliver an ideal night vision effect Supports infrared light focusing to avoid defocusing phenomenon Three Simultaneous Video Streams Dual H...

Page 6: ...A Focus Auto Manual M A Shutter Auto 1 1 5s 1 30 000s Auto 1 30s 1 10000s DSS Yes Image Mirror Off H mirror V mirror HV mirror Off H mirror Image Freeze Yes DNR OFF MANU AUTO level 1 3 White Balance AUTO MANU SODI MERC AGC Yes WDR OFF WDR WDR AD WDR AD WDR ON OFF Backlight Compensation ON OFF Defog Processing Yes Camera Others Sharpness adjustable Slow AE Sharpness adjustable Wavelength 850nm LED ...

Page 7: ...Turns on below 59 F 15 C Turns off above 68 F 20 C Construction High strength aluminum alloy stainless steel Environmental Rating IP66 Mounting Surface wall pole side corner pole top Window Type HD transparent glass Window Size 2 32 2 32 59mm 59mm Unit Weight 48 50lbs 22kg Shipping Weight 55 12 lbs 25kg Unit Dimensions L W H 19 26 13 79 18 11 489 2 mm 350 2 mm 460 mm Physical Box Dimensions L W H ...

Page 8: ...cture the PTZ camera has to be mounted at the edge of desktop Thus something related to the intensity and other factors of the desktop has to be taken into consideration To mount the PTZ camera 1 Drill a few holes 55mm in diameter for easy cable routing carefully with proper distance from the edge of desktop and then follow the drilling drawing below to prepare well 2 Thread the cables through the...

Page 9: ...th the base plug and slightly rotate them for a tight connection 3 Mount the PTZ camera to the bracket properly to finish installation Shown as below Wall Mount Bracket Structure 2 4 Pole Mount Pole side mount is to install the PTZ camera to the cylinder via linkage components It is necessary to fix a connection board to the cylinder recommended diameter 140mm via a hoop before installing Then ins...

Page 10: ...re installing Then install the corner mount brackets to the Corner Mount Adapter After it is fastened steadily just mount the PTZ camera on the wall bracket to complete the mounting Bracket Dimension To mount the PTZ camera 1 Fit the corner mounting adapter to a corner in a proper position 2 Fix the mounting bracket to the adapter with six screws 3 Thread the cable through the brackets 4 Connect t...

Page 11: ...r application 3 2 Set IE Browser When the PTZ camera is working users can view images with IE browser before which it is required to set the security property of the browser in order to download the ActiveX controls normally 1 Click Tools in the menu bar and then the pop up Internet Options 2 Select Security in the pop up Internet Option as shown in the figure below Fig 3 1 Security Option 3 Selec...

Page 12: ...cale Click the button to snapshoot and to enter the storage path Default C InfiPlayerAX Picture V1492MR T series supports local recording Click the recording button to start recording when the button changes to click it to stop recording During recording REC appears on the screen Click the button to enter the recording storage path Default C InfiPlayerAX Video Users can set the snapshootting and r...

Page 13: ...nc Local Sync means the system time is consistent with that of local PC In the NTP Sync mode the system will automatically adjust time to the same as that of NTP Server 4 2 3 Advanced Settings Fig 4 5 Advanced Settings Software Update Free software update is provided for V1492MR T series PTZ camera As required by the user we will send an update letter to confirm the product version provide the lat...

Page 14: ...age directly If it is reset to 192 168 1 100 you may be unable to enter the webpage Then you have to set the host IP to 192 168 1 IP segment like 192 168 1 25 After setting you can enter the webpage and modify and save the IP of PTZ camera and then the host IP will be restored to the relevant IP segment Note 1 The operation of online resetting should be performed under qualified personnel s guide ...

Page 15: ...load can be achieved 4 3 3 SMTP Settings Fig 4 17 SMTP Settings User needs to set mail server recipient etc in SMTP settings interface Server IP Set mail server address From Set sender s mail address To Mail address of recipient CC Mail address of the person copy to Authentication Enable or disable authentication function This function should be set according to authentication requirements of mail...

Page 16: ...n as precise to two places of decimal 4 3 9 MDA Settings Fig 4 23 MDA settings In the MDA interface users can set the server IP and the Port No 4 3 10 DDNS Settings Figure 4 24 DDNS Settings Dynamic Domain Name System DDNS synchronizes the host name and dynamic IP address continuously Users don t have to memorize the dynamic IP address but enter the dynamic domain name to connect the IP camera DDN...

Page 17: ...de videos are displayed in color B W mode videos are displayed in black and white Special Functions Mirror mode Off H mirror V mirror and HV mirror Freeze On Off Pst Freeze Preset Sharpness Auto Manual In the Auto mode sharpness can be automatically adjusted as per the videos in the Manual mode horizontal and vertical sharpness can be adjusted to 0 63 Slow AE Adjust the exposure time to 1 48 The l...

Page 18: ...uring mode switching Lucidness turn on off the lucidness function IR Correction t turn on the IR correction function to avoid the virtual focus which brought by the infrared light On Off Auto optional 4 5 Audio Video Settings Click the button Audio Video in the navigation bar to display the following interface Fig 4 29 Video Settings Video OSD Motion Path and Audio can be set in this interface Cli...

Page 19: ...ig 4 30 OSD include Titles PTZ info and Date OSD Click the ON buttons and you can set the device title as well as its location PTZ information and date OSD Titles The PTZ camera supports 2 titles Title 1 There are two options of Text and Image for instance to show a logo Click Text and you can enter a title in the context box which allows up to 127 bytes a z A Z and 0 9 Click Image and you can cli...

Page 20: ...ct the preset number 1 255 available 2 Set the Preset title which allows a maximum of 16 characters including a z A Z 0 9 space and underline Then click Set button to save the title 3 Change the PTZ and lens position by clicking the direction keys and lens function keys iris focus and zoom 4 Click button to save the current position as a preset 5 Select the preset No 1 255 6 Press button to call u...

Page 21: ...position before power off 4 6 5 Normal Tour Fig 4 38 Normal Tour Tour is a combination of different actions like Preset 1 32 Pattern 1 4 and Autopan 1 4 This PTZ camera system supports up to 6 tours with 14 actions associated for each one and also the interval between actions can be set After normal tour is properly set in the interface you can call up certain one under PTZ Functions in the live v...

Page 22: ...he Threshold level Fig 4 41 Sensitivity Settings The Threshold level of sensitivity can set to 0 10 which could be adjusted according to light conditions Fig 4 42 Power Settings Power Set Adjusting the power can change the IR lamp brightness for different digital zoom level When the ambient light is proper and with small digital zoom level the power can be set at a low level but if the ambient lig...

Page 23: ...elevant alarm response way for alarm input or motion detection alarm SD card out or network break which can be Alarm out 1 if Net Contact is selected Alarm output 1 is unavailable on the webpage Mail FTP SD card or Audio After setting completed click Save button to take effect Alarm Schedule V1492MR T series can set the effective alarm schedule Select the alarm period if Sunday is selected alarm w...

Page 24: ...duce how to add and delete an account by super user Click Account Settings button the following account information will display The Num item shows the current user number In Property column stands for super user stands for common user In Operation column means to delete means to edit user information Fig 4 48 1 Add a User 1 Click enter the interface of Add a User Fig 4 49 Add a User 2 Enter the d...

Page 25: ...us and Pan Tilt speed in this interface To start the PTZ camera you can press the direction keys Note Do not release the key before operation stops can be used to control the iris The button is use to reduce the iris The image will become dim when you press this button The button is used to increase the iris The image will become bright when you press this button can be used to perform zoom operat...

Page 26: ...ideo to display the dialog box as shown in Fig 5 3 and click the option Turn On PTZ to tick it Fig 5 3 After Turn On PTZ being selected as shown in Figure 5 3 click Area Zoom and press the left mouse button to drag a frame to keep the selected area centered and zoomed in or out area zoom in or out on the screen Click somewhere of selected area with mouse the target can be centered in video menu Fi...

Page 27: ...TZ you can double click the left mouse button to display the video in the full screen mode Double click it again to restore Snapshot can be performed by clicking the right mouse button Just click the right mouse button on the screen and tick Snapshot from the pop up menu to save the current image to the local PC Deselect Turn On PTZ and click Digital Zoom as shown below Figure 5 7 Drag your mouse ...

Page 28: ...n the webpage Please follow the steps below for DIP settings Step 1 Loosen the two screws that fasten DIP switch window with a Philips head screwdriver Then take off the window The DIP switch is shown in figure below Step 2 Remove the DIP switch window and user can see two DIP switches S1 on the left is to set the camera address and S2 on the right is to set the baud rate and reset the camera Plea...

Page 29: ... O 92 I I O I I O I O 93 O O I I I O I O 94 I O I I I O I O 95 O I I I I O I O 96 I I I I I O I O 1 2 3 4 5 6 7 8 Camera ID Switch Positions 97 O O O O O I I O I On O Off 98 I O O O O I I O 99 O I O O O I I O 100 I I O O O I I O 101 O O I O O I I O 102 I O I O O I I O 103 O I I O O I I O 104 I I I O O I I O 105 O O O I O I I O 106 I O O I O I I O 107 O I O I O I I O 108 I I O I O I I O 109 O O I I...

Page 30: ...26 ...

Page 31: ...pecific setting Pin of S2 DIP Switch Baud Rate 2 3 2400 BPS OFF OFF 4800 BPS ON OFF 9600 BPS OFF ON Hardware Resetting The camera IP address can be restored to the default factory setting via the DIP switch S2 Pin of S2 DIP Switch 5 6 ON OFF After the PTZ camera is normally started set the 5th and 6th switches to ON and OFF respectively About 10 seconds later the camera IP will be restored to defa...

Page 32: ...ameter shall be 0 8000mm A lower diameter value tends to cause voltage loss and even system instability 0 8000 1 000 1 250 2 000 10 283 86 451 137 716 218 1811 551 20 141 42 225 68 358 109 905 275 30 94 28 150 45 238 72 603 183 40 70 21 112 34 179 54 452 137 50 56 17 90 27 143 43 362 110 60 47 14 75 22 119 36 301 91 70 40 12 64 19 102 31 258 78 80 35 10 56 17 89 27 226 68 90 31 9 50 15 79 24 201 6...

Page 33: ...e Use shielded cables or thread the cables through metal tubes for burial thus to ensure the electric connection to the metal tube In case it s difficult to thread the cable through the tube all the way it s acceptable to use tube threaded cables only at both ends of the transmission line yet the length in burial should be no less than 15 meters The cable sheath and the tube should be connected to...

Page 34: ...Infinova 51 Stouts Lane Monmouth Junction NJ 08852 U S A Tel 1 888 685 2002 USA only 1 732 355 9100 Fax 1 732 355 9101 sales infinova com V1 4 1409 ...

Reviews: