background image

TRADUCTION OF THE ORIGINAL USER’S INSTRUCTIONS 

 KS450FTeng ED.2011 rev.34 

19

13.2 -- ELECTRICAL CONNECTION 
Verify that voltage and power frequency are compatible with the range reported on the identification plate. Variations 
of more than 10% cause working anomalies, which can be either significant or not. 
  
The power cable is complete with a pin that complies with CEE  Norms. If  it is not of the same type  used in 
your  premises,  it  will  have  to  be  replaced  (this  should  be  done  by  skilled  personnel,  for  example  an 
electrician).  
 

The phasing performed by the manufacturer allows to get a correct rotation of all motors by connecting the 

wires in the following order: L1=R, L2=S, L3=T, 
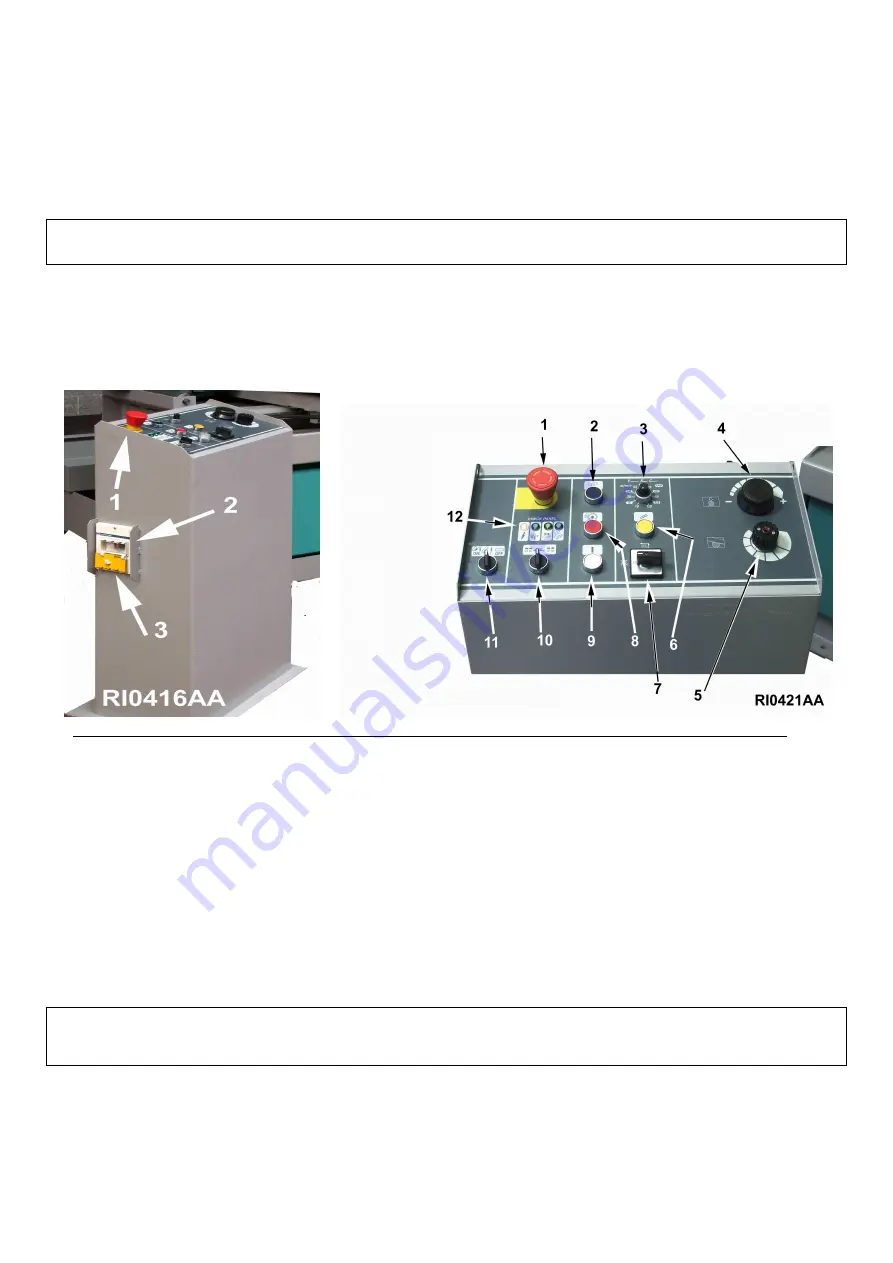
The control box of the picture below is the “stand alone” model , to be placed at floor .  The “built-in machine” model 
has the same controls and functining . 
Verify the correct working as follows (the blade protection structure must be closed): 
a) if the EMERGENCY BUTTON – picture RI0416, No. 1 - is pushed, turn it 1/4 of a round in the direction shown on 
the button. 
b) push the button ON of the main switch – picture RI0416, No. 2 , the WHITE lamp must turn on.  
 

.


c) push the yellow button RESET – picture RI0421, No. 6 - for 6/10 seconds to start the hydraulic unit motor (all the 
GREEN lamps can turn on as well) and check the sawframe motions:  
BLACK button (picture RI0421, No. 2): the sawframe drops (you can change the down-feed speed by means of the 
speed selector – picture RI0421, No. 5). 
RED button (picture RI0421, No. 8): the sawframe stops and  lifts if you continue pushing. 
 
If this does not happen, turn off the machine by means of the main switch, disconnect the feeding plug in and 
reverse the connection of two of the wires inside the pin, with exclusion of the green or yellow earthing cable. 
Start again from point a) 
 
d) switch –off  the saw by pushing the button OFF on the main switch (picture RI0416, No. 2). You can place as much 
as 3 locks – picture RI0416, No. 3 – on this switch to prevent unauthorized access to the equipment 
  
If no button is pushed for 10/15 minutes, the electronic panel disable the hydraulic unit motor. 
 To start it again, push the yellow button – picture RI0421, No. 6. 
 

In  case  an  external  tension  transformer  is  supplied,  put  it  in  a  safe  place  away  from        the 

loading/unloading area. 
 
  14 - BLADE TENSION 
This  machine  is  supplied  with  a  blade  which  is  already  tensioned,  so  as  to  allow  the  motor  to  start  (as  a 
matter of fact, it doesn’t work if the blade doesn’t have the right tension).   
Before starting, we suggest you to verify what follows: 

Summary of Contents for KS 450 FT

Page 1: ...R S INSTRUCTIONS KS450FTeng ED 2011 rev 34 1 IMET Spa Loc Tre Fontane Cisano Bergamasco Tel 035 4387911 Fax 035 787066 Web site www imetsaws com E mail imet imetsaws com Semiautomatic hydraulic bandsaw KS 450 FT USER S INSTRUCTIONS ...

Page 2: ...strial and not for household use In the event of electromagnetic interferences the user is responsible for solving the problem with the help of the technical assistance by the manufacturer Before installing the machine the user must take into account possible electromagnetic problems of the working area In particular we suggest to install the machine away from signalling control and telephone cabl...

Page 3: ... N D O F T H E C O U N C I L O F T H E 1 5 1 2 0 4 R E G A R D I N G T H E E L E C T R O M A G N E T I C C O M P A T I B I L I T Y E M C D I R E C T I V E 2 0 0 6 9 5 C E O F T H E E U R O P E A N P A R L I A M E N T A N D O F T H E C O U N C I L O F T H E 1 2 1 2 0 6 R E G A R D I N G E L E C T R I C A L E Q U I P M E N T F O R U S E O F L O W V O L T A G E L V D H A R M O N I Z E D S T A N D A R...

Page 4: ...staff and the good results of the work Useful is the European Guideline 2003 10 CE The noise depends mostly on the cutting material on its size and on the clamping Considering that the above mentioned decibels could be exceeded we recommend the operator to use personal protections headsets plugs and so on when working for a long time with high noise levels 3 1 ADDITIONAL HEALTH AND SAFETY REQUIREM...

Page 5: ...ns made on the machine or by the use of it in a place not corresponding to the required environmental specifications 4 1 The manufacturer does not offer further warranties written or verbal explicit or implicit for its products and does not offer implicit warranties on sale potential or compliance with particular uses not foreseen by the original agreement The a m limitations and exclusions can al...

Page 6: ...it 9 9 Fittings optionals 10 10 Blade choice 11 11 Correct use and contraindications 12 12 Machine description 15 13 Work preparation 16 14 Band tensioning 17 15 Functioning 19 16 Regulations 23 17 Maintenance for the user 24 18 Band running in 25 19 Machine running in 26 20 Draining of used produced substances 26 21 Trouble shooting 27 22 Machine demolition 29 23 Spare parts 29 24 Maintenance for...

Page 7: ...witch as a final step the sawframe goes back to the cut start position and the blade stops hydraulic regulators for feed speed and feed force located on control consol mechanical blade tensioning up to 1700 kg cm 2 microswitch for checking the tension instant stop in case the blade breaks or is not tensioned hydraulic front vice free to move transversally on the worktable hydraulic vice opening 46...

Page 8: ...EB 450X300 45 300 330 270 320 320X270 320X300 IPE 300X150 HEB 320X300 60 SINISTRA 210 200 180X270 HEB 200X200 60 DESTRA 160 150 150X270 HEB140X140 7 INSTALLATION This machine works according to the parameters provided by the manufacturer if it is correctly installed and the minimum requirements are observed as follows It must be used indoor and with temperatures ranging from 5 to 40 C The relative...

Page 9: ...take into account possible electromagnetic problems of the working area In particular we suggest to install the equipment away from signalling control and telephone cables radio television transmitters and receivers The supply cable has to be as short as possible with no twists All doors coverings and frame have to be closed when the saw is running Do not make any modifications to the machine exce...

Page 10: ...d to the packing by means of screws so as to hinder it from moving during the shipment see drawing in the following page 9 ACCESSORIES ASSEMBLING The necessary information for the installation are given along with the accessories Anyway you can find here a short description of how they work Connection element RAKS450 OPTIONAL Required to connect in solidarity any material support roller to the loa...

Page 11: ...ectric equipment of the building and the electric supply of the machine It allows to work with a different voltage than the standard one that is 400V 50 Hz Available voltages 230V 460V 500V 575V Minimal lubrication THE MINIMAL LUBRICATION SYSTEM APPLIED TO THE BANDSAW ALLOW TO ELIMINATE ALMOST COMPLETELY THE TRADITIONAL COOLANT SYSTEM THE MATERIAL IS MUCH CLEANER AND THERE IS NO WASTE SPILLING OF ...

Page 12: ...al purpose tube solids and profiles available in all pitches M51 or SHL preferred for big solids of hardened steel INOX material too available in 3 4 and 2 3 pitch The teeth hardness increases and the fragility too by going from the material M2 to the M51 To make a good cut it s crucial to choose the right pitch t or NUMBER OF TEETH PER INCH z The blade must generally have the toothing as follows ...

Page 13: ...cessories for example the ESC Electronic Speed Control If the material size increases it is necessary to decrease the indicated values considering also the machine model and its performance and or some accessories such as the ESC Electronic Speed Control MATERIAL GROUP i e DIN denomination DIN N Maximum BLADE SPEED m min Minimum BLADE SPEED m min MOTOR SPEED 1or2 FEED FORCE COOL ratio 1 STRUCTURAL...

Page 14: ...20 15 HIGH 15 NiCr13Mo6Ti3 Nimonic 24662 20 15 HIGH 15 TITANIUM Ti1 37025 30 20 1 HIGH 10 G TiAl6V4 37164 35 20 1 HIGH 10 4 CAST IRON GG15 GG30 50 30 1 Med Lo w dry 5 not FERROUS ALUMINIUM AL99 5 GalSi15Mg 300 50 2 Med Lo w 2 BRONZE CuSn6 CuSn6Zn 120 40 2 1 Med Hig 2 COPPER G Cu Ke Cu 200 50 2 LOW 2 ...

Page 15: ... organized work area with suitable light and operating room 8 the whole equipment has to be correctly and constantly maintained and inspected on a regular basis 9 never use tools with different features from those for which the machine is designed for 10 never use this machine to cut material bigger than the cutting capacity 11 keep the cutting area clear of tools or other loose objects 12 never o...

Page 16: ...ome stickers which warn about the safety measures that have to be taken by the operator who runs it Their meaning easy to understand is indicated in the following chart 3 2 OPERATOR S SAFETY This section illustrates the safety protections applied on the saw according to the current legislation in the field of safety ...

Page 17: ...restoring of the working cycle 3 2 2 PROTECTION AGAINST ACCIDENTAL CONTACTS Complete metallic protection of the blade and the pulleys the blade cleaning brush and the back blade driving pads Forward metallic moving guard fixed to the forward blade driving pad It assures the coverage of the blade in every position except for the stretch of blade which makes the cut Joint to the blade driving pad it...

Page 18: ...t working of the machine In the following paragraphs you will find all information to use the saw in the best way and for a very long time All necessary indications for the machine marking follow the identification plate with the serial number is fixed on the front right angle 13 MACHINE SETTING FOR STARTING Check that the machine is damage free and that the standard equipment that includes tools ...

Page 19: ...SET picture RI0421 No 6 for 6 10 seconds to start the hydraulic unit motor all the GREEN lamps can turn on as well and check the sawframe motions BLACK button picture RI0421 No 2 the sawframe drops you can change the down feed speed by means of the speed selector picture RI0421 No 5 RED button picture RI0421 No 8 the sawframe stops and lifts if you continue pushing If this does not happen turn off...

Page 20: ...utting giving the operator the possibility to adjust down feed speed and power At the end of the cut the sawframe stops and lifts thanks to a limit switch The control panel includes 1 General switch that can be locked with magnetic and thermal protection for the whole equipment complete with minimum tension coil picture RI0416 No 2 3 2 CHECK PANEL includes function and control lights 3 Emergency a...

Page 21: ...h if all GREEN lights remain off it s necessary to push the YELLOW button for a few seconds to activate the control panel and the hydraulic unit if the machine is inactive for 10 15 minutes the control circuit turns off again a turn the selector picture RI0421 No 10 to open the vice jaw in order to place the material on the worktable Make sure the bar is positioned correctly and move the jaw to cl...

Page 22: ... oil pump by pushing the YELLOW button picture RI0421 No 6 and close the vice by means of the proper selector picture RI0421 No 10 Make sure that the material is really clamped and that the clamping pressure is correct i e it does not cause material deformations e place the front blade guide as close as possible to the material by loosening the upper handle picture RI0415 No 5 Be certain that it d...

Page 23: ...with the blade and or the sawframe loosen the handle below the vice support and move it horizontally along the slot Fasten the handle again when the vice is in the correct position To make this operation easier we suggest to have no material on the worktable or clamped in the vice 15 6 OVERLOAD PROTECTIONS The motor is protected against overheating by bi metal thermo protectors placed directly ins...

Page 24: ...s very important and along with the blade tensioning assures to get a good cut With the sawframe at 0 the sawframe up and the vice opened put a square at 90 on the worktable near the support jaws and very close to the blade before it collides with the teeth though While keeping the square still lower the sawframe till reaching the bottom and evaluate if the blade gets closer or farther from the sq...

Page 25: ...em It is a modular unit and it is assembled on the saw between the manifold base and the hydraulic valve on the hydraulic unit Equipped with a specific gauge to read the oil pressure and a rotating knob to adjust it Use the proper valve to reducing the vice clamping power to avoid the danger for example to deform the material Open the front door and turn the knob to adjust the pressure of hydrauli...

Page 26: ...operly closed the corresponding GREEN light turns ON When you have to change the blade because you need a different pitch or because of wear and tear or breaking you must follow the same procedure as the one described above In these cases it is highly recommended to clean carefully all parts in direct contact with the blade When running the blade adjusts by moving slightly away from the pulleys 17...

Page 27: ... of the gear reducer and of the electric motor Control also the oil level in the tank of the hydraulic unit as described in Maintenance for the user N B The heating of the mechanical parts and of the oil hydraulic parts for semiautomatic saws is normal during the usual working and anyway it does not exceed the conventional thermic limits of Norm EN563 Please see the OIL AND LUBRICANTS TABLE in ord...

Page 28: ... 13 the maximum pressure valve is broken 14 Quality of the hydraulic oil old too much liquid 15 There is water in the oil and or there is some condensate in the tank 16 Too high pressure over 20 BAR 17 The hydraulic pump is blocked seizure expansion oxidation 18 The circuit taps are closed 19 The cooling filters are obstructed or must be cleaned 20 The electro pump does not work see 3 4 5 9 24 21 ...

Page 29: ...leys and the blade backside is polished The blade guides are too tight the blade spirals up like a spring the more they are tight the more the blade twists Not enough coolant 6 THE CUTS SHOW A ROUND SURFACE Increase the band tension Move the blade guides toward the cutting area The teeth are too thin Reduce the cutting pressure 7 THE CUT IS NOT STRAIGHT Move the blade guides closer to the cutting ...

Page 30: ...dures are not required but it is necessary to take only some cares to avoid damages in the last phase of the machine life Generally you must empty the cooling installation tank take out the oil from the reduction box from the hydraulic or hydropneumatic installation Lock the parts that could move and cause danger or instability Remove the parts assigned to the differentiated draining for example t...

Page 31: ...F THE ORIGINAL USER S INSTRUCTIONS KS450FTeng ED 2011 rev 34 31 17 2 OILS AND LUBRICANTS In the following chart you can find information on the oils and lubricants of different brands that can be used with this saw ...

Page 32: ...uard the technical productive and safety features of this equipment according to the initial setting by the manufacturer To get a detailed knowledge of this machine you can find here enclosed Electrical scheme s divided into theme tables and made according to the current norms concerning this subject with index material indication reference code numbers Pneumatic or Hydraulic circuit If the users ...

Page 33: ...TRADUCTION OF THE ORIGINAL USER S INSTRUCTIONS KS450FTeng ED 2011 rev 34 33 ...

Page 34: ...TRADUCTION OF THE ORIGINAL USER S INSTRUCTIONS KS450FTeng ED 2011 rev 34 34 ...

Page 35: ...TRADUCTION OF THE ORIGINAL USER S INSTRUCTIONS KS450FTeng ED 2011 rev 34 35 ...

Page 36: ...TRADUCTION OF THE ORIGINAL USER S INSTRUCTIONS KS450FTeng ED 2011 rev 34 36 ...

Page 37: ...TRADUCTION OF THE ORIGINAL USER S INSTRUCTIONS KS450FTeng ED 2011 rev 34 37 ...

Page 38: ...TRADUCTION OF THE ORIGINAL USER S INSTRUCTIONS KS450FTeng ED 2011 rev 34 38 CLOSED ...

Page 39: ...TRADUCTION OF THE ORIGINAL USER S INSTRUCTIONS KS450FTeng ED 2011 rev 34 39 ...

Page 40: ...TRADUCTION OF THE ORIGINAL USER S INSTRUCTIONS KS450FTeng ED 2011 rev 34 40 ...

Page 41: ...TRADUCTION OF THE ORIGINAL USER S INSTRUCTIONS KS450FTeng ED 2011 rev 34 41 ...

Page 42: ...TRADUCTION OF THE ORIGINAL USER S INSTRUCTIONS KS450FTeng ED 2011 rev 34 42 ...

Page 43: ...TRADUCTION OF THE ORIGINAL USER S INSTRUCTIONS KS450FTeng ED 2011 rev 34 43 ...

Page 44: ...TRADUCTION OF THE ORIGINAL USER S INSTRUCTIONS KS450FTeng ED 2011 rev 34 44 ...

Page 45: ...TRADUCTION OF THE ORIGINAL USER S INSTRUCTIONS KS450FTeng ED 2011 rev 34 45 ...

Page 46: ...TRADUCTION OF THE ORIGINAL USER S INSTRUCTIONS KS450FTeng ED 2011 rev 34 46 ...

Page 47: ...TRADUCTION OF THE ORIGINAL USER S INSTRUCTIONS KS450FTeng ED 2011 rev 34 47 ...

Page 48: ...TRADUCTION OF THE ORIGINAL USER S INSTRUCTIONS KS450FTeng ED 2011 rev 34 48 ...

Page 49: ...TRADUCTION OF THE ORIGINAL USER S INSTRUCTIONS KS450FTeng ED 2011 rev 34 49 ...

Page 50: ...TRADUCTION OF THE ORIGINAL USER S INSTRUCTIONS KS450FTeng ED 2011 rev 34 50 ...

Page 51: ...TRADUCTION OF THE ORIGINAL USER S INSTRUCTIONS KS450FTeng ED 2011 rev 34 51 ...

Page 52: ...TRADUCTION OF THE ORIGINAL USER S INSTRUCTIONS KS450FTeng ED 2011 rev 34 52 ...

Page 53: ...TRADUCTION OF THE ORIGINAL USER S INSTRUCTIONS KS450FTeng ED 2011 rev 34 53 ...

Reviews: