


COMBI 200: use and maintenance
___________________________________________________________________________________________________________________
4
'
%
$
)
&
(
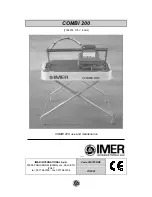
Fig.3.3
2SHUDWLQJXQLW
The operating unit consists of the following:
1.
A sliding unit guided by wheels on bearings (Fig.3.3-B and Fig.3.1-
A);
2.
An electric motor (Fig.3.3-C);
3.
A cutting unit consisting of a cutting disk (Fig.3.1-D);
4.
A maintained push-button (Fig.3.3-A);
5.
A cutting disk guard (Fig.3.1-H);
6.
A handle (Fig.3.3-D);
7.
An operating head clamping knob (Fig.3.1-F);
8.
A safety knob (Fig.3.1-G);
0DLQWHQDQFH
,QWURGXFWLRQ
The normal operations for ordinary maintenance can be carried out by non
specialized personnel provided they observe the safety indications listed in the
previous and following paragraphs.
0DFKLQHFOHDQLQJ
The machine must
RQO\
be cleaned when the machine is at a standstill.
7KHSRZHUVXSSO\VZLWFKHVPXVWEHWXUQHGWRWKH
SRVLWLRQ
DQGWKHSOXJVGLVFRQQHFWHGIURPWKHPDLQVSRZHUVXSSO\
♦
Do not used compressed air: this would send dust and residuals
into the most inaccessible corners of the machine.
♦
Check that the cooling liquid nozzles are not blocked.
♦
We recommend that the cooling water in the tank is changed every
day.
♦
Do not use detergents or lubricants which may harm the materials
of which the machine is made.
5HFRPPHQG SURGXFW IRU FOHDQLQJ DQG OXEULILFDWLQJ WKH
PHFKDQLFDOSDUWVRIWKHVDZ
:'
'LVSRVDORIZDVWHPDWHULDOV
To dispose of the waste materials produced by the machine, current
legislation must be observed.
5HSDLUV
Repairs of the electrical systems must only be carried out by specialized
personnel. The spare parts to be used for mechanical repairs must be original
,0(5 ,17(51$7,21$/ 6SD
parts and they should not be modified in any
way.
No further maintenance is required for the special structure of
&20%,
.
Check that the plug and plug-switch unit contacts are not damaged. If they are
oxidized, clean them immediately.
&OHDQLQJWKHWDQN
Clean the tank every time that sediment forms on the bottom, or at least once
a day. Failure to clean the tank could create problems for the immersion pump
which circulates water for cooling the cutting disk. To clean the tank, remove it
from the machine, secure the head, take it by the arms and wash it down with
direct water jets (this operation prevents direct contact of the electric parts and
the water jets), then clean it by hand with cloths or brushes.
♦
Pay attention to the cable when replacing the machine on the tank.
♦
Pay attention to the pump when releasing the machine and placing
it on the table.
5HSODFLQJWKHPRWRU
If you have to dismantle the electric motor, take care when re-fitting it on the
fixing plate.
∆
5HILWWKHHOHFWULFPRWRUXVLQJWKHVDPHEROWVFRG
7DE$DQGZDVKHUVFRG7DE$VRWKDWEROWV
ZLWKWKHLQFRUUHFWGLPHQVLRQVGRQRWGDPDJHWKHPRWRU
5HSODFHPHQWRIWKHGLVN
The diamond-dressed disk is manufactured in special material for cutting the
materials described above and must be cooled with water during the work
phase.
To replace the disk, the following procedure must be followed:
1.
Secure the axial slide of the operating head with the lever.
2.
Dismantle the front guard.
3.
Loosen the securing nut by turning it in a clockwise direction (left
hand thread), using a 10 mm spanner.
4.
Remove the disk by first moving it and then tilting it slightly to
extract it from its housing.
♦
When removing the disk, ensure that the cooling water jet nozzle is
not bent.
5.
Insert the new disk, by carrying out the operations described in
point 4 in reverse order, paying particular attention to the rotation
direction of the disk.
6.
Secure the disk nut correctly by turning it in an anti-clockwise
direction (left hand thread), ensuring that there is a torque of 1.8
Kgf.m
$WWHQWLRQ ZKHQ UHDVVHPEOLQJ WKH GLVN IODQJH FKHFN WKDW
WKHUH
DUHQRIRUHLJQERGLHVEHWZHHQWKHWLJKWHQLQJIODQJHDQGWKH
GLVN:KHQFOHDQLQJWKHIODQJHGRQRWXVHWRROVZKLFKPD\
DOWHUWKHVKDSHRIWKHIODQJH
([WUDRUGLQDU\PDLQWHQDQFH
After a work period of approximately one year, check that the operating unit is
stable; if not, carry out the following operations to stabilize it:
1.
Release the two nuts (Fig.4.1-A);
2.
Press down on the operating unit (near the plate)
3.
First push the right wheel in a diagonal direction towards the inside
$
$
$
Fig.4.1
4.
Secure the wheel nut by pressing it.
5.
Do the same with the left wheel.


