P
P
a
a
g
g
e
e
4
4
3
3
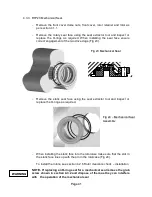
4.3.5 RTP30 Class 2 Hygienic Mechanical Seal.
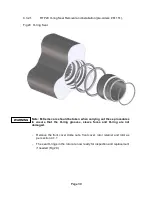
Fig 26 Class 2 Hygienic Mechanical Seal.
Read the general procedures before proceeding, refer to section 4.3.1.
-
Remove dome nuts (36), front cover (38), rotor retainers (35), rotors (41)
and front cover O-ring (39), see section 4.1.
-
The seal can now be accessed for inspection.
-
Remove O-ring (25), from the end of the shaft.
-
Remove the rotary seal face assembly from the shaft.
-
If required, remove the seal housing (67) from the rotorcase by releasing
the retaining nut (12), care should be taken as the stationary seal face
may still be installed.
-
If required, extract the stationary face from the seal sleeve, exposing the
O-rings. Note that there is an anti-rotation device incorporated into the
rotorcase (not shown) when replacing the seal housing (67), alignment
between the seal sleeve and rotorcase must be achieved to prevent
rotation.
Note: Extreme care should be taken when carrying out these procedures
to ensure that the seal faces are not damaged. If seals are being refitted,
ensure that seal faces remain matched.
-
Assembly is the reverse of the above procedure, ensure that all faces are
clean and free from damage.
W
W
A
A
R
R
N
N
I
I
N
N
G
G
W
W
A
A
R
R
N
N
I
I
N
N
G
G
W
W
A
A
R
R
N
N
I
I
N
N
G
G
Summary of Contents for Wright Flow Technologies RTP Series
Page 1: ...P Pa ag ge e 0 0 INSTALLATION OPERATION AND MAINTENANCE MANUAL FOR THE RANGE OF PUMPS...
Page 47: ...P Pa ag ge e 4 46 6 5 0 Specifications 5 1 Clearance Chart B A C Radial D C Radial...
Page 54: ...P Pa ag ge e 5 53 3 5 6 Typical Basic Pump Build RTP20 Shown...
Page 56: ...P Pa ag ge e 5 55 5 5 8 RTPTM Service History Pump Serial No Date Comments...


