31
Harrier GTE -
Installation & Servicing
INSTALLATION
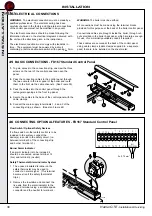
47 WIRING DIAGRAM - FD167 Standard Control Panel
VA
TCH1
TCH2
N
N
TS1
ZB
ZB
Dj6A
ZTB
(B)
L1
T1
BA
BA
T2
T6
T7
T8
S3
5
BA 4
2
L
BA
3
BA 6
BA 7
BA 8
BA 9
BA 10
BA 11
BA 12
B
Burner
BA
Connection strip
Dj 6 A
6 A circuit-breaker
L
Live
N
Neutral
TCH1
Stage 1 boiler thermostat
TCH2
Stage 2 boiler thermostat
TS1
Safety thermostat
VA
Alarm indicator
ZB
Burner switch
ZTB
STB-Test switch
Connecting strip
*
*
Optional
Connector
har7051
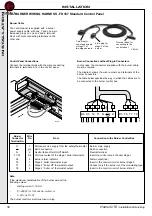
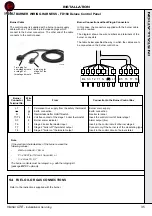
48 BASIC CONNECTIONS - FD168 Deluxe Control Panel
1. To gain access to the connection strip,
loosen the two screws located on either side
of the front of the panel.
2. Tilt the panel back.
3. Unscrew the two terminal strip cover screws
and remove the cover.
4. Pass the connecting cables to the control
panel through the two cut-outs in the rear
panel of the boiler and route them to the front
via the cable channel/s. (See Frame 35).
5. Pass the cables into the control panel
through the rectangular openings in the front
top panel.
6. Secure the cables to the base of the control
panel with the cable clamps.
7. Connect the mains to terminals 1, 2 and 3 of
the connecting strip as shown. (See also
Frame 49)
N
L
VA
AL
I
23
0V
50
Hz
N
L
N
L
N
L
N
L
10
9
8
13
12
11
3
2
1
VA
- T
S
5
4
7
6
CS
14
15
AL
IM
EN
T A
TI
ON
ST
RO
M
ZU
F†
HR
M
AI
N
SUP
PL
Y
POM
PE
D
E
REC
YC
LA
GE
KE
SS
ELK
RE
IS
PU
M
PE
SH
UN
T
PUM
P
AL
IM
EN
T A
TI
ON
ST
RO
M
ZUF
†H
R
M
AI
N
SUP
PL
Y
VO
Y A
NT
A
LA
RM
E
TS
TS
A
LA
RM
LE
UCH
TE
TS
A
LA
RM
IN
DI
CA
TO
R
VO
Y A
NT
A
LA
RM
E
TS
TS
A
LA
RM
LE
UC
HT
E
TS
A
LAR
M
IND
IC
A T
OR
CO
NT
ACT
D
E
SE
CUR
IT
E
SI
CH
ER
HE
IT
SK
ONT
AC
T
SA
FE
TY
C
ON
T A
CT
N
L
VA
AL
I
23
0V
50
Hz
N
L
N
L
N
L
N
L
VA
- T
S
CS
N
L
VA
AL
I
23
0V
50
Hz
N
L
N
L
N
L
N
L
VA
- T
S
1
3
1
2
6
INST
ALLA
TION

