background image

23

Falcon GTE - 

Installation & Servicing

INSTALLATION

41 BASIC CONNECTIONS (On/Off Burner Control - All Models)

For standard operation connect mains supply and heating pump as shown in the above diagram.

SONDE SONDE

SONDE SONDE

COMMANDE A DISTANCE

TL

LP

TAM

TF

VA         

ALI

230V- 50Hz

1

2

3

4

5

6

7

8

9 10  11


12


13


14


 15


16


17


18  19


20  21


22


23


24

25 26 27 28 29 30 31 32 33 34 35 36

13 12 11 10

THE

RMOS

TA

T LI

MITE

UR

 POUR

 S

VR

LIM

IT  THE

RMOS

TA

T F

OR

 S

VR

 L

OG

IQ

UE 

DE 

POMP

E


A

LI

M

ENT

A

TI

O

N


MA

IN 

SUPP

LY


S

TROM

ZU

FU

H

R


THE

RMOS

TA

D

'AMB

IA

N

C

E


FE

R

N

B

E

D

IEN

U

N

GSR

E

G

LE

RS


ROOM

THE

RMOS

TA

T


THE

RMOS

TA

D

E F

UM

EE

S


RAUC

H

GAS

THE

RMOS

TA

T


FL

U

GAS


THE

RMOS

TA

VO

YA

NT 

AL

ARM

E

AL

ARM

 IN

DI

CA

TOR

AL

ARM

LE

UC

HTE

POMP

D

C

H

ARG


SP

EI

C

HE

R

LAD

E

PUMP


LOAD

 PUMP


 ACC

ELE

RA

TE

UR


 HEIZ

U

N

GSPUMP

E


 HE

A

TIN

G

 PUMP


 V

A

NNE 

3 V

O

IE

S


 3

 - 

W

E

G

M

ISC

HE

R


 3

 - 

WA

Y V

A

LVE


SO

N

D

E EXTE

R

IE

UR

E


AUSS

ENFÜHLE

R


EXTE

R

N

A

S

EN

SOR


 SO

N

D

BRU

LE

UR


 BR

ENNE

R

FÜHLE

R


 BUR

NE

R

 S

EN

SOR


SO

N

D

BA

LL

O

N


BEI

STELL

SP

EI

C

HE

R

FÜHLE

R


SE

PARA

TE 

CA

LOR

IFIE

SEN

SOR


  SO

N

D

D

E

PAR

T


  V

OR

LAU

FFÜHLE

R


  WA

TE

R

 FL

OW

 S

EN

SOR

COMMA

N

D

A

 D

IS

TA

N

C

E

FE

R

N

B

E

D

IEN

U

N

GSR

E

G

LE

R

R

E

MO

TE 

CO

NT

RO

SW

IT

C

H

OPTION - ZÜBEHOR

OPTION - ZÜBEHOR - OPTION

OPTION-ZÜBEHOR

OPTION - ZÜBEHOR                      

OPTION - ZÜBEHOR - OPTION

TE

MP

ERA

TURWA

EC

HTE

R FÜ

SV

R

PUMP

ENL

OG

IK

PUMP

 L

OG

IC

F

A

L

5852

N         L

N       L

N      L

N

AF 

N

3x 0.75 mm

MAINS

ROOM STAT
(not supplied)

ALARM LIGHT

(not supplied)

CH PUMP

(not supplied)

This terminal block is for COMBI Models only

N

2

3x 0.75 mm

2

42 WIRING DIAGRAM - (On/Off Control - IC7 Control Panel - All Models)

F 6,3AT

Remove 
bridge 

LP

to benefit 
from the 
heating 
pump
logic

ZG

ZG

L

N

LP

TF*

TS

(RG)*

(RG)*

(TL)*

ZEH 1

TCH

(TAM)*

A

ZEH 2

P*

ZT

(B)

(CH)*

VA

BA

BA

BA

BA

8

BA

7

23

24

19

20

16

25

21

22

18

26

4

5

20

BA

BA

24

BA

13

BA

12

BA

17

23

BA

19

BA

22

BA

16

L1

T1

T2

B4

S3

BA

14

1

2

3

11 

10 

h

N

q

q

q

fal5923

A
B
BA
CH
CS
F6, 3AT
L
LP
N
P

Heating pump
Burner
Connection strip
Time counter
Safety contact
Fuse
Phase
Pump logic
Neutral
DHW Pump

RG
TAM
TCH
TF
TL
TS
VA
V3V
ZEH1

Control unit
Room thermostat
Boiler thermostat
Flue gas thermostat
Limiting thermostat
Safety thermostat
Alarm indicator
Three-way valve
Burner Summer/
Winter switch

ZEH2

ZG
ZT
*

Heating pump Summer/
Winter switch
Main switch
Test switch
Optional
Connecting strip
Connector

TEST

STB

WARNING

.

If the installation does not include a room thermostat (TAM), set three position switch 4 to    (see Frame 48) .

If the installation includes a room thermostat (TAM), set three position switch 4 to 

AUTO 

(see Frame 48) 

.

INST

ALLA

TION

Summary of Contents for Falcon GTE 4

Page 1: ...MIND When replacing any part on this appliance use only spare parts that you can be assured conform to the safety and performance specification that we require Do not use reconditioned or copy parts t...

Page 2: ...ce It is therefore important that no external control devices e g flue dampers economisers etc are directly connected to these appliances unless covered by these Installation and Servicing Instruction...

Page 3: ...boilers offering high efficiency operation ease of maintenance fuel flexibility and low emissions in a compact package Suitable for oil or gas operation the Falcon GTE range is supplied in a choice of...

Page 4: ...5854 Flues and flue structures in buildings BS 5885 Pt1 Gas burners with inputs 60kW and above NOTE TO THE INSTALLER LEAVE THESE INSTRUCTIONS ADJACENT TO THE BOILER BS 6644 Installation of gas fired...

Page 5: ...need to treat the water contained in all heating and indirect water systems particularly open vented systems It is assumed incorrectly that because boilers are operating in conjunction with what is a...

Page 6: ...the section and the location of which must comply with local recommendations Refer also to Frame 3 560 987 50 1 189 188 753 608 A B 51 111 214 355 346 205 heating outlet EO heating return EO 3 4 tapp...

Page 7: ...the advice of the gas supplier should be obtained The temperature within a boiler room shall not exceed 25o C within 100 mm of the floor 32o C at mid height and 40o C within 100 mm of the ceiling Fil...

Page 8: ...ations or the requirements of the local authority as or water undertakings In general commercial closed pressurised systems are provided with either manual or automatic water make up In both instances...

Page 9: ...storage cylinder is less than that required by the boiler A combined shunt DHW primary pump sized on the minimum flow to be required MUST be fitted Provided adequate heat dissipation can be achieved a...

Page 10: ...in BS 6644 and IGE UP 10 whilst BS 5410 Pt 1 similarly applies to OIL fired boilers The table below contains the minimum dimensions of the flue required for each boiler model in order to ensure suffic...

Page 11: ...The packages are listed in the order in which they are opened for assembly Tools required Phillips head screwdriver Wide flat screwdriver 13 and 17mm spanners hammer Silicone glue JDTE assembly tool S...

Page 12: ...e groove facing up and fix the height converter with two M10 x 25 bolts serated washers and nuts using a 17mm spanner 14 PREPARING THE SECTIONS 1 Support the rear section with a wooden block 2 Place a...

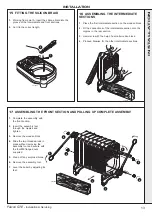
Page 13: ...the rear section 3 Hammer in with the help of a small wooden block 4 Proceed likewise for the other intermediate sections FAL5823 3 3 17 ASSEMBLING THE FRONT SECTION AND PULLING UP COMPLETE ASSEMBLY...

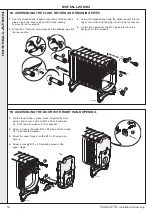
Page 14: ...WITH RIGHT HAND OPENING 3 Screw the threaded bush with the sensor pocket into the upper connection and the plug into the lower connection 4 On the front install the two M10 studs into the holes design...

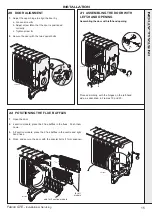
Page 15: ...g the door with left hand opening Proceed similarly with the hinges on the left hand side as described in Frames 19 and 20 22 POSITIONING THE FLUE BAFFLES 1 Open the door 2 4 section models place the...

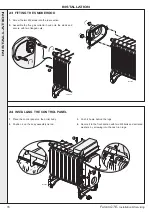
Page 16: ...od onto the studs and secure with two flanged nuts 1 FAL5832 FAL5833 2 24 INSTALLING THE CONTROL PANEL 1 Place the control panel on the boiler body 2 Position it on the body assembly tie rod 1 2 3 4 F...

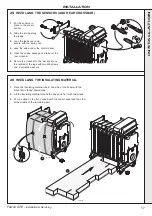
Page 17: ...5 Open the casing package and take out the rear crossbar 6 Secure the crossbar to the rear section on the outside of the lugs with two M8 screws and 2 serrated washers 26 INSTALLING THE INSULATING MA...

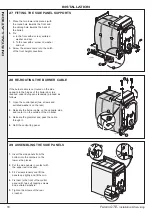
Page 18: ...opean standards proceed as follows 1 Open the control panel two screws and serrated washers on the rear 2 Relocate the burner cable on the opposite side and route it on the outside of the crossbar 3 R...

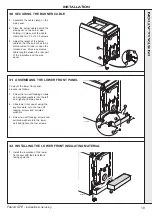
Page 19: ...he rear part of the insulation and the side panel FAL5843 3 2 1 31 ASSEMBLING THE LOWER FRONT PANEL To mount the lower front panel proceed as follows 1 Screw the two self tapping screws and serrated w...

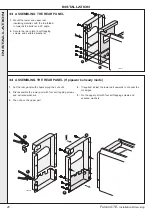
Page 20: ...crews and serrated washers 1 2 FAL5846 34 ASSEMBLING THE REAR PANEL If pipework already made 1 Cut the rear panel with shears along the cut outs 2 First assemble the lower part with four self tapping...

Page 21: ...self tapping screws and washers 1 2 FAL5848 37 ASSEMBLING THE FRONT PANEL 1 Put notches A on studs B of the lower front panel 2 Position point C in the centring groove of the side panel 3 Push the pa...

Page 22: ...ctrical control panel equipped with temperature control The control panel carton contains 1 control panel complete with burner connection harness The control panel incorporates a boiler thermostat con...

Page 23: ...EHOR OPTION Z BEHOR OPTION Z BEHOR OPTION TEMPERATURWAECHTER F R SVR PUMPENLOGIK PUMP LOGIC FAL5852 N L N L N L N AF N 3x 0 75 mm MAINS ROOM STAT not supplied ALARM LIGHT not supplied CH PUMP not supp...

Page 24: ...onnection block CS Safety contact ECS Domestic hot water control F6 3AT Delayed 6 3 A fuse L Live N Neutral P2 DHW shunt pump RG Connection block TCH Boiler thermostat TS Safety thermostat VA Alarm in...

Page 25: ...be separate from those of the power supply phase s which are wired direct to the burner via the installer supplied burner mains relay No 8 N Neutral from control panel interrupted by panel ON OFF swit...

Page 26: ...d 5 Boiler thermometer indicates boiler flow water temperature 6 Fuse 6 3 amp timed fuse 7 Boiler Thermostat Adjustment range 30 90o C for ON OFF burners and 30 90o C 1st Stage 26 86o C 2nd stage for...

Page 27: ...ion sequence If the burner has failed to light then it will lock out Press the reset button to restart the ignition sequence 10 Operate the boiler for 20 minutes and for gas fired boilers check the ga...

Page 28: ...ace the flue baffles into the flue ways 4 section models fit 3 flue baffles one each flue 5 8 section models fit 2 flue baffles only in the centre and right hand flues 12 Check the condition of the co...

Page 29: ...system hot examine all water connections for soundness Check the gas rate and measure the combustion CO CO2 content Complete the boiler log book Carry out functional checks as appropriate 58 SERVICING...

Page 30: ...30 Falcon GTE Installation Servicing NOTES...

Page 31: ...31 Falcon GTE Installation Servicing NOTES...

Page 32: ...uing improvement in the design and performance of its products The right is therefore reserved to vary specification without notice The Ideal Boilers Technical Training Centre offers a series of first...

Reviews: