background image

Wireless Sensor System 

Main Menu – G1 Series-2.4GHz

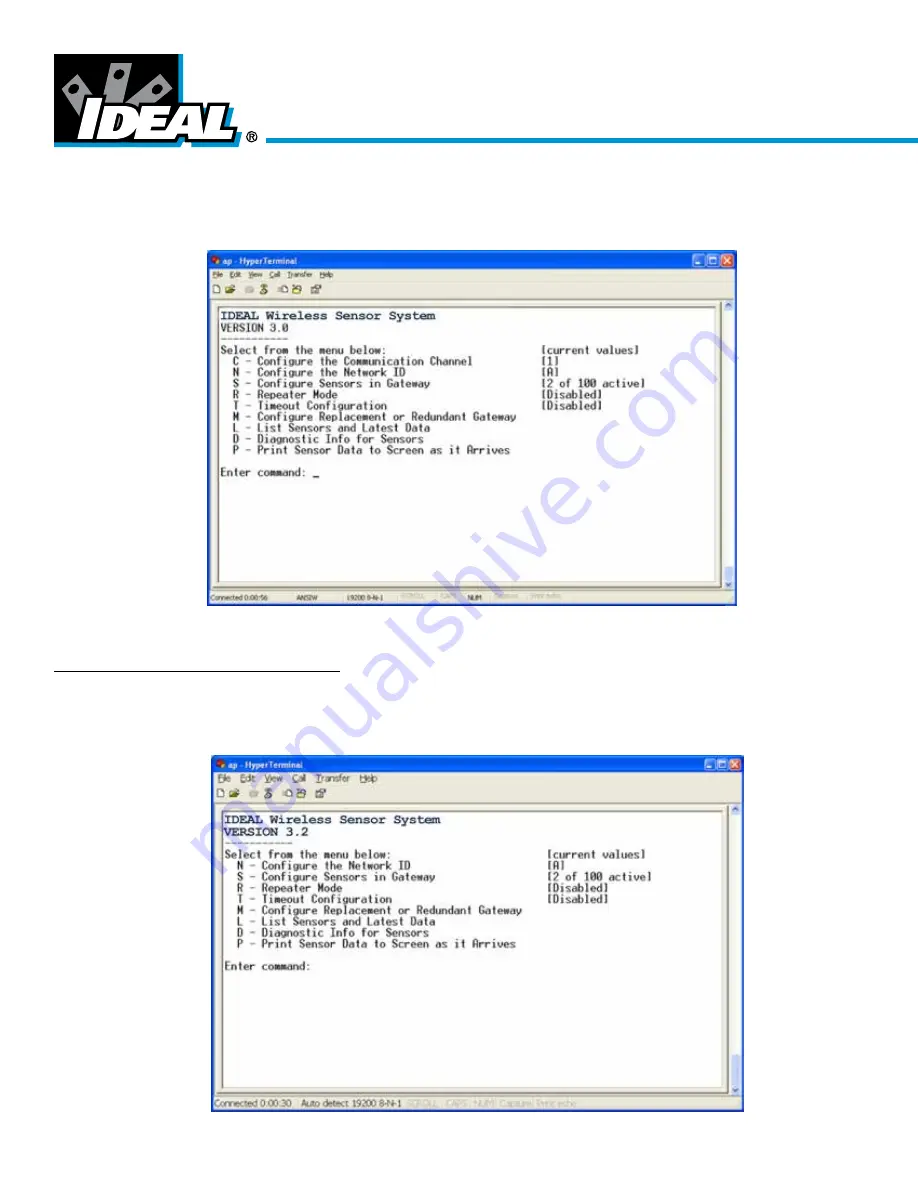
When any key is pressed the system menu will appear as shown below. The system menu also provides an indication of the 
Communication Channel, Network ID, and the number of devices configured to the gateway. 
To continue, enter the number shown on the left side of the screen for the desired command.

Note – The wired network parameters are not configured through this menu. See the following page for the Network Configuration 
Guide, for configuring the wired BAS interface (e.g. BACnet, Modbus, LonWorks).

http://www.idealwirelesssensors.com/support/

Main Menu - G2 Gateway - 915MHz

When any key is pressed the system menu will appear as shown below. The system menu also provides an indication of the 
Network ID, the number of devices configured to the gateway and other settings.


- 10 -

Summary of Contents for 58-N Series

Page 1: ...censed 915MHz ISM band and one on another channel at the upper end The G2 Series Gateway receivers have the ability to automatically change channels in the event of interference It is extremely unlikely that both channels will simultaneously be blocked Various configurations and sensor types are available The sensors need to be configured to a gateway prior to use Connect the USB port inside the e...

Page 2: ...stallation 1 Download the file 2 Unzip to a preferred location right Click Extract All 3 Plug in the 24V power supply to the gateway 58 PS 24V T 24VDC power supply sold separately Conductor with the colored sleeve is and terminates into the port on left labeled 24V the un sleeved conductor is the ground and terminates into the middle port labeled Ground and right port is unused 4 Connect the Wirel...

Page 3: ...pecific location and then click Next 7 Select the Search option deselect the removable media option and select Include this location then click browse to navigate to the folder where you unzipped the USB driver Click Next Users Guide 3 ...

Page 4: ...h your PC should provide a message bubble indicating the new hardware is found and ready to use Note the driver only needs to be located and installed once After the initial installation if you connect a new Wireless gateway to the same computer you can have Windows automatically find the correct driver without locating it manually Wireless Sensor System 4 ...

Page 5: ...eep these files in the same directory Do not launch HyperTerminal until after the USB driver has been installed This appendix describes how to configure HyperTerminal but the following settings are needed with any terminal emulator that is used Baud rate 19200 bps Data bits 8 bits Parity None Stop bits 1 bit Flow control None Emulation ANSI or Auto Detect Windows XP or Windows 2000 HyperTerminal i...

Page 6: ...access point and click OK COM 14 is used in this example If there is more than one COM port select the one for the highest number Note If more than one COM port is shown you can use System Properties through Windows Control Panel to determine which is the correct COM port To access System Properties on your PC using Windows XP select the following menu options 1 Start Menu Control Panel System 2 C...

Page 7: ...nfigured if you aren t immediately connected press the Call button or use the menu option Call Call Once you are connected you should see the startup message depicted below 7 After pressing a key you will be shown the options menu Return to the main section of this guide for further information 7 Users Guide ...

Page 8: ...ed 24V the un sleeved conductor is the ground and terminates into the middle port labeled Ground and right port is unused Gateway Configuration Note see page 2 7 above in order to install the USB driver and HyperTerminal This MUST be completed in order for a PC to com municate to a gateway Each WSG BAS gateway is pre configured with a Network ID and a communication channel The Network ID can be ch...

Page 9: ...igured are Net work ID and Sensor ID and these items are automatically assigned by the gateway Wireless Gatway Interface Ports and Status LEDs Wireless Gateway Power Connector Welcome Screen When the USB driver has been properly installed and HyperTerminal is properly configured the message Press any key to show menu will display in the HyperTerminal window Note If you see information from wireles...

Page 10: ...e of the screen for the desired command Note The wired network parameters are not configured through this menu See the following page for the Network Configuration Guide for configuring the wired BAS interface e g BACnet Modbus LonWorks http www idealwirelesssensors com support Main Menu G2 Gateway 915MHz When any key is pressed the system menu will appear as shown below The system menu also provi...

Page 11: ... key configuration will be cancelled and you will return to the main menu options Wireless communication for the system is based on 802 15 4 radios also used for ZigBee devices The four channels represent the 802 15 4 channels as follows System Channel 802 15 4 channel Center Frequency 1 26 2480 MHz 2 25 2575 MHz 3 15 2425 MHz 4 20 2450 MHz Channels 25 and 26 are outside the range of Wi Fi channel...

Page 12: ...next prompt press A Z to designate your Network ID preference and the Network ID will be immediately changed If you press N or press any other key configuration will be cancelled and you will return to the main menu options This option allws for easy user selection as well as a range of choices that is large enough to accommodate large scale deployment of sensors and gateways in close proximity Se...

Page 13: ... with a USB cable at any time before or after selection menu option S The USB connector on the sensor is located inside the enclosure lower left inside corner for battery powered devices Open the enclosure using a screw driver or other tool with the tabs provided When the USB configuration port is connected the status light on the gateway will BLINK continuously until the sensor is configured The ...

Page 14: ...ill look like the following Above screen is for G1 Series For a G2 Series CHANNEL is removed from the screen Information is retrieved from the sensor which is blank and the system will automatically assign it the next Sensor ID available in this case 1 The gateway also assigns the sensor its Network ID for communication This sensor is now functioning normally and transmitting data to the gateway 1...

Page 15: ...will update the sensor to match the gateway s communication configuration Note this option is only available if the configuration data is different between the sensor and gateway Note If a configuration error occurs due to a faulty connection of the USB port cable such as electrical noise the system may display some unknown data but will conclude with a message that the sensor configuration has no...

Page 16: ...onfiguration for redundancy is also the same as configuring for replacement in the unlikely event a gateway fails or is damaged A redundant or replacement gateway can be configured in just a few minutes Note the descriptions below only show how to configure the gateway for the wireless network parameters and wireless sensors The wired network parameters need to be configured through the Remote Use...

Page 17: ...evices have not been found Option 4 allows you to manually add or remove sensors from the gateway Also use this option to update a sensor s model number helpful if Listening mode was used to activate sensors Note the operation described here does not configure the wired network parameters of the replacement redundant gateway but only the wireless sensors that are to be configured to it See the Net...

Page 18: ... text file data logging through HyperTerminal another terminal emulator program or a custom designed application When this mode is enabled it will continue until terminated by typing SHIFT P Wireless Sensor System Note the header information and oldest data will scroll off the top of the screen as new information is added to the bottom 18 ...

Page 19: ...r which they are configured Repeaters will not repeat data from other repeaters and the gateway and repeaters will not display repeated data from the same sensor node Proper use of the Wireless Sensor Gateway as a repeater requires the use of the same Network ID as is used for the gateway These parameters can be selection through menu option N as listed earlier in this guide The repeater should be...

Page 20: ...rs that have stopped communicating Wireless Sensor System Press SHIFT T to enable the timeout Once enabled you are required to set the number of minutes before a sensor gets timed out This can be 15 120 minutes 2 hours This is a global timeout so all sensors activated in the system will be subject to this setting To deactivate reenter this option and press SHIFT T again You can also update the tim...

Page 21: ...hooting Each repeater node in the network increments a hop counter and updates the received signal strength for each data packet Diagnostic information could be used to determine if additional repeaters are needed to meet certain network specifications such as having more than one path to the gateway or potentially reducing the number of hops to the gateway 21 Users Guide ...

Page 22: ...ransmitter ID only valid in RF powered sensors Array Starting Address Length Type Description TXID 30001 100 Integer Transmitter ID only used for RF powered nodes PWR 30101 100 Integer Battery voltage displayed as 2 digit integer e g 3 6V 36 5 4V 54 or RSSI 1 5 or received RF power SECS 30201 100 Integer Time seconds since last update This is refreshed at 10 second intervals in groups of 10 e g 1 ...

Page 23: ...er of sensors currently in tiemout if mode enabled 31108 SOFTWARE_VERSION Version of gateway software 31109 RESERVED 31110 RESERVED Object Identifier Description STATUS Array containing the below info COMM_CHANNEL Communication channel of system COMM_NET_ID Communication network ID of system ACTIVE_SENSORS Number of sensors active in system SENSORS_WITH_LOW_BATTERY Number of sensors that are sendi...

Page 24: ...ut 2 DA_S3 Sensor input 3 DA_S4 Sensor input 4 DA_S5 Sensor input 5 DA_S6 Sensor input 6 DA_S7 Sensor input 7 DA_S8 Sensor input 8 DA_TXID Transmitter ID only valid in RF powered sensors XML Configuration A Wireless Sensor Gateway with XML configured as the output can be accessed using HTTP GET and HTTP POST commands Us ing this method the data arrays in the Protocessor unit are accessed directly ...

Reviews: