background image

iData 90UHF User Manual 

- 4 - 


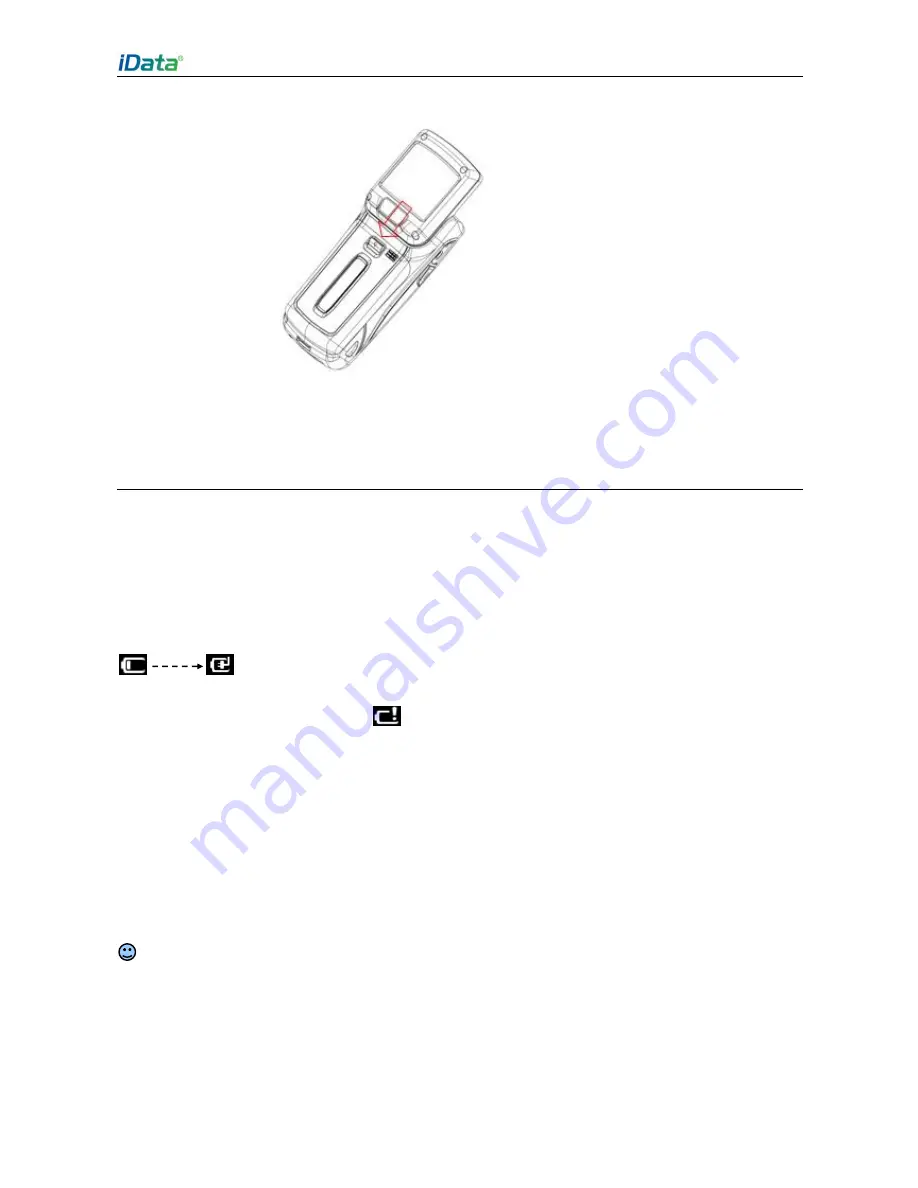
Figure 1-6 Disassembling the battery cover


1.6 Charging


You can charge a battery in the following ways:


1. Charge the iData 90UHF by using a charger. 


2. Connect the iData 90UHF to a PC by using a USB cable to charge the iData 90UHF. 


In the charging status, the LED is red. When the LED becomes blue, charging is complete. 


If  you  charge  the  battery  when  the  iData  90UHF  is  powered  on,  the  battery  icon  on  the 

upper right part of the screen changes, indicating that charging starts. 


When  the battery  volume is  low, an alarm is generated on  the screen of the iData  90UHF 

and the battery volume becomes 


When the battery volume is too low, the iData 90UHF is automatically powered off.


    Caution


The battery can be charged for more  than or  less than  three hours.  The battery will  not be 

damaged  if  charging  is  interrupted.  The  duration  of  the  battery  depends  on  different 

applications  of  the  iData  90UHF,  for  example,  selected  functions  of  iData  90UHF,  usage 

mode, and data transmission.


Tips 


To ensure a longer standby time of the iData 90UHF, follow the following tips:


  Always connect the iData 90UHF to the AC power supply when you do not use it.


  In the power supply setting, set the iData 90UHF to make it automatically closed after 

being idle for a short time. 


Hold the button at the bottom 
and pull out the battery cover 

Summary of Contents for 90UHF

Page 1: ......

Page 2: ...13 2 8 Setting Ringtone 13 2 9 Setting Screen 13 2 10 Label Reading Direction 13 3 E mail 15 4 Connection and Synchronization 17 4 1 1 Wi Fi Network Connection 17 4 1 2 iData Wi Fi Optimization 18 4...

Page 3: ...7 1 Precautions 29 7 2 Troubleshooting 30 Appendix 33...

Page 4: ...iData 90UHF User Manual 1 1 Introduction 1 1 Appearance of iData 90UHF Figure 1 1 Front view of iData 90UHF Figure 1 2 Rear view of iData 90UHF...

Page 5: ...install an SD card do as follows 1 Push the card cover along the direction marked on the cover and open the cover 2 Insert an SD card 3 Press the SD card downward and lock the card along the IN direct...

Page 6: ...p of the battery downward to tighten the battery 3 Push the joint at the bottom of the battery cover into the back shell Figure 1 5 Installing a battery 1 5 Disassembling the Battery Cover To disassem...

Page 7: ...en of the iData 90UHF and the battery volume becomes When the battery volume is too low the iData 90UHF is automatically powered off Caution The battery can be charged for more than or less than three...

Page 8: ...and hold the On Off key for several seconds 2 The power on page is displayed and the iData 90UHF enters the Windows Mobile operating system after the boot process is complete When you power on the iD...

Page 9: ...ta 90UHF is not at Home select Start Home to switch to Home Figure 2 1 Home Caution When the iData 90UHF is switched to Home some applications may still run in the background If you do not wish the ap...

Page 10: ...ations Window Click Start The applications window is displayed where icons of applications are placed You can drag the icons of applications to sequence applications according to your habits Click the...

Page 11: ...emails and text messages Calendar Views dates tracks appointments and creates appointments Alarms Views and sets time date and sets alarms Pictures Videos Views and manages pictures cartoons and vide...

Page 12: ...e Customer Feedback Submits a feedback about Windows Mobile Task Manager Views the memory and CPU allocation and stops processes Memory Checks memory allocation and information about the memory card R...

Page 13: ...losed Backlight Sets the duration for closing the backlight when the iData 90UHF is powered by a battery or external power supply and the iData 90UHF is idle and adjusts the screen brightness Phone Re...

Page 14: ...lick any place where text can be entered The screen keypad is displayed Hiding Screen Keypad In the text state click to hide the screen keypad To display the hidden screen keypad again click again Usi...

Page 15: ...itch the input mode the icon of the physical keypad mode in the status bar also changes The physical keypad is in the numeric input mode The physical keypad is in the lowercase input mode The physical...

Page 16: ...ngtone 2 9 Setting Screen To set the screen do as follows 1 Select Start Settings System Screen 2 In the General tab set the screen direction to adjust the screen 3 In the ClearType tab set the screen...

Page 17: ...na To read a label from a long distance try to make the polarization direction of the device parallel to the polarization direction of the label Handheld direction vertical Polarization direction of t...

Page 18: ...ail account cannot be completed automatically you can enter your Email account setting manually Before entering the Email account setti ng contact your Email service provider to obtain the correct Ema...

Page 19: ...16 Deleting an Email 1 Select Start Tools Email 2 Select an Email account and open the Email box 3 Click in the upper left corner and select Inbox 4 Select the Email to be deleted 5 Click in the lowe...

Page 20: ...displayed Ask your network administrator which IP address should be entered If IP addresses are assigned over DHCP select Use server assigned IP address Figure 4 3 Wi Fi connection setting 5 After se...

Page 21: ...ath for storing the iDataWiFiConfig tool Parameter settings 1 It is recommended to retain the value of Associate Retry Times 2 It is recommended to retain the value of Power mode 3 The value of Roamin...

Page 22: ...on mode select the No Longer Ask check box The option box does not appear the next time and a connection is established in the mode selected last time To set the mode of connecting to a PC through USB...

Page 23: ...omatically on the PC After that the task bar in the lower right corner of the PC becomes and keeps rolling In this case the synchronization wizard is displayed 3 Select the options to be synchronized...

Page 24: ...s started by default after the system is started You can also select Start iScan to start iScan After the iScan program is started the iScan icon is displayed in the lower area of the iData 90UHF 5 2...

Page 25: ...andby status After this function is enabled the Wi Fi connection can be always retained Disable Dial Hangup Windows Mobile 6 5 supports dialing By default if you press the hang up key the system exits...

Page 26: ...on according to the installation wizard 4 After the software is installed successfully the software icon is displayed in the applications window Software in exe Format After the iData 90UHF is synchro...

Page 27: ...o open the file explorer Figure 6 2 File Explorer 6 5 Restoring Factory Settings By restoring factory settings you can make the iData 90UHF return to the original state Caution After the factory setti...

Page 28: ...iData 90UHF User Manual 25 Figure 6 3 Restore Factory Defaults window You can also press and hold the left function key right function key power on power off key to restore factory settings...

Page 29: ...sharp articles in case the screen may be scratched Do not throw beat or violently collide the iData 90UHF Otherwise the components of the iData 90UHF may be damaged and the iData 90UHF may be faulty...

Page 30: ...strip marks are left on the screen Scan lens Clean the scan lens regularly by using lens paper or other articles suitable for cleaning optical materials 7 2 Troubleshooting Table 7 1 iData 90UHF trou...

Page 31: ...a 90UHF Remove unused memos and records If necessary save the records on the host or increase the storage capacity by using an SD card Too many applications are installed on the iData 90UHF Remove app...

Page 32: ...and the IP address cannot be set In this case set the IP address manually The password of the WLAN device is incorrect Too many devices access the AP at the same time In this case restart the AP When...

Page 33: ...Memory 512 MB ROM 256 MB RAM Expansion Slot Mini SD card up to 32 GB PSAM card optional Display 3 5 inch HVGA 320x480 high brightness TFT LCD LED backlight Touch Panel Resistive touch panel Industria...

Page 34: ...na Circularly polarized 2 dBi Linearly polarized 1 4 dBi Max Output Power 1 W 30 dBm Data Capture Range Within 2 5 m 3 5 m for special tags 1D Laser Scanner Optical Resolution 4 mil Scan Depth of Fiel...

Page 35: ...e content in this document is subject to update without notice Without written approval of Wuxi iData Technology Company Ltd no one shall copy extract back up modify spread or translate any part of th...

Page 36: ...iData 90UHF User Manual...

Reviews: