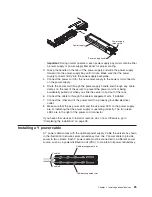


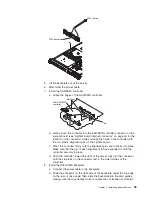
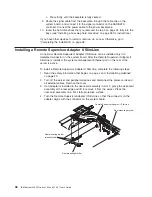


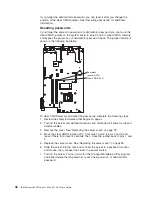


5.
At
a
downward
angle,
slip
the
back
end
of
the
adapter
under
the
tab
on
the
rear
mounting
bracket,
aligning
the
holes
in
the
adapter
with
the
posts
on
the
rear
mounting
bracket.
Rotate
the
connector
end
of
the
adapter
down
into
the
front
mounting
bracket,
aligning
the
holes
in
the
adapter
with
the
posts
on
the
front
mounting
bracket.
6.
Press
the
Remote
Supervisor
Adapter
II
SlimLine
firmly
into
the
connector
and
make
sure
that
all
tabs
on
both
mounting
brackets
secure
the
adapter
in
place.
Attention:
Incomplete
insertion
might
cause
damage
to
the
server
or
the
adapter.
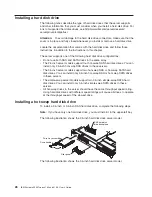
7.
If
you
removed
the
riser-card
assembly,
install
it
in
slot
2
on
the
system
board.
Make
sure
that
the
riser-card
assembly
is
fully
seated
in
the
riser-card
connector
on
the
system
board.
See
the
documentation
that
comes
with
the
Remote
Supervisor
Adapter
II
SlimLine
for
information
about
installing
the
firmware
and
configuring
the
adapter.
Create
a
backup
copy
of
the
configuration
so
that
you
can
restore
the
configuration
if
you
have
to
replace
the
adapter
in
the
future.
Note:
When
you
start
the
server
for
the
first
time
after
you
install
a
Remote
Supervisor
Adapter
II
SlimLine,
the
start-up
process
will
take
several
minutes
longer
than
a
typical
startup.
If
you
have
other
devices
to
install
or
remove,
do
so
now.
Otherwise,
go
to
“Completing
the
installation”
on
page
38.
Chapter
2.
Installing
optional
devices
37
Summary of Contents for x3350 - System - 4192
Page 1: ...IBM System x3350 Types 4192 and 4193 User s Guide...
Page 2: ......
Page 3: ...IBM System x3350 Types 4192 and 4193 User s Guide...
Page 28: ...14 IBM System x3350 Types 4192 and 4193 User s Guide...
Page 84: ...70 IBM System x3350 Types 4192 and 4193 User s Guide...
Page 96: ...82 IBM System x3350 Types 4192 and 4193 User s Guide...
Page 97: ......
Page 98: ...Part Number 43W7070 Printed in USA 1P P N 43W7070...