background image

2. Remove the two thumbscrews, and remove the top cover from the drawer.

3. Determine the slot from which you are removing the adapter.

4. Ensure that any processes or applications that might use the adapter are stopped.

Note: Removing a hot-pluggable PCI adapter requires the system administrator to

take the PCI adapter offline before performing any PCI adapter hot-plug
procedures. Before taking an adapter offline, the devices attached to the
adapter must be taken offline as well. This action prevents a service
representative or user from causing an unexpected outage for system
users.

For additional information about taking an adapter offline or removing it from
the system configuration, see the

AIX System Management Guide:

Operating System and Devices. This publication is available at the following
Web address: http://www-1.ibm.com/servers/aix/library/. Select Technical
Publications
. AIX documentation is also located on the

AIX Documentation

CD. The documentation information is made accessible by loading the
documentation CD onto the hard disk or by mounting the CD in the
CD-ROM drive.

5. Refer to “PCI Hot-Plug Manager Access” on page 37, and follow the steps in the

access procedure to select PCI Hot Plug Manager. Then return here to continue.

6. Select Unconfigure a Device, and then press Enter.

7. Press F4 to display the Device Names menu.

8. Select the adapter you are removing from the menu.

9. If you are replacing an adapter with an identical one, answer YES to Keep

Definition. If you are removing an adapter permanently, use the Tab key to
answer NO to Keep Definition. Press Enter.

10. The ARE YOU SURE screen displays. Press Enter to verify the information.

11. Press F3 to return to the PCI Hot-Plug Manager.

12. Select Replace/Remove a PCI Hot-Plug Adapter and press Enter. The

Replace/Remove a PCI Hot-Plug Adapter menu displays.

13. Move the cursor to select the adapter that you are removing and press Enter. (The

description entry displays as

unknown

).

14. Press the Tab key until the entry field displays the desired operation and then

press the Enter key. Follow the instructions that display on the screen until you are
instructed to remove the adapter.

15. When you are instructed to remove the adapter from the adapter slot, disconnect

any cables that are connected to the adapter being removed.

16. Turn the locking latch and lift the plastic stop for the adapter. Some full-length

adapter cards can be removed by rotating the blue adapter latch on the right end
of the adapter divider clockwise.

17. Carefully grasp the adapter by the edges and pull it straight out from the system

board. Store the adapter in a safe place.

Chapter 2. Installing Options In Your System

35

Summary of Contents for RS/6000 Enterprise Server M80

Page 1: ...RS 6000 Enterprise Server Model M80 Eserver pSeries 660 Model 6M1 Installation Guide SA38 0576 02 IBM...

Page 2: ...to Information Development Department H6DS 905 6C006 11400 Burnet Road Austin Texas 78758 3493 To send comments electronically use this commercial internet address aix6kpub austin ibm com Any informa...

Page 3: ...g and Securing Cables 21 Step 8 Setting Up Attached Devices 24 Step 9 Updating the Device Records 24 Step 10 Attaching External Devices 24 Step 11 Connecting the Power 25 Step 12 Installing a System w...

Page 4: ...e Diagnostics 49 Step 3 Running System Verification 49 Step 4 Performing Additional System Verification 50 Step 5 Stopping the Diagnostics 51 Appendix A Communications Statements 53 Federal Communicat...

Page 5: ...Purpose 69 Syntax 69 Description 69 Flags 69 Appendix F General Attributes Required When Using a TTY Terminal 71 Additional Communication Attributes 72 Additional Keyboard Attributes 73 Additional Pri...

Page 6: ...vi Installation Guide...

Page 7: ...s C v Do not install this unit in a rack where the air flow is compromised Any side front or back of the unit used for air flow through the unit must not be in indirect contact with the rack v Ensure...

Page 8: ...the signal cables are connected If possible disconnect all power cables from the existing system before you add a device Use one hand when possible to connect or disconnect signal cables to prevent a...

Page 9: ...ication numbers and approval information CAUTION All IBM laser modules are designed so that there is never any human access to laser radiation above a class 1 level during normal operation user mainte...

Page 10: ...x Installation Guide...

Page 11: ...ges or component failures must verify the accuracy of operations performed and data saved or transmitted by the system at or near the time of the outage or failure In addition users must establish pro...

Page 12: ...xii Installation Guide...

Page 13: ...perations v The RS 6000 Enterprise Server Model M80 Eserver pSeries 660 Model 6M1 Service Guide order number SA38 0571 contains reference information maintenance analysis procedures MAPs error codes r...

Page 14: ...marks of International Business Machines Corporation in the United States other countries or both v AIX v RS 6000 v pSeries v e logo Other company product and service names may be trademarks or servic...

Page 15: ...e system __ v RS 6000 Enterprise Server Model M80 Eserver pSeries 660 Model 6M1 Installation Guide SA38 0576 this book __ v PCI Adapter Placement Reference SA38 0538 __ v System Unit Safety Informatio...

Page 16: ...al cables are connected If possible disconnect all power cables from the existing system before you add a device Use one hand when possible to connect or disconnect signal cables to prevent a possible...

Page 17: ...the recommended temperature for this system is 24 C 75 F and the recommended relative humidity is 45 The following are the acceptable operating ranges Temperature 10 C 50 F to 38 C 100 F Humidity 8 to...

Page 18: ...e If the receptacle case or faceplate is painted be sure the probe tip penetrates the paint and makes good electrical contact with the metal __ 3 Check the resistance from the ground pin of the recept...

Page 19: ...__ 8 Verify that the grounding impedance is correct by using the ECOS 1020 1023 B7106 or an appropriately approved ground impedance tester Chapter 1 Setting Up the System 5...

Page 20: ...d at the bottom front of the rack unit and the other at the bottom rear of the rack unit Both stabilizers must be installed prior to servicing the system 4 If the system is the only system in the rack...

Page 21: ...be firmly attached to the bottom rear of the rack to prevent the rack from turning over when the drawers are pulled out of the rack Do not pull out or install any drawer or feature if the stabilizer...

Page 22: ...the previous figures 2 Assemble the drawer rails as follows a Use two screws to attach an anti tip guide 2 to each rail b Use one screw to attach a Model T00 type cable guide 3 to each rail The Model...

Page 23: ...the rack unit As you install the right rail into the rack install the drawer latch reset bracket above the right rail Detail B Right Rail Detail A Left Rail Detail C Rear of Left Rail A B C Chapter 1...

Page 24: ...er in front of the rack 3 Remove the following parts to facilitate lifting the drawer into the rack unit a Front bezel b Both power supplies 4 Lift the drawer onto the support rails and slide it slowl...

Page 25: ...to prevent the drawer from sliding out the front Use six screws 1 and four nut clips 3 to attach the drawer stops See the following figure 8 Replace the parts that you removed earlier a Both power su...

Page 26: ...ions on routing and securing cables see Routing and Securing Cables on page 21 Connecting JTAG and VS COMM Cables Refer to the following figure to connect the JTAG and VS COMM cables CEC Drawer Attach...

Page 27: ...are possible for the RIO cabling depending on the number and desired configuration of I O drawers These loops begin and end at the primary I O drawer RIO Cabling The following rules apply to RIO cable...

Page 28: ...awer Attached to One I O Drawer CEC Drawer Attached to Two I O Drawers Type A A0 A1 R1 R0 CEC Drawer Primary Drawer A0 A1 R1 R0 CEC Drawer Secondary I O Drawer R1 R0 Primary I O Drawer 14 Installation...

Page 29: ...CEC Drawer Attached to Three I O Drawers A0 A1 CEC Drawer Secondary I O Drawer Secondary I O Drawer Primary I O Drawer R1 R0 R1 R0 R1 R0 B0 B1 Chapter 1 Setting Up the System 15...

Page 30: ...CEC Drawer Attached to Four I O Drawers A0 B1 R1 R0 CEC Drawer Secondary I O Drawer Secondary I O Drawer R1 R0 Primary I O Drawer R1 R0 B0 A1 Secondary I O Drawer R1 R0 16 Installation Guide...

Page 31: ...ling configurations Match your configuration to the appropriate figure and connect your SPCN cables as shown CEC Drawer Attached to One I O Drawer Note The V S COMM cable incorporates SPCN wiring CEC...

Page 32: ...CEC Drawer Attached to Two I O Drawers CEC Drawer Primary I O Drawer V S COMM V S COMM Secondary I O Drawer J15 J16 J15 J16 18 Installation Guide...

Page 33: ...CEC Drawer Attached to Three I O Drawers CEC Drawer Primary I O Drawer V S COMM V S COMM Secondary I O Drawer J15 J16 J15 J16 Secondary I O Drawer J15 J16 Chapter 1 Setting Up the System 19...

Page 34: ...C Drawer Attached to Four I O Drawers CEC Drawer Primary I O Drawer V S COMM V S COMM Secondary I O Drawer J15 J16 J15 J16 Secondary I O Drawer J15 J16 Secondary I O Drawer J15 J16 20 Installation Gui...

Page 35: ...es Use two screws 2 to connect the RIO drawer cables to the I O drawer and secure the cables with the RIO cable retainer 3 Use the cable hanging brackets 1 as needed to hold the cables Route the cable...

Page 36: ...C Drawer Cables Route the CEC drawer cables toward the right rack rail and secure the cables with Velcro strips 1 Use the cable hanging brackets 2 as needed to hold the cables 2 1 22 Installation Guid...

Page 37: ...r Cables Route the cables over the cable guides 2 and secure the cables with Velcro strips 1 Leave a loop that is large enough so that the drawer can be pulled out the back 1 3 2 Chapter 1 Setting Up...

Page 38: ...t the keyboard K mouse M and graphics display if available Refer to the following figure for the connector locations Step 9 Updating the Device Records Update the System Records in Appendix D System R...

Page 39: ...e order number SC23 4112 If the AIX operating system was preinstalled on your system go to the AIX System Management Guide Operating System and Devices This publication is available at the following W...

Page 40: ...rdcopy To access the hardware documentation on the Web go to http www ibm com servers eserver pseries library hardware_docs Installation Using and Service documentation is available from this Web site...

Page 41: ...and all attached devices are unplugged When adding or removing any additional devices to or from the system ensure that the power cables for those devices are unplugged before the signal cables are co...

Page 42: ...the same time v Handle the devices carefully in order to prevent permanent damage Stopping the System Unit Attention When shutting down your system to install options shut down all applications first...

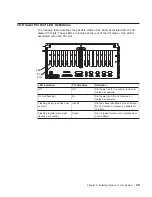
Page 43: ...ff Slot power is off It is safe to remove or replace an adapter On not flashing On Slot power is on Do not remove or replace an adapter Flashing slowly one flash per second Identify Slot has been iden...

Page 44: ...ty Upgrade on Demand Feature on page 43 and follow the instructions to install and verify the feature If the Capacity Upgrade on Demand feature is already installed in your system and you want to upgr...

Page 45: ...rawer in the rear service position as follows a If you have not already done so open the front door of the rack unit b Loosen the two thumbscrews that attach the front bezel to the drawer c Grasp both...

Page 46: ...the drawer 2 Remove the two thumbscrews and remove the top cover from the drawer 3 Refer to PCI Hot Plug Manager Access on page 37 and follow the steps in the access procedure to select PCI Hot Plug M...

Page 47: ...n remove PCI adapters with the power on These adapters are referred to as hot pluggable PCI adapters Some adapters are not hot pluggable and power must be removed from the system for adapter removal B...

Page 48: ...oved 6 Turn the locking latch and lift the plastic stop for the adapter 7 Carefully grasp the adapter by the edges and pull it straight out from the I O board Store the adapter in a safe place 8 Place...

Page 49: ...o continue 6 Select Unconfigure a Device and then press Enter 7 Press F4 to display the Device Names menu 8 Select the adapter you are removing from the menu 9 If you are replacing an adapter with an...

Page 50: ...successful Successful removal is indicated by the OK message displayed next to the Command field at the top of the screen 20 Press F10 to exit the Hot Plug Manager 21 If you have added removed or rep...

Page 51: ...lable at the following Web address http www 1 ibm com servers aix library Select Technical Publications AIX documentation is also located on the AIX Documentation CD The documentation information is m...

Page 52: ...efined state see Unconfigure a Device option below You will be asked to identify the PCI slot prior to the actual operation The selected PCI slot will go into the action state Identify a PCI Hot Plug...

Page 53: ...s listed as unknown perform the Install Configure Devices Added After IPL option to configure the adapter v If you receive a warning indicating that the required device packages are not installed the...

Page 54: ...40 Installation Guide...

Page 55: ...re codes can be ordered with the system or added as upgrades to allow additional processors to be installed in the system and then enabled later FC 8306 This Capacity Upgrade on Demand feature code ca...

Page 56: ...ine installed Electronic Service Agent available Name and address available System or feature hardware is installed Diagnostics used to verify installation Customer information is completed using comm...

Page 57: ...system 2 Use the Electronic Service Agent user s guide to complete the tasks in the following sections v Prerequisites v Obtaining and installing Electronic Service Agent v Basic Electronic Service A...

Page 58: ...y is the number of Capacity Upgrade on Demand enabled processors If yy is equal to 0 then Capacity Upgrade on Demand is not enabled If yy is greater than 0 then Capacity Upgrade on Demand is enabled 3...

Page 59: ...type the following at the command line chcod The following information is displayed Current MailAddress _______Reserved________ Current CustInfo Jane_Doe CustomerNumber_9999999 Phone_ 333 _444 5555 Cu...

Page 60: ...e following at the command line chcod The following information displays Current MailAddress _______Reserved________ Current CustInfo Jane_Doe CustomerNumber_9999999 Phone_ 333 _444 5555 Current Model...

Page 61: ...e do the following 1 Log in to the system as root user or as a user with system group privileges 2 Type the following command At the command line chcod Record the displayed information below Current M...

Page 62: ...stem performs the command to enable additional processors information about the new system configuration is added to the error log and sent through the Electronic Service Agent to the service support...

Page 63: ...IX operating system get help if needed 2 Remove all tapes diskettes and CD ROM discs 3 Turn off the system unit power 4 Turn on the system unit power 5 After the keyboard POST indicator displays on th...

Page 64: ...nd v The A Problem Was Detected On Time Stamp menu displays with either a service request number SRN or an error code Make a note of any codes displayed on the display or operator panel To perform add...

Page 65: ...anged any attributes on your ASCII terminal to run the diagnostics change the settings back to normal 3 This completes the system verfication If you received an error code record the code and report i...

Page 66: ...52 Installation Guide...

Page 67: ...quipment Unauthorized changes or modifications could void the user s authority to operate the equipment This device complies with Part 15 of the FCC Rules Operation is subject to the following two con...

Page 68: ...he manufacturer s adapters it is essential that other optional cards not supplied by the manufacturer do not use main voltages or any other excessive voltages Seek advice from a competent engineer bef...

Page 69: ...rmit tserkl rung ist die IBM Germany Dieses Ger t erf llt die Bedingungen der EN 55022 Klasse A F r diese von Ger ten gilt folgende Bestimmung nach dem EMVG Ger te d rfen an Orten f r die sie nicht au...

Page 70: ...56 Installation Guide...

Page 71: ...n disposal of batteries contact your local waste disposal facility In the United States IBM has established a collection process for reuse recycling or proper disposal of used IBM sealed lead acid nic...

Page 72: ...58 Installation Guide...

Page 73: ...untry where such provisions are inconsistent with local law THIS MANUAL IS PROVIDED AS IS WITHOUT WARRANTY OF ANY KIND EITHER EXPRESSED OR IMPLIED INCLUDING BUT NOT LIMITED TO THE IMPLIED WARRANTIES O...

Page 74: ...60 Installation Guide...

Page 75: ...__________________ Serial Number ____________________________ ____________________________ The identification numbers for the system are located on the front cover and on the rear of the system as sho...

Page 76: ...MB 1GB 128MB 256MB 512MB 1GB D C B A 128MB 256MB 512MB 1GB 128MB 256MB 512MB 1GB 128MB 256MB 512MB 1GB 128MB 256MB 512MB 1GB D C B A 128MB 256MB 512MB 1GB 128MB 256MB 512MB 1GB 128MB 256MB 512MB 1GB 1...

Page 77: ...D C B A 128MB 256MB 512MB 1GB 128MB 256MB 512MB 1GB 128MB 256MB 512MB 1GB 128MB 256MB 512MB 1GB D C B A 128MB 256MB 512MB 1GB 128MB 256MB 512MB 1GB 128MB 256MB 512MB 1GB 128MB 256MB 512MB 1GB D C B A...

Page 78: ...__________________ Expansion Slot 4 ______________________________________________ Expansion Slot 5 ______________________________________________ Expansion Slot 6 ____________________________________...

Page 79: ...Secondary I O Drawer Records Location Option Description SCSI Connector ______________________________________________ Expansion Slot 1 ______________________________________________ Expansion Slot 2...

Page 80: ...____ Expansion Slot 10 ______________________________________________ Expansion Slot 11 ______________________________________________ Expansion Slot 12 ______________________________________________...

Page 81: ...record the expansion slot number for that adapter in the Adapter field of the following table 2 The SCSI bus IDs in bays A1 B1 and B2 are the recommended values Field installations may not comply wit...

Page 82: ...68 Installation Guide...

Page 83: ...ervice Agent to the service support center The CustomerInfo text is included in the error log Flags c CustomerInfo Specifies the text string to include in the error log CustomerInfo cannot be more tha...

Page 84: ...rt Capacity Upgrade on Demand for ResourceType If r is specified then n must also be specified The default for the chcod command with no flags displays the current value of CustomerInfo a reserved fie...

Page 85: ...descriptions with those of your terminal and set your attributes accordingly Generated Code Set ASCII Screen Normal Normal Uses the EIA 232 interface protocol Row and Column 24 x 80 24 x 80 Uses the E...

Page 86: ...it when the Trace key is pressed Additional Communication Attributes The following communication attributes are for the 3151 3161 and 3164 terminals Communication Setup Attributes 3151 11 31 41 Settin...

Page 87: ...erminal waits for 100 ms for the system unit to respond Additional Keyboard Attributes The following keyboard attributes are for the keyboard attached to the 3151 3161 and 3164 terminals Keyboard Setu...

Page 88: ...ings 3161 3164 Settings Description Line speed 9600 9600 9600 Uses 19200 or 9600 bps bits per second line speed to communicate with the system unit Word length bits 8 8 8 Selects eight bits as a data...

Page 89: ...es set up 24 diagnostics loading 49 documentation 26 hardware 26 operating system 26 documentation accessing 26 drawer installation 10 E emissions noise 57 H handling static sensitive devices 28 hot p...

Page 90: ...ng 13 starting the operating system 25 stopping the system unit 28 system installation 1 system records 61 key serial number 61 machine type model 61 serial number 61 system unit stopping 28 T tradema...

Page 91: ...on in this book is Very Satisfied Satisfied Neutral Dissatisfied Very Dissatisfied Accurate h h h h h Complete h h h h h Easy to find h h h h h Easy to understand h h h h h Well organized h h h h h Ap...

Page 92: ...DDRESSEE Information Development Department H6DS 9561 11400 Burnet Road Austin TX 78758 3493 _ _ _ _ _ _ _ _ _ _ _ _ _ _ _ _ _ _ _ _ _ _ _ _ _ _ _ _ _ _ _ _ _ _ _ _ _ _ _ _ _ _ _ _ _ _ _ _ _ _ _ _ _ _...

Page 93: ......

Page 94: ...IBMR Part Number 09P4388 Printed in U S A September 2001 SA38 0576 02 1P P N 09P4388...

Reviews: