5-4
Installing the Intelligent Battery Backup Unit
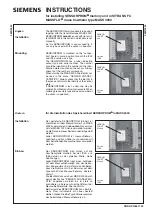
Figure 5.2
Installing the iBBU Daughtercard on the ServeRAID-
MR10M Controller
4. Carefully press the iBBU onto the controller, so that the two
connectors are firmly joined.
5. Secure the iBBU to the controller with the screws and the standoffs
in the three screwholes.
The standoffs are threaded at both ends and a screw goes into each
end.
6. Use the Phillips-head screws that are provided to secure the iBBU
to the controller.
Attention:
Center the screwdriver carefully to avoid stripping the
screwhead. Do not over-tighten the screws.
7. Install the controller in the computer in the PCI Express slot, as
Press down gently, but firmly, to make sure that the controller is
properly seated in the slot. The bottom edge of the controller must
be flush with the slot.
Attention:
Never
apply pressure to the iBBU when you insert the
controller. Instead, press down only on the top edge of the
controller, as shown in
.
85021-03
Pb
LSI
31503-00
Rev
.B
Caution:
Danger
of
expl
osion
ifbattery
is
in
corr
ectly
replaced.
Replace
with
sam
e
or
equi
valent
type
recomm
ended
by
m
anufacturer
.
Dispose
of
use
d
batteri
es
accordi
ng
to
m
anufactur
er's
instructi
ons.
e1
Pb
ASSEM
BLED
IN
USA
.
WWYYN0000
J1
Summary of Contents for Redbooks ServeRAID-MR10M
Page 1: ...IBM P N 81Y1995 ServeRAID MR10M USER S GUIDE J u n e 2 0 1 0...
Page 12: ...xii Contents...
Page 14: ...xiv Contents...
Page 16: ...xvi Contents...
Page 34: ...1 18 Overview...
Page 58: ...5 6 Installing the Intelligent Battery Backup Unit...
Page 74: ...6 16 Using the Intelligent Battery Backup Unit...
Page 80: ...A 4 Notices...
Page 86: ...B 6 Glossary of Terms and Abbreviations...
Page 87: ......
Page 88: ...81Y1995...