background image

Cabling the server to the HMC:

The Hardware Management Console (HMC) controls managed systems, including the management of
logical partitions, the creation of a virtual environment, and the use of capacity on demand. Using service
applications, the HMC can also communicate with managed systems to detect, consolidate, and forward
information to IBM service for analysis.

If you have not installed and configured your HMC, do so now. For instructions, see Installation and
configuration scenarios 
(http://www.ibm.com/support/knowledgecenter/POWER8/p8hai/
basichmcinstallationandconfigurationtaskflow.htm).

To manage POWER8 processor-based servers, the HMC must be at version 8 release 8.1.0, or later. To
view the HMC version and release, complete the following steps:

1.

In the navigation area, click

Updates

.

2.

In the work area, view and record the information that appears in the HMC Code Level section,
including the HMC version, release, maintenance level, build level, and base versions.

To cable the server to the HMC, complete the following steps:

1.

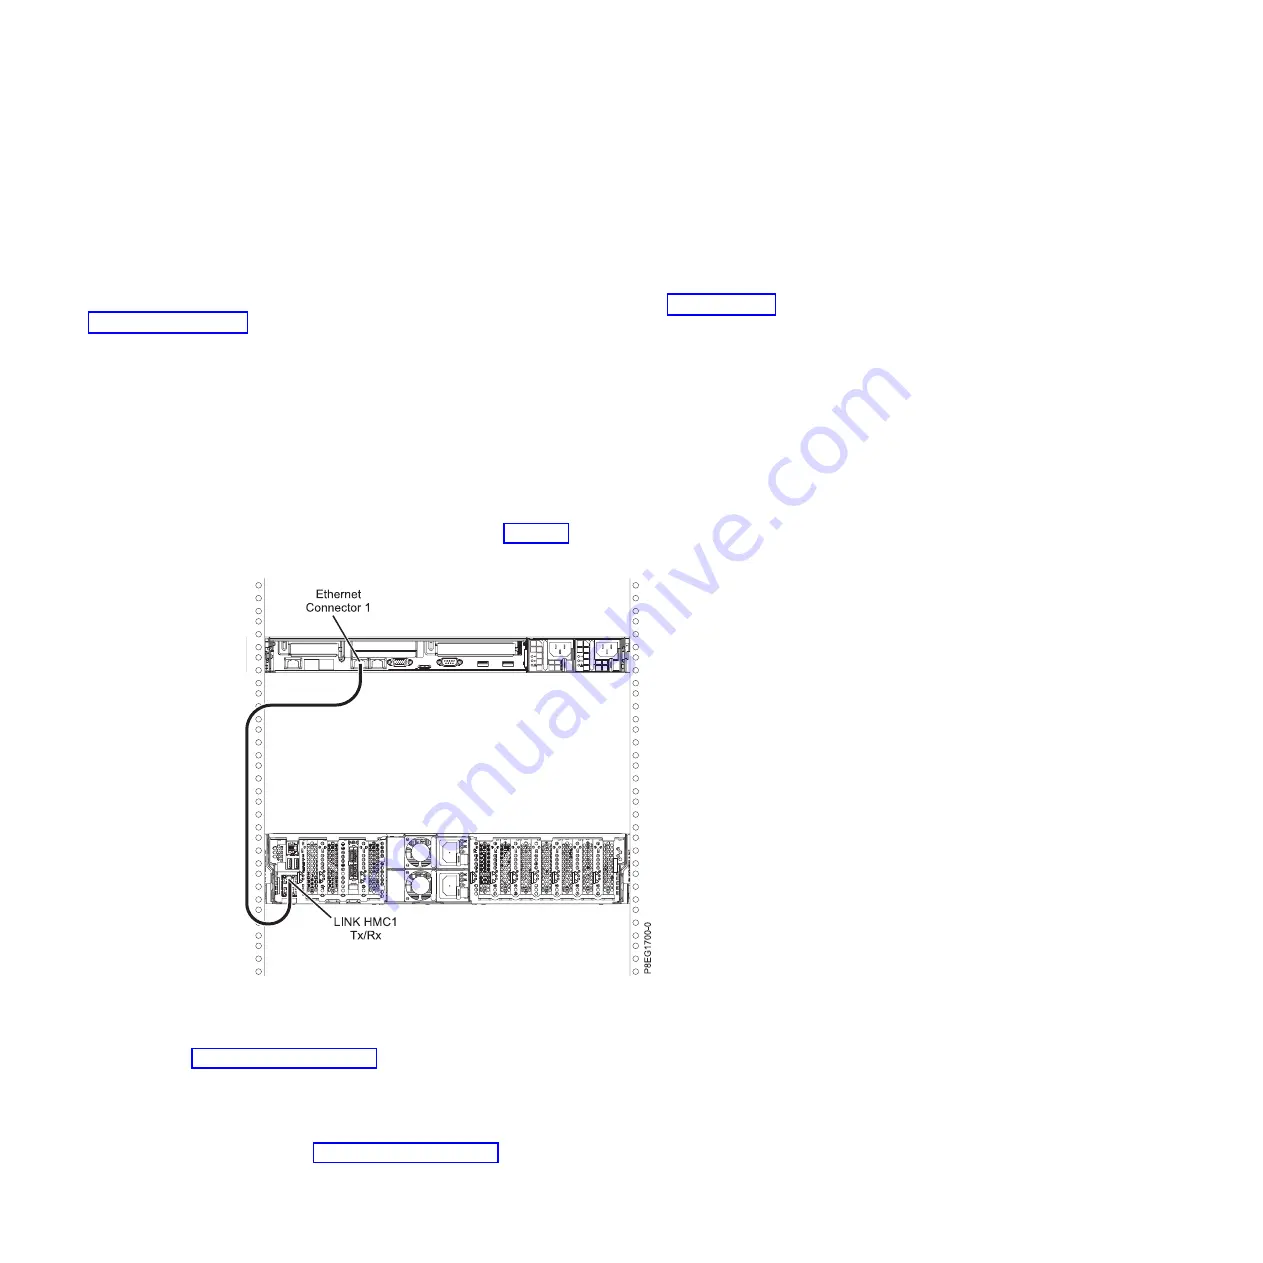
If you want to directly attach your HMC to the managed system, connect

Ethernet Connector 1

on

the HMC to the

HMC1

port on the managed system. See Figure 19.

2.

To learn how to connect an HMC to a private network so that it can manage more than one managed
system, see HMC network connections (http://www.ibm.com/support/knowledgecenter/POWER8/
p8hai/netconhmc.htm).

Notes:

v

You can also have multiple systems that are attached to a switch that is then connected to the
HMC. For instructions, see HMC network connections (http://www.ibm.com/support/
knowledgecenter/POWER8/p8hai/netconhmc.htm).

Figure 19. Attaching the HMC to the managed system

26

Power Systems: Installing the IBM Power System S822 (8284-22A)

Summary of Contents for Power System 8284-22A

Page 1: ...Power Systems Installing the IBM Power System S822 8284 22A GI11 9906 00 ...

Page 2: ......

Page 3: ...Power Systems Installing the IBM Power System S822 8284 22A GI11 9906 00 ...

Page 4: ...ty Notices manual G229 9054 and the IBM Environmental Notices and User Guide Z125 5823 This edition applies to IBM Power Systems servers that contain the POWER8 processor and to all associated models Copyright IBM Corporation 2014 US Government Users Restricted Rights Use duplication or disclosure restricted by GSA ADP Schedule Contract with IBM Corp ...

Page 5: ...nstalled server 22 Removing the shipping bracket and connecting power cords and power distribution unit PDU for your preinstalled server 23 Cabling the server and setting up a console 24 Determining which console to use 24 Routing cables through the cable management arm and connecting expansion units 28 Completing the server setup 28 Completing the server setup by using an HMC 28 Completing the se...

Page 6: ...iv Power Systems Installing the IBM Power System S822 8284 22A ...

Page 7: ...roduct The documentation contains the safety information in your national language with references to the U S English source Before using a U S English publication to install operate or service this product you must first become familiar with the related safety information documentation You should also refer to the safety information documentation any time you do not clearly understand any safety ...

Page 8: ...hat will be attached to this product to properly wired outlets v When possible use one hand only to connect or disconnect signal cables v Never turn on any equipment when there is evidence of fire water or structural damage v Disconnect the attached power cords telecommunications systems networks and modems before you open the device covers unless instructed otherwise in the installation and confi...

Page 9: ...he customer to ensure that the outlet is correctly wired and grounded to prevent an electrical shock CAUTION v Do not install a unit in a rack where the internal rack ambient temperatures will exceed the manufacturer s recommended ambient temperature for all your rack mounted devices v Do not install a unit in a rack where the air flow is compromised Ensure that air flow is not blocked or reduced ...

Page 10: ... your rack cabinet for the weight of a loaded rack cabinet v Verify that all door openings are at least 760 x 230 mm 30 x 80 in v Ensure that all devices shelves drawers doors and cables are secure v Ensure that the four leveling pads are raised to their highest position v Ensure that there is no stabilizer bracket installed on the rack cabinet during movement v Do not use a ramp inclined at more ...

Page 11: ... L003 or or 1 2 3 4 DANGER Multiple power cords The product might be equipped with multiple power cords To remove all hazardous voltages disconnect all power cords L003 L008 Safety notices ix ...

Page 12: ...ain equipment transmitting on system links with laser modules that operate at greater than Class 1 power levels For this reason never look into the end of an optical fiber cable or open receptacle C027 CAUTION This product contains a Class 1M laser Do not view directly with optical instruments C028 CAUTION Some laser products contain an embedded Class 3A or Class 3B laser diode Note the following ...

Page 13: ... this equipment must not be metallically connected to the interfaces that connect to the OSP outside plant or its wiring These interfaces are designed for use as intrabuilding interfaces only Type 2 or Type 4 ports as described in GR 1089 CORE and require isolation from the exposed OSP cabling The addition of primary protectors is not sufficient protection to connect these interfaces metallically ...

Page 14: ...xii Power Systems Installing the IBM Power System S822 8284 22A ...

Page 15: ...ver v The latest version of this document is maintained online See Installing the IBM Power System S822 8284 22A http www ibm com support knowledgecenter POWER8 p8egh p8egh_roadmap htm v Plan your server installation For instructions see Planning for the system http www ibm com support knowledgecenter POWER8 p8had p8had_8xx_kickoff htm v If you are using a Hardware Management Console HMC see Obtai...

Page 16: ...t contact information Determining and marking the location in the rack Use this procedure to determine where to install the system unit into the rack To determine where to install the system unit into a rack complete the following steps 1 Read the Rack safety notices http www ibm com support knowledgecenter POWER8 p8hbf racksafety htm 2 Determine where in the rack to place the system units As you ...

Page 17: ...ower hole of each EIA unit 6 Repeat step 5 for the corresponding holes located on the left side of the rack 7 Go to the rear of the rack 8 On the right side find the EIA unit that corresponds to the bottom EIA unit marked on the front of the rack 9 Place a self adhesive dot at the bottom EIA unit 10 Mark the corresponding holes on the left side of the rack Figure 1 Removing the filler panels Insta...

Page 18: ... the rack complete the following steps 1 Each slide rail is marked with either an R right or an L left when you look from the front Select the left slide rail bring it to the rear of the rack and locate the selected U that was previously marked 2 Push up on the locking tab 1 on the front and pull out the front latch 2 at the front of the rail Then remove the screw from the rear of the rail 3 For d...

Page 19: ...ward and insert three pins on the front of the rail into the holes within the selected U that were previously marked Lower the slide rail down 1 to engage the hook feature on the middle pin For details see Figure 5 Figure 3 Aligning and engaging the pins into the holes in the rear of the rack Figure 4 Reinstalling the screw Figure 5 Pins that are seated on the front rail of the rack Installing the...

Page 20: ... and the front of the system if present 2 Extend the slide rails forward 1 until they click twice into place Carefully lift the server and tilt it into position over the slide rails so that the rear nail heads 2 on the server line up with the rear slots 3 on the slide rails Slide the server down until the rear nail heads slip into the two rear slots Then slowly lower the front of the server 4 unti...

Page 21: ...A Support arm B Cable management stop bracket C Mounting bracket D Cable management arm E Extension bracket 2 The cable management arm can be installed on either side of the server For this procedure it is illustrated that you are installing it on the right side while you are facing the server from the rear 2 P8EG1501 0 1 Figure 8 Lift the release latches and push the server into the rack Figure 9...

Page 22: ...ort arm so that the locking tab on the underside of its tip aligns with the bracket hole Insert the tab into the hole 1 and turn the bracket 2 to secure it to the support arm For details see Figure 11 4 Attach the mounting bracket C to the slot on the inside of the right slide by sliding the mounting bracket C into the slide rail until the spring loaded pin snaps into place For details see Figure ...

Page 23: ... to the slot on the inside of the right slide by sliding the mounting bracket C into the slide rail until the spring loaded pin snaps into place For details see Figure 14 on page 10 Figure 12 Extending the pin and installing the bracket into the slide rail Figure 13 Installing the extension bracket into the slide rail Installing the IBM Power System S822 8284 22A 9 ...

Page 24: ...ether you create logical partitions which operating system you install in your primary partition and whether you install a Virtual I O Server VIOS in one of your logical partitions Determining which console to use Your console monitor or interface choices are guided by whether you create logical partitions which operating system you install in your primary partition and whether you install a Virtu...

Page 25: ... terminal you must use a conversion cable This cable part number 46K5108 is used to convert the ASCII terminal 9 pin Dshell connector to an RJ45 serial port connector on the system For information about the locations of the connectors on the system see Part locations and location codes http www ibm com support knowledgecenter POWER8 p8ecs p8ecs_locations htm To cable an ASCII terminal to the serve...

Page 26: ...p without using a management console on page 21 Cabling the server to the HMC The Hardware Management Console HMC controls managed systems including the management of logical partitions the creation of a virtual environment and the use of capacity on demand Using service applications the HMC can also communicate with managed systems to detect consolidate and forward information to IBM service for ...

Page 27: ...are connecting a second HMC to your managed server connect to the Ethernet port that is labeled HMC2 on the managed server 4 Continue with Cabling the server and connecting expansion units on page 19 Cabling the server and accessing the console by using IBM i Access Client Solutions IBM i Access Client Solutions provides support for connecting to the console of a new system by using a LAN connecti...

Page 28: ... are supported for Operations Console LAN is documented at IBM i Access http www 03 ibm com systems i software access windows supportedos html a Log on to the system as a local administrator b Ensure that you install the latest IBM i Access service pack The website to download the latest service pack for IBM i Access can be found at IBM i Access http www 03 ibm com systems i software access window...

Page 29: ...st name and IP address by doing the following types 1 Give your session a name The name must be one of the following names v A valid host name that was registered in the site DNS for the console IP address v A unique name that you create that is not currently registered in the DNS for any other IP address 2 If you are using IBM i V6R1 and later press the Tab key The Service TCP IP Address field is...

Page 30: ... A601 500A Twinax console v A602 500A Direct cable console v A603 500A LAN console v A604 500A HMC console If the system reference code SRC A603500A skip to step 6e For all others SRCs continue to the next step d Set console type to LAN 1 Use the 65 21 11 sequences until it returns A603500B This indicates that the console type will be changed to LAN 2 Use the 21 11 sequences if it returns A603500C...

Page 31: ...nitor the console status After the status changes to Pending Authorization the Service Tools Sign On window opens Note The Service Tools Sign On window might open behind the Operations Console window Resize or move the Operations Console window to locate the Service Tools Sign On window b Sign on to the Service Tools application To sign on to the Service Tools application enter 11111111 for the us...

Page 32: ...he Web based ASMI change the partition boot mode back so that the server loads the operating environment during startup 1 Expand Power Restart Control 2 Click Power On Off System 3 Select Continue to operating system in the AIX or Linux partition mode boot field 4 Click Save settings 3 Insert the Virtual I O Server CD or DVD into the optical drive 4 In SMS select the CD or DVD as the boot device a...

Page 33: ...rawers to the PDU with an IEC 320 type receptacle 2 Attach the PDU input power cord and plug it into the alternating current ac power source 2 For information about connecting enclosures and expansion units see Enclosures and expansion units http www ibm com support knowledgecenter POWER8 p8ham p8ham_kickoff htm Completing the server setup Learn about the tasks you must complete to set up your man...

Page 34: ...ix Central b If necessary update your managed system firmware levels In the navigation area select Updates c In the contents area select your managed system d Click Change Licensed Internal Code for the current release 6 To power on your managed system by using the HMC complete the following steps a Verify that the logical partition start policy is set to User Initiated by completing the following...

Page 35: ...dx_ibmi htm v Install the Linux operating system For instructions see Installing Linux http www ibm com support knowledgecenter POWER8 p8hdx p8hdx_installlinux htm v Install the VIOS operating system For instructions see Installing VIOS http www ibm com support knowledgecenter POWER8 p8hch p8hch_installvios htm 10 You have now completed the steps to install your server Completing the server setup ...

Page 36: ...he terracotta shipping brackets on the right and left of the rear of the server do not interfere with the installation or operation of the system They can remain installed on the system Preparing to set up your preinstalled server Use the information to understand the prerequisites that are required for setting up the server You might need to read the following documents before you begin to instal...

Page 37: ...nly v Directory of worldwide contacts website http www ibm com planetwide Select your location to view the service and support contact information Removing the shipping bracket and connecting power cords and power distribution unit PDU for your preinstalled server Before you set up a console you must remove the shipping brackets and connect power cords To remove the shipping bracket and connect po...

Page 38: ... and whether you install a Virtual I O Server VIOS in one of your logical partitions Choose one of the consoles interfaces or terminals in the following table Table 6 Available console types Console type Operating system Logical partitions Cable required Cabling setup instructions ASCII terminal AIX Linux or VIOS Yes for VIOS no for AIX and Linux Serial cable equipped with a null modem Cabling the...

Page 39: ...8 p8ecs p8ecs_locations htm To cable an ASCII terminal to the server complete the following steps 1 Using a serial cable that is equipped with a null modem connect the ASCII terminal to the serial port on the rear of the server 2 Ensure that your ASCII terminal is set to the following general attributes These attributes are the default settings for the diagnostic programs Be sure that your termina...

Page 40: ...avigation area click Updates 2 In the work area view and record the information that appears in the HMC Code Level section including the HMC version release maintenance level build level and base versions To cable the server to the HMC complete the following steps 1 If you want to directly attach your HMC to the managed system connect Ethernet Connector 1 on the HMC to the HMC1 port on the managed...

Page 41: ...lowing settings as appropriate for the type of partition on which you are installing the Integrated Virtualization Manager For an AIX or Linux partition complete the following steps to change the partition boot mode 1 In the navigation area expand Power Restart Control 2 Click Power On Off System 3 Select Boot to SMS menu in the AIX or Linux partition mode by boot field 4 If you are installing the...

Page 42: ...o route cables through the cable management arm and to connect expansion units To route cables through the cable management arm and to connect expansion units complete the following steps 1 Route the console cable through the cable management arm 2 Connect expansion units that were shipped with the system For more information see the expansion unit installation book that was shipped with the syste...

Page 43: ... navigation area click Updates Firmware information is displayed in the contents area 4 Compare your installed firmware level with available firmware levels If necessary update your firmware levels a Compare your installed firmware level with available firmware levels For more information see the Fix Central website Fix Central b If necessary update your managed system firmware levels In the navig...

Page 44: ... Install an operating system and update the operating system v Install the AIX operating system For instructions see Installing AIX http www ibm com support knowledgecenter POWER8 p8hdx p8hdx_installaix htm v Install the IBM i operating system For instructions see Installing IBM i http www ibm com support knowledgecenter POWER8 p8hdx p8hdx_ibmi htm v Install the Linux operating system For instruct...

Page 45: ...edgecenter POWER8 p8hdx p8hdx_installlinux htm v Install the VIOS operating system For instructions see Installing VIOS http www ibm com support knowledgecenter POWER8 p8hch p8hch_installvios htm 5 Update the system firmware if required v For instructions to get firmware fixes through the AIX or Linux operating system see Getting server firmware fixes through AIX or Linux without a management cons...

Page 46: ...32 Power Systems Installing the IBM Power System S822 8284 22A ...

Page 47: ... system Flashing Off Flashing Off Power is not being supplied to one of the power supplies but power is being supplied to the second power supply and the system is in standby mode On Off Flashing Off Power is not being supplied to one of the power supplies but power is being supplied to the second power supply and the system is powered on Off Off Off Off Power is not being supplied to either power...

Page 48: ... your system and its cables have optimal clearance for maintenance and other operations The guidelines also provide guidance in correctly cabling your system and using the appropriate cables The following guidelines provide cabling information for installing migrating relocating or upgrading your system v Position drawers in racks to allow enough space where possible for routing cableson the botto...

Page 49: ...nd power cables v Four cable management bridge lanes on the top of the rack Use these bridge lanes to route the cables from one side of the rack to the other by routing to the top of the rack where possible This routing helps to avoid having a cable bundle that blocks the cable exit opening at the bottom of the rack v Use the cable management brackets that are provided with the system to maintain ...

Page 50: ...d System Management Interface by using a web browser if you need to set IP addresses on your notebook or if you need to troubleshoot a connection Accessing the ASMI by using a web browser If your system is not managed by a Hardware Management Console HMC you can connect a PC or notebook to the server to access the Advanced System Management Interface ASMI You need to configure the Web browser addr...

Page 51: ...he Ethernet port labeled HMC2 on the rear of the managed system Important If you attach an Ethernet cable to the service processor before the system reaches power off standby the IP address shown in Table 10 might not be valid For details see Correcting an IP address on page 39 4 Use Table 10 to help you determine and record the information needed to set the IP address of the service processor on ...

Page 52: ...lete the following procedure Windows Vista To set the IP address within Windows Vista complete the following steps 1 Click Start Control Panel 2 Ensure Classic View is selected 3 Click Network and Sharing Center 4 Click View status in the Public network area 5 Click Properties 6 If the Security window is shown click Continue 7 Highlight Internet Protocol Version 4 and click Properties 8 Select Use...

Page 53: ...anagement Interface ASMI by using a network connection complete one of the following tasks v Using a serial cable that is equipped with a null modem connect the ASCII terminal to the serial port on the rear of the server v Determine the current IP address For details see Function 30 Service processor IP address and port location http publib boulder ibm com infocenter systems scope hw topic p8hb5 f...

Page 54: ...40 Power Systems Installing the IBM Power System S822 8284 22A ...

Page 55: ... NON INFRINGEMENT MERCHANTABILITY OR FITNESS FOR A PARTICULAR PURPOSE Some states do not allow disclaimer of express or implied warranties in certain transactions therefore this statement may not apply to you This information could include technical inaccuracies or typographical errors Changes are periodically made to the information herein these changes will be incorporated in new editions of the...

Page 56: ...ations performed and data saved or transmitted by the system at or near the time of the outage or failure In addition users must establish procedures to ensure that there is independent data verification before relying on such data in sensitive or critical operations Users should periodically check IBM s support websites for updated information and fixes applicable to the system and related softwa...

Page 57: ...nications Commission FCC statement Note This equipment has been tested and found to comply with the limits for a Class A digital device pursuant to Part 15 of the FCC Rules These limits are designed to provide reasonable protection against harmful interference when the equipment is operated in a commercial environment This equipment generates uses and can radiate radio frequency energy and if not ...

Page 58: ... GmbH Technical Regulations Department M372 IBM Allee 1 71139 Ehningen Germany Tele 49 0 800 225 5423 or 49 0 180 331 3233 email halloibm de ibm com Warning This is a Class A product In a domestic environment this product may cause radio interference in which case the user may be required to take adequate measures VCCI Statement Japan The following is a summary of the VCCI Japanese statement in th...

Page 59: ... need to perform practical action Electromagnetic Interference EMI Statement Taiwan The following is a summary of the EMI Taiwan statement above Warning This is a Class A product In a domestic environment this product may cause radio interference in which case the user will be required to take adequate measures IBM Taiwan Contact Information Electromagnetic Interference EMI Statement Korea Notices...

Page 60: ...ann vom Betreiber verlangt werden angemessene Maßnahmen zu ergreifen und dafür aufzukommen Deutschland Einhaltung des Gesetzes über die elektromagnetische Verträglichkeit von Geräten Dieses Produkt entspricht dem Gesetz über die elektromagnetische Verträglichkeit von Geräten EMVG Dies ist die Umsetzung der EU Richtlinie 2004 108 EG in der Bundesrepublik Deutschland Zulassungsbescheinigung laut dem...

Page 61: ... following measures v Reorient or relocate the receiving antenna v Increase the separation between the equipment and receiver v Connect the equipment into an outlet on a circuit different from that to which the receiver is connected v Consult an IBM authorized dealer or service representative for help Properly shielded and grounded cables and connectors must be used in order to meet FCC emission l...

Page 62: ...its for Class B equipment were derived for typical residential environments to provide reasonable protection against interference with licensed communication equipment European Community contact IBM Deutschland GmbH Technical Regulations Department M372 IBM Allee 1 71139 Ehningen Germany Tele 49 0 800 225 5423 or 49 0 180 331 3233 email halloibm de ibm com VCCI Statement Japan Japanese Electronics...

Page 63: ...hland Einhaltung des Gesetzes über die elektromagnetische Verträglichkeit von Geräten Dieses Produkt entspricht dem Gesetz über die elektromagnetische Verträglichkeit von Geräten EMVG Dies ist die Umsetzung der EU Richtlinie 2004 108 EG in der Bundesrepublik Deutschland Zulassungsbescheinigung laut dem Deutschen Gesetz über die elektromagnetische Verträglichkeit von Geräten EMVG bzw der EMC EG Ric...

Page 64: ...t the express consent of IBM Rights Except as expressly granted in this permission no other permissions licenses or rights are granted either express or implied to the Publications or any information data software or other intellectual property contained therein IBM reserves the right to withdraw the permissions granted herein whenever in its discretion the use of the publications is detrimental t...

Page 65: ......

Page 66: ... Part Number 00LA014 Printed in USA GI11 9906 00 1P P N 00LA014 ...

Reviews: