


11.
Answer
YES
to
Keep
Definition
.
Press
Enter.
12.
The
ARE
YOU
SURE
screen
displays.
Press
Enter
to
verify
the
information.
Successful
unconfiguration
is
indicated
by
the
OK
message
displayed
next
to
the
Command
field
at
the
top
of
the
screen.
13.
Press
F3
to
return
to
the
PCI
Hot-Plug
Manager
menu.
14.
Select
List
PCI
Hot-Plug
Slots
.
15.
If
the
List
PCI
Hot-Plug
Slots
menu
indicates
that
the
slot
is
not
empty,
go
to
step
17.
16.
If
the
List
PCI
Hot-Plug
Slots
menu
indicates
that
the
slot
is
empty,
do
the
following:
a.
Press
F3
to
cancel.
b.
Select
Add
PCI
Hot-Plug
Adapter
,
and
press
Enter.
The
display
screen
indicates
that
the
PCI
slot
is
empty.
c.
On
the
display
screen,
select
the
indicated
empty
slot.
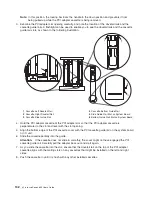
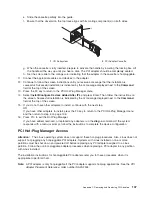
Look
at
the
adapter
you
intend
to
remove.
A
slow
blinking
amber
LED
located
next
to
the
adapter
on
the
PCI
riser
card
indicates
that
the
slot
has
been
identified.
Press
Enter.
The
adapter
has
been
put
into
the
action
state.
d.
Disconnect
any
cables
that
are
connected
to
the
adapter
being
removed.
e.
Completely
remove
the
hot-plug
adapter
from
the
slot.
The
LED
goes
off.
f.
Go
to
step
21.
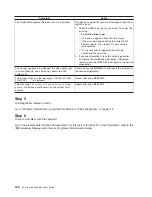
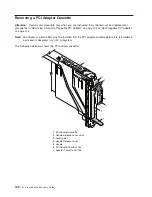
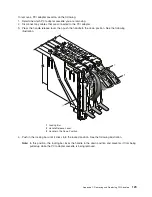
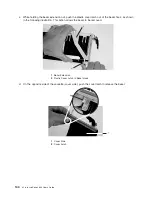
17.
When
you
are
instructed
to
remove
the
adapter
from
the
adapter
slot,
disconnect
any
cables
that
are
connected
to
the
adapter
being
removed,
and
then
refer
to
“Removing
a
PCI
Adapter
Cassette”
on
page
128.
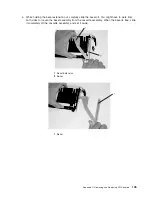
18.
Install
the
replacement
adapter
into
the
PCI
adapter
cassette.
See
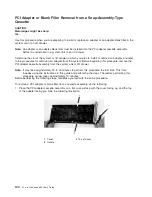
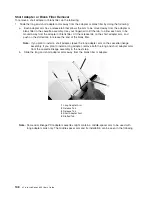
“PCI
Adapter
or
Blank
Filler
Removal
from
a
Snap-Assembly-Type
Cassette”
on
page
140.
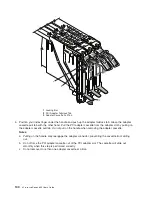
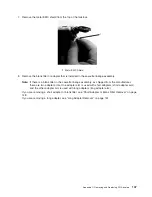
19.
With
the
replaced
adapter
installed
into
the
PCI
adapter
cassette,
refer
to
“Replacing
a
PCI
Adapter
Cassette”
on
page
131.
20.
If
you
installed
an
adapter
into
the
adapter
cassette,
connect
the
appropriate
cables
and
devices
to
the
adapter
connectors.
21.
Continue
to
follow
the
screen
instructions
until
you
receive
a
message
that
the
replacement
is
successful.
Successful
replacement
is
indicated
by
the
OK
message
displayed
next
to
the
Command
field
at
the
top
of
the
screen.
22.
If
you
did
not
install
an
adapter
into
the
adapter
cassette,
go
to
step
23.
If
you
did
install
an
adapter
into
the
adapter
cassette,
do
the
following:
a.
Press
the
F3
key
to
return
to
the
PCI
Hot-Plug
Manager
menu.
b.
Select
Install/Configure
Devices
Added
After
IPL
and
press
Enter.
Then
follow
the
instructions
on
the
screen.
Successful
replacement
is
indicated
by
the
OK
message
displayed
next
to
the
Command
field
at
the
top
of
the
screen.
23.
If
you
do
not
have
other
adapters
to
replace,
continue
with
the
next
step.
OR
If
you
have
other
adapters
to
replace,
press
the
F3
key
to
return
to
the
PCI
Hot-Plug
Manager
menu
and
then
return
to
step
14.
24.
Press
F10
to
exit
the
Hot-Plug
Manager.
If
you
have
added,
removed,
or
replaced
any
adapters,
run
the
diag
-a
command.
If
the
system
responds
with
a
menu
or
prompt,
follow
the
instructions
to
complete
the
device
configuration.
Appendix
C.
Removing
and
Replacing
PCI
Adapters
135
Summary of Contents for p 655 series
Page 1: ...pSeries 655 User s Guide SA38 0617 03 ERserver...
Page 2: ......
Page 3: ...pSeries 655 User s Guide SA38 0617 03 ERserver...
Page 10: ...viii Eserver pSeries 655 User s Guide...
Page 14: ...xii Eserver pSeries 655 User s Guide...
Page 16: ...xiv Eserver pSeries 655 User s Guide...
Page 24: ...6 Eserver pSeries 655 User s Guide...
Page 32: ...14 Eserver pSeries 655 User s Guide...
Page 36: ...18 Eserver pSeries 655 User s Guide...
Page 90: ...72 Eserver pSeries 655 User s Guide...
Page 144: ...126 Eserver pSeries 655 User s Guide...
Page 208: ...190 Eserver pSeries 655 User s Guide...
Page 214: ...196 Eserver pSeries 655 User s Guide...
Page 217: ......


