background image

6-34

HySpeed HT2000

Instruction Manual

OPERATION

22

Shield

Arc

Approx.

Material

Plasma Gas Flow Rate %

Gas (Air)

Torch-to-work

Initial Torch

Voltage

Motion

Thickness

Preflow 

Cutflow

Pressure

Distance

Piercing Height

Setting

Travel Speed

Delay Time

(inches)

(mm)

(Air %)

(Air %)

(psi)

(inches)

(mm)

(inches)

(mm)

(volts)

(ipm) (mm/min.)

(sec)

3/32

2.5

40

20

60

3/32

2.5

3/16

5

120

140

3550

1/8

3

(46.0

(23.1

(275

3/32

2.5

3/16

5

130

100

2550

0.5

1/4

6

SCFH)

SCFH)

SCFH)

1/8

3

140

35

900

3/8

10

1/8

3

150

15

350

Aluminum

40 amps • Air Plasma / Air Shield

This gas combination gives good cut speed, low dross levels and is very economical.

Notes: 

Set plasma gas inlet pressure to 90 psi (6.2 bar)
Set shield gas inlet pressure to 90 psi (6.2 bar)

Production cutting above 1/8" (3 mm) not recommended

Above Water Only

020613

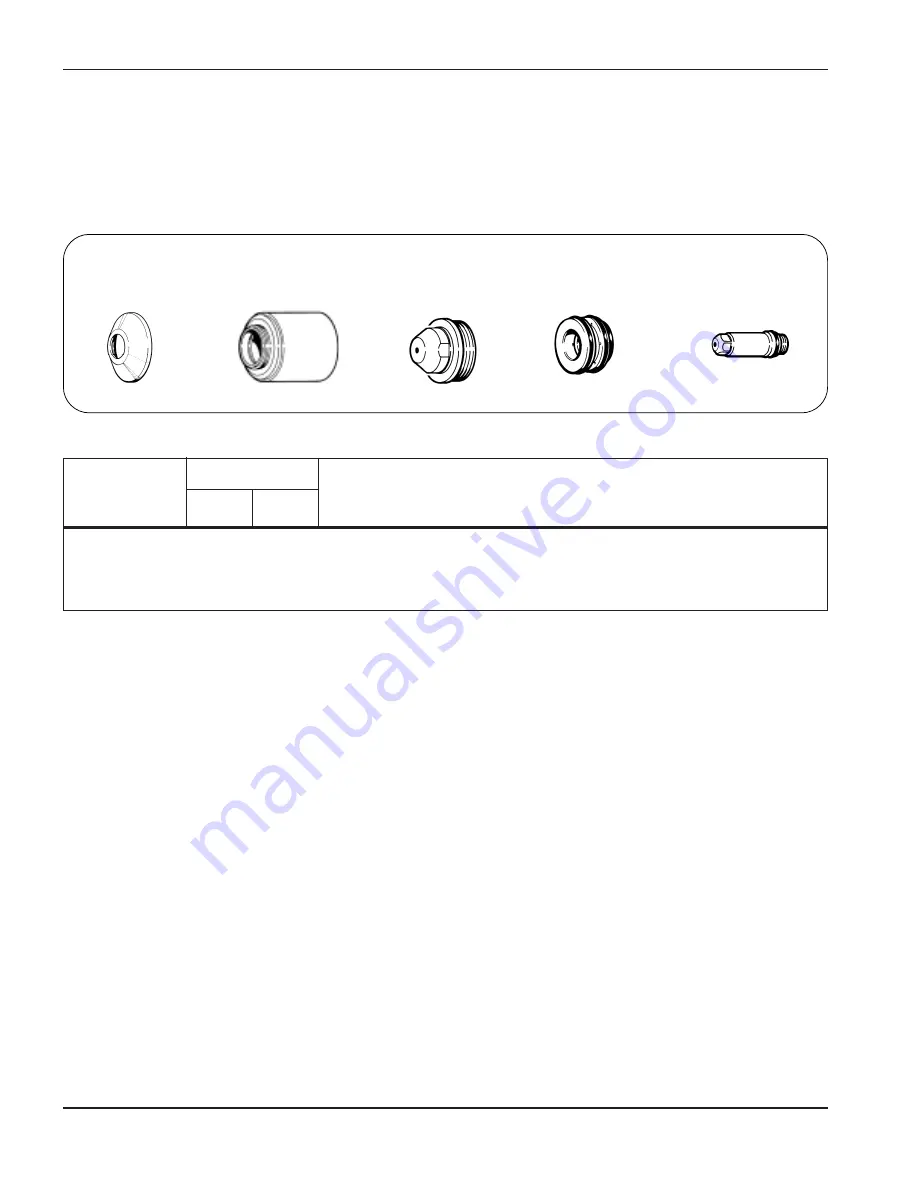
Swirl ring

120667

Electrode

020689

Nozzle

020423

Retaining cap

020688

Shield

Summary of Contents for HT2000

Page 1: ...200 Volt Plasma Arc Cutting System Instruction Manual 802460 Revision 14 HySpeed HT2000 ...

Page 2: ...lation by qualified rewrote hard plumbing suggestions 3 03 Bumped page 3 04 Bumped page 6 01 Updated TOC for added section on cutting techniques 6 12 Referenced new section on cutting technique 6 39 6 42 New section on cutting techniques 8 25 Changed graphic of coolant reservoir 8 26 New graphic of coolant reservoir 9 01 Updated TOC for beveling consumable parts kit 9 17 Corrected part no of adapt...

Page 3: ...Clarified production cutting capacity 6 24 Changed electrode p n clarified production cutting capacity 6 25 Clarified production cutting capacity 6 26 Changed electrode p n 6 27 Changed electrode p n clarified production cutting capacity 6 28 Clarified production cutting capacity 6 29 Clarified production cutting capacity 6 30 Clarified production cutting capacity 6 31 Changed electrode p n clarif...

Page 4: ... of ECNs 9523 9483 grounding appendix serial jump to 2000 005000 0 05 Added System Grounding to TOC 0 06 Added System Grounding to TOC 0 07 Bumped page 0 08 Added System Grounding to TOC 3 04 Referenced new grounding appendix 4 03 Referenced new grounding appendix 4 04 Referenced new grounding appendix 7 06 Added more verbiage on H35 cutting 7 07 Bumped page 7 08 Added more verbiage on H35 cutting...

Page 5: ...ight to cut charts combined under above water on 1 page 6 30 Added initial torch piercing height to cut charts 6 31 Added initial torch piercing height to cut charts combined under above water on 1 page 6 32 6 34 Added initial torch piercing height to cut charts 6 35 Put all gouging cut charts on 1 page 6 36 Bumped page 6 37 Bumped page better graphic of main body removed reference to nozzle o rin...

Page 6: ...one dimension for gas console 3 02 Reference to Section 2 for gas specs added caution 3 03 Reference to Section 2 for gas specs 3 10 Changed view of power cable connections to match label 4 06 Referenced to section 9 for additional lengths of hoses and cables 5 03 Added tolerances to gas pressures 6 10 Added tolerances to gas pressures 6 17 Added note to cut chart for using 020679 swirl ring 6 19A...

Page 7: ...dded note about arc voltage added scfh flows 7 05 New graphics of torch new layout clarification in procedure 7 06 Clarification of procedure 8 11 Removed outdated reference to leaking oil in transformer 9 05 Uprevved firmware to J 9 07 Added 440V power transformer part 9 09 Added 440V control transformer part 9 18 Added graphic of pump coupler 9 19 Added part of pump coupler 9 24 Graphic of new g...

Page 8: ...Added See Status Indicators Before Startup to step 7 8 03 Added 6 month maintenance to power supply 8 04 New figure for cleaning pump strainer 8 05 Bumped page 8 06 New startup logic 8 09 Picture of new power distribution board 8 11 Changed logic of cause 3 3 8 15 New STATUS logic 8 16 New STATUS logic 8 17 New STATUS logic 8 18 New STATUS logic 8 20 Removed reference to old chopper temperature sw...

Page 9: ......

Page 10: ...14 November 2013 Copyright 2013 Hypertherm Inc All Rights Reserved Hypertherm HT HyLife HySpeed and LongLife are trademarks of Hypertherm Inc and may be registered in the United States and or other countries Hypertherm Inc Hanover NH USA www hypertherm com ...

Page 11: ...blic of Singapore 65 6 841 2489 Tel 65 6 841 2490 Fax 65 6 841 2489 Technical Service Hypertherm UK Ltd 9 Berkeley Court Manor Park Runcorn Cheshire England WA7 1TQ 44 1928 579 074 Tel 44 1928 579 604 Fax France 15 Impasse des Rosiers 95610 Eragny France 00 800 3324 9737 Tel 00 800 4973 7329 Fax Hypertherm S r l Via Torino 2 20123 Milano Italia 39 02 725 46 312 Tel 39 02 725 46 400 Fax 39 02 725 4...

Page 12: ...nnection to the workpiece but in some countries where direct connection is not permitted the bonding should be achieved by suitable capacitances selected according to national regulations Note The cutting circuit may or may not be earthed for safety reasons Changing the earthing arrangements should only be au thorized by a person who is competent to assess whether the changes will increase the ris...

Page 13: ...erm PATENT INDEMNITY Except only in cases of products not manufactured by Hypertherm or manufactured by a person other than Hypertherm not in strict conformity with Hypertherm s specifications and in cases of designs processes formulae or combinations not developed or purported to be developed by Hypertherm Hypertherm will defend or settle at its own expense any suit or proceeding brought against ...

Page 14: ...a 2 Le coupage peut provoquer un incendie ou une explosion 1a 2 Les chocs électriques peuvent être fatals 1a 3 Le coupage peut produire des vapeurs toxiques 1a 3 L arc plasma peut provoquer des blessures ou des brûlures 1a 4 Mise à la masse et à la terre 1a 4 Les rayons de l arc peuvent brûler les yeux et la peau 1a 4 Sécurité des bouteilles de gaz comprimé 1a 5 Les bouteilles de gaz comprimé peuv...

Page 15: ...Electrical Configurations 3 7 240 480V Linkboard Configurations 3 7 220 380 415V Transformer T1 and T2 Configurations 3 8 Connecting the Power 3 10 Torch Lifter Requirement 3 11 Optional Equipment 3 11 Water Muffler 3 11 Initial Height Sensing IHS 3 12 Section 4 INSTALLATION 4 1 Upon Receipt 4 2 Claims 4 2 Module Grounding and Grounding Checks 4 3 Noise Levels 4 3 System Units Placement 4 4 Power ...

Page 16: ... and Indicators 6 2 Power Supply 6 2 STATUS Indicators Before Startup 6 3 Gas Console 6 4 Digital Remote DR V C Module 6 6 Programmable Remote PR V C Module 6 7 Timer Counter 6 7 Noise Levels Decibels 6 8 Daily Start Up 6 9 Check Torch 6 9 Turn Gases On 6 9 Turn Power Supply On and Adjust Voltage Current 6 10 Adjust Preflow Gases 6 10 Adjust Cut Flow Gases and Prepare for Cutting 6 11 Common Cutti...

Page 17: ... Checks 8 7 Troubleshooting 8 10 STATUS LED Troubleshooting 8 15 Chopper Module Test Procedure 8 19 Error Codes 8 21 Analog Board LED Functions 8 22 Relay Board LED Function List 8 23 Relay Board LED Status Conditions 8 23 Coolant Flow Test Procedure 8 25 Check Reservoir Coolant 8 25 Verify Flow Rate Return from Torch 8 25 Verify Flow Rate to Torch 8 26 Check Pump Motor and Solenoid Valve 8 27 Tor...

Page 18: ...et 9 39 Torch Leads Leads Cables and Hoses 9 40 Consumable Parts Kits 9 50 Lead Packages 9 54 Power Supply to Remote High Frequency Console Cables and Hoses 9 54 Remote High Frequency Console to Gas Console Hoses 9 54 Gas Console to Motor Valve Console Hoses 9 54 Recommended Spare Parts 9 55 Power Supply 9 55 Remote High Frequency Console 9 55 Gas Console 9 56 Motor Valve Console 9 56 Section 10 W...

Page 19: ... Connect Power Cable e 2 Power Supply e 2 Line Disconnect Switch e 4 EMI Filter Parts List e 5 Appendix F SYSTEM GROUNDING g 1 System Grounding Requirements g 1 Suggested Ground Cable Routing g 1 Power Supply g 1 Equipment Grounding g 1 Work Table Grounding g 2 ...

Page 20: ...n Kill 1 3 Cutting Can Produce Toxic Fumes 1 3 A Plasma Arc Can Cause Injury and Burns 1 4 Arc Rays Can Burn Eyes and Skin 1 4 Grounding Safety 1 4 Compressed Gas Equipment Safety 1 5 Gas Cylinders Can Explode If Damaged 1 5 Noise Can Damage Hearing 1 5 Pacemaker and Hearing Aid Operation 1 5 A Plasma Arc Can Damage Frozen Pipes 1 5 Additional Safety Information 1 5 Warning Label 1 6 ...

Page 21: ... sure the area is safe before doing any cutting Keep a fire extinguisher nearby Remove all flammables within 35 feet 10 m of the cutting area Quench hot metal or allow it to cool before handling or before letting it touch combustible materials Never cut containers with potentially flammable materials inside they must be emptied and properly cleaned first Ventilate potentially flammable atmospheres...

Page 22: ... on the workbench with the work cable attached during the cutting process Before checking cleaning or changing torch parts disconnect the main power or unplug the power supply Never bypass or shortcut the safety interlocks Before removing any power supply or system enclosure cover disconnect electrical input power Wait 5 minutes after disconnecting the main power to allow capacitors to discharge N...

Page 23: ...rdant clothing to cover all exposed areas Cuffless trousers to prevent entry of sparks and slag Remove any combustibles such as a butane lighter or matches from your pockets before cutting Cutting Area Prepare the cutting area to reduce reflection and transmission of ultraviolet light Paint walls and other surfaces with dark colors to reduce reflection Use protective screens or barriers to protect...

Page 24: ...s possible to the work cable Do not wrap or drape the torch lead or work cable around your body Keep as far away from the power supply as possible PACEMAKER AND HEARING AID OPERATION ADDITIONAL SAFETY INFORMATION 1 ANSI Standard Z49 1 Safety in Welding and Cutting American Welding Society 550 LeJeune Road P O Box 351020 Miami FL 33135 2 ANSI Standard Z49 2 Fire Prevention in the Use of Cutting and...

Page 25: ...cutting path 2 3 Wear complete body protection 3 Electric shock from torch or wiring can kill Protect yourself from electric shock 3 1 Wear insulating gloves Do not wear wet or damaged gloves 3 2 Insulate yourself from work and ground 3 3 Disconnect input plug or power before working on machine 4 Breathing cutting fumes can be hazardous to your health 4 1 Keep your head out of the fumes 4 2 Use fo...

Page 26: ...vention des chocs électriques 1a 3 Le coupage peut produire des vapeurs toxiques 1a 3 L arc plasma peut provoquer des blessures ou des brûlures 1a 4 Torches à allumage instantané 1a 4 Les rayons de l arc peuvent brûler les yeux et la peau 1a 4 Protection des yeux Protection de la peau Zone de coupage 1a 4 Mise à la masse et à la terre 1a 4 Câble de retour Table de travail Alimentation 1a 4 Sécurit...

Page 27: ...e sont pas suivies correctement Prévention des incendies Avant de commencer s assurer que la zone de coupage ne présente aucun danger Conserver un extincteur à proximité Éloigner toute matière inflammable à une distance d au moins 10 m du poste de coupage Tremper le métal chaud ou le laisser refroidir avant de le manipuler ou avant de le mettre en contact avec des matériaux combustibles Ne jamais ...

Page 28: ...lors du coupage Laisser la pièce à couper en place ou sur la table de travail le câble de retour connecté lors du coupage Avant de vérifier de nettoyer ou de remplacer les pièces de la torche couper l alimentation ou débrancher la prise de courant Ne jamais contourner ou court circuiter les verrouillages de sécurité Avant d enlever le capot du système ou de la source de courant couper l alimentati...

Page 29: ...sées du corps Pantalon sans revers pour éviter que des étincelles ou des scories puissent s y loger Avant le coupage retirer de ses poches tout objet combustible comme les briquets au butane ou les allumettes Zone de coupage Préparer la zone de coupage afin de réduire la réverbération et la transmission de la lumière ultraviolette Peindre les murs et autres surfaces de couleur sombre pour réduire ...

Page 30: ...e jamais exposer des bouteilles à une chaleur excessive aux étincelles aux scories ou aux flammes nues Ne jamais utiliser des marteaux des clés ou d autres outils pour débloquer le robinet des bouteilles Une exposition prolongée au bruit du coupage ou du gougeage peut provoquer des problèmes auditifs Utiliser un casque de protection homologué lors de l utilisation du système plasma Prévenir les pe...

Page 31: ... peut être fatal Se protéger contre les risques de chocs électriques 3 1 Porter des gants isolants Ne pas porter de gants mouillés ou abîmés 3 2 S isoler de la surface de travail et du sol 3 3 Débrancher la prise ou la source de courant avant de manipuler l équipement 4 L inhalation des vapeurs produites par le coupage peut être dangereuse pour la santé 4 1 Garder le visage à l écart des vapeurs 4...

Page 32: ...ltage Current V C Control 2 3 Initial Height Sensing IHS 2 4 Timer Counter 2 4 Water Muffler 2 4 Specifications 2 5 System Requirements 2 5 Power Supply 2 5 HYSpeed HT2000 Machine Torches 2 6 Remote High Frequency Console 2 6 Gas Console 2 7 Motor Valve Console 2 7 Argon Hydrogen Console 2 8 Digital Remote DR V C Control 2 8 Programmable Remote PR V C Control 2 9 Initial Height Sensing 2 10 Timer ...

Page 33: ...on ferrous materials nitrogen or argon hydrogen can be used as the plasma gas Hypertherm recommends a mixture of 35 hydrogen and 65 argon When cutting mild carbon steel oxygen can be used as the plasma gas Shield gases other than air which can be used are nitrogen and carbon dioxide The following descriptions briefly describe the purpose and configuration of the major units which comprise the HT20...

Page 34: ...e plasma off valve The plasma off valve for nitrogen and oxygen is located at the torch The argon hydrogen manifold interfaces with the supply gas the power supply and the torch Remote Voltage Current V C Control Optional This unit provides accurate operator control of the arc voltage and current It includes high intensity LED displays which indicate the setpoints for volts and amperes prior to st...

Page 35: ... an air supply to operate Timer Counter Optional This unit allows the operator to monitor the number of arc starts and the cumulative time that the arc is on in hours The arc starts can be reset This unit connects with the power supply Water Muffler Optional The water muffler for the HT2000 system is an option which greatly improves cutting safety and pollution control capabilities The water muffl...

Page 36: ...r 0 7 bar at 220 scfh 6230 l h Nitrogen 90 psi 10 psi 6 2 bar 0 7 bar at 275 scfh 7787 l h Oxygen 120 psi 10 psi 8 3 bar 0 7 bar at 35 scfh 991 l h Power Supply Maximum OCV U0 280 VDC Output Current I2 40 to 200 amps Output Voltage U2 150 VDC Duty Cycle Rating X 100 up to 30kW Beyond 30kW Duty Cycle X 30kW Actual Power 2 Eg If Actual Power 32kW then Duty Cycle X 30kW 32kW 2 88 Ambient Temperatures...

Page 37: ...ir Class F Torch Coolant Tank Capacity 2 9 gallons 11 liters Figure 2 1 Mounting Dimensions RHF Console Maximum cutting thickness 2 inch 50 mm Maximum current at 100 duty cycle 200 amps Plasma Gas Flow Refer to the Cut Charts in the Operation Shield Gas Flow section for specific gas requirements Water coolant flow rate 0 8 gpm 3 0 l min Weight 2 1 2 pounds 1 13 kg Remote High Frequency Console 073...

Page 38: ...eight Width 16 40 6 cm Height 16 75 42 5 cm Depth 12 75 32 cm Weight 75 pounds 34 kg Figure 2 2 Mounting Dimensions Gas Console Figure 2 3 Mounting Dimensions Motor Valve Console Dimensions and Weight Width 11 5 29 cm Height 14 5 37 cm Depth 4 10 cm Weight 23 pounds 10 4 kg 1 4 20 PEM Use 1 4 20 screws that do not enter more than 1 2 into enclosure Motor Valve Console 073219 10 3 4 6 8 11 1 2 5 16...

Page 39: ...Digital Remote DR V C Control 073007 Optional Controls Voltage adjust pot Adjusts arc cutting voltage and displays value on LEDs Current adjust pot Adjusts arc cutting current and displays value on LEDs Control Range Current 40 to 200 Amps Voltage 100 to 200 Volts Control Resolution Current 10 Amps Voltage 5 Volts Dimensions and Weight Width 11 1 2 29 cm Height 3 7 6 cm Depth 13 3 8 34 cm Weight 5...

Page 40: ... machinery computer Control Range Current 40 to 200 Amps Voltage 100 to 200 Volts Control Resolution Current 10 Amps Voltage 5 Volts Dimensions and Weight Width 11 1 2 29 cm Height 3 7 6 cm Depth 12 1 2 31 8 cm Weight 5 pounds 5 oz 2 4 kg Figure 2 5 Mounting Dimensions Remote V C Modules 10 5 5 6 5 11 4 7 32 dia 4 11 65 45 1 2 Digital Remote shown ...

Page 41: ...t Width 9 23 cm Height 4 5 11 cm Depth 11 1 2 29 cm Weight 13 pounds 6 kg Figure 2 6 Mounting Dimensions IHS Console Timer Counter 073194 Optional Dimensions and Weight Width 6 1 2 16 5 cm Height 2 1 2 6 4 cm Depth 8 5 8 21 9 cm Weight 3 pounds 1 kg Water Muffler Optional The water muffler can not be used with the stainless steel machine torch Refer to Water Muffler Instruction Manual 802050 6 10 ...

Page 42: ...Torch Coolant Requirements 3 4 Grounding Requirements 3 5 Power Requirements 3 5 Line Disconnect Switch 3 5 Power Cable 3 5 Positioning the Power Supply 3 6 Electrical Configurations 3 7 240 480V Linkboard Configurations 3 7 220 380 400 415V Transformer T1 and T2 Configurations 3 8 Connecting the Power 3 10 Torch Lifter Requirement 3 11 Optional Equipment 3 11 Water Muffler 3 11 Initial Height Sen...

Page 43: ...r compressed air or shop compressed air From Cylinder Compressed Air or Shop Air to Gas Console Use an inert gas hose to connect the air supply to the input connection on the gas console Hosing can be purchased through Hypertherm When using air as the plasma or shield gas Hypertherm recommends a three stage filtration system See Appendix section for suggested filtration Introduction Prior to the i...

Page 44: ...gas to the gas console we recommend using standard oxygen hose with the system Note If cutting with oxygen as the plasma gas nitrogen must also be connected to the gas console to achieve the proper oxygen nitrogen mixtures in the preflow and cut flow conditions From Gas Console to Motor Valve Console Hose from the gas console to the motor valve console is provided by Hypertherm Shield Gas From Sou...

Page 45: ...water solution is needed for your particular application Observe the warning and cautions below Refer to the Material Safety Data Sheets in Appendix B for data on safety handling and storage of propylene glycol and benzotriazole Caution Always use propylene glycol in the coolant mixture Do not use anti freeze in place of propylene glycol Antifreeze contains corrosion inhibitors that will damage th...

Page 46: ...witch The line disconnect switch serves as the supply voltage disconnecting isolating device Install this switch on a wall near the power supply for easy accessibility by the operator The line disconnect switch must be installed by qualified personnel following all applicable local and national codes The switch should Isolate the electrical equipment and disconnect all live conductors from the sup...

Page 47: ...end the entire length of the base Care should be used when lifting with the forks so that the underside of the power supply is not damaged 1 Place the power supply in an area that is free of excessive moisture has proper ventilation and is relatively clean Allow room for accessing the sides of the power supply for servicing 2 Place the power supply so that air flow is not blocked in any way Coolin...

Page 48: ...p observe the following warning 240 480V Linkboard Configurations The 240 480 volt units are shipped from the factory linked for 480 volt operation The links must be moved for 240 volt operation Ensure that the linkboard is configured properly to the appropriate voltage line see Figure 3 1 Figure 3 1 Dual Voltage 240 480 Volt Linkboard Configurations WARNING Danger High Voltage Line voltage is pre...

Page 49: ... normally shipped from the factory set up for 380 volt operation unless otherwise specified To change the power supply to a different voltage the control transformer T1 and 30 kw transformer T2 must be re configured see Figure 3 2 A long 6 AWG 600V wire is shipped with every unit Figure 3 2 220 380 400 415V Transformer T1 and T2 Configurations 1 of 2 T1 T1 T2 T2 ...

Page 50: ...PRE INSTALLATION HySpeed HT2000 Instruction Manual 3 9 19 Figure 3 2 220 380 400 415V Transformer T1 and T2 Configurations 2 of 2 T2 T2 T1 T1 ...

Page 51: ...ads to the L1 L2 and L3 terminals of TB1 See Fig 3 3 3 Connect the ground lead to the stud as shown Ground lead WARNING The line disconnect switch must be in the OFF position before making the power cable connections In the U S use a lock out tag out procedure until installation is complete In other countries follow appropriate local or national safety procedures WARNING There is line voltage at t...

Page 52: ... pump priming problems as well as water lag problems during start up This results in excessive noise and smoke during the initial starting Water pump and water hosing can be purchased by the customer or supplied by Hypertherm when ordering a Water Muffler system Please refer to Water Muffler System part numbers listed below and Water Muffler instruction manual 802050 for further information Torch ...

Page 53: ...Volts 60 Hz 034097 wo hoses 028042 240 480 Volt 60 Hz 034101 wo hoses 028299 380 415 Volt 50 Hz 034099 wo hoses 028308 600 Volts 60 Hz Initial Height Sensing IHS The customer must provide the Initial Height Sensing system a source of compressed air to activate the inductive probes positioning rod Air Requirements Use a clean dry source of air to prevent possible problems created by moisture and wa...

Page 54: ...RHF and Motor Valve Consoles to Torch Connections 4 28 Routing the Torch Leads 4 28 Connecting the HF Torch Leads to the RHF Console 4 28 Connecting the HF Torch Leads to the Torch 4 30 Connecting the Off Valve Cable and Plasma Hose from the Torch to the Motor Valve Console 4 30 Optional Power Supply Connections 4 32 Timer Counter to Power Supply 4 32 Hold Cable Connections When using Multi Torch ...

Page 55: ...rs Before unpacking inspect the cartons for evidence of damage during shipment If there is evidence of damage refer to Claims for Damage During Shipment for details 1 Remove the units and items from the shipping cartons 2 Verify that the components of the system optional units cables and hoses and items listed below are included Alert your distributor or Hypertherm if any of the items are damaged ...

Page 56: ...ding checks to ensure proper operation personal safety and to reduce emission of radio frequency interference Ensure the power cord ground wire is properly connected to the ground in the line disconnect box Ensure the power cord ground wire is properly connected to the power supply terminal TB1 Refer to Connecting the Power in the Pre Installation section of this manual Ensure that all electrical ...

Page 57: ...ve console must be located within 10 ft 3 m of the torch and the IHS console must be located within 40 ft 12 m of the torch To prevent leaks in the system tighten all gas and water connections to the following specifications Figure 4 2 Typical Unit Placement for Gantry Cutter Motor Valve Console Torch w IHS Probes Water In Water Filter Water Muffler Pump Power In Power In Machine Control Power Sup...

Page 58: ...uffler Pump Power Supply Remote V C Machine Computer Interface 2X1 1X1 1X9 3X1 1X2 1X3 14X1 4X1 1X7 1X4 1X5 5X1 5X2 1X6 1X10 11X1 8X1 8X3 4X2 8X2 Work table Workpiece 25 25 24 21 20 22 23 19 18 Off Valve 8X5 8X4 3 Phase Power 3 Phase Power H2O in 1 3 13 15 14 14 16 27 26 6 7 2 8 9 10 11 12 4 5a 5b Air in To Second Power Supply 17 Key Plasma gas hosing Shield gas hosing Air hosing Shielded torch le...

Page 59: ...ft 62 m Negative Lead Power Supply PS to RHF Console Positive Lead PS to Work Table 1 2 Pilot Arc lead PS to RHF Console 3 Power Supply Connections Match numbers in figures on right hand pages with numbers of cables and hoses on left hand pages to make connections Any special instructions for installation are explained on the left hand page The cable and hose part numbers on these pages represent ...

Page 60: ...INSTALLATION HySpeed HT2000 Instruction Manual 4 7 19 Figure 4 4 Power Supply Connections to RHF Console and Work Table RHF Console Pilot Arc Shield To work table Power Supply Connections Rear 2 3 1 3 1 ...

Page 61: ...5 White PS3 Shield Gas 9 6 Shld Cable Shield 23 7 Black SV6 Shield ON 24 8 Green SV6 Shield ON 25 11 Shld Shield 10 10 Black SV7 Cap OFF 11 13 Blue SV7 Cap OFF 12 14 Shld Shield 1 12 Black T1 HV Xfrmer 2 15 Yellow T1 HV Xfrmer 3 16 Shld Shield 5 1X1 GRN RED GRN RED 2X1 Part No Length 023550 15 ft 4 6 m 023610 25 ft 7 6 m 023611 50 ft 15 m 023612 75 ft 23 m 023613 100 ft 30 5 m 023614 150 ft 46 m 0...

Page 62: ...INSTALLATION HySpeed HT2000 Instruction Manual 4 9 19 Power Supply Rear Figure 4 5 Power Supply Connections to RHF Console 5b 5a RHF Console Rear 5b 4 5a ...

Page 63: ...Brown SV1A O2 N2 22 22 Shld Shield 16 16 Black SV2 O2 N2 17 17 Yellow SV2 O2 N2 10 10 Shld Shield 11 11 Black SV3 Preflow Trap 12 12 Brown SV3 Preflow Trap 18 18 Shld Shield 19 19 Black S1 N2 O2 20 20 Orange S1 N2 O2 13 13 Shld Shield 14 14 Red S2 Test Preflow 15 15 White S2 Test Common 21 21 Shld Shield 35 35 Red S2 Test Operate 36 36 Green S2 Test Common 31 31 Shld Shield 32 32 Red PS1 PS2 33 33...

Page 64: ...INSTALLATION HySpeed HT2000 Instruction Manual 4 11 19 Figure 4 6 Power Supply Connection to Gas Console 2WRENCHES Power Supply Rear Gas Console 3 X 1 6 4 6 ...

Page 65: ... 23 Red SV4B Preflow 24 24 Yellow SV4B Preflow 25 25 Shld Shield 29 29 Black SV5 Plasma OFF 30 30 Red SV5 Plasma OFF 34 34 Shld Shield 11 11 Black MV2 Decrease 12 12 Brown MV2 Decrease 18 18 Shld Shield 14 14 Brown MV2 Motor Increase 21 21 Shld Shield Part No Length 023551 15 ft 4 5 m 023590 25 ft 7 6 m 023776 35 ft 10 5 m 023591 50 ft 15 m 023592 75 ft 23 m 023593 100 ft 30 5 m 023594 150 ft 46 m...

Page 66: ...INSTALLATION HySpeed HT2000 Instruction Manual 4 13 19 Figure 4 7 Power Supply Connection to Motor Valve Console Power Supply Rear Motor Valve Console 7 7 ...

Page 67: ...hield 4 Orange 4 Auto Height Sig OFF Closed 8 Black 8 Auto Height Com 13 Shld Shield 34 Red 34 Lifter DOWN Load DOWN Closed 29 Black 29 Lifter DOWN Line 23 Shld Shield 35 Green 35 Lifter UP Load UP Closed 30 Black 30 Lifter UP Line 24 Shld Shield 36 Red 36 Upper Limit Switch OFF Closed 31 Blue 31 Upper Limit Switch 25 Shld Shield 33 Red 33 Arc Voltage 1 50 Arc Voltage 28 Yellow 28 Arc Voltage 27 S...

Page 68: ...V C Interface Cable PS to Machine Computer Interface 9 1X7 From 1X7 Color Signal 2 White Current 10 3 Red Current 20 4 Green Current 40 5 Orange Current 80 6 Blue Current 100 7 White Black Current 200 10 Shld Shield 11 Blue Black Current ICom 12 Black White Spare 13 Red White Spare 16 Black Red Voltage V5 17 White Red Voltage V10 18 Orange Red Voltage V20 19 Blue Red Voltage V40 20 Red Green Volta...

Page 69: ...mable V C readout skip this page PS End PR V C End Color Signal 1 1 Black Current 20 2 2 Blue Current 40 3 3 Green Current 80 4 4 White Current 100 5 5 Orange Current 200 7 7 White Black Common PS End PR V C End Color Signal 8 8 White Blue Voltage 5 9 9 Black Blue Voltage 10 10 10 Black Green Voltage 20 11 11 Black Orange Voltage 40 12 12 Black Red Voltage 80 13 13 White Grey Voltage 100 14 14 Whi...

Page 70: ...TALLATION HySpeed HT2000 Instruction Manual 4 17 19 Figure 4 10 Power Supply Connections to Remote V C Modules Programmable Remote Rear Digital Remote Rear Power Supply Rear 8 9 11 10 10 10 11 5X1 5X1 5X2 ...

Page 71: ...or 2 Coil Black Water Muffler Coil 4 AC Neut White AC Neutral 3 Ground Green Ground Part No Length 023866 50 ft 15 m 023867 75 ft 23 m 023868 100 ft 30 5 m Legend PS End Pin Color Function 1 Red IHS Complete Sig 2 Grn Upper Limit Sw Sig 4 Blk IHS Complete Com 5 Blk Upper Limit Sw Com 8 Drain Shield Wht Blk 9 Drain Shield Red Blk 7 Drain Shield Grn Blk 11 Blk AC Power 14 Wht AC Power Legend Remote ...

Page 72: ...INSTALLATION HySpeed HT2000 Instruction Manual 4 19 19 Figure 4 11 Power Supply Connections to Water Muffler and IHS Console Power Supply Rear 13 12 IHS Module 13 ...

Page 73: ...id The two inductive probes come as part of the IHS torch mounting subassembly see page 9 43 IHS Air Supply Air Supply to IHS Module The customer must supply the 20 psig regulated shop air and the air hose Air Hose Assembly IHS Module to Inductive Sensor Air Cylinder The 40 foot air hose is a component of the IHS leads packages see page 9 43 Function Pin Color Power 15 VDC A Brown Common B Blue Si...

Page 74: ...struction Manual 4 21 19 Figure 4 12 Initial Height Sensing Connections AIR CYLINDER INDUCTIVE PROBES TORCH MOUNTING SUBASSEMBLY TORCH TYPICAL SWIVEL FITTING IHS CONTROL MODULE 20 PSI REGULATED SHOP AIR TORCH LIFTER TYPICAL 16 14 15 ...

Page 75: ...randed Use Belden 8761 2 At the upper limit switch connect the common wire black and signal wire clear to the upper limit switch Cut the shield drain wire uninsulated Wrap the cut end with electrician s tape 3 At the IHS control module loosen the two 2 latches and open the front cover 4 Route the cable through the strain relief to connect the cable wires to 1TB 5 Connect the shield drain wire unin...

Page 76: ...INSTALLATION HySpeed HT2000 Instruction Manual 4 23 19 Figure 4 13 Intial Height Sensing Upper Limit Switch Connections UPPER LIMIT SWITCH AND CABLE IHS CONTROL MODULE TORCH LIFTER TB1 S 4 67 ...

Page 77: ...Console Shield Gas Supplies Any supply gases that will be used for the shield gas attach to the same point on the gas console see Fig 4 14 Shield Gas Supply Hose Shield Supply to Gas Console 17 18 18 19 Part No Length Part No Length 024204 15 ft 4 6 m 024205 25 ft 7 6 m 024155 50 ft 15 m 024206 100 ft 30 m 024159 150 ft 46 m Part No Length Part No Length 024210 10 ft 3 m 024203 15 ft 4 6 m 024232 ...

Page 78: ...INSTALLATION HySpeed HT2000 Instruction Manual 4 25 19 Figure 4 14 Gas Console Connections Gas Console to Gas Supplies 2WRENCHES Oxygen Nitrogen Shield Air 17 18 18 17 19 19 18 Gas Console Rear ...

Page 79: ...0 ft 46 m Part No Length Part No Length 024061 5 ft 1 5 m 024063 10 ft 3 m 024065 15 ft 4 6 m 024067 20 ft 6 2 m 024069 25 ft 7 6 m 024071 30 ft 9 1 m 024092 40 ft 12 4 m 024096 50 ft 15 m 024174 60 ft 18 2 m 024468 75 ft 23 m Part No Length Part No Length 024316 5 ft 1 5 m 024307 10 ft 3 m 024320 15 ft 4 6 m 024308 20 ft 6 2 m 024321 25 ft 7 6 m 024309 30 ft 9 1 m 024322 35 ft 10 6 m 024310 40 ft...

Page 80: ...HySpeed HT2000 Instruction Manual 4 27 19 Figure 4 15 Gas Console Connections Gas Console to RHF and Motor Valve Consoles 2WRENCHES RHF Console Rear 20 22 23 22 21 20 21 23 Motor Valve Console Rear Gas Console Rear ...

Page 81: ...or scraping Once the torch leads have been routed proceed with torch connections Connecting the HF Torch Leads to the RHF Console Torch Leads HF Torch Leads to RHF Console Fig 4 16 A Route the HF torch leads through the Torch Brass Fitting on the RHF console and connect the Torch Coolant Hose w Red Band to the red fitting on the brass cathode block located in the RHF console Tighten using a 1 2 op...

Page 82: ...HT2000 Instruction Manual 4 29 19 Figure 4 16 HF Torch Lead Connections in RHF Console 24 Pilot Shield Gas Hose Blue Torch Brass Fitting Torch Coolant Hose w Red Band Torch Coolant Hose w Green Band Cap On Sensor Hose Gray ...

Page 83: ...7 16 open end wrench to turn the torch lead fitting E Finally connect the gray torch lead hose to Point 4 Again use a 5 16 open end wrench to hold the torch body fitting and a 7 16 open end wrench to turn the torch lead fitting Note If the 12 Off valve hose is not connected to the torch make the connection to Point 5 left hand threaded connection at this time Use the same wrenches as in steps D E ...

Page 84: ...tions 25 25 Off valve connector Point 1 left hand threaded Torch sleeve 12 Off valve hose Red and Green tubes Point 4 Point 5 left hand threaded Point 2 left hand threaded Off valve subassembly Plasma hose Point 3 Torch main body Motor Valve Console Torch off valve cable 12 Off valve hose ...

Page 85: ...or To HT2000 Function TB3 Black 13 Hold Signal Red 14 Hold Common GND Shield 15 Hold Shield 26 27 11X1 Black Black Red Red GND GND From Timer Counter To HT2000 Color Function 11X1 TB3 1 2 White Starts Arc time CON1 Closed 2 1 Black Starts Arc time CON1 Closed 3 3 Drain Drain 15 5 Red Error Counter Ramp Down Error 16 4 Black Error Counter Ramp Down Error 12 6 Drain Drain Part No Length Part No Leng...

Page 86: ...INSTALLATION HySpeed HT2000 Instruction Manual 4 33 19 Figure 4 18 Timer Counter Cable Connections Hold Cable Connections 27 26 26 Power Supply Inside Rear Timer Counter Rear 11X1 ...

Page 87: ...t IHS Mounting the Machine Torch 1 Loosen Securing screw s and install the machine torch with torch leads attached in the torch mounting bracket or the torch mounting subassembly if IHS is used See Figure 4 19 for torch mounting bracket with IHS and Figure 4 20 for torch mounting bracket without IHS 2 Position the torch until the torch body extends all the way through the bracket so that the brack...

Page 88: ...ion 5 2 System Checkout 5 3 Set Switches and Check Torch 5 3 Turn Gases On 5 3 Turn Power Supply On and Adjust Voltage Current 5 3 Adjust Preflow Gases 5 5 Adjust Cut Flow Gases and Check Initial Height Sensing IHS 5 5 Final Torch Adjustment 5 6 Check Torch Height Control THC and V C Module 5 6 ...

Page 89: ...re correct and to make any necessary final adjustments before actual production cutting begins Before proceeding with the system checkout Ensure that your cutting environment and that your clothing meet the safety requirements outlined in the Safety section of this manual Be certain that all pre installation and installation requirements have been met Refer to Section 3 Pre Installation and Sectio...

Page 90: ...Section 4 for the torch alignment procedure Turn Gases On 4 Set the plasma gas select switch on the gas console to N2 Air or O2 5 Turn the required supply gases On When using oxygen nitrogen or argon hydrogen as the plasma gas adjust supply regulator to read 120 psi 10 psi 8 3 bar 0 7 bar When using air as the plasma gas adjust supply regulator to read 90 psi 10 psi 6 2 bar 0 7 bar Adjust supply r...

Page 91: ...POST INSTALLATION 5 4 HySpeed HT2000 Instruction Manual 19 Figure 5 1 Controls and Indicators for System Checkout UP Indicator DOWN Indicator POWER ON Button ...

Page 92: ...he pilot arc operation by positioning the torch a minimum of 3 inches 75mm above the work 15 Depress the START button After two seconds of gas preflow the primary contactor will close and the pilot arc will start The pilot arc should emit a steady hissing sound and a cone of light should appear at the face of the torch nozzle The pilot arc will continue for approximately 300 milli seconds O2 600 m...

Page 93: ...ontrol THC and V C Module 23 Angle the workpiece on the work table one end higher than the other to check the auto height torch height control mode Position the torch at the highest point on the workpiece Program a square cut pattern into the controller See controller instruction manual 24 Enable the Auto Height Control for the THC 25 Manually lower the torch to approximately 25 inches 6mm above t...

Page 94: ...rections in this manual If all pre installation and installation directives have been followed and you are still experiencing difficulty with the system feel free to call Hypertherm s Field Service group at 1 800 643 9878 Figure 5 2 Torch with inductive probes Leads to RHF Console and Motor Valve Console Off valve not shown Probes Torch sleeve Torch mounting bracket Securing screw ...

Page 95: ...POST INSTALLATION 5 8 HySpeed HT2000 Instruction Manual 19 ...

Page 96: ...rn Power Supply On and Adjust Voltage Current 6 10 Adjust Preflow Gases 6 10 Adjust Cut Flow Gases and Prepare for Cutting 6 11 Common Cutting Faults 6 11 Technical Questions 6 12 Cut Charts 6 12 Conversions 6 12 Cut Charts and Consumable Parts Index 6 13 Changing Consumable Parts 6 36 Removal and Inspection 6 37 Replacement 6 38 Changing the Water Tube 6 39 How to Optimize Cut Quality 6 40 Tips f...

Page 97: ...at one of the door interlock switches in the RHF console is disengaged TRANSFORMER LED When illuminated indicates that either the power supply main transformer or one of the choppers is operating above the proper temperature range COOLANT LEVEL LED When illuminated indicates that the coolant level is inadequate SHIELD GAS CAP LED When illuminated indicates that either the shield gas pressure is in...

Page 98: ... button is pushed the coolant flow LED will be illuminated Once the POWER ON button is pushed and held for a few seconds this LED will extinguish if the system is in proper working condition Other fault conditions may also be indicated when the line power is switched on Be sure to press and hold the power supply POWER ON I button in some cases up to 1 minute to extinguish all status indicators If ...

Page 99: ... rate is specified in Cut Charts O2 Preflow Metering Valve MV3 Adjusts oxygen plasma gas flow rate while in Test Preflow mode Preflow plasma gas flow rate percentages are specified in Cut Charts PLASMA Cut Flow Switch S3 Adjusts nitrogen air or oxygen plasma gas flow rate while in Test Cut Flow mode Cut Flow plasma gas flow rate percentages are specified in Cut Charts Test Preflow Run Test Cut Flo...

Page 100: ...PG3 Indicates shield gas pressure at the torch Shield Gas Metering Valve MV4 Adjusts shield gas pressure to the torch DC Light LT1 Lights when main contactor closes indicating DC power is being supplied to the torch Figure 6 2 Gas Console Front Panel Controls and Indicators ...

Page 101: ... metal to cut and metal thickness VOLTAGE LEDs Displays cutting voltage CURRENT Adjust Pot Adjusts the cutting arc current from 40 amps to 200 amps Values are chosen from the Cut Charts and depend on the type of metal to cut and metal thickness CURRENT LEDs Displays cutting current UP DOWN LEDs Indicates that torch height is being adjusted up or down Figure 6 3 Digital Remote DR V C Front Panel Co...

Page 102: ... w Reset Indicates the number of arc starts ARC TIME LCD Counter Indicates the cumulative time that the arc is on in hours ERRORS LCD Counter w Reset Indicates the number of times that the arc cut cycle ended before the programmed current ramp down time had elapsed This reading provides a direct correlation to the long life operation of the electrode the higher the reading the shorter the electrod...

Page 103: ...p conditions while cutting one inch mild steel using oxygen at a travel rate of 20 inches per minute Above water 6 without Water Muffler 10 feet 106 dbs Above water 6 with Water Muffler 10 feet 104 dbs Water at bottom of plate without Water Muffler 10 feet 100 dbs Water at bottom of plate with Water Muffler 10 feet 95 dbs Water 3 over plate without Water Muffler 10 feet 75 dbs Water 3 over plate w...

Page 104: ...two times the recommended depth of an all copper electrode Wipe the current ring in the torch with a clean paper towel or Q tip see Figure 6 7 Refer to the Cut Charts in this section to choose the correct consumables for your cutting needs 2 Replace consumable parts Refer to the Changing Consumable Parts section later in this manual for detailed information on replacing consumables 3 Ensure that t...

Page 105: ... arc current and arc voltage from the Cut Charts in this section for the type and thickness of metal to be test cut Adjust Preflow Gases 10 Set S2 on the gas console to Test Preflow Verify that the plasma gas pressure gauges PG1 PG2 on the gas console both read 120 psi 8 2 bar 11 Look at the oxygen FM2 and or nitrogen air FM1 flowmeters on the gas console and set the Preflow plasma gas flow rate b...

Page 106: ...aults Torch pilot arc will initiate but will not transfer Cause can be 1 Work cable connection on cutting table not making good contact 2 Malfunction in system See Section 8 The workpiece is not totally penetrated and there is excessive sparking on top of the workpiece Causes can be 1 Current is set too low check Cut Chart information 2 Cut speed is too high check Cut Chart information 3 Torch par...

Page 107: ...iques later in this section for methods to improve cutting performance Technical Questions Claims for defective merchandise All units shipped from Hypertherm undergo rigorous quality control testing However if your system does not function correctly 1 Recheck all pre installation and installation requirements and connections 2 If you are unable to solve the problem call your distributor He she wil...

Page 108: ...20837 020608 020607 020415 6 31 100 Air Air 020448 120837 020611 020607 120547 6 32 100 H35 N2 020448 120837 020611 020607 020415 6 33 40 Air Air 020688 020423 020689 020613 120667 6 34 200 O2 Air 120260 120837 120259 120833 120258 6 35 200 Air Air 020485 120837 020615 020607 120667 6 36 200 H35 N2 020485 120837 020615 020607 020415 6 36 200 H35 N2 020485 120837 020615 020607 020415 6 36 BEVEL CUT...

Page 109: ... 8 3 1 4 6 160 50 1300 0 7 1 1 4 32 1 8 3 5 16 8 168 30 760 2 6 1 1 2 38 1 8 3 5 16 8 175 20 500 4 0 1 3 4 44 1 8 3 N A N A 180 15 380 N A 2 50 1 8 3 N A N A 188 10 250 N A Mild Steel HySpeed 200 amps O2 Plasma Air Shield This gas combination gives superior cut speed minimum dross minimum surface nitriding and excellent weldability Notes Set oxygen plasma gas inlet pressure to 120 psi 8 3 bar Set ...

Page 110: ... 6 155 15 380 1 3 4 44 5 16 8 165 10 250 2 50 5 16 8 170 7 180 Notes Set oxygen plasma gas inlet pressure to 120 psi 8 3 bar Set nitrogen plasma gas inlet pressure to 120 psi 8 3 bar Set shield gas inlet pressure to 90 psi 6 2 bar Production cutting above 1 25 mm not recommended Drop cutting above 1 1 2 38 mm not recommended Use 020679 swirl ring in place of 120833 swirl ring to obtain smoother cu...

Page 111: ...0 1520 2 0 3 4 20 3 16 5 3 8 10 150 45 1140 2 5 7 8 22 1 4 6 1 2 12 155 30 760 2 5 1 25 1 4 6 1 2 12 160 25 635 2 5 1 1 4 32 1 4 6 165 15 380 1 1 2 38 1 4 6 170 10 250 1 3 4 44 5 16 8 180 7 180 2 50 5 16 8 185 5 130 Mild Steel 200 amps Air Plasma Air Shield This gas combination gives good cut speed low dross levels and is very economical Some surface nitriding can occur Notes Set plasma gas inlet ...

Page 112: ...8 3 1 4 6 130 55 1400 2 0 5 8 15 157 4 314 8 135 45 1140 2 0 3 4 20 3 16 5 3 8 10 145 25 635 2 5 7 8 22 1 4 6 1 2 12 150 20 510 3 0 1 25 1 4 6 1 2 12 160 15 380 3 0 1 1 4 32 1 4 6 165 10 250 1 1 2 38 1 4 6 175 5 130 Mild Steel 200 amps N2 Plasma CO2 Shield This gas combination may be used when cut edge quality and surface nitriding are less important Electrode life is extended when using this comb...

Page 113: ...6 1 8 3 1 4 6 130 125 3175 0 5 3 8 10 1 8 3 1 4 6 135 50 1270 1 0 1 2 12 1 8 3 140 35 890 5 8 15 157 4 145 25 635 3 4 20 3 16 5 150 20 510 Mild Steel 100 amps Air Plasma Air Shield This gas combination gives good cut speed low dross levels and is very economical Some surface nitriding can occur While this process may be used on thicker materials optimal recommended range is to 3 8 10mm Set arc cur...

Page 114: ...00 amps O2 Plasma Air Shield This gas combination gives good cut speed low dross and is very economical Some surface nitriding can occur While this process may be used on thicker materials optimal recommended range is to 3 8 10mm Notes Set oxygen plasma gas inlet pressure to 120 psi 8 3 bar Set nitrogen plasma gas inlet pressure to 120 psi 8 3 bar Set shield gas inlet pressure to 90 psi 6 2 bar Pr...

Page 115: ...f using the Digital Remote DR or Programmable Remote PR set current to 60 amps If using a torch height control system capable of achieving the arc voltage setting on this chart set accordingly If using a less sensitive torch height control system round off the arc voltage numbers to the nearest achievable setting Torch to work Distance tolerances are 010 inch 25 mm When using a THC the tolerances ...

Page 116: ...57 4 314 8 140 75 1900 2 0 3 4 20 3 16 5 3 8 10 140 55 1400 2 5 7 8 22 1 4 6 1 2 12 145 40 1000 3 0 1 25 1 4 6 150 30 760 1 1 4 32 1 4 6 160 15 380 1 1 2 38 1 4 6 170 10 250 Stainless Steel 200 amps Air Plasma Air Shield This gas combination gives good cut speed low dross and is very economical Some surface nitriding and surface oxidation of alloying elements can occur Notes Set air plasma gas inl...

Page 117: ...8 15 157 4 314 8 140 60 1520 2 0 3 4 20 3 16 5 3 8 10 140 45 1140 2 5 7 8 22 1 4 6 1 2 12 145 35 890 2 5 1 25 1 4 6 150 20 510 1 1 4 32 1 4 6 160 15 380 1 1 2 38 1 4 6 160 10 250 Stainless Steel 200 amps N2 Plasma Air Shield This gas combination is used when cut edge quality surface nitriding and surface oxidation of alloying elements are less important Electrode life is extended when this combina...

Page 118: ... 140 70 1800 2 0 3 4 20 3 16 5 3 8 10 140 50 1250 2 5 7 8 22 1 4 6 1 2 12 145 40 1000 3 0 1 25 1 4 6 150 30 760 1 1 4 32 1 4 6 160 15 380 1 1 2 38 1 4 6 170 10 250 Stainless Steel 200 amps N2 Plasma CO2 Shield This gas combination is used when surface nitriding and surface oxidation of alloying elements is less important Electrode life is extended when using this gas combination Notes Set nitrogen...

Page 119: ...Shield Argon Hydrogen Manifold 073109 Required This gas combination Hypertherm recommends a mixture of 35 hydrogen and 65 argon for the plasma gas gives maximum thickness cutting capability minimum dross levels minimum amount of surface contamination excellent weldability and excellent cut quality on thicknesses greater than 1 2 On thicknesses less than 1 2 excessive dross levels may be experience...

Page 120: ...0 110 2800 0 5 1 4 6 SCFH SCFH SCFH 1 8 3 1 4 6 130 80 2030 0 5 3 8 10 1 8 3 1 4 6 135 55 1400 0 5 1 2 12 1 8 3 140 35 890 5 8 15 157 4 145 25 635 3 4 20 3 16 5 150 20 510 Stainless Steel 100 amps Air Plasma Air Shield This gas combination gives good cut speed low dross and is very economical Some surface nitriding and surface oxidation of alloying elements can occur Notes Set air plasma gas inlet...

Page 121: ...ss Steel 100 amps H35 Plasma N2 Shield Argon Hydrogen Manifold 073109 Required This gas combination Hypertherm recommends a mixture of 35 hydrogen and 65 argon for the plasma gas gives good cut speed but may result in excessive dross Some surface nitriding and surface oxidation of alloying elements can occur See Section 7 for installation and operation with Argon Hydrogen Manifold Notes Set argon ...

Page 122: ...5 3 16 5 120 120 3050 1 8 3 SCFH SCFH SCFH 3 32 2 5 3 16 5 125 75 1900 0 5 1 4 6 1 8 3 135 24 610 3 8 10 1 8 3 140 12 300 Stainless Steel 40 amps Air Plasma Air Shield This gas combination gives good cut speed low dross level and is very economical Some surface nitriding and surface oxidation of alloying elements can occur Notes Set air plasma gas inlet pressure to 90 psi 6 2 bar Set air shield ga...

Page 123: ... 3 1 4 6 140 145 3700 2 0 1 2 12 1 8 3 1 4 6 145 110 2800 2 5 5 8 15 157 4 314 8 150 85 2200 2 5 3 4 20 3 16 5 3 8 10 155 65 1650 2 5 7 8 22 1 4 6 1 2 12 160 50 1300 2 5 1 25 1 4 6 165 35 900 1 1 4 32 1 4 6 170 20 500 1 1 2 38 1 4 6 175 12 300 Aluminum 200 amps Air Plasma Air Shield This gas combination gives good cut speed low dross levels and is very economical Notes Set plasma gas inlet pressur...

Page 124: ... 4 6 140 80 2030 2 0 5 8 15 157 4 314 8 140 70 1780 2 0 3 4 20 3 16 5 3 8 10 150 50 1270 2 5 7 8 22 1 4 6 1 2 12 160 35 890 2 5 1 25 1 4 6 165 25 635 1 1 4 32 1 4 6 175 20 510 1 1 2 38 1 4 6 185 10 250 Aluminum 200 amps N2 Plasma Air Shield This gas combination is used when cut edge quality is less important Electrode life is extended when this combination is used Notes Set plasma gas inlet pressu...

Page 125: ...4 6 140 95 2400 2 5 5 8 15 157 4 314 8 140 70 1800 2 5 3 4 20 3 16 5 3 8 10 150 55 1400 3 0 7 8 22 1 4 6 1 2 12 160 42 1050 3 0 1 25 1 4 6 165 33 840 1 1 4 32 1 4 6 175 20 510 1 1 2 38 5 16 8 185 11 280 Aluminum 200 amps N2 Plasma CO2 Shield This gas combination is used when cut edge quality is less important Electrode life is extended when this combination is used Notes Set plasma gas inlet press...

Page 126: ...0 1 1 4 32 5 16 8 165 26 660 1 1 2 38 5 16 8 170 18 460 1 3 4 44 5 16 8 180 12 300 2 50 5 16 8 185 7 180 Aluminum 200 amps H35 Plasma N2 Shield Argon Hydrogen Manifold 073109 Required This gas combination Hypertherm recommends a mixture of 35 hydrogen and 65 argon for the plasma gas gives maximum thickness cutting capability excellent cut quality and excellent weldability Electrode life is extende...

Page 127: ...10 2800 3 16 5 55 3 44 9 270 1 8 3 1 4 6 140 90 2290 0 5 1 4 6 SCFH SCFH SCFH 1 8 3 1 4 6 145 70 1780 0 5 3 8 10 1 8 3 1 4 6 145 50 1270 0 5 1 2 12 1 8 3 150 40 1010 5 8 15 157 4 155 30 760 3 4 20 3 16 5 160 25 635 Aluminum 100 amps Air Plasma Air Shield This gas combination gives good cut speed low dross levels and is very economical Notes Set plasma gas inlet pressure to 90 psi 6 2 bar Set shiel...

Page 128: ...60 1530 0 5 1 2 12 1 8 3 150 50 1280 Aluminum 100 amps H35 Plasma N2 Shield Argon Hydrogen Manifold 073109 Required This gas combination Hypertherm recommends a mixture of 35 hydrogen and 65 argon for the plasma gas gives good cut speed low dross levels and is very economical See Section 7 for installation and operation with Argon Hydrogen Manifold Notes Set plasma gas inlet pressure to 120 psi 8 ...

Page 129: ... 60 3 32 2 5 3 16 5 120 140 3550 1 8 3 46 0 23 1 275 3 32 2 5 3 16 5 130 100 2550 0 5 1 4 6 SCFH SCFH SCFH 1 8 3 140 35 900 3 8 10 1 8 3 150 15 350 Aluminum 40 amps Air Plasma Air Shield This gas combination gives good cut speed low dross levels and is very economical Notes Set plasma gas inlet pressure to 90 psi 6 2 bar Set shield gas inlet pressure to 90 psi 6 2 bar Production cutting above 1 8 ...

Page 130: ... 8 125 70 1780 2 0 3 4 20 3 16 5 3 8 10 130 55 1400 2 5 7 8 22 1 4 6 1 2 12 135 45 1140 2 5 1 25 1 4 6 1 2 12 135 35 890 2 5 1 1 4 32 1 4 6 140 22 560 1 1 2 38 1 4 6 150 15 380 1 3 4 44 5 16 8 160 10 250 2 50 5 16 8 170 7 180 Mild Steel Beveling Consumables 200 amps O2 Plasma Air Shield Notes Set oxygen plasma gas inlet pressure to 120 psi 8 3 bar Set nitrogen plasma gas inlet pressure to 120 psi ...

Page 131: ...Air Air psi amps psi psi 71 71 50 200 90 90 81 8 SCFH Mild Steel Gouging 200 amps Air Plasma Air Shield See Section 7 for installation and operation with Argon Hydrogen Manifold 29 29 50 200 120 90 81 8 SCFH Stainless Steel or Aluminum Gouging 200 amps H35 Plasma N2 Shield Argon Hydrogen Manifold 073109 Required Hypertherm recommends a mixture of 35 hydrogen and 65 argon for the plasma gas 020607 ...

Page 132: ...l afterward The hole in the nozzle should not be worn or oval shaped 6 Using the 3 8 center hole in the wrench remove the Electrode and inspect it If the center of an all copper electrode has a pit more than 044 1 1 mm deep replace it A SilverPlus electrode should be replaced when the pit depth exceeds approximately two times the recommended depth of an all copper electrode Use the electrode gauge...

Page 133: ...ling the Swirl ring be certain that the O rings have been lubricated with a small amount of silicon grease Install the swirl ring with the bottom O ring facing the inside of the torch Push it into place Be sure to hold the swirl ring in place until the nozzle is installed to avoid dropping it into the water of the water table 3 Install the nozzle and finger tighten it Finish tightening it with the...

Page 134: ...bent or loose If you suspect a problem with the water tube you may need to replace it 1 Disconnect power supply from power source 2 Remove all consumables from torch see Changing Consumable Parts 3 Look for any damage or bends in the water tube 4 Remove and replace the water tube by using the water tube wrench 027347 supplied by Hypertherm Fig 6 8 When installing water tube do not over tighten Snu...

Page 135: ...op on the workpiece The torch should never fire into the air Starting the cut at the edge of the workpiece is acceptable as long as the arc is not fired in the air To start with a pierce use a pierce height that is 1 5 to 2 times the torch to work distance See Cut Charts Each cut should end with the arc still attached to the workpiece to avoid arc blow outs ramp down errors When cutting drop parts...

Page 136: ...tting speed is too slow and the arc shoots ahead It forms as a heavy bubbly deposit at the bottom of the cut and can be removed easily Increase the speed to reduce the dross High speed dross forms when the cutting speed is too fast and the arc lags behind It forms as a thin linear bead of solid metal attached very close to the cut It is welded to the bottom of the cut and is difficult to remove To...

Page 137: ... shield mixture may produce a smoother cut surface Trade off This may produce more dross HyDefinition and HT4400 only On mild steel a higher concentration of O2 in the O2 N2 shield mixture may increase the cutting speed and produce less dross Trade off This may produce a rougher cut surface Piercing The pierce delay must be sufficiently long that the arc can pierce the material before the torch mo...

Page 138: ...N ARGON HYDROGEN MANIFOLD In this section Front Panel Controls and Indicators 7 2 Installation 7 3 Operation 7 6 Check Torch 7 6 Turn Gases On 7 6 Turn Power Supply On and Adjust Voltage Current 7 7 Adjust H35 Gas Flow 7 7 After Cutting with Argon Hydrogen 7 8 ...

Page 139: ...asma gas flow rate in Test Preflow mode Preflow plasma gas flow rate percentages are specified in Cut Charts Argon Hydrogen Flowmeter FM1 Indicates the argon hydrogen plasma gas flow rate Flow rates for argon hydrogen are specified in Cut Charts Flowmeter Adjust Valve MV1 Argon Hydrogen Flowmeter FM1 Figure 7 1 Argon Hydrogen Manifold Front Panel Controls and Indicators ...

Page 140: ...ogen manifold Fig 7 2 B Connect the other end of the cable to TB4 smaller terminal strip on the inside rear panel of the power supply Match up wires 102 103 13 and 14 to wires already connected to the strip Connect the two shield wires to points labeled as PE protective earth Argon Hydrogen supply to Argon Hydrogen Manifold A Attach one end of the supply hosing to the argon hydrogen supply tank or...

Page 141: ... OFF Shield 9 Shield Part No Length 024355 12 in 305 mm 024354 10 ft 3 m 024368 20 ft 6 2 m 024369 30 ft 9 1 m 024370 40 ft 12 4 m 024443 50 ft 15 m 024467 75 ft 23 m Part No Length Part No Length 023660 15 ft 4 6 m 023661 25 ft 7 6 m 023662 50 ft 15 m 023663 75 ft 23 m 023664 100 ft 30 m 023665 150 ft 46 m 14X1 13 14 etc Figure 7 3 Argon Hydrogen Manifold Cable Argon Hydrogen Manifold to Power Su...

Page 142: ...ead Fig 7 4 to the Plasma gas torch lead connection located on the front of the manifold Fig 7 5 D Attach the other end of the plasma gas torch lead to Point 1 on the torch Fig 7 5 Figure 7 5 Argon Hydrogen Manifold to Torch Connection Points Figure 7 6 Nitrogen Supply to Gas Console Nitrogen supply to Gas Console Fig 7 6 Connect the nitrogen supply to the shield connection at the rear of the gas ...

Page 143: ...e torch to malfunction Check the pit depth of the electrode The electrode should be replaced when the depth exceeds 040 inch 1 mm Wipe the current ring in the torch with a clean paper towel or Q tip see Figure 6 7 Refer to the Cut Charts to choose the correct consumables for your cutting needs 2 Replace consumable parts Refer to Changing Consumable Parts in Section 6 for detailed information on re...

Page 144: ... and arc voltage from the Cut Charts on pages 6 14 through 6 35 for the type and thickness of metal to be test cut Adjust H35 Gas Flow 1 Set S2 on the gas console to Test Preflow Verify that the argon hydrogen supply regulator reads 120 psi 8 2 bar 2 Look at the flowmeter FM1 on the argon hydrogen manifold and set the Preflow plasma gas flow rate by referring to the Cut Charts and turning the argo...

Page 145: ...achine torch plasma hose from the motor valve console to point 1 of the torch See Connecting the Off Valve Cable and Plasma Hose from the Torch to the Motor Valve Console in Section 4 5 Remove the nitrogen supply hose from the shield supply connection of the gas console 6 Connect the nitrogen supply hose to the N2 connection of the gas console See Figure 7 7 7 Connect the shield gas supply hose to...

Page 146: ...s 8 7 Troubleshooting 8 10 STATUS LED Troubleshooting 8 15 Chopper Module Test Procedure 8 19 Error Codes 8 21 Analog Board LED Functions 8 22 Relay Board LED Function List 8 23 Relay Board LED Status Conditions 8 23 Coolant Flow Test Procedure 8 25 Check Reservoir Coolant 8 25 Verify Flow Rate Return from Torch 8 25 Verify Flow Rate to Torch 8 26 Check Pump Motor and Solenoid Valve 8 27 Torch Coo...

Page 147: ...nel performing the troubleshooting testing are high level electronic service technicians that have worked with high voltage electro mechanical systems Knowledge of final isolation troubleshooting techniques is also assumed In addition to being technically qualified maintenance personnel must perform all testing with safety in mind Refer to the Safety section for operating precautions and warning f...

Page 148: ...erior for any damage If there is damage ensure it does not affect safe operation of the power supply Remove covers and inspect the interior Check wiring harnesses and connections for wear and damage Check for loose connections and look for areas of discoloration due to overheating At the rear of the power supply inspect the filter element of the water coolant sub assembly In the event that the fil...

Page 149: ... flowmeters and check the pressure gauges for damage Inspect all interconnecting cables hoses and leads for wear and damage Ensure all connections are tight and that there are no leaks Do not overtighten fittings Cleaning Keep the flowmeters and pressure gauges free of dirt dust and foreign matter Motor Valve Console Inspection Inspect the motor valve console on a routine basis Check the exterior ...

Page 150: ...d blow out the unit with compressed air It is important to keep the cover closed except when cleaning or when maintenance is being performed Startup Sequence On the following page is a detailed flowchart outlining the startup sequence during proper operation This flowchart details system functioning from the time the POWER ON button is pushed up to the ready state before START button is pushed Sha...

Page 151: ...ed CR1 24V 120V relay on Power Distribution Board PCB1 closes 24VAC to LT1 Power Supply ON light PCB2 Power Supply µP Control Board 24VAC interlock 120VAC to CH1 CH2 Power Supply Choppers MV2 Motor Valve Console Motor Valve PCB3 Power Supply Analog Board PCB4 Power Supply Relay Board PCB9 Power Supply THC Board PCB11 Power Supply Isolation Board CR2 120V relay on Power Distribution Board PCB1 clos...

Page 152: ...8 1 for detail of TB1 The voltage between any two of the three points at TB1 should be equal to your supply voltage 200 208 220 240 380 415 480 or 600VAC If there is a problem at this point disconnect main power and check connections power cable and fuses at line disconnect switch Repair and or replace defective component s if necessary For the 220 380 415 volt CE power supplies measure the voltag...

Page 153: ...ter the line disconnect switch is ON even if the ON 1 pushbutton on the HT2000 power supply has not been pressed Use extreme care when measuring primary power in this area Voltages present at the terminal block and contactor can cause injury or death Figure 8 1 Primary Power Measurement Location HT2000 ...

Page 154: ...40VAC F4 120VAC If voltages are not present or incorrect at one or more of these points disconnect power and troubleshoot PCB1 fuses and associated pins connectors and wiring between power distribution board connector REC1 and transformer secondary T1 Refer to Figure 9 4 for location of T1 Also check main power circuit breaker CB1 located in Figure 9 4 and associated wiring and connections between...

Page 155: ... green POWER ON 1 PB1 pushbutton is defective Check that switch is operating correctly and that good contact is being made The POWER ON switch is normally open 1 2 The red POWER OFF 0 PB2 pushbutton is defective Check that switch is operating correctly and that good contact is being made The POWER OFF switch is normally closed 1 3 Associated wiring not making good contact Check wiring and repair o...

Page 156: ... frequency and no pilot arc 4 1 There is no spark between the spark gap electrodes Clean with emery cloth align and reset the electrode gaps to 020 0 51 mm if necessary The electrode surfaces between the gaps should be flat If surfaces are rounded replace and reset the gap See Figure 9 12 for part number information Inspect the high voltage transformer T1 in the RHF console for overheating See Fig...

Page 157: ...mmand is given and the DC ON indicator illuminates and there is high frequency but there is no pilot arc 5 1 Pilot arc relay CR1 is not closing not getting 120VAC from the relay board PCB4 See if the CR1 relay contacts close after the START command is given See Figure 9 8 for location of CR1 If CR1 does not close With an AC voltmeter across the relay see if 120VAC is coming from PCB4 after START c...

Page 158: ...f there is voltage at some but not all of the above points check wiring and connections to and from T2 If wiring checks out OK return to Initial Checks section and repeat steps 1 5 5 4 Choppers are defective or not functioning See Chopper Module Test Procedure later in this section 6 The unit stops cutting during cut or cuts poorly 6 1 The work cable is not connected or it is broken Connect or rep...

Page 159: ...tions 6 5 The power supply has overheated Shut down system and wait for unit to cool down If power supply will not restart see Status LED Troubleshooting guide later in this section 6 6 Choppers are defective or not functioning See Chopper Module Test Procedure later in this section ...

Page 160: ...F console are closed The switches will close when the RHF console doors are closed If the doors are closed check pins connectors and associated wiring for good continuity from receptacle 1X1 to 2X1 Repair and or replace defective component s if necessary 2 TRANSFORMER LED illuminated 2 1 Main Transformer T2 or one of the choppers is overheating This LED will extinguish when the main transformer T2...

Page 161: ...eld gas pressure of 12 psi 0 83 bar or greater is sensed by PS3 located in the RHF console Check to see that shield gas supply is set according to the Cut Charts in this manual Verify that all shield gas connections are secure and that there are no leaks in any hoses connected to the RHF console or gas console 4 2 Torch cap not tightened securely If the torch retaining cap is not tightened securel...

Page 162: ... After PS1 and PS2 are closed in O2 mode or PS1 is closed in N2 mode the PLASMA GAS LED extinguishes Using the wiring diagrams check pins connectors and associated wiring from the power distribution board PCB1 to PS1 and PS2 Repair and or replace defective component s if necessary 6 COOLANT TEMP LED illuminated 6 1 Coolant too hot This LED will extinguish when temperature switch TS2 senses that th...

Page 163: ...ally open switch that closes when a flow greater than 0 5 gpm is sensed See Coolant Flow Test Procedure later in this section to troubleshoot coolant flow problems Note Coolant flow LED illuminates when line disconnect switch is turned ON because coolant reservoir pump M2 is not activated until the power supply POWER ON PB1 is pressed Using the wiring diagrams check pins wires and connections from...

Page 164: ...DC and corresponding fuse is not blown check output of CH1 by placing the positive lead of the voltmeter at point WORK on the chopper module wire 48A and negative lead at point TORCH wire 39A Check output of CH2 by placing leads of voltmeter at the corresponding points on the other chopper module 6 Turn the system on and press the START command After the START command has been given check the volt...

Page 165: ...s 3 4 REC1 of PCB3 for CH1 and 5 6 REC1 for CH2 To determine if there is a problem with the chopper modules or with control board PCB2 or analog board PCB3 proceed as follows Ensure that high frequency is still disabled see step 1 Disconnect PL3 1 from REC1 on PCB3 Place voltmeter across output of chopper and press the START command If the voltmeter reads 280 VDC then replace either control board ...

Page 166: ...lashing all outputs from the control board are turned off and the power supply is in an idle mode After the error is corrected you may resume operation of the system Note Eight or nine blinks will occur during normal operation If the ERROR CODE LED remains on without blinking this indicates that a microcontroller internal RAM or ROM self check error has occurred power supply will hang up For troub...

Page 167: ... there was no transfer within 300ms 5 Indicates that transferred current arc was lost during ramp up 6 Indicates that the current was lost from chopper 1 CH1 7 Indicates that the current was lost from chopper 2 CH2 8 Indicates that transferred current arc was lost during ramp down 9 Indicates that the software has an error 10 Indicates that the input voltage has dropped below 15 of the nominal val...

Page 168: ...13 D12 D11 D10 D9 D8 D7 D14 D15 D16 D17 D18 D20 Relay Board LED Status Conditions The following LEDs are illuminated during the conditions shown Idle D6 12VDC D8 O2 Solenoid Valve SV1A if in O2 Mode D16 N2 Solenoid Valve SV1B if in N2 Mode D19 Cap Sense Solenoid Valve SV7 D20 Output Enable D26 Spare Test Preflow D6 12VDC D8 O2 Solenoid Valve SV1A if in O2 Mode D10 Plasma Off Valve Solenoid Valve S...

Page 169: ...oid Valve SV1A if in O2 Mode D10 Plasma Off Valve Solenoid Valve SV5 D11 Preflow Solenoid Valve SV4B D14 Main Contactor CON1 D15 DC ON Lights LT1 LT2 D16 N2 Solenoid Valve SV1B if in N2 Mode D17 N2 Preflow Solenoid Valve SV2 D18 O2 Preflow Solenoid Valve SV3 D19 Cap Sense Solenoid Valve SV7 D20 Output Enable D26 Spare D28 Shield Gas Solenoid Valve SV6 Run Cutflow D6 12VDC D8 O2 Solenoid Valve SV1A...

Page 170: ... coolant if necessary Verify Flow Rate Return from Torch 1 Find a clean one gallon container 2 Locate the two coolant hoses that come off of the cathode block at the rear of the power supply black hoses one with a green tape band and one with a red tape band See Fig 8 6 3 Remove the torch coolant return hose black hose with the red band from the cathode block WARNING Push OFF 0 button on power sup...

Page 171: ... supply Start power supply If COOLANT FLOW LED remains illuminated replace the flow switch If the LED does not illuminate replace filter element Verify Flow Rate to Torch 1 Push power supply OFF 0 button and place main disconnect switch to OFF position see warning on previous page 2 Remove the torch consumables 3 Replace only the retaining cap on the torch Do not replace the electrode nozzle and s...

Page 172: ...isfied See Startup Sequence flowchart 2 If motor pump and valve all seem to be functioning and the flow is not sufficient replace the pump and motor assembly Figure 8 7 Plumbing Schematic of Power Supply Reservoir Assembly with RHF Console and Torch Cathode Block in back of power supply Remote High Frequency Console Heat Exchanger Check Valve Flow Switch FS1 Solenoid Valve V1 Particulate Filter Co...

Page 173: ... after coolant is drained See Fig 8 8 On older systems there is either no petcock or the petcock is in a different position than the one shown in the figure below Siphon coolant out of the tank through the fill inlet if there is no petcock 4 Ensure that the torch and consumables are installed and connected to the power supply 5 Disconnect the torch coolant supply hose black hose with the green ban...

Page 174: ...Clean torch threads and current ring Verify cooling fans are working properly Verify proper coolant level Monthly Date Completed Jan Feb March April May June July Aug Sept Oct Nov Dec Inspect for loose wire connections Inspect contacts on main contactor for wear Inspect pilot arc relay for pitting Verify proper operation of coolant flow switches Perform coolant flow test Check gas console packing ...

Page 175: ...MAINTENANCE 8 30 HySpeed HT2000 Instruction Manual 22 ...

Page 176: ...tation 9 29 Remote V C Programmable PR Control Station 9 31 IHS Console 9 33 Argon Hydrogen Console 9 34 Timer Counter 9 35 HySpeed HT2000 Machine Torch with 2 Sleeve 9 37 HySpeed HT2000 Stainless Steel Machine Torch 9 37 Torch Mounting Bracket 9 37 HySpeed HT2000 Machine Torch with 1 3 4 Sleeve 9 39 Torch Mounting Bracket 9 39 Torch Leads Leads Cables and Hoses 9 40 Consumable Parts Kits 9 50 Lea...

Page 177: ... 15KW HT2000 Bold descriptions that are indented Ex PC BD Assy Snubber represent subassemblies that are under a parent assembly Designator Represents a cross reference to wiring diagrams or pneumatic diagrams Ex CH1 refers to chopper assembly CH1 shown in wiring diagrams Note When referencing components to the wiring diagrams in Section 10 designations may appear to be repeated Ex C1 appears on sh...

Page 178: ...wer Supply Remote V C Machine Computer Interface 2X1 1X1 1X9 3X1 1X2 1X3 14X1 4X1 1X7 1X4 1X5 5X1 5X2 1X6 1X10 11X1 8X1 8X3 4X2 8X2 Work table Workpiece 11 36 26 22 11 10 35 25 34 22 31 30 29 33 Off Valve 8X5 8X4 3 Phase Power 12 13 23 24 24 26 37 6 3 1 5 2 4 9 7 8 28 16 17 14 18 19 20 21 22 15 38 To Second Hyspeed HT2000 Power Supply 27 Key Plasma gas hosing Shield gas hosing Air hosing Shielded ...

Page 179: ...PARTS LIST 9 4 HySpeed HT2000 Instruction Manual 24 Figure 9 1 HT2000 Power Supply Front Panel 1 2 4 5 6 7 See Figure 9 2 for detail of control panel See Figure 9 1A for detail of THC 3 ...

Page 180: ... Guard 8 75 Dia 5 041762 PCB Assy HT2000 ControI II PCB2 1 6 041276 PCB Assy HT2000 Anlg PCB3 1 7 041246 PCB Assy Relay HD1070 HT2000 PCB4 1 001566 Panel HT2000 Front Filter 1 001567 Cover HT2000 Front Filter Panel 1 027441 Filter 24 X 24 X 2 Fiberglass air 1 Items not shown in Figure 9 1 Figure 9 1A HT2000 Power Supply THC Assembly HT2000 Power Supply THC Assembly optional Part Item Number Descri...

Page 181: ...5149 Bulb 120VAC LT2 1 4 005089 Lens White for 005088 1 041536 PC BD Assy Intlk Dsply 200 4001 PCB5 1 5 008516 Post Header 8 pin RA MTA 156 1 6 008517 Spcr 19 OD 12 ID 50 LG 7 7 009063 Diode Ind LED Amber 7 8 041535 PC BD only Intlck Dsply 200 1070 1 9 005121 Pushbutton 2 NO Green Illumin PB1 LT1 1 10 005122 Pushbutton 2 NC Red Extended PB2 1 Figure 9 2 HT2000 Power Supply Control Panel 8 6 5 7 10...

Page 182: ...2 1 2 014158 Transf mer 30KW 440 460V 3PH 50 60Hz T2 1 3 005102 Thermostat 160 C 6 Amp TS1 1 4 014080 Inductor 4mh 100A L1 1 5 014080 Inductor 4mh 100A L2 1 6 075241 M S 1 4 20 X1 2 SL IHW S Z 4 7 075199 Flwshr 1 2 532 1 06 099 S Z 4 8 075242 M S 1 4 20 X 3 4 SL IHW S Z 1 Used on 240 480V power supplies Used on 208 volt power supplies Used on 220 380 415 volt power supplies and 400V CE power suppl...

Page 183: ...PARTS LIST 9 8 HySpeed HT2000 Instruction Manual 20 Figure 9 4 HT2000 Power Supply Center Wall Right Side 6 7 9 1 2 3 8 10 5 4 12 11 13 ...

Page 184: ...r SA 220 380 400 415 50 T1 1 9 029422 Cont Transf mer SA 200V 3PH 50Hz T1 1 9 029404 Cont Transf mer SA 600 3 60 T1 1 9 029713 Cont Transf mer SA 440 460 3 50 60 T1 1 10 008481 Grommet Strip Panel 18 11 041534 PC BD Assy Power Distribution PCB1 1 12 003142 Relay 120 VAC DPDT CRA 1 13 003142 Relay 120 VAC DPDT CRB 1 001601 Plate CE LVD Lift Eye 1 001602 Gasket CE LVD Lift Eye 1 Used on 240 480 volt...

Page 185: ...PARTS LIST 9 10 HySpeed HT2000 Instruction Manual 19 Figure 9 5 HT2000 Power Supply Center Wall Left Side 1 2 3 4 5A 5B 6 7 8A 8B 9 10 11 14 15 16 13 12 17 17 12 ...

Page 186: ... 1 5B 007022 Shunt 100A 100mv R1 1 6 007024 Shunt 200A 100mv R3 1 7 008945 Fuseholder 100A 2 8A 008317 Fuse Semiconductor 125A 250V F1 1 8B 008317 Fuse Semiconductor 125A 250V F2 1 9 075137 Hhdcap 3 8 16 X 1 1 4 Hex S Z 3 10 075166 Hexnut 3 8 16 S Z 3 11 075194 Lkwshr 3 8 Splitlock 3 12 075092 M S 10 32 X 1 2 PH Pan 10 13 075241 M S 1 4 20 X 1 2 SL IHW 4 14 075136 Hhdcap 3 8 16 X 3 4 Hex S Z 3 15 ...

Page 187: ...PARTS LIST 9 12 HySpeed HT2000 Instruction Manual 19 Figure 9 6 HT2000 Power Supply Front Wall Inside See Figure 9 6A for detail of item 2 CH2 right side 3 3 2 1 ...

Page 188: ...y Front Wall Inside Part Item Number Description Designator Qty 1 129118 CH130 CE LVD Chopper SA CH1 1 005199 Temperature Switch 82 C TSW1 1 2 129118 CH130 CE LVD Chopper SA CH2 1 005199 Temperature Switch 82 C TSW2 1 3 008509 Bushing 1 75 MTG X 1 37 ID 3 4 041564 PCB Assy Phase Loss Detection Circuit 1 4 2 ...

Page 189: ...PARTS LIST 9 14 HySpeed HT2000 Instruction Manual 22 Figure 9 8 HT2000 Power Supply Rear Wall Inside 4 1 2 3 5 9 12 8 See Figure 9 9 for High Frequency and I O PCB parts 6 11 10 7 14 14 15 16 13 14 ...

Page 190: ...T 1 5 ID 2 Screw 1 7 001378 Panel HT2000 Rear 1 8 008500 Strain Relief 1 2 X 125 375 1 9 041274 PC BD Assy ISO PCB11 1 10 028666 Timer Counter 1 004545 Bracket 1 027274 Counter Self Powered 2 027275 Meter Elapsed Time 1 003140 Relay 120VAC 2 009204 Capacitor 3 029645 Harness SA HT2000 11 008079 Terminal Strip 8 TB4 1 12 008073 Terminal Strip 16 TB3 1 13 008447 Receptacle 23 37 Std Sex 1X6 1X5 2 14...

Page 191: ...T2000 Instruction Manual 19 Figure 9 9 HT2000 Power Supply High Frequency I O PCB Assembly 1 5 11 3 14 12 12 14 14 12 12 14 14 12 14 12 12 14 4 12 14 12 2 14 12 14 15 13 16 17 18 19 20 21 22 22 21 23 24 25 25 7 8 10 9 8 6 9 26 ...

Page 192: ...n 2 9 015015 Adapter 90 1 4 NPT X 6 2 10 015532 Street Elbow 1 4 1 11 041152 Panel MAX200 Output 1 12 075153 Hexnut 3 8 16 Finish Brs 10 13 075156 Hexnut 1 2 20 Finish Jam Brs 1 14 075194 Lkwshr 3 8 Splitlock Brz 9 15 075217 Flwshr 3 8 390 875 063 Brs 2 16 075335 M S 8 32 X 1 2 SL Bin Nyl 3 17 075347 Bolt 5 16 X 11 4 Hex Brz 1 18 075229 Bolt 3 8 16 X 1 1 2 FTH Hex Brs 1 19 075351 Bolt 3 8 16 X 1 H...

Page 193: ...PARTS LIST 9 18 HySpeed HT2000 Instruction Manual 22 Figure 9 10 HT2000 Power Supply Rear Wall Outside 15 14 12 5 3 4 10 11 7 8 1 13 6 9 ...

Page 194: ...h 0 5GPM FS1 1 6 006053 Valve Check 1 3 PSI 1 4 NPTM 1 7 027005 Filter Element 1 8 027139 Filter Housing 10 X 3 8 NPT 1 9 022036 Gauge Liquid Level 1 10 006099 Bib Drain Valve 1 4NPT 1 11 029324 Heat Exchanger SA MAX200 1 027978 Heat Exchanger Water Air M5 M6 1 12 129383 Valve SA HT2000 Power Supply 1 006046 Valve Sol 240V 3 8 NPT NC V1 1 129252 Water Pump SA 1 13 128385 Kit Motor 1 3 HP Carbon 23...

Page 195: ...PARTS LIST 9 20 HySpeed HT2000 Instruction Manual 21 Figure 9 11 Remote High Frequency Console 1 2 2 3 4 5 6 7 8 9 10 11 12 13 14 ...

Page 196: ...041312 PCB Assy 2000 I O 1 7 009224 Cap 22UF 10 1000 C1 C2 2 8 109072 Spark Gap Assy SG1 1 9 129150 HV Transformer SA 6kV T1 1 10 005227 Switch Pressure 12 PSI PS3 1 11 006032 Valve Sol 120V SV6 1 12 006106 Valve Sol 120V 1 8FPT SV7 1 13 008212 Strain Relief 1 2 NPT 1 14 008483 Strain Relief 1 NPS Basket 1 Capacitors not shown in Fig 9 11 See Fig 9 12 for detail of Spark Gap Assy Part number for s...

Page 197: ...PARTS LIST 9 22 HySpeed HT2000 Instruction Manual 19 Figure 9 12 Remote High Frequency Console Spark Gap Assembly 2 3 3 4 6 9 13 15 9 9 13 13 13 13 12 14 12 8 7 5 10 10 10 11 11 11 1 1 1 16 17 17 ...

Page 198: ...4 Bar Capacitor Mtg 1 7 009975 Cap 1400pF 20KV C3 1 8 009975 Cap 1400pF 20KV C4 1 9 075034 M S 8 32 X 1 4 SL Rnd Brs 4 10 075036 M S 8 32 X 3 4 SL Rnd Brs 3 11 075147 Hexnut 8 32 Brs 3 12 075152 Hexnut 5 16 18 Finish Brs 1 13 075191 Lkwshr 8 Splitlock Brz 7 14 075193 Lkwshr 5 16 Splitlock Brz 1 15 075213 Flwshr 8 202 436 037 Brs 3 16 075100 SktSet 8 32 X 3 8 HexCp SST 1 17 075101 SktSet 8 32 X 5 8...

Page 199: ...PARTS LIST 9 24 HySpeed HT2000 Instruction Manual 19 Figure 9 13 Gas Console 18 2 24 23 5 19 9 10 22 6 3 11 5 4 1 22 12A 12B 21 23 20 24 15 21 16 11 13 14 7 17 8 4 ...

Page 200: ... Way NC SV2 1 14 006109 Sol Valve 150 Manf 120V 2 Way NC SV3 1 15 006064 Valve Ndl 1 8 FPT 125 Orf MV2 1 16 006064 Valve Ndl 1 8 FPT 125 Orf MV3 1 17 006064 Valve Ndl 1 8 FPT 125 Orf MV4 1 18 011053 Flowmeter 7 8 GPM 44 CFH FM1 1 011058 Fltube w Float BP 8 Flt 0 10 SC Cal 2 011008 Shield Plastic for 011053 or 011056 011081 Flowmeter Float Stop 19 011053 Flowmeter 7 8 GPM 44CFH FM2 1 011058 Fltube ...

Page 201: ...PARTS LIST 9 26 HySpeed HT2000 Instruction Manual 19 6 Figure 9 14 Motor Valve Console 8 13 3 4 12 15 16 7 2A 14 2B 17 18 12 20 10 12 9 20 19 1 15 16 14 17 11 5 6 4 ...

Page 202: ...1 8 NPT x Oxy A 1 6 015210 Adapter 1 8 NPT x Acet A LH 2 7 015530 Street Elbow 1 8 1 8 015588 Nipple 1 8 x 2 1 9 015608 Sleeve Delrin 1 4 OD 6 10 015609 Insert Brass 1 4 OD 6 11 015611 Connector Male 1 4 Tube x 1 8 2 12 015612 Elbow Male 1 4 Tube x 1 8 NPT 4 13 129166 Harn HT2000 Mtr Valve Csl 1 14 008210 Receptacle 11 4 Rev Sex 4X2 1 15 008447 Receptacle 23 37 Std Sex 4X1 1 16 008176 Pin 20 24 AW...

Page 203: ...PARTS LIST 9 28 HySpeed HT2000 Instruction Manual 19 Figure 9 15 Remote V C Digital DR Control Station 2 4 9 7 13 17 18 20 19 8 5 6 3 14 15 16 1 10 11 12 21 22 ...

Page 204: ... MDL Fr 1 11 001137 FR HT400 DR PR ST V C Mdl LS 1 12 001138 FR HT400 DR PR ST V C Mdl RS 1 029302 Filter PNL PCB SA DR SR V C 1 13 009871 Potentiometer 500 Ohm 10 turn 2 14 008175 Receptacle Shell Size 13 9 1 15 008176 Pin 20 24 AWG Type III 6 074016 Term 22 18 250 FEM QC Insul 2 074038 Term 22 18 FEM QC Insul 11 074041 Term 22 18 6 Ring Uninsul 1 074067 Term 22 18 25 MAL QC Insul 2 16 041070 PC ...

Page 205: ...PARTS LIST 9 30 HySpeed HT2000 Instruction Manual 19 Figure 9 16 Remote V C Programmable PR Control Station 19 2 3 4 5 6 7 8 13 13 14 15 16 17 18 20 1 9 10 11 12 21 ...

Page 206: ...r 1 10 001137 FR HT400 DR PR ST V C Mdl LS 1 11 001138 FR HT400 DR PR ST V C Mdl RS 1 029089 Filter PNL PCB SA PR V C 1 12 008175 Receptacle Shell 13 9 Size 1 13 008176 Pin 20 24 AWG Type III 22 14 008193 Recp CPC 17 16 Standard Sex 1 074016 Term 22 18 250 FEM QC Insul 2 074038 Term 22 18 FEM QC Insul 5 074041 Term 22 18 6 Ring Uninsul 4 074067 Term 22 18 25 MAL QC Insul 2 15 041070 PC BD Assy Opt...

Page 207: ...PARTS LIST 9 32 HySpeed HT2000 Instruction Manual 19 Figure 9 17 IHS Console 1 2 3 4 5 7 8 10 11 11 12 12 13 14 12 15 16 17 18 9 6 ...

Page 208: ...elief 1 2 X 375 500 1 5 008175 Receptacle Shell Size 13 9 1 6 008176 Pin 20 24 AWG Type III 7 7 008177 Grommet HHS 91107 1 8 008186 Socket 20 24 AWG Type III 8 9 008210 Receptacle 11 4 2 10 009041 Filter AC 1 Amp 1B3 1 11 015001 Adapter Bulkhead 1 4 NPTF 2 12 015005 Adapter 1 4 NPT x 4 4 13 015100 Adapter 1 4 NPT x 1 4 Poly 1 14 015502 Nipple 1 4 x CL 1 15 024038 Hose Assy 4 x 7 1 16 041043 PC BD ...

Page 209: ...ss 1 6 015551 Coupling 1 4 Brass 1 7 024143 Hose Assy 4 X 9 1 029831 Manifold SA 073109 H35 Manifold 1 8 005046 Pressure Switch 0 200 1 4FPT PS1 1 9 006009 Solenoid Valve 200 1 4FPT 120V NC SV5 1 10 015001 Adapter 1 4FPT X 15 16 Brass 1 11 015014 Adapter 1 4NPT X 4 Male 90 Brass 1 12 015047 Adapter 1 4NPT X AC A Male Brass 1 13 015596 Tee 1 4 Brass 1 023702 Cable HT2000 H35 Manifold Press Sw 1 14 ...

Page 210: ...tr Tmr 1 001068 Encl DCC PCC RCC RVR 1 2 001391 Pnl DCC RCVR Rear 1 3 001392 Pnl DCC RCVR Front 1 4 005161 PB Sw Blk SPST NO Sub Mini 2 5 008176 Pin 24 20 AWG Type III CRP 4 6 008193 RCPT Shell CPC 17 16 Std Sex 11X1 1 7 027274 Counter Self Powered LCD 2 8 027275 Meter Elapsed Time LCD 1 003140 Relay 120VAC DP AU Cont 2 See HT2000 wiring diagram 5 6 2 8 7 7 1 3 4 4 ...

Page 211: ...PARTS LIST 9 36 HySpeed HT2000 Instruction Manual 19 9 Figure 9 20 HT2000 Torch 2 50 mm Diameter Mounting Sleeves 7 7 11 8 12 10 1 4 6 5 3 3a 2 3b 13 15 17 14 18 16 16 10 ...

Page 212: ... A 1 Torch Mounting Bracket for 2 50 mm Dia Sleeve 020046 HySpeed HT2000 Machine Torch with 2 50 mm Dia Sleeve 128381 HySpeed HT2000 Stainless Steel Machine Torch with 2 50 mm Dia Sleeve 128367 Part Item Number Description Designator Qty 128381 HT2000 Machine Torch Assy w Valve 1 220242 Nozzle Retaining Cap with IHS Hyspeed 200A 1 2 220239 Shield Hyspeed 200A 1 3 120584 Machine Torch Main Body 1 3...

Page 213: ...PARTS LIST 9 38 HySpeed HT2000 Instruction Manual 19 Figure 9 20A HySpeed HT2000 Torch 1 3 4 45 mm Diameter Mounting Sleeve 8 9 11 7 12 10 10 1 4 6 5 3 3a 2 3b ...

Page 214: ... 1 3a 020963 Water Tube PAC200T 2000 Electd Cool 1 3b 044027 O Ring Buna 70Duro 1 301X 070 2 4 020605 Nozzle MAX200 200A 082 O2 1 5 120667 Electrode HT2000 200A O2 LL 1 6 120833 Swirl Ring HT2000 O2 1 129168 Off Valve SA HT2000 Mch Tch 1 7 006100 Solenoid Valve 150 1 8 FPT 1 8 020431 Tch Mtg Sleeve 1 3 4 GNRC 1 9 120492 Bracket 1 3 4 Dia Torch Off Valve II 1 10 024355 Hose Assy 3 16Blu LH A 1 1 ft...

Page 215: ...2 023013 023013 25 ft 7 6 m 028660 023432 024224 023014 023014 30 ft 9 2 m 028661 023433 024225 023015 023015 35 ft 10 7 m 028662 023434 024226 023016 023016 40 ft 12 2 m 028663 023435 024227 023387 023387 45 ft 13 7 m 028547 023327 024193 023199 023199 50 ft 15 3 m 028767 023773 024404 023772 023772 55 ft 16 8 m 028768 023515 024259 023052 023052 60 ft 18 3 m Part 2 Part 1 Part 3 Part 4 Figure 9 ...

Page 216: ...0 7 m 023405 50 ft 15 3 m 123041 60 ft 18 3 m 023406 75 ft 22 9 m 123074 85 ft 25 9 m 023407 100 ft 30 5 m 023964 110 ft 33 6 m 023959 115 ft 35 1 m 123144 120 ft 36 6 m 023738 125 ft 38 1 m 023408 150 ft 45 8 m 023644 200 ft 61 m 1X1 2X1 12 13 14 Figure 9 23 Pilot Arc Cable PS to RHF Console Figure 9 24 Negative Lead and Work Cable PS to RHF Console PS to Work Table 15 Figure 9 25 HT2000 RHF Cabl...

Page 217: ...otor Valve Console 18 Figure 9 28 Machine Interface Cable PS to Machine I O Part No Length Part No Length 023841 6 ft 1 8 m 023842 15 ft 4 6 m 023843 25 ft 7 6 m 023844 35 ft 10 7 m 023845 50 ft 15 3 m 123047 60 ft 18 3 m 023846 75 ft 22 9 m 123080 85 ft 25 9 m 023847 100 ft 30 5 m 023962 115 ft 35 1 m 123148 120 ft 36 6 m 023848 125 ft 38 1 m 023849 150 ft 45 8 m 023850 200 ft 61 m 1X6 Part No Le...

Page 218: ...ength 023990 7 ft 2 1 m 023911 15 ft 4 6 m 023878 25 ft 7 6 m 023879 50 ft 15 3 m 123040 60 ft 18 3 m 023880 75 ft 22 9 m 123073 85 ft 25 9 m 023881 100 ft 30 5 m 123188 120 ft 36 6 m 023882 125 ft 38 1 m 023883 150 ft 45 8 m 023884 200 ft 61 m 023885 250 ft 76 3 m 023886 275 ft 83 9 m 023887 300 ft 91 5 m 1X4 5X1 21 Figure 9 31 Power Supply Programmable Remote PR Cable PS to PR V C Part No Length...

Page 219: ... 150 ft 45 8 m 023864 200 ft 61 m 1X9 8X1 1X10 Part No Length 023866 50 ft 15 3 m 023867 75 ft 22 9 m 023868 100 ft 30 5 m Part No Length 023888 2 ft 0 6 m 023869 40 ft 12 2 m Part No Length 023889 2 ft 0 6 m 023870 40 ft 12 2 m Part No 005074 See IM205 802050 for Water Muffler Pump information Figure 9 32 Water Muffler Pump Cable PS to WM 8X2 8X4 8X3 8X5 Figure 9 34 Cables from IHS to Sensors Fig...

Page 220: ...Torch A 004082 Bracket IND Sensor 1 B 004349 Bracket MTG Torch 1 3 4 1 C 015005 Adapter 1 4 NPT x 4 1 D 027024 Cylinder IND Sensor UW IHS 1 E 005074 Inductive Sensor Assembly 2 053016 IHS Control Module pg 9 32 and 9 33 1 Interconnecting Leads for Inductive IHS System Included with both systems above 028811 028812 028813 028814 028815 028816 Item 25 ft 7 6 m 50 ft 15 3 m 75 ft 22 9 m 100 ft 30 5 m...

Page 221: ...6 m 023758 38 ft 11 6 m 023693 50 ft 15 3 m 123046 60 ft 18 3 m 023694 75 ft 22 9 m 123079 85 ft 25 9 m 023695 100 ft 30 5 m 023993 115 ft 35 1 m 123189 120 ft 36 6 m 023696 150 ft 45 8 m 023954 200 ft 61 m 13 14 Etc 11X1 5 6 Etc 29 Figure 9 39 Oxygen Supply Hose Oxygen Supply to Gas Console Part No Length Part No Length 024204 15 ft 4 6 m 024205 25 ft 7 6 m 024155 50 ft 15 3 m 024398 75 ft 22 9 m...

Page 222: ...024317 5 ft 1 5 m 024026 10 ft 3 m 024027 15 ft 4 6 m 024017 20 ft 6 1 m 024028 25 ft 7 6 m 024029 30 ft 9 2 m 024030 35 ft 10 7 m 024031 40 ft 12 2 m 024207 45 ft 13 7 m 024340 50 ft 15 3 m 024419 56 ft 17 1 m 024127 60 ft 18 3 m 024343 75 ft 22 9 m 024344 100 ft 30 5 m Figure 9 41 Plasma Preflow Gas Hosing Gas Console to Motor Valve Console 32 Part No Length Part No Length 024316 5 ft 1 5 m 0243...

Page 223: ...Shield Gas Supply to Gas Console 34 Part No Length Part No Length 024348 5 ft 1 5 m 024313 10 ft 3 m 024302 15 ft 4 6 m 024349 20 ft 6 1 m 024303 25 ft 7 6 m 024350 30 ft 9 2 m 024351 35 ft 10 7 m 024352 40 ft 12 2 m 024353 45 ft 13 7 m 024304 50 ft 15 3 m 024305 75 ft 22 9 m 024306 100 ft 30 5 m 024312 150 ft 45 8 m Figure 9 44 Shield Gas Gas Console to RHF Console 35 Part No Length Part No Lengt...

Page 224: ... m 023342 50 ft 15 3 m 023343 100 ft 30 5 m 023344 150 ft 45 8 m Figure 9 47 Hold Cable Power Supply to Power Supply 38 Part No Length Part No Length 028760 3 ft 0 9 m 028860 7 ft 2 1 m 028652 10 ft 3 m 028440 15 ft 4 6 m 028653 20 ft 6 1 m 028441 25 ft 7 6 m 028442 50 ft 15 3 m 128052 60 ft 18 3 m 028443 75 ft 22 9 m 128078 85 ft 25 9 m 028444 100 ft 30 5 m 028902 110 ft 33 6 m 028896 115 ft 35 1...

Page 225: ...leStarter 001285 Box Gray Plastic 1 1 220239 Shield Hyspeed 200A 1 2 220242 Nozzle Retaining Cap with IHS tab HySpeed 200A 1 3 220237 Nozzle Hyspeed 200A 3 5 220236 Swirl RIng Hyspeed 200A 1 7 220235 Electrode HySpeed 200A 3 027055 Lubricant Silicon 1 4 Oz Tube 1 804560 Quick Set up Card HT2000 HySpeed 1 1 2 5 3 4 Figure 9 49 HySpeed HT2000 Starter Consumable Parts ...

Page 226: ...e 100A 055 O2 2 4 020608 Nozzle 200A 086 Air N2 H35 3 4 020611 Nozzle 100A 059 Air 3 5 220236 Swirl RIng Hyspeed 200A 1 6 020607 Swirl Ring Air N2 H35 1 6 020613 Swirl Ring Air 1 6 020679 Swirl Ring Air N2 1 7 220235 Electrode HySpeed 200A 3 7 120667 Electrode HT2000 200A Oxy LL 2 7 020415 Electrode N2 H35 2 7 120547 Electrode HT2000 100A LL 2 8 020963 Water Tube PAC200T 2000 Electd Cool 1 027055 ...

Page 227: ...59 Air 3 5 120833 Swirl RIng HT2000 O2 1 6 020607 Swirl Ring Air N2 H35 1 6 020613 Swirl Ring Air 1 6 020679 Swirl Ring Air N2 1 7 120667 Electrode HT2000 200A Oxy LL 5 7 020415 Electrode N2 H35 5 7 120547 Electrode HT2000 100A LL 3 8 020963 Water Tube PAC200T 2000 Electd Cool 1 027055 Lubricant Silicon 1 4 Oz Tube 1 027194 Wrench Nozzle 3 4 1 027524 Wrench Nozzle 1 1 044027 O Ring Buna N 2 027347...

Page 228: ...0 Shield HT2000 Extended 2 2 120837 Nozzle Retaining Cap with IHS tab 1 3 120259 Nozzle HT2000 200A Oxygen Extended 5 4 120833 Swirl Ring HT2000 O2 2 5 120258 Electrode HT2000 Extended 5 6 120257 Water Tube Electd Cool Extended 1 027055 Lubricant Silicon 1 4 Oz Tube 1 027194 Wrench Nozzle 3 4 1 044027 O Ring Buna N 2 027347 Tool Water Tube Removal 1 1 2 5 3 4 6 Figure 9 52 HT2000 Beveling Consumab...

Page 229: ...5 m 028651 200 ft 61 m Remote High Frequency Console to Gas Console Hoses Part No Length 028683 10 ft 3 m 028684 15 ft 4 6 m 028685 20 ft 6 2 m 028686 25 ft 7 6 m 028687 30 ft 9 1 m 028688 35 ft 10 6 m 028689 50 ft 15 m Gas Console to Motor Valve Console Hoses Part No Length 028622 10 ft 3 m 028623 15 ft 4 6 m 028624 20 ft 6 2 m 028625 25 ft 7 6 m 028626 30 ft 9 1 m 028627 35 ft 10 6 m 028654 50 f...

Page 230: ...4 PCB Assy Power Distribution PCB1 1 9 9 008317 Fuse Semiconductor 125A 250V F1 F2 5 9 11 129118 CH130 Chopper SA CH1 CH2 1 9 13 009684 Res 4 Ohm 420W w bracket R6A R6B 2 9 15 003021 Relay 120VAC NO SPST CR1 1 9 15 009794 Coil Air Core Transformer 8AWG T1 1 9 17 029202 Current Sensor SA CS1 1 9 17 129618 Switch Level SA 1 2 NPT LS1 1 9 19 029323 Switch Temp SA 162 Deg F TS2 1 9 19 029361 Flowswitc...

Page 231: ...064 Needle Valve 1 8 FPT 125 Orifice MV2 MV3 MV4 1 9 25 011053 Flowmeter 7 8 GPM 44CFH FM1 FM2 1 9 25 011058 Flowtube with Float BP 8 Flt 0 10 SC Cal 2 2 011008 Shield Plastic for 011053 or 011056 2 011081 Flowmeter Float Stop 2 022020 Gauge Pressure 160 psi bar Panel Mnt PG1 PG2 1 9 25 022008 Gauge Pressure 100 psi bar Panel Mnt PG3 1 9 25 Motor Valve Console Part Number Description Designation Q...

Page 232: ... of each sheet Lining up the coordinates will bring you to the source or destination blocks similar to a road map When referencing components to the wiring diagrams designations may appear to be repeated Ex C1 appears on sheet 2 in the wiring diagrams in 2 separate locations Sections of the power supply on that page are outlined with a dotted box and a label Within different sections the same desi...

Page 233: ...terlock Fan Feedthru LC Filter AC DC supply Fuse Ground Clamp Ground Chassis Ground Earth IGBT Inductor LED Light Pin Plug PNP Transistor Potentiometer Push Button Normally Closed MOV Push Button Normally Open Receptacle Relay Coil Relay Normally Closed Relay Normally Open Relay Solid State AC Relay Solid State DC Relay Solid State Dry SCR Shield Shunt Spark Gap Switch Flow Resistor ...

Page 234: ...e Transformer Coil Valve Solenoid Voltage Source Zener Diode VAC Source Triac Switch Pressure Normally Closed Switch Pressure Normally Open Switch 1 Pole 1 Throw Switch 1 Pole 2 Throw Switch 1 Pole 1 Throw Center Off Switch Temperature Normally Closed Switch Temperature Normally Open Time Delay Closed NC Off Time Delay Open NO Off Time Delay Open NC On Terminal Block Torch HyDefinition ...

Page 235: ......

Page 236: ......

Page 237: ......

Page 238: ......

Page 239: ......

Page 240: ......

Page 241: ......

Page 242: ......

Page 243: ......

Page 244: ......

Page 245: ......

Page 246: ......

Page 247: ......

Page 248: ......

Page 249: ......

Page 250: ......

Page 251: ......

Page 252: ......

Page 253: ......

Page 254: ......

Page 255: ......

Page 256: ...ing Mode Component Idle Cutflow Preflow SV1A OFF OFF OFF SV1B ON ON ON SV2 OFF OFF ON SV3 OFF OFF OFF SV4A OFF ON OFF SV4B OFF OFF ON SV5 OFF ON ON SV6 OFF ON ON SV7 ON ON ON Solenoid valve status for N2 timing chart ...

Page 257: ......

Page 258: ... status for O2 timing chart O2 or Air Cutting Mode Component Idle Cutflow Preflow SV1A ON ON ON SV1B OFF OFF OFF SV2 OFF OFF ON SV3 OFF OFF ON SV4B OFF OFF ON SV4B OFF OFF ON SV5 OFF ON ON SV6 OFF ON ON SV7 ON ON ON ...

Page 259: ......

Page 260: ... status for O2 timing chart O2 or Air Cutting Mode Component Idle Cutflow Preflow SV1A ON ON ON SV1B OFF OFF OFF SV2 OFF OFF ON SV3 OFF OFF ON SV4B OFF OFF ON SV4B OFF OFF ON SV5 OFF ON ON SV6 OFF ON ON SV7 ON ON ON ...

Page 261: ......

Page 262: ...Coolant Flow Diagram ...

Page 263: ......

Page 264: ...rent AC Plasma cutting torch AC input power connection The terminal for the external protective earthed conductor A chopper based power source Anode work clamp Temperature switch Pressure switch Plasma torch in the TEST position cooling and cutting gas exiting nozzle The power is on The power is off Volt amp curve ...

Page 265: ...APPENDIX A a 2 HySpeed HT2000 Instruction Manual 20 ...

Page 266: ... Section 9 Physical and Chemical Properties b 4 Section 10 Stability and Reactivity b 4 Section 11 Toxicological Information b 4 Section 12 Ecological Information b 5 Section 13 Disposal Considerations b 5 Section 14 Transport Information b 5 Section 15 Regulatory Information b 5 Section 16 Other Information b 5 Benzotriazole COBRATEC Safety Data Section I b 7 Section II Ingredients b 7 Section II...

Page 267: ...b 2 HySpeed HT2000 Instruction Manual 19 ...

Page 268: ...HySpeed HT2000 Instruction Manual b 3 19 ...

Page 269: ...b 4 HySpeed HT2000 Instruction Manual 19 ...

Page 270: ...HySpeed HT2000 Instruction Manual b 5 19 ...

Page 271: ...b 6 HySpeed HT2000 Instruction Manual 19 Figure b 1 Freezing Point of Propylene Glycol Solution of Propylene Glycol Temperature F 70 60 50 40 30 20 10 0 10 20 30 40 0 10 20 30 40 50 60 ...

Page 272: ...HySpeed HT2000 Instruction Manual b 7 19 ...

Page 273: ...b 8 HySpeed HT2000 Instruction Manual 19 ...

Page 274: ...HySpeed HT2000 Instruction Manual b 9 19 ...

Page 275: ...b 10 HySpeed HT2000 Instruction Manual 19 ...

Page 276: ...ed HT2000 Instruction Manual c 1 20 Appendix C AERATION MANIFOLD FOR PLASMA CUTTING ALUMINUM In this section Aeration Manifold for Plasma Cutting Aluminum c 2 Introduction c 2 Making an Aeration Manifold c 2 ...

Page 277: ...ee hydrogen buildup is to install an aeration manifold on the floor of the water table to replenish the oxygen content of the water Making an Aeration Manifold Figure c 1 Make an Aeration Manifold with two inch 50 mm PVC tubing with one inch 25 mm Distribution Lines connected to it Drill 1 8 inch 3 mm holes every six inches 150 mm in the distribution lines Cap the ends of the distribution lines an...

Page 278: ...arts life will be shortened which increase production costs To optimize both consumables life and cut quality Hypertherm recommends a three stage filtering process for compressor air for removing contaminants from the air supply 1 The first stage of filtering should remove at least 99 of all particles and liquids 5 microns and larger in size 2 The second stage should be a coalescing type filter to...

Page 279: ...APPENDIX D d 2 HySpeed HT2000 Instruction Manual 19 ...

Page 280: ...000 Instruction Manual e 1 19 Appendix E ELECTROMAGNETIC COMPATIBILITY EMC In this section General e 2 Power Cable e 2 Connect Power Cable e 2 Power Supply e 2 Line Disconnect Switch e 4 EMI Filter Parts List e 5 ...

Page 281: ...tion and installation of the power cord should be made by a licensed electrician and according to applicable national or local codes See also Mains Supply on page e 2 for further power supply cable shielding recommendations Connect Power Cable Connect one end of the power cable to the EMI filter first and then connect the other end to the line disconnect switch Power Supply 1 Locate the EMI filter...

Page 282: ...Figure e 2 3 Insert the power cable through the strain relief see Figure e 1 4 Connect leads L1 to U L2 to V and L3 to W terminals of TB1 see Figure e 3 Ensure that all connections are tight to avoid excessive heating 5 Connect the ground lead to terminal marked PE at TB1 see Figure e 3 Figure e 2 Power Supply with EMI Filter Cover Off Top View Filter TB1 ...

Page 283: ...nly by qualified licensed personnel See Power Requirements and Line Disconnect Switch on page 3 5 Figure e 3 Power Cable Connections to TB1 WARNING Tthere is line voltage at the filter even if the ON 1 pushbutton on the HT2000 power supply has not been pressed As a common safety practice ALWAYS verify that the line disconnect switch is in the OFF position before installing disconnecting or servici...

Page 284: ...8 Enclosure Hyspeed HT2000 CE Electronic Filter 1 2 001559 Cover Hyspeed HT2000 CE Top 1 3 008489 Bushing 1 97 ID X 2 5 Hole Black Snap 1 4 008610 Strain Relief 1 1 2NPT 1 5ID 2 Screw 1 5 029316 TB1 Input Power SA 200 2000 4X00 HD 1 6 109036 Filter 60A 440VAC 3PH 2 Stage Electronic 1 7 109040 Filter Mounting Bracket for 109036 1 1 3 2 4 5 6 7 Figure e 4 EMI Filter Parts ...

Page 285: ...APPENDIX E e 6 HySpeed HT2000 Instruction Manual 19 ...

Page 286: ...r cord and the line disconnect switch Equipment Grounding All accessory modules that receive power from the plasma power supply must also use the power supply s ground either by connection to the PE terminal of the power supply or by direct connection to the equipment ground conductor Each module should have only one connection to ground to avoid ground loops If any enclosure is grounded to the wo...

Page 287: ...ocal codes Place the supplementary ground rod within 20 ft 6 m of the worktable according to national or local codes If any module is grounded to the work table the work table must be grounded to the power supply or the configuration must be changed to comply with applicable national and local electrical codes A ferrite choke can be placed in the conductor between the work table ground rod and the...

Page 288: ...ection Configuration Note Configuration may vary for each installation and may require a different ground scheme Plasma Power Supply PE PE PE PE Power Cord Ground Ferrite Choke Supplementary Grounding Rod Gas Console Other Equipment receiving power from the plasma power supply Ignition Console Work Table ...

Page 289: ...is acceptable to daisy chain the grounds for the gas console and other equipment to the ignition console The ignition console should NOT be daisy chained through the other components to the work table Plasma Power Supply PE PE Power Cord Ground Ferrite Choke Supplementary Grounding Rod Gas Console Other Equipment receiving power from the plasma power supply Ignition Console Work Table PE PE ...

Reviews: