background image

5-4


S

ervice

P/N 0515297_E 

U.S. & Canada 1-800-922-1919 • Mexico 1-800-890-2900 • www.hussmann.com

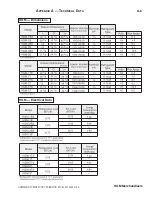
Refrigeration                                                        Part Number    HGM1BS   HGM2BS   HGM3BS   HGM1TS   HGM2TS   HGM3TS

Compressor (FFU100HAK)

0518077

X


X


Compressor (NEK6187Z)

 2000575


X

X


X

X

Condenser

2100516

X


X


Condenser

E108804


X


X


Condenser

25S050


X


X

Condenser Fan Motor

1804579

X

X

X

X

X

X

Condenser Fan Blade

1700156

X


X


Condenser Fan Blade

0510453


X


X


Condenser Fan Blade

21S017


X


X

Condenser Fan Motor Bracket

0201543

X


X


Condenser Fan Motor Bracket

0438051


X


X


Condenser Fan Motor Bracket

21S007


X


X

Evaporator Coil

25S121

X


X


Evaporator Coil

26S0741


X


X


Evaporator Coil

26S0742


X


X

Pullout Coil Asm.

953070

X


Pullout Coil Asm.

952350


X


Pullout Coil Asm.

95201


X


Filter Drier (Sporlan C-032-S-T)

17S332

X

X


X

X


Filter Drier (Sporlan C-052-S)

17S362


X


X

Accumulator

17S489

X


X


Accumulator

17S098


X

X


X

X

Replacement Parts List

Standard Parts                                                     Part Number     HGM1BS   HGM2BS   HGM3BS    HGM1TS   HGM2TS    HGM3TS

Evaporator Fan Motor

0477654

X

X

X

X

X

X

Evaporator Fan Blade

0501426

X


X


Evaporator Fan Harness Plug

    19S785

X


X


Evaporator Fan Blade

0519568


X

X


X

X

Evaporator Fan Harness

0517365


X


X


Evaporator Fan Harness

0518201


X


X

Air Sensor (Black) 4000MM

0510533

X

X

X

X

X

X

Safe-Net III  Controller 65C

0524126

X

X

X

X

X

X

Safe-Net III Display (F°) 65C

0527186

X

X

X

X

X

X

Safe-Net III Display Interface Cable

0509783

X

X

X

X

X

X

Safe-Net IIIControl Harness

0513058

X

X

X

X

X

X

Compressor Relay

0459304

X

X

X

X

X

X

Power Switch

     03S286

X

X

X

X

X

X

Solar Thermometer

    05S528

X

X

X

X

X

X

Cantilever Shelf (White)

    22S268

X

X

X

X

X

X

Bottom Shelf (White) 1 per door

    22S128

X

X

X

X

X

X

Wire Rear Flue Spacer (1 per door)

    22S121

X

X

X

X

X

X

Legs Adjustable 6” (TS Only)

    35S032


X

X

X

Power Cord (5-15P) NEMA 5-15P

    19S216

X

X

X

X

Power Cord (5-20P) NEMA 5-20P

19S63612

X

X

Summary of Contents for HGM-1 BS

Page 1: ...Temperature Remote and Self Contained Glass Door Merchandisers Installation Operation Manual P N 0515297_E June 2015 HGM 3BS HGM 2TS Spanish 0531289 French 0531290 IMPORTANT Keep in store for future...

Page 2: ......

Page 3: ...22 1919 Mexico 1 800 890 2900 www hussmann com 2015 Hussmann Corporation P N 0515297_E iii Merchandiser must operate for 24 hours before loading product Regularly check merchandiser temperatures Do no...

Page 4: ......

Page 5: ...djustment 3 6 Alarms and Codes 3 6 Defrost Termination Switch 3 6 Manual Defrost 3 6 Temperature Adjustment 3 7 Sensor to Control Configuration 3 8 Lighting 3 9 LED Lights 3 9 Door Defrost Heater Ther...

Page 6: ...vi P N 0515297_E U S Canada 1 800 922 1919 Mexico 1 800 890 2900 www hussmann com ANSI Z535 5 DEFINITIONS DANGER Indicate s a hazardous situation which if not avoided will result in death or serious i...

Page 7: ...en carefully inspected at our factory Any claim for loss or damage must be made to the carrier The carrier will provide any necessary inspection reports and or claim forms Apparent Loss or Damage If t...

Page 8: ...s known to the State of California to cause cancer birth defects or other reproductive harm This warning is the result of the California State law known as the California Safe Drinking Water and Toxic...

Page 9: ...handisers and 6 inches of clearance at the rear to provide the necessary free air movement to and from the condensing unit The condensing unit is located at the bottom of these merchandiser HGM 2BS me...

Page 10: ...merchandisers or damage to the merchandisers and serious personal injury could occur merchandisers are not structurally designed to support excessive external loading such as the weight of a person D...

Page 11: ...n The legs are packaged inside the cabinet Replace the tape and door blocks To install legs Raise one end of the cabinet about 8 inches Block the merchandiser securely and install two legs The leg mou...

Page 12: ...e is in the floor from one end of the merchandiser to the other Sealing of the lower front and rear panels on self contained models may hamper their removal for servicing or maintenance of the condens...

Page 13: ...safe place for future reference 2 Examine unit Confirm there is NO damage or concealed damage 3 Level the unit side to side and front to rear 4 Remove all shipping brackets compressor straps bolts et...

Page 14: ...1 8 Installation P N 0515297_E U S Canada 1 800 922 1919 Mexico 1 800 890 2900 www hussmann com...

Page 15: ...ser Failure to do so voids the warranty Do not use an extension cord Never plug in more than one merchandiser per electrical circuit Always use a dedicated circuit with the amperage stated on the unit...

Page 16: ...connected to the waste water system for washing out the cabinet This system is designed to evaporate normal condensate This system should be checked regularly especial ly during high relative humidity...

Page 17: ...artup and for periodic maintenance purposes 1 Check operation of condenser fan motors Fan blades must turn freely 2 Check drain pan and heater to prevent accidental overflow 3 Make sure doors are clos...

Page 18: ...n adjustment knob and status LEDs The back of the controller has connections for sensors and switched equipment The Safe NET III controller includes the following features and connections Adjustment k...

Page 19: ...e front grille Check thermostat knob is at the appropriate position See temperature adjustment on Page 3 6 Check the check the merchandiser s cabinet thoroughly for loose nuts and bolts Check all elec...

Page 20: ...ll LEDs turn off until the compressor starts There may be a delay before the compressor starts If the red Temperature or Sensor Alarm LED stays on after the self check The green Compressor Powered On...

Page 21: ...ompressor will start after a delay 30 seconds after the power is applied 3 The compressor will continue to run until it reaches its cut out temperature pull down 4 The refrigeration cycle will continu...

Page 22: ...se sensor has failed or E2 if the evaporator sensor has failed If the merchandiser sensor fails refrigeration will run continuously Turn off or repeat a duty cycle of a few minutes on and a few minute...

Page 23: ...tings perform the operations below Output readings should be within one degree of the temperatures shown above The control has protective settings to prevent short cycling of the compressor A The comp...

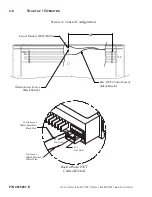
Page 24: ...2900 www hussmann com Sensor to Control Configuration Sensor Bracket HGL HGM x Safe NET Control Sensor Black Sheath Thermometer Sensor Black Sheath 10 Sensor Black Sheathed White Wire 11 Not Used Bac...

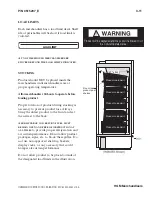
Page 25: ...shipped with the merchandiser DOOR DEFROST HEATER THERMOSTAT This cabinet is equipped with both frame and door heaters These are thermostatically con trolled and will not come on until the cabinet is...

Page 26: ...is possibly that dirt dust or moisture may collect in the capillary tube causing the system to go into a vacuum Should this occur it is recommended that dry nitrogen or a dry refrigerant be forced thr...

Page 27: ...duct loss Always bring the oldest product to the front and set the newest to the back Air discharge and return flues must remain open and free of obstruction at all times to provide proper refrigerati...

Page 28: ...3 12 Start up Operation P N 0515297_E U S Canada 1 800 922 1919 Mexico 1 800 890 2900 www hussmann com NOTES...

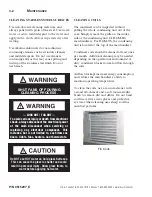
Page 29: ...ed cleaners on acrylic parts Solvent oil or acidic based cleaners on any interior surfaces Do not use high pressure water hoses Do Remove the product and all loose debris to avoid clogging the waste o...

Page 30: ...s should be cleaned at least once per month Additional cleaning may be needed depending on the operational environment A dirty condenser blocks normal airflow through the coils Airflow blockage increa...

Page 31: ...pan to overflow DO NOT FLOOD Use only enough water necessary to clean surface Water must not drip down the case Never use ammonia based cleansers abrasive cleansers or scouring pads PRECAUTION CLEANI...

Page 32: ...nit Heat and air registers fans and doors etc x Check for water leaks x Clean evaporator coil s and fan blade s Do not use an acid base cleaner Rinse off any cleaner residue x Clean discharge air hone...

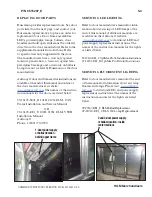
Page 33: ...CING THERMOMETER The thermometer may be replaced by remov ing the two screws holding it to the evaporator fan grille Lower the evaporator coil cover by removing the brass screws located at the two fro...

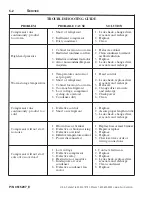
Page 34: ...hort on refrigerant 1 Blown fuse or breaker 2 Defective or broken wiring 3 Defective overload 4 Defective temperature control 5 Power disconnected 1 Low voltage 2 Defective compressor 3 Defective rela...

Page 35: ...sted below 99 16105 S001_B 101B 210X ELM 101X Frame Installation and Service Manual OR 99 16105 I001_E 101B 210X ELM VSTB Installation Manual Anthony Phone 1 800 772 0900 SERVICING LED LIGHTING Refer...

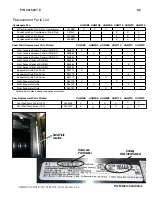
Page 36: ...362 X X Accumulator 17S489 X X Accumulator 17S098 X X X X Replacement Parts List Standard Parts Part Number HGM1BS HGM2BS HGM3BS HGM1TS HGM2TS HGM3TS Evaporator Fan Motor 0477654 X X X X X X Evaporato...

Page 37: ...SNIII KO 950851 X Front Louvered Access Panel w SNIII KO 950852 X Front Louvered Access Panel w SNIII KO 950853 X Front Access Panel w SNIII KO 953451 X Front Access Panel w SNIII KO 953452 X Front Ac...

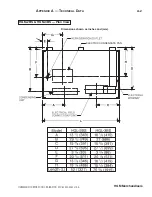
Page 38: ...P N 0515297_E U S Canada 1 800 922 1919 Mexico 1 800 890 2900 www hussmann com A 1 Appendix A Technical Data HGM 1BS Plan View HGM1BS ELECTRIC CONDENSATE PAN Dimensions shown as inches and mm...

Page 39: ...HUSSMANN CORPORATION BRIDGETON MO 63044 2483 U S A HGM Merchandisers Appendix A Technical Data A 2 ELECTRIC CONDENSATE PAN HGM 2BS HGM 3BS Plan View Dimensions shown as inches and mm...

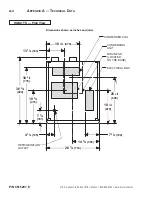
Page 40: ...hnical Data CONDENSING UNIT REFRIGERATION OUTLET 7 1 8 181 4 1 8 105 7 5 8 194 28 7 8 733 14 3 8 365 18 1 2 470 18 5 8 473 30 5 8 778 36 3 8 924 25 3 8 645 13 1 8 333 18 7 8 479 ELECTRICAL BOX DRAIN P...

Page 41: ...HUSSMANN CORPORATION BRIDGETON MO 63044 2483 U S A HGM Merchandisers Appendix A Technical Data A 4 HGM 2TS Plan View Dimensions shown as inches and mm...

Page 42: ...P N 0515297_E U S Canada 1 800 922 1919 Mexico 1 800 890 2900 www hussmann com A 5 Appendix A Technical Data HGM 3TS Plan View Dimensions shown as inches and mm...

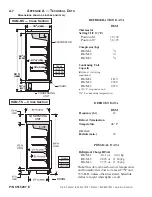
Page 43: ...HUSSMANN CORPORATION BRIDGETON MO 63044 2483 U S A HGM Merchandisers Appendix A Technical Data A 6 HGM Dimensions HGM Electrical Data...

Page 44: ...GM 2 1 2 HGM 3 3 4 Condensing Unit Capacity Btu hr at std rating conditions HGM 1 1870 HGM 2 2300 HGM 3 4270 at 10 F evaporator and 110 F condensing temperature DEFROST DATA HGM Frequency hr 12 Defros...

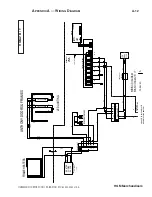
Page 45: ...GRN W SWITCH S3 REVERSIBLE MOTORS OPTIONAL KIT B BK BK W W BL BL W RELAY REV MOTORS BK W W R REVERSIBLE MOTOR KIT ONLY GRN LINE 1 LINE 2 COMP NA PHASE FAN PHASE THERMOSTAT SENSOR AIR TEMP HEATER 2 M...

Page 46: ...W W BL BL W RELAY REV MOTORS BK W W R REVERSIBLE MOTOR KIT ONLY GRN LINE 1 LINE 2 COMP NA PHASE FAN PHASE THERMOSTAT SENSOR AIR TEMP HEATER 2 M 1H16704002 DISPLAY SAFENET III CONTROL 1 2 3 4 5 6 7 8 9...

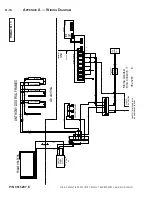
Page 47: ...BL W BL BK BK R BK BK BK END LED END LED CENTRAL LED R BK BK BK W BL W BL R BK CENTRAL LED R BK BK W BL W BL L L II N N E E 1 1 LINE 2 C C O O M M P P N N A A P P H H A A S S E E F F A A N N P P H H A...

Page 48: ...THERMOSTAT SENSOR AIR TEMP HEATER 2 M 1H16704002 DISPLAY SAFENET III CONTROL 1 2 3 4 5 6 7 8 9 10 11 SERIAL HACCP LINK PROG KEY BLACK SHEATH W BL BK BK Y B 1PH 60 Hz 115 V BK BK 5 7 11 23 25 LINE 2 1...

Page 49: ...002 DISPLAY SAFENET III CONTROL 1 2 3 4 5 6 7 8 9 10 11 SERIAL HACCP LINK PROG KEY BLACK SHEATH W BL BK BK Y B 1PH 60 Hz 115 V BK BK 5 7 11 23 25 LINE 2 1 3 9 LINE 1 A 2 4 6 8 10 12 24 26 5 7 11 23 25...

Page 50: ...LED R BK BK W BL W BL LINE 1 LINE 2 COMP NA PHASE FAN PHASE THERMOSTAT SENSOR AIR TEMP HEATER 2 M 1H16704002 DISPLAY SAFENET III CONTROL 1 2 3 4 5 6 7 8 9 10 11 SERIAL HACCP LINK PROG KEY BLACK SHEAT...

Page 51: ...Anthony Door Supplement for Hussmann Models HGM HGL The following pages are reprinted by permission of Anthony Copyright 2010 by Anthony...

Page 52: ...part of this document may be reproduced or transmitted in any form or by any means electronic or mechanical for any purpose without express permission of Anthony Manufacturing Co Inc Anthony products...

Page 53: ...e 6 Top Bottom Rail 7 Hold Open Backing Plate 8 Hold Open Fork Spacer 9 Access Hole Cover 10 Top Bottom Rail Cover 11 Side Rail Covers 12 Wedge Spacer 13 Vinyl Glazing 14 Glass Pack Assembly 15 10 28...

Page 54: ...NTER MULLION CENTER MULLION PLASTIC 6 32 X 1 4 SCREWS SOCKET MOUNTING CLIP LENS END CAP 1 8 X 7 32 RIVET CENTER MULLION LENS CENTER MULLION LENS MOUNTING CLIP Center Mullion Lamp Assembly END CAP MIRR...

Page 55: ...HINGE PIN RECEPTACLE AND SINGLE GIB HOLD OPEN ASSEMBLY HINGE PIN DOOR RAIL ASSEMBLY DUAL HINGE PIN RECEPTACLE AND DUAL GIB FLOURESCENT LAMP SOCKETS 2 SHOWN FLOURESCENT LAMP BALLASTS 2 SHOWN MULLION BA...

Page 56: ...access the hold open device then loosen and remove hold open bolt using a phillips head screwdriver Refer to figure B 5 Remove the hold open stud using a 7 16 hand wrench 6 Retract the door to a near...

Page 57: ...rame until the top door rail clears the frame 10 Lift and remove the door from the torquemaster and carefully set the door aside Refer to figure E Reversing the Door Swing SPRING CLIP SPRING CLIP GRIP...

Page 58: ...the bottom frame rail Refer to figure B 2 Locate the mounting hole at the opposite side of the door opening 3 Using the flat head screwdriver carefully pry underneath the plug cap and remove it Refer...

Page 59: ...pposite hold open mount of the same door frame Refer to figure F 10 If installing in Reverse Geometry insert the hold open stand off into the frame header and install the detent bolt into the top of t...

Page 60: ...pin and the torque rod completely into the ends of the door assembly hinge rail 17 If necessary lightly tap on the hinge pin and torque rod with a plastic or rubber mallet until each is fully seated i...

Page 61: ...at the mounting clips lock into the outer edge of the LED light aluminum extrusion c Adjust the lamp position until it is centered on the Mullion 2 Go to Locking LED Fixture to Center Mullion Fixture...

Page 62: ...ng clip NOTE Ensure that the mounting clips lock into the outer edge of the LED light aluminum extrusion c Adjust the LED lamp assembly until it is centered on the Mullion 2 Continue to Locking LED Fi...

Page 63: ...a 29 0 136 dia drill bit drill a hole through the LED Lighting fixture through the End Mullion Fixture 2 Using a Phillips screw driver to start threading the 8 X 1 long self tapping screw to hold the...

Page 64: ...ions using insulating material 6 Go to MOUNTING THE LED POWER SUPPLIES on page 12 Connecting Wires at the Top of the Frame 1 Connect wires from the fixture to the black and red wires from the 2 conduc...

Page 65: ...he 3 position plug on the primary side of the LED power supply as follows a If a 3 position plug is present on the load wire harness go to step 5 b If no 3 position plug is present on the load wire ha...

Page 66: ...3 position plug on the primary side of the LED power supply as follows a If a 3 position plug is present on the load wire harness go to step 5 b If no 3 position plug is present on the load wire harne...

Page 67: ...T WHT BLU BLU WHT WHT BLU 16 GA BLU WHT 16 GA WHT BLU LIGHT 120 240 VAC BLK BLK BLK BLK RED BLK RED BLK BLK BLK BLU WHT WHT BLU BLU WHT WHT BLU WHT BLU RED BLK BLK BLK RED BLK BLK BLK WHT BLU BLU WHT...

Page 68: ...o Frame Hussmann Frame Refer to 99 18258 I001_A Optiplex2 Retrofit Instructions Web Use found on www Anthonyintl com LED CLEANING INSTRUCTIONS The LED light may be dusted as needed with a dry clean so...

Page 69: ...information or other support contact your Hussmann representative Please include the model and serial number of the product Hussmann Corporation Corporate Headquarters Bridgeton Missouri U S A 63044 2...

Page 70: ...Hussmann Corporation 12999 St Charles Rock Road Bridgeton MO 63044 2483 www hussmann com...

Reviews: