STARTER
5
10
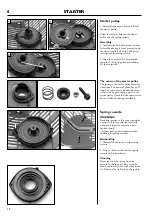
Spring cassette
WARNING!
Handling springs of this type con stitutes
a major risk for eye injuries, especially
when you dismantle a cas sette with a
broken spring!
Always wear protective glasses when
handling the spring cassette!
Dismantling
1. Dismantle both screws on the spring
cassette.
2. Press out both catches on the spring
cassette with a screwdriver.
Cleaning
Never take out the spring from the
cassette. If the spring is dirty it can be
blown sufficiently clean with compressed
air. Now apply a light oil on the spring.
Starter pulley
1. Dismantle the centre bolt and lift off
the starter pulley.
Clean the surfaces between the starter
pulley and the spring cassette.
Assembly
2. Lubricate the hub with grease (arrows).
Preferably also apply some grease around
the starter pulley hub so that the grease
seals against the spring cassette.
3. Align the starter pulley cut-out with
the end of the spring when assembling.
Fit the centre bolt.
1
2
1
2
3
The centre of the starter pulley
The spring in the starter pulley dampens
vibrations. The dust seal above has an O-
ring. The spacer sleeve around the centre
screw is the upper bearing point for the
starter pulley. Check that the spacer sleeve
has not fallen off during reassembly.


