English - 31
Carburettor
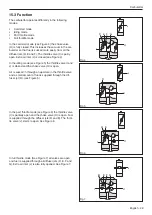
13. Loosen the screws (A) and remove top cover (B).
Remove control diaphragm (C) and gasket (D).
See Figure 12.
14. Loosen the screw (E) and lift out the needle valve
(I) with the lever arm (F), the axle (H) and the spring
(G). See Figure 12.
15. Loosen the screw (M) and dismantle the cover (L).
Carfully remove the gasket (K) and the diaphragm
(J). See Figure 12.
15.5 Cleaning and inspection
Clean all units in clean petrol.
WARNING!
Never direct the compressed air jet
towards the body. Air can penetrate into
the blood circulation, which means
mortal danger.
Use compressed air to dry the petrol on the components.
Direct the air through all channels in the carburettor
housing and ensure that they are not blocked. Check the
following:
•
That the gasket, pump and control diaphragms are
undamaged, as well as the gasket between the
carburettor body and the autotuner.
•
That there is no play on the throttle valve and choke
valve shafts.
•
That the needle valve (I) and its lever arm (F) are not
worn. See Figure 12.
E
H
F
G
I
A
C
D
Q
R
B
S T
Y
P
Z
U
V
X
AA
AB
AC
AD
AF
AG
AE
J
K
L
M
O
N
Fig. 12
•
That the fuel screen is intact and clean.
•
That the inlet manifold is undamaged.


