20 - English
Throttle trigger lockout, throttle trigger and spring
Fig. 4
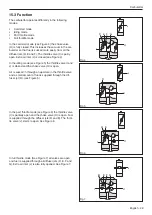
9. Remove the tank unit and front handle. See Figure
4.
10. Remove the screw (J) and the handle cover (K). See
Figure 5.
11. Knock out the pin (L) and remove the throttle trigger
(M) See Figure 5.
12. Remove the throttle wire (N). See Figure 5.
13. Use a flat screwdriver to pry out the throttle control
(O) See Figure 5.
14. Remove the throttle control (O). See Figure 5.
9.2 Cleaning and inspection
•
Carefully clean and inspect all parts.
•
Parts must be replaced if cracked or if they show
signs of other defects. Always use original spare
parts.
•
Check that the spring is intact and retains all its ten-
sion.
9.3 Replace a defect throttle cable
1. Attach the wire to the throttle trigger. Pull the wire
through the handle. See Figure 6.
9.4 Assembly
1. Insert the throttle control (O) into the handle. See
Figure 6.
2. Insert the throttle trigger into the handle. Attach the
throttle trigger to the handle by knocking the pin (L)
into the handle.
3. Put together the tank unit and cylinder assembly.
See Figure 4.
4. Attach the throttle cable to the throttle lever (P). See
Figure 3.
5. Attach the fuel hose (H) to the carburettor and
attach the suction hose (I) to the primer bulb. See
Figure 3.
6. Attach the antivibration element. See Figure 2 and
1.
7. Attach the air filter holder, air filter, clutch cover and
cylinder cover.
Fig. 5
Fig. 6
L
O
J
M
K
N
O
N
M
L


