English - 25
Flywheel
Fig. 5
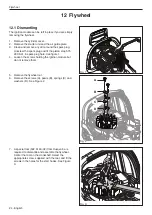
8. Mount the screw press in the center and screw it
down far enough to ensure it is secure in the plate.
Lock the outer socket with a wrench and screw in
the centre screw until the flywheel releases. See
Figure 4.
NOTE! If the flywheel is sitting very firmly,
you can knock lightly with a hammer on
the screw to the flywheel to release. At
the same time lift the machine slightly
from the base by the tool handle.
12.2 Cleaning and inspection
•
Clean all parts, especially the tapers on the flywheel
and shaft.
•
Check the flywheel for cracks or any other signs of
damage.
12.3 Assembly
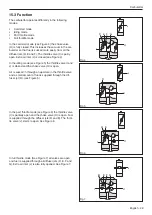
1. Fit the washers (D), springs (C), pawls (B) and
screws (A). See Figure 5.
2. Clean crankshaft to remove grease or oil.
3. Fit the flywheel onto the crankshaft pin. Turn the
flywheel until the key fits into the key slot on the
shaft. See figure 6.
4. Tighten the nut for the flywheel.
5. Remove the piston stop. See figure 1.
6. Turn the flywheel so that the magnets are in line
with the ignition module. Fit the the plastic feeler
gauge (502 51 34- 02). Loosen the screws that
hold the ignition module. Set a distance of 0.3 +/-
0.1 mm, between the ignition module and magnet.
Tighten the screws. See figure 7.
7. Fit the baffle and attach the starter unit.
8. Fit the spark plug and fit the spark plug cable on the
spark plug.
9. Attach the cylinder cover.
Fig. 6
Fig. 7
Air gap tool
A
B
C
D
Fig. 4


