2-11
Sewing Mode
How to Program Stitches and
Letters
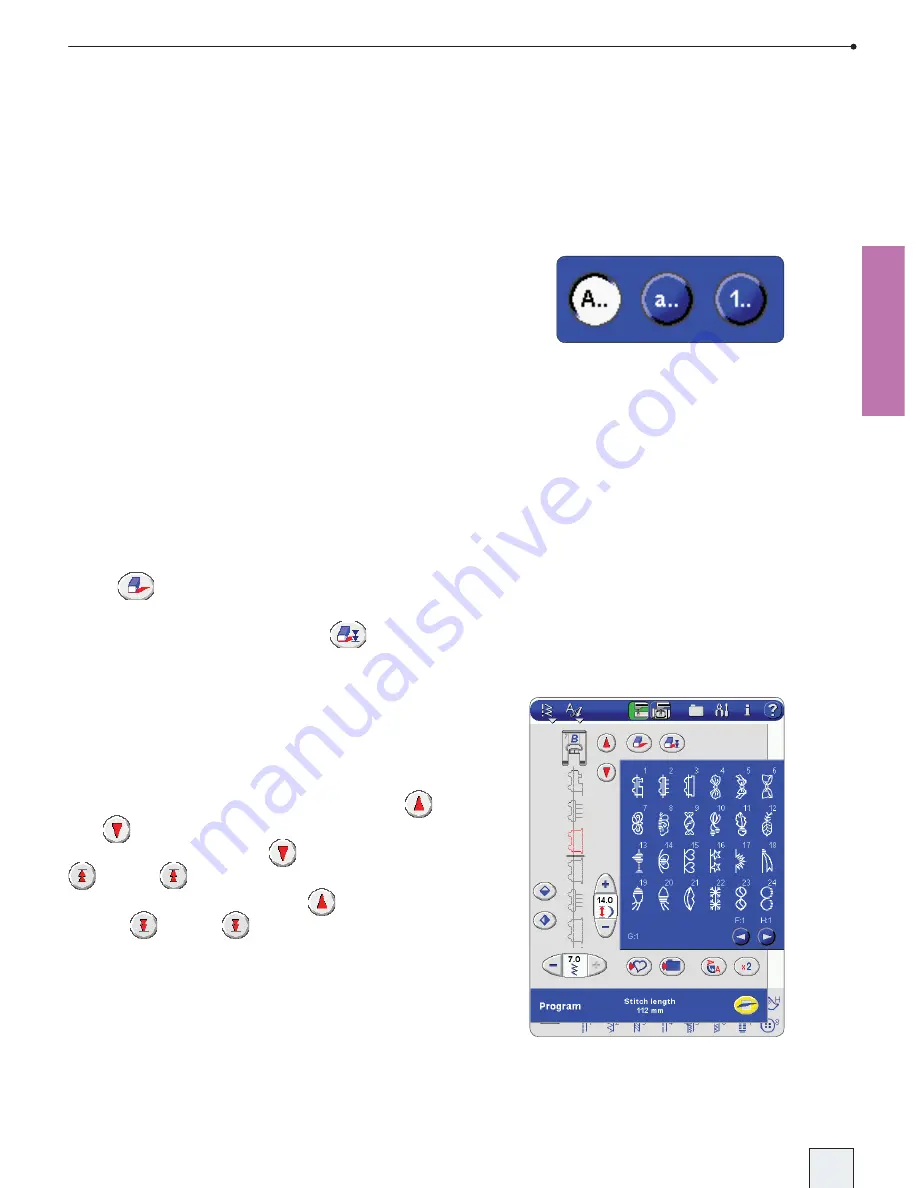
To program a combination, simply touch your
desired stitch and it appears under the presser
foot on the screen. Touch another stitch and it
will appear below the previous one. Continue
selecting stitches and letters.
Font Style Menus
For each font there are different style menus,
for example: upper case letters
A..
, lower case
letters
a..
and number and special characters
1..
.
Depending on selected font, the style menus can
differ. Touch the button to select a style menu.
Add a Stitch or Letter
To add a stitch or letter to a stitch program,
place the cursor where you wish to add it.
Touch the desired stitch, and it is inserted at the
cursor position.
Delete Stitch(es) or Letter(s)
Use the buttons above the stitch area to delete
stitches. To delete a stitch at the cursor position,
touch
.
To delete all stitches from the highlighted stitch
to the end of the program, touch
.
Change a Stitch or Letter
To change a stitch you must delete it and insert
the stitch you want instead.
Adjust Individual Stitches/Letters in Program
To adjust stitches in the program, move the
cursor back and forth stitch by stitch using
and
. When the cursor is positioned at the
very end of the program,
has the symbol
. Touch
to quickly move the cursor to
the beginning of the program.
now has the
symbol
. Touch
to move the cursor to
the end of the program.
A stitch is adjustable when it is highlighted in
red. Use the mirroring, stitch length and stitch
width buttons to adjust the stitch. Only the
stitch highlighted in red will be affected by the
adjustments.
DSE 05 Kap 2.indd 2-11
05-09-16 11.37.28
Summary of Contents for Designer SE
Page 1: ...User s Guide KEEPING THE WORLD SEWING ...
Page 29: ...2 1 Sewing Mode ...
Page 46: ...2 18 Sewing Mode ...
Page 47: ...Set to Embroider ...
Page 55: ...4 1 Interactive 3D Embroidery Embroidery Mode ...
Page 77: ...5 1 File Manager ...
Page 87: ...Care of your Designer SE ...


