Humzor NEXZDAS PRO Manual Download Page 14


14

5


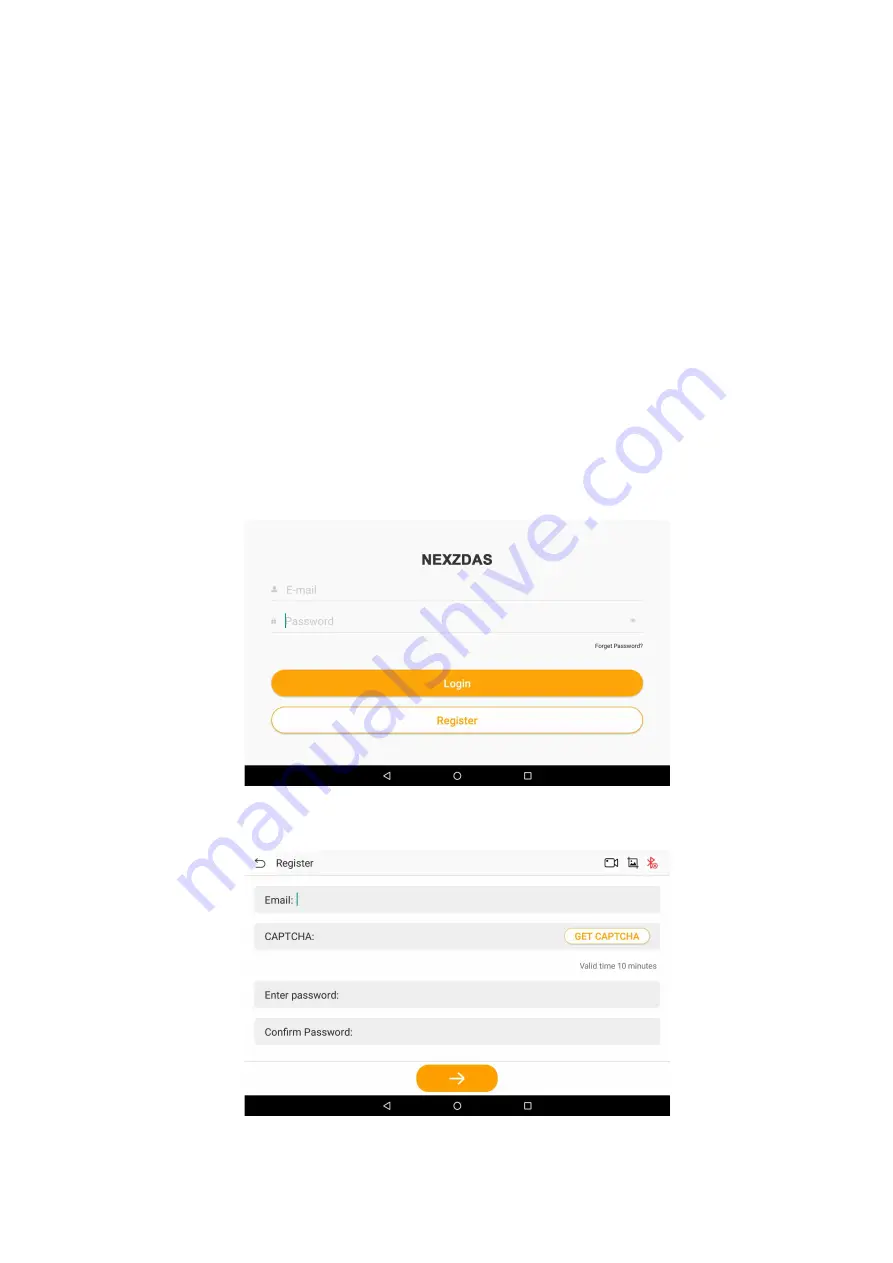
Product Registration and Login 

5.1 User Registration 

When you access the "NEXZDAS" application for the first time, you need to follow the steps below to 

register: 

1. Click the "NEXZDAS" icon on the desktop to open the application. 
2. On the Login interface, click the "Register" button to enter the registration interface. 
3. Enter your mailbox or mobile phone number in the "Email" column. 
4. Click the "GET CAPTCHA" button to get your captcha. 
5. Enter the captcha you obtained in the "CAPTCHA" column. 
6. Set up your password in the "Enter password" field, and enter your password again in the "Confirm 

Password" field. 

7. Click the "->" button at the bottom, once your email account, captcha, and password format are 

entered correctly, then the registration will be successful. 


Figure 5-1 Sample Login and Registration Interface 


www.obdii365.com

Summary of Contents for NEXZDAS PRO

Page 1: ...the product specifications functions and illustrations HUMZOR will not be liable for any direct special incidental indirect damages or any economic consequential damages including lost profits IMPORTA...

Page 2: ...ls test equipment etc away from all moving or hot engine parts Operate the vehicle in a well ventilated work area for exhaust gases are poisonous Put the transmission in PARK for automatic transmissio...

Page 3: ...ON AND LOGIN 14 5 1 USER REGISTRATION 14 5 2 LOGIN 15 5 3 BLUETOOTH CONNECTION 20 6 DIAGNOSTICS 20 6 1 ESTABLISH VEHICLE COMMUNICATION 20 6 2 PROTOCOL SUPPORTED 21 6 3 GETTING STARTED 21 7 SPECIAL FUN...

Page 4: ...S 44 14 1 SYSTEM INFO 44 14 2 UNITS 44 14 3 SEARCH ENGINE 44 14 4 RUN MODE 45 14 5 LANGUAGE 45 15 OTHER 46 15 1 DATA PLAYBACK 46 15 2 DATA MANAGE 46 16 NAVIGATION BAR 48 16 1 RECORD VIDEO 48 16 2 SCRE...

Page 5: ...if not avoided may result in damage to the tablet or vehicle 1 1 3 Illustrations Illustrations used in this manual are samples and the actual testing screen may vary for each vehicle being tested Obs...

Page 6: ...d from experienced industry experts but provides step by step guidance to ensure the repair is done correctly and efficiently There are two main components to the NEXZDAS PRO ND366 system NEXZDAS Tabl...

Page 7: ...ging port 6 DC Power supply input port 7 Volume button for up and down 8 Reset button for restart tablet 9 Power button 10 Collapsible Stand extends from the back to allow hands free viewing of the ta...

Page 8: ...ct Parameters Appearance Size 250 1 171 7 8mm Accessories LCD specification 10 1 inch 800 1280 1200 1920 TP specification G G COB COF compatible with 5 10point Camera Front 2M 5M compatible with0 3M R...

Page 9: ...UDS SAE J2411 Single Wire Can GMLAN ISO 11897 2 ISO 11897 3 SAE J2819 TP20 TP16 ISO 9141 ISO 14230 SAE J2610 Chrysler SCI UART Echo Byte SAE J2809 Honda Diagnose H SAE J2740 GM ALDL SAE J1567 CCD BUS...

Page 10: ...tems of the car and then generate professional diagnosis reports Special customization special functions are supported such as Oil reset TPMS EPB etc Support online DTC Query Remote Assistance one cli...

Page 11: ...ions Detailed descriptions of the menu structures are found in the chapters for each application 3 1 1 Application Buttons The table below briefly describes each of the applications in the NEXZDAS sys...

Page 12: ...s Name Button Description Feedback Collect the customer requirement or question to engineer team Video recorder Record user operation process and communication data Camera Take a screenshot and save t...

Page 13: ...s press and hold the Lock Power Button 2 Tap Power off option 3 Tap OK 3 2 1 Reboot System In case of system crash long press the Lock Power button and tap reboot to restart the system 4 Software Inst...

Page 14: ...nterface 3 Enter your mailbox or mobile phone number in the Email column 4 Click the GET CAPTCHA button to get your captcha 5 Enter the captcha you obtained in the CAPTCHA column 6 Set up your passwor...

Page 15: ...login will be successful and the system will guide you to the serial number binding and selection interface 5 2 1 Change Password If you forget your password or need to set a new password you can foll...

Page 16: ...d a new product button and the Binding serial number interface will pop up b Enter the serial number S N of the device you purchased in the Serial number field and enter the Activation code of the dev...

Page 17: ...elete button that slides out to successfully delete the serial number Figure 5 6 Sample Delete Serial Number 5 2 5 Product Selection 1 Click the product serial number you need to enter and the icon on...

Page 18: ...pt Box 3 In Location interface if the switch on the right side of the Use location column is not turned on please click the on switch Figure 5 9 Sample Location Interface Figure 5 10 Sample Location S...

Page 19: ...itioning is not turned on Figure 5 11 Sample Location Icon 2 7 Click the icon on the right side of the top navigation bar In the pop up location permission prompt box click the OK button Figure 5 12 S...

Page 20: ...ation cannot automatically connect to your VCI device or the device fails to connect please click the icon button on the top right to reconnect or check whether the VCI is well connected to the car s...

Page 21: ...ach device has its own termination Single CAN offers baud rates up to 33 3 Kbit s up to 88 3 Kbit s for high speed mode J1939 CAN is used in the commercial vehicle area for communication throughout th...

Page 22: ...Manufacturer buttons display the various vehicle brand names Select the manufacturer button after the VCCI device is properly connected to the test vehicle to start a diagnostic session Select EUROPE...

Page 23: ...or vehicles that do not support the Auto VIN diagnose function the NEXZDAS diagnostic system allows you to enter the vehicle brand manually Figure 6 4 Sample Manual Selection 6 3 2 2 Vehicle Select by...

Page 24: ...ap ENTER The vehicle will be identified and matched to the vehicle database and the Vehicle Diagnostics screen will display 5 Tap the cross icon on the top right corner to exit Manual Input Figure 6 5...

Page 25: ...e Quick Test function performs a comprehensive scanning of all the systems in the vehicle ECU to locate faults and retrieve DTCs Tap Fault to start Systems with no faults detected will display in blue...

Page 26: ...de System information displays detailed ECU information Select to display information screen Trouble codes contains Read Codes and Erase Codes The former displays detailed DTC information retrieved fr...

Page 27: ...tested control unit including unit type and version numbers Figure 6 11 Sample ECU Information Screen 6 3 6 Trouble Codes 6 3 6 1 Read Codes This function retrieves and displays the DTCs from the veh...

Page 28: ...DTCs are read and needed repairs are performed before erasing codes Read DTCs retrieves and displays the DTCs from the vehicle control system The Read Codes screen varies for each vehicle being teste...

Page 29: ...le Clear DTCs Screen 2 6 3 7 Live Data When this function is selected the screen displays the data list for the selected module The parameters display in the order that they are transmitted by the ECU...

Page 30: ...vehicle Select test from menu option Follow the instructions displayed on screen to complete test Procedures and instructions vary by vehicle Figure 6 17 Sample Active Test Screen The functional butt...

Page 31: ...le Special Function Screen 1 For example Click on Special Function BATTERY Europe BMW interface as image such as Figure 7 2 Sample Special Function Screen 2 Figure 7 3 Sample Special Function Screen 3...

Page 32: ...32 Figure 7 4 Sample Special Function Screen 4 Figure 7 5 Sample Special Function Screen 5 Figure 7 6 Sample Special Function Screen 6 www obdii365 com...

Page 33: ...ons perform various key programmer including add and erase keys reset immobilizer replace engine or immobilizer ECU and so on For example Click on Key Programming ASIA HYUNDAI Agree Calculator Securit...

Page 34: ...ple Key Programmer Screen 2 Figure 8 3 Sample Key Programmer Screen 3 Figure 8 4 Sample Key Programmer Screen 4 9 App Store You can download the model or function you need through the following steps...

Page 35: ...at the top to display the Vehicle interface 2 Click the car model icon or click the icon button at the bottom left to select single or multiple car models 3 If you need to find a certain car model yo...

Page 36: ...to select single or multiple model functions 3 If you need to inquire about a certain function you can click the icon button in the upper left corner of the top and enter the name of the function you...

Page 37: ...o select single or multiple car models 3 If you need to find a certain car model you can click the icon button at the top left corner and enter the car model name you need to search in the Please ente...

Page 38: ...slide down to query the DTC you need to view or enter the ID of the DTC you want to query in the Searching Code input box 3 Click on the globe icon on the right to jump to the Google webpage and quer...

Page 39: ...terface 12 Personal On the HUMZOR main interface click the Personal icon button and the system will guide you to the Personal interface 12 1 Editing Personal Information If you need to add or modify s...

Page 40: ...ation Interface 2 12 2 Upgrade If your NEXZDAS application is not the latest version you can upgrade the application version through the following steps 1 On the Personal interface click the Upgrade i...

Page 41: ...is downloaded successfully click the INSTALL button to start the installation Figure 12 4 Sample Upgrade Interface 2 4 After installation click the OPEN button then the upgrade completes successfully...

Page 42: ...e NEXZDAS login interface 12 5 Remote Assistance If you need some remote assistance when using the NEXZDAS application you can get help in the following ways 1 On the HUMZOR main interface click the R...

Page 43: ...the left of the bottom tab bar to select all or cancel all 4 After selecting the vehicle or function for which you need feedback click the icon button at the bottom right to successfully return to th...

Page 44: ...Settings interface 14 1 System Info Figure 14 1 Sample System Info Interface 14 2 Units In the Settings interface click the Units button to switch the units Figure 14 2 Sample Units Interface 14 3 Sea...

Page 45: ...een modes Figure 14 4 Sample Run Mode Interface 14 5 Language You can switch the display language through the following steps 1 On the Settings interface click Language the system will guide you to th...

Page 46: ...the other interface Figure 15 1 Sample Other Interface 15 1 Data Playback Data stream playback function 15 2 Data Manage You can manage the downloaded models functions screen recordings screenshots et...

Page 47: ...a Manage Interface 1 3 If you need to manage the models and functions downloaded in the APP store in the NEXZDAS application click the APPS button on the left Click the icon or click the icon button a...

Page 48: ...are Screen recording Screenshot Bluetooth connection 16 1 Record Video When you use the NEXZDAS application you can do the following steps to record video 1 On the main interface of HUMZOR click the i...

Page 49: ...When you use the NEXZDAS application you can save a screenshot of the current interface through the following steps On the main interface of HUMZOR click the icon on the right side of the top navigati...

Reviews: