background image

Create a New Route

1.

Open a Group:

Use the 4-WAY Cursor Control key to open the group

(where you want to save the new route). Home is the highest level
group, or the main directory, in the Waypoint Management dialog box.

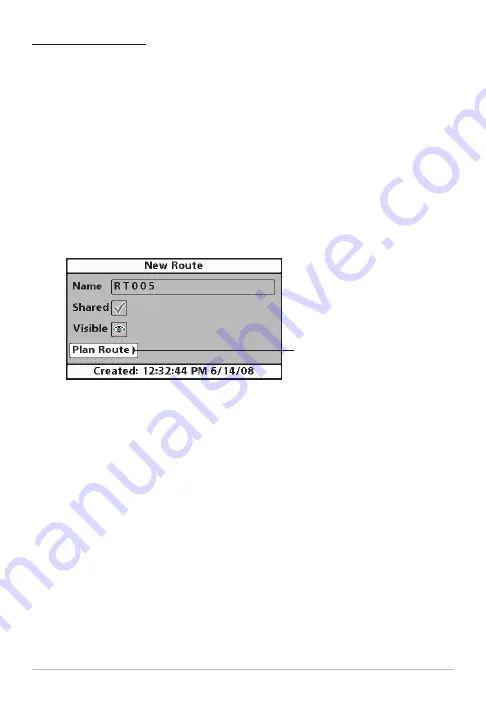
2. Select Options > New > New Route.

3.

New Route Dialog Box:

Use the 4-WAY Cursor Control key to set the

available fields (see

Customize your Wayoints, Routes, Tracks, and

Groups

for details). You can name the route, set the InterLink™ share

or lock, and set the route to hidden or visible on the Chart Views.

4.

Plan Route:

Select Plan Route, and press the RIGHT Cursor key. The

New Route dialog box closes so that you can select waypoints from
the Waypoint Management dialog box.

5.

Add Waypoints:

Press the UP or DOWN Cursor keys to scroll through

the available waypoints. To add a selected waypoint to the route, press
the RIGHT Cursor key. Repeat as needed. See the illustration

Adding

Waypoints to a Route

in this section.

6.

Save:

When you are finished adding waypoints to the route, press the

EXIT key to select Save. Press the RIGHT Cursor key to confirm your
changes.

Creating a New Route

Select Plan Route, and
press the RIGHT Cursor key.

20

Routes

Summary of Contents for waypoint

Page 1: ...531815 1EN_A Waypoint Management Guide Waypoint Management Guide...

Page 2: ...t charts not to replace them Only official government charts and notices to mariners contain all of the current information needed for the safety of navigation and the captain is responsible for their...

Page 3: ...rement This symbol WEEE wheelie bin on product indicates the product must not be disposed of with other household refuse It must be disposed of and collected for recycling and recovery of waste EEE Hu...

Page 4: ...d Waypoint 7 Move the Cursor to a Selected Waypoint 7 Travel a Saved Route 8 Save the Current Route 8 Save the Current Track 8 Clear the Current Track 8 Cancel Navigation 8 Customize your Waypoints Ro...

Page 5: ...u 24 Edit a Saved Track 25 Delete a Saved Track 25 Groups 26 Open the Group Submenu 26 Set a Group as the Default Directory 27 Create a New Group 28 Add Remove Navigation Items 29 Edit a Group 30 Dele...

Page 6: ......

Page 7: ...ment on your control head and the related features on HumminbirdPC Use the instructions in this section to confirm that you have the latest available software Required Equipment Personal computer with...

Page 8: ...ware and run through a series of prompts to confirm the software installation Waypoint Management Overview We recommend that you read this guide completely to understand the waypoint management featur...

Page 9: ...the Waypoint Management Dialog Box 1 Press the MENU key twice to open the Main Menu 2 Press the RIGHT Cursor key until the Navigation Menu Tab is selected 3 Press the DOWN Cursor key to choose Waypoi...

Page 10: ...to the higher level group or the higher level directory press the LEFT Cursor key As you scroll through the Waypoint Management dialog box press the EXIT key to select the Options menu quickly Press...

Page 11: ...fault group This field also changes to display instructions Directory Shows the directory structure and the currently selected group The illustration shows group GP070 as the selected group Arrows Whe...

Page 12: ...es link two or more waypoints together to create a path for navigation and are used in trip planning A route represents your intended navigation and shows the shortest path from each waypoint to the n...

Page 13: ...visibility and more Start Navigation to a Selected Waypoint 1 In a Chart View use the 4 WAY Cursor Control key to select a waypoint 2 Press the GOTO key If your unit does not have a GOTO key press th...

Page 14: ...e X Press Menu Press the RIGHT Cursor key to confirm Save the Current Track 1 From a Chart View press the MENU key once 2 Select Save Current Track from the X Press Menu Press the RIGHT Cursor key to...

Page 15: ...lows you to select more than one navigation item and apply settings or actions to them at the same time You can also use Options Select All and to apply settings or actions to all of the navigation it...

Page 16: ...All to view all available icons All Geometry Alerts Supplies Navigation Recreation Fish Environment Icon Press the UP or DOWN Cursor keys to scroll through the available icons used to represent the se...

Page 17: ...he menu option Edit Opens the Edit Waypoint dialog box see Waypoints Edit a Waypoint Delete Deletes the waypoint To remove the waypoint from the group choose Selected To delete the waypoint from all g...

Page 18: ...see Introduction to Navigation Target Applies a target to the selected waypoint in chart views Grid Applies a grid to the selected waypoint in chart views NOTE In any Chart or Combo View press the MEN...

Page 19: ...r key to confirm your changes Delete a Waypoint 1 Select a waypoint and press the RIGHT Cursor key 2 Select Delete from the submenu and press the RIGHT Cursor key To remove the waypoint from the group...

Page 20: ...Cursor key 2 Select Edit from the Waypoint submenu and press the RIGHT Cursor key 3 Use the 4 WAY Cursor Control key to edit the available fields see Customize your Waypoints Routes Tracks and Groups...

Page 21: ...ntil the Navigation tab is selected 2 Select Waypoint Settings and press the RIGHT Cursor key 3 The Waypoint Settings can be set as follows Icon Category Press the UP or DOWN Cursor keys to scroll thr...

Page 22: ...ou mark a waypoint you will be prompted to change the waypoint icon and category To accept the current settings press the MARK key again 4 Select Save and press the RIGHT Cursor key to confirm your ch...

Page 23: ...ys to scroll through the waypoints To select a waypoint highlight it and press the RIGHT Cursor key The selected waypoints are highlighted in blue Repeat as needed 3 Select Icon Press the EXIT key to...

Page 24: ...te Travel Starts navigation on the selected route in forward or reverse See Introduction to Navigation Add Remove Copies waypoints into the route or deletes waypoints from the route See Routes Add Rem...

Page 25: ...from the selected group to a different group see Search and Organize Info Opens the Route Info box and displays the waypoints in the route The distance and bearing from each waypoint to the next as w...

Page 26: ...hidden or visible on the Chart Views 4 Plan Route Select Plan Route and press the RIGHT Cursor key The New Route dialog box closes so that you can select waypoints from the Waypoint Management dialog...

Page 27: ...rm your changes Add Remove Waypoints Add Remove allows you to copy waypoints into a route or delete waypoints from a route 1 Select a route from the Waypoint Management dialog box and press the RIGHT...

Page 28: ...m your changes Adding Waypoints to a Route A confirmation displays each time you add a waypoint to the Route New Route Information Shows the Route s name and next steps Save Press the EXIT key to choo...

Page 29: ...ss the UP or DOWN Cursor keys 3 Press the EXIT key to select Save Press the RIGHT Cursor key to confirm your changes Delete a Route 1 Select a route and press the RIGHT Cursor key 2 Select Delete from...

Page 30: ...Track dialog box See Tracks Edit a Saved Track for details Delete Deletes the track To delete the track from the group choose Selected To delete the track from all groups choose All Instances Duplica...

Page 31: ...eld is only available when a line style is selected in the Style field 4 Select Save and press the RIGHT Cursor key to confirm your changes Delete a Saved Track 1 Select a track and press the RIGHT Cu...

Page 32: ...DOWN or UP Cursor keys to choose from the submenu and press the RIGHT Cursor key to select the menu option Open Opens the group so that you can see the saved waypoints routes and tracks in the group A...

Page 33: ...up and press the RIGHT Cursor key 2 Select Open from the submenu and press the RIGHT Cursor key 3 Select Options Set as Default All new waypoints routes and tracks will be saved directly to this group...

Page 34: ...so you can select items from the Waypoint Management dialog box You can also leave the group empty and add to it later Press the UP or DOWN Cursor keys to choose a waypoint route or track and press th...

Page 35: ...e illustration Adding a Waypoint to the Group NOTE When you add an item to a group it is a copy or an instance If you make changes to a copy the changes will be made to all copies Remove Press the RIG...

Page 36: ...s see Customize your Waypoints Routes Tracks and Groups for details 4 Select Save and press the RIGHT Cursor key to confirm your changes Delete a Group 1 Select a group and press the RIGHT Cursor key...

Page 37: ...HT or LEFT Cursor keys to move from space to space and press the UP or DOWN Cursor keys to set the letter or number 4 Select Enter and press the RIGHT Cursor key to start the search Duplicate or Move...

Page 38: ...the properties from the original but it will not be affected by changes to the original 1 Select a waypoint route or track and press the RIGHT Cursor key 2 Select Save As from the submenu and press th...

Page 39: ...lected group directory in the Waypoint Management dialog box select Options Select Multiple and Export 2 Select Items Press the UP or DOWN Cursor keys to scroll through the waypoints routes and tracks...

Page 40: ...ys By Telephone Monday Friday 8 00 a m to 4 30 p m Central Standard Time 1 800 633 1468 By e mail typically we respond to your e mail within three business days service humminbird com For direct shipp...

Reviews: