background image

Saved Tracks

Saved Tracks

allows you to view the Saved

Tracks submenu.

To view the Saved Tracks Submenu:

1. Highlight Saved Tracks on the Navigation main menu.

2. Use the RIGHT 4-WAY Cursor Control keys to view the Saved Tracks

submenu.

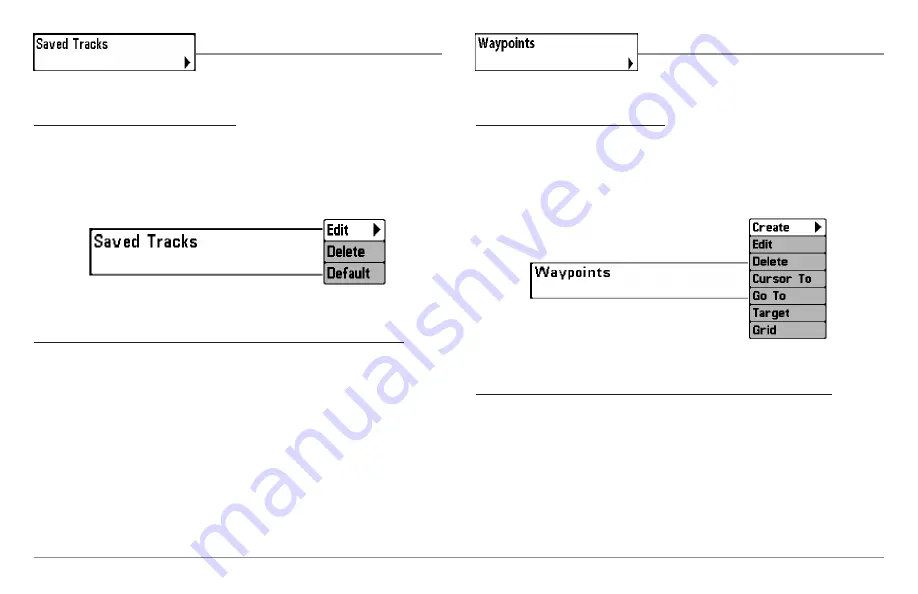
The Saved Tracks Submenu contains the following menu choices:

Edit

allows you to select a previously-saved track and edit its name, whether

it is visible or not, and its appearance.

Delete

allows you to delete a track from a list of previously-saved tracks.

Default

sets the appearance of the track created by selecting Save Current

Track.

Waypoints

Waypoints

allows you to view the Waypoints

submenu.

To view the Waypoints Submenu:

1. Highlight Waypoints on the Navigation main menu.

2. Use the RIGHT 4-WAY Cursor Control keys to view the Waypoints

submenu.

The Waypoints Submenu contains the following menu choices:

Create

allows you to create a new waypoint and edit it immediately. The

current boat position will be used as the default, but you can set the
coordinates to any valid position. The Icon used to represent the waypoint in
the Chart and Combo Views can also be changed.

Edit

allows you to choose from a list of previously-saved waypoints, then edit

the Name, Position (Latitude and Longitude) and select the Icon that will be
used to represent the waypoint in the Chart and Combo Views.

Waypoints Submenu

Saved Tracks Submenu

95

Summary of Contents for 997c SI Combo

Page 1: ......

Page 2: ...uickly to allow time for you to react Always operate the boat at very slow speeds if you suspect shallow water or submerged objects WARNING Disassembly and repair of this electronic unit should only b...

Page 3: ...nd Finish the Transducer Installation 20 GPS Receiver Installation 21 Stem Mounting with an Existing 1 14 Thread Stem 21 Access Under Mounting Location 22 No Access Under Mounting Location 23 Finish R...

Page 4: ...osition 60 Add a Waypoint Target or Trolling Grid 60 Save Edit or Delete a Route 61 Save or Clear a Current Track 62 Edit Delete or Hide Saved Tracks 62 Man Overboard MOB Navigation 63 The Menu System...

Page 5: ...shot and Recording View only 81 Start Recording optional purchase MMC SD Card Snapshot and Recording View only 82 Stop Recording optional purchase MMC SD Card only 82 Delete Image optional purchase MM...

Page 6: ...ange 98 Map Datum Advanced 98 Course Projection Line 99 Export All Nav Data Advanced 99 Delete All Nav Data Advanced 99 Continuous Navigation Mode 99 Chart Menu Tab 100 Chart Detail Level 100 Map Bord...

Page 7: ...e Cause of Noise 122 1 Year Limited Warranty 123 Humminbird Service Policy 123 900 Series Accessories 125 Specifications 127 Glossary 128 Appendix A Transducer Mounting Template XHS 9 HDSI 180 T 138 C...

Page 8: ......

Page 9: ...reflected off of an object it then uses the reflected signal to interpret location size and composition of an object Sonar is very fast A sound wave can travel from the surface to a depth of 240 ft 70...

Page 10: ...vercome noise better high speed performance and enhanced depth capability High Definition Side Imaging Sonar Your 900 Series 997c SI Combo uses Side Imaging sonar to provide a wide yet precise survey...

Page 11: ...cted by such factors as boat speed wave action bottom hardness water conditions and transducer installation QuadraBeam PLUS Sonar optional purchase QuadraBeam PLUS transducer only Your 900 Series 997c...

Page 12: ...lities typically within 4 5 meters depending on conditions This means that 95 of the time the GPS receiver will read a location within 4 5 meters of your actual position Your GPS Receiver also uses in...

Page 13: ...es Fishing System also has a multi media card MMC SD slot that is used to insert optional purchase cards containing additional detailed maps If you insert an MMC SD that contains a more detailed chart...

Page 14: ...additional details NOTE Accessories to enable WeatherSense and the SmartCast Wireless Sonar Link require separate purchases You can visit our website at www humminbird com or contact our Customer Reso...

Page 15: ...NOTE Accessories may require a separate purchase You can visit our website at www humminbird com to order these accessories online or contact our Customer Resource Center at 1 800 633 1468 Control He...

Page 16: ...lass hulls it is best to start with a smaller bit and use progressively larger drill bits to reduce the chance of chipping or flaking the outer coating Fill all holes with marine grade silicone sealan...

Page 17: ...o mark the position of the two mounting screws Remove the hole cover drill the two mounting holes using a 9 64 3 5 mm bit fill them with marine grade silicone then replace the hole cover and insert th...

Page 18: ...careful not to force the connectors into the wrong slots If you don t have a cable for every hole in the insert install the blank plugs to protect the control head from the weather 1 Cables Routed Dir...

Page 19: ...tallation so be careful not to force the connectors into the wrong sockets Once the cable collector and all cables are plugged into the back of the control head lock the assembly into place by threadi...

Page 20: ...the proper selection and installation of a 3 amp fuse NOTE In order to minimize the potential for interference with other marine electronics a separate power source such as a second battery may be nec...

Page 21: ...ating NOTE Due to the wide variety of hulls only general instructions are presented in this installation guide Each boat hull represents a unique set of requirements that should be evaluated prior to...

Page 22: ...he best location on the transom to install the transducer Consider the following to find the best location It is very important to locate the transducer in an area which is relatively free of turbulen...

Page 23: ...oat 1 Remove the transducer mounting template from this manual See Appendix A for the Transducer Mounting Template 2 Hold the template on the transom of the boat in the location where the transducer w...

Page 24: ...e transducer 1 Attach the pivot to the transducer body using the two 1 4 20 x 5 8 16 mm machine screws toothed washers and square nuts The toothed washers must fit on the inside of the transducer ears...

Page 25: ...ssary to tweak the installation after high speed testing To adjust the running position of the transducer The transducer mounting bracket allows height and tilt adjustment while the pivot bolt allows...

Page 26: ...existing wiring channel or conduit that you can use for the transducer cable 1 Unplug the other end of the transducer cable from the control head Make sure that the cable is long enough to accommodat...

Page 27: ...sducer on a trolling motor use this procedure Several styles of the transducer are compatible with trolling motor mounting If you have a trolling motor bracket refer to the separate installation instr...

Page 28: ...fully submerged since the sonar signal cannot pass through air 4 If the unit is working properly gradually increase the boat speed to test high speed performance If the unit functions well at low spe...

Page 29: ...PS receiver Preplan and test the cable routing to your control head before any drilling or cutting of your boat surfaces If you have purchased hardware to stem mount your GPS receiver follow the instr...

Page 30: ...ails may vary with unit configuration 2 Mark the mounting location and drill a 3 4 19 mm hole for the cable and cable plug Route the cable 3 Cover the cable hole with the receiver Make sure the receiv...

Page 31: ...has two wire routing notches Use the cable notch closest to the intended cable route 4 With the cable routed position the GPS receiver in the planned mounting location and mark the mounting holes with...

Page 32: ...ar NOTE If you wait too long the system will default to whichever menu mode happens to be highlighted and you will have to start again 2 Self Test displays results from the internal diagnostic self te...

Page 33: ...e information Powering Up the Control Head Turn on your 900 Series control head by pressing the POWER key The Title screen is displayed until the 900 Series begins operation Your 900 Series will begin...

Page 34: ...es traveled 2 7 Distance Distance traveled with Speed accessory or GPS Receiver 3 Average Speed Average speed reading with Speed accessory or GPS Receiver 4 Thermoclines layers of water with different...

Page 35: ...t side of the display in the Sonar View only The RTS Window always updates at the fastest rate possible for depth conditions and shows only the returns from the bottom structure and fish that are with...

Page 36: ...roken random appearance NOTE A sloping bottom will be represented as a thicker line across the display Harder bottoms typically will be displayed with red and softer bottoms typically will be displaye...

Page 37: ...sest to the boat icon at the top of the display are the most recent sonar data The information is scrolled down the screen as new data drawn at the top of the screen becomes available The side beams c...

Page 38: ...hed the 900 Series can display the speed of the boat and can keep a triplog of nautical or statute miles traveled 7 Timer Elapsed time with Speed accessory or GPS Receiver The water column shows the r...

Page 39: ...graphy and how structure is oriented for more efficient fishing Saltwater anglers pick up precise details of popular fishing structure like wrecks reefs humps and drop offs as well as being able to sp...

Page 40: ...s perpendicular to the waves instead of parallel with the waves in order to minimize the side to side rocking of the boat Beam Coverage When there is an area directly under the boat that does not have...

Page 41: ...imber Plus Bait Fish Bait fish 1 1 Submerged Swimming Pool Swimming pool 1 1 Standing and fallen timber 2 2 Submerged Bridge A Closer Perspective Submerged Bridge 1 1 Submerged Bridge Alternative Pers...

Page 42: ...y EXIT key VIEW key 4 WAY Cursor Control key MENU key VIEW PRESET keys MARK key GOTO key INFO key ZOOM keys POWER LIGHT Key The POWER LIGHT key is used to turn the 900 Series on and off and also to ad...

Page 43: ...p Options Menu Press the MENU key during the power up sequence to view the Start Up Options menu X Press Menu Press the MENU key once for the X Press Menu The X Press Menu allows you to access frequen...

Page 44: ...ys are used to control the speed of playback NOTE Menu choices are implemented and saved immediately no further action is required VIEW PRESET Keys The VIEW PRESET keys are used to program your three...

Page 45: ...if Screen Snapshot is enabled but there is no GPS receiver connected pressing the MARK key will capture the screen image and display an error saying that a GPS position fix is required to create a way...

Page 46: ...Views Menu tab NOTE When you change any menu settings that affect the sonar the view will update immediately i e you don t have to exit the menu to apply the change to the screen Side Imaging View Son...

Page 47: ...r less detail the range of the side beams the scrolling speed of the chart and the color scheme of the display all from the Side Imaging X Press Menu See Side Imaging X Press Menu as well as Understan...

Page 48: ...cursor and cursor dialog box will be displayed on the screen The cursor can be positioned on the display using the 4 WAY Cursor Control key to determine the depth of any sonar return The RTS Window c...

Page 49: ...Level or magnification is displayed in the upper left corner and can be changed to suit conditions Upper and Lower Zoom Depth Range numbers indicate the depth of the water which is being viewed Freez...

Page 50: ...the 4 WAY Cursor Control key will freeze the screen in this view and a cursor and cursor dialog box will be displayed on the screen The cursor can be positioned on the display using the 4 WAY Cursor C...

Page 51: ...screen see Sonar X Press Menu Split Position or Side Imaging X Press Menu Split Position for more information In this view you can change which side you look at the sensitivity of the sonar to allow y...

Page 52: ...icons in this view The selected thumbnail or icon will be highlighted with arrows NOTE The speed of the screen capture or of the recording depends on the type of card you use in general SD cards captu...

Page 53: ...e your cursor is on the screen and the screen will freeze while the snapshot is being saved to the MMC SD card A status dialog box will appear that shows the progress of the save as a percentage and t...

Page 54: ...the bottom of the screen shows the progress of the recording as well as how much space is remaining on the MMC SD card NOTE The waypoints that are created by a recording have the same name as the fil...

Page 55: ...g View only playback speed can also be changed using the Left and Right 4 Way Cursor keys Playback is paused when the sonar cursor is active and resumes playing when the cursor is removed Playback is...

Page 56: ...X Press menu when in Side Beam View the display will represent the same sonar data in one of the following three layouts Default Classic and Slanted Default layout The top portion of the display prese...

Page 57: ...ts the sonar information from the side looking beams reveals bottom contour structure and fish similar to the down looking beam but the area covered is to the left and right of the area shown in the d...

Page 58: ...o move and turn the eye point so that you can look off to the sides or even behind the boat Pressing the RIGHT or LEFT arrow keys on the 4 WAY Cursor key turns the eye point right or left while pressi...

Page 59: ...active You can also adjust the size of the left side of a split screen see Sonar X Press Menu Split Position or Navigation X Press Menu Split Position for more information NOTE See Bird s Eye View an...

Page 60: ...more information A green arrow points to the side that is active You can also adjust the size of the left side of a split screen see Sonar X Press Menu Split Position or Navigation X Press Menu Split...

Page 61: ...aid on the chart You can use the 4 WAY Cursor Control key to shift pan the chart to another area You can use the ZOOM keys to zoom in and out You can use the INFO key to get information on the chart o...

Page 62: ...more information A green arrow points to the side that is active You can also adjust the size of the left side of a split screen see Sonar X Press Menu Split Position or Navigation X Press Menu Split...

Page 63: ...en arrow points to the side that is active You can also adjust the size of the left side of a split screen see Navigation X Press Menu Split Position or Side Imaging X Press Menu Split Position for mo...

Page 64: ...rsor is drawn at the top of the screen and is linked to the boat by a yellow line even if the boat is off the screen At the same time a cursor dialog box is displayed at the top of the screen with the...

Page 65: ...to remove the information box and the Bullseye Cursor will be centered over the tide station position The cursor information boxes will indicate the distance and bearing to the tide station from your...

Page 66: ...h contain up to 50 waypoints Tracks consist of detailed position history and are displayed as a breadcrumb trail of trackpoints The Current Track shows the position history since the unit was powered...

Page 67: ...reate option and press the RIGHT Cursor key Use the Cursor keys to program a waypoint name latitude longitude and icon before selecting Save Edit a waypoint From the Waypoints submenu select Edit and...

Page 68: ...nd press the RIGHT Cursor key Canceling navigation removes the route and any waypoints created using the GOTO key but does not remove any saved routes from memory You will be prompted to save the curr...

Page 69: ...From any view press the MENU key twice to display the Main Menu System then use the RIGHT Cursor key to select the Navigation tab Select Routes and press the RIGHT Cursor key to display the Routes sub...

Page 70: ...to display the Main Menu System then use the RIGHT Cursor key to select the Navigation tab Select Tracks and press the RIGHT Cursor key to display the Tracks submenu Edit a saved track From the Track...

Page 71: ...nd an additional info box that shows the lat lon position of the MOB waypoint and the elapsed time since MOB was activated is added to the Chart View It is not possible to re activate MOB or modify th...

Page 72: ...ews and Accessories Press the MENU key twice for the Main Menu then use the 4 WAY Cursor LEFT or RIGHT key to select a tab and use the DOWN or UP key to select a specific menu item under that tab then...

Page 73: ...is displayed to access the Start Up Options menu Use the UP or DOWN 4 WAY Cursor keys to position the cursor then the RIGHT Cursor key to select one of the following choices If you wait too long the s...

Page 74: ...y actually do when in Normal operation NOTE To get the full benefit of the Simulator it is important to select Simulator manually from the Start Up Options menu as opposed to letting the 900 Series en...

Page 75: ...Board PCB serial number software revision total hours of operation and the input voltage Accessory Test Accessory Test lists the accessories connected to the system NOTE The speed accessory will be d...

Page 76: ...ng monitored but is not yet being used This view also reports the current position local time and date and other numeric information The current GPS Fix Type is reported as No Fix 2D Fix 3D Fix or Enh...

Page 77: ...ve Side allows you to select which side of a Combo View will be active key presses will only affect the active side of the screen When a menu is displayed the non active side of the screen will be gra...

Page 78: ...30 40 50 60 70 Right Default varies Sensitivity Sensitivity controls how much detail is shown on the display Increasing the sensitivity shows more sonar returns from small baitfish and suspended debr...

Page 79: ...together to view a specific depth range manually when looking for fish or bottom structure will be displayed in the lower right corner of the screen when you start manually adjusting the Lower Range...

Page 80: ...e Sonar X Press Menu 2 Use the LEFT or RIGHT 4 WAY Cursor Control keys to increase or decrease the Chart Speed setting 1 10 where 1 Slowest 10 Fastest Default 5 Quad Layout with optional purchase Quad...

Page 81: ...the LEFT or RIGHT 4 WAY Cursor Control keys to change the Bottom Lock setting to on Off On Default Off 3 Once you turn on Bottom Lock the Bottom Range X Press menu choice will be displayed 10 60 feet...

Page 82: ...e Side 1 Highlight Active Side on the Side Imaging X Press Menu 2 Use the RIGHT 4 WAY Cursor Control key to change which side is active Left Right Default Left or Sonar Split Position Split Position a...

Page 83: ...ing Auto 1 to 20 where Low 1 High 20 Default 10 SI Range SI Range sets the deepest range that will displayed in the Side Imaging views The range must be set manually The SI Range menu choice can only...

Page 84: ...u The Navigation X Press Menu provides access to the settings most frequently used Press the MENU key once while in the Bird s Eye View the Chart or the Chart Sonar Combo Chart Chart Combo View or Cha...

Page 85: ...ft sets the left side of the screen to its smallest setting The Split Position menu choice is only available when a Combo View is active To Adjust Split Screen Position 1 Highlight Split Position on t...

Page 86: ...nt Save Current Track Save Current Track allows you to save the current track being displayed After the current track is saved a new current track is started To Save Current Track 1 Highlight Save Cur...

Page 87: ...o cancel skipping the next waypoint press the LEFT Cursor key Cancel Navigation Only when navigating Cancel Navigation discards the current route and exits Navigation Mode This menu choice will only a...

Page 88: ...ursor Control key to remove the grid Waypoint Name Most recently created waypoint Waypoint Name allows you to view the waypoints submenu for the most recently created waypoint NOTE You must have press...

Page 89: ...ints Grid allows you to apply a trolling grid to a waypoint selected from the list of waypoints Snapshot and Recording X Press Menu Snapshot and Recording View only The Snapshot and Recording X Press...

Page 90: ...talled To stop sonar recording 1 To stop recording highlight Stop Recording from any X Press menu 2 Press the RIGHT 4 Way Cursor key Delete Image optional purchase MMC SD Card Snapshot and Recording V...

Page 91: ...to delete or No to change your mind Delete Recording optional purchase MMC SD Card Snapshot and Recording View only Delete Recording allows you to delete a single sonar recording from the Snapshot and...

Page 92: ...1 Highlight Pings Per Second on the Snapshot and Recording X Press menu and press the RIGHT 4 Way Cursor key to increase and decrease the number in the menu bar 1 AUTO Default AUTO Playback Speed opt...

Page 93: ...of time memory left to play is indicated by the status bar For more information see Snapshot and Recording View Sonar Menu Tab Press the MENU key twice to access the Main Menu System and then press t...

Page 94: ...z narrow beam When set to 83 kHz the returns from the 83 kHz wide beam will be displayed in the Sonar View The Split Sonar View will continue to display returns from both beams in their respective win...

Page 95: ...ID is turned off the 900 Series shows only the raw sonar returns on the display These returns will often result in arches forming on the display indicating potential targets Due to the transducer bea...

Page 96: ...vity setting 1 Highlight Fish ID Sensitivity on the Sonar main menu 2 Use the LEFT or RIGHT 4 WAY Cursor Control keys to change the Fish Sensitivity setting Low 1 High 10 Default 5 Real Time Sonar RTS...

Page 97: ...z Sensitivity Advanced 83 kHz Sensitivity changes the sensitivity of the 83 kHz beam Increasing the 83 kHz Sensitivity will display additional weak returns and decreasing the 83 kHz Sensitivity will d...

Page 98: ...nd that the QuadraBeam PLUS transducer is connected then highlight 455 kHz Sensitivity on the Sonar Main Menu 2 Use the LEFT or RIGHT 4 WAY Cursor Control keys to change the 455 kHz Sensitivity 10 to...

Page 99: ...ise Filter adjusts the sonar Noise Filter to limit interference on the display from sources such as your boat engine turbulence or other sonar devices The Noise Filter menu choice is available when Us...

Page 100: ...the bottom The Max Depth menu choice is available when User Mode is set to Advanced see Setup Menu Tab User Mode To change the Max Depth setting 1 Make sure you are in Advanced User Mode then highlig...

Page 101: ...ual Beam Dual 50 200 Universal Sonar 2 Default Hi Def Sidescan Color Bar Color Bar allows you to display or suppress the display of the color bar shown in the full screen Sonar View To change the disp...

Page 102: ...menu choices Save Current Track allows you to save the current track Clear Current Track allows you to clear the current track Appearance allows you to change the style and color of the current track...

Page 103: ...ypoints allows you to view the Waypoints submenu To view the Waypoints Submenu 1 Highlight Waypoints on the Navigation main menu 2 Use the RIGHT 4 WAY Cursor Control keys to view the Waypoints submenu...

Page 104: ...mpty route and add waypoints to it immediately Edit allows you to select a previously saved route and edit its name and the waypoints on it Delete allows you to delete a route from a list of previousl...

Page 105: ...sor Control keys to change the Trolling Grid Rotation setting 0 to 89 Default 0 Trackpoint Interval Trackpoint Interval allows you to select the time period between trackpoints The current track can o...

Page 106: ...ion Track Color Range Track Color Range allows you to set the depth range that will be displayed as black the deepest depth when Color By Depth is selected as the style for the current track see Navig...

Page 107: ...ed in the slot then highlight Export All Nav Data on the Navigation main menu 2 Use the RIGHT 4 WAY Cursor Control key to export all navigation data Delete All Nav Data Advanced Delete All Nav Data al...

Page 108: ...dmarks ferryways and navigation routes in addition to the Basic information Underwater shows depth contours fishing areas underwater wrecks tides and currents in addition to the Basic and Navigation i...

Page 109: ...n Grid setting 1 Highlight Lat Lon Grid on the Navigation main menu 2 Use the LEFT or RIGHT 4 WAY Cursor Control keys to change the Lat Lon Grid setting Hidden Visible Default Hidden Spot Soundings Sp...

Page 110: ...4 WAY Cursor Control keys to change the Shaded Depth setting Off 1 to 60 Feet or 1 to 20 Meters International Units only Default 15 ft 5 m Set Simulation Position Advanced Set Simulation Position all...

Page 111: ...highlight Set Map Offset on the Navigation main menu 3 Use the RIGHT 4 WAY Cursor Control key to set the Map Offset A confirmation dialog box will appear to allow you to change your mind or to confirm...

Page 112: ...the menu setting To change the Depth Alarm setting 1 Highlight Depth Alarm on the Alarms main menu 2 Use the LEFT or RIGHT 4 WAY Cursor Control keys to change the Depth Alarm setting OFF 1 to 100 fee...

Page 113: ...Battery Alarm setting 1 Highlight Low Battery Alarm on the Alarms main menu 2 Use the LEFT or RIGHT 4 WAY Cursor Control keys to change the Low Battery Alarm setting Off 8 5V 13 5V Default Off Aux Tem...

Page 114: ...Way Cursor Control keys to change the Temp Alarm setting Off 32 120 Fahrenheit 0 50 Celsius International models only Default Off Off Course Alarm Off Course Alarm sounds when the boat has moved too f...

Page 115: ...val Alarm setting Off 25 to 3000 feet 10 to 1000 meters International models only Default 150 ft 50 m Drift Alarm Drift Alarm sounds when the boat has exceeded the distance from the boat s anchored po...

Page 116: ...2 Use the LEFT or RIGHT 4 WAY Cursor Control keys to change the Alarm Tone setting High Medium Low Default Medium Setup Menu Tab From any view press the MENU key twice to access the tabbed Main Menu...

Page 117: ...heit Default Celsius Units Distance with Speed input only Units Distance selects the units of measure for all distance related readouts To change the Units Distance setting 1 Highlight Units Distance...

Page 118: ...with Speed input only Triplog Reset resets the Triplog to zero The Triplog provides the following information timer for elapsed time distance traveled since last reset and average speed To Reset Trip...

Page 119: ...ating On Sonar only views as long as you are not navigating all 5 readouts are customizable Other Views Not Navigating On any view with a chart as long as you are not navigating two of the readouts ar...

Page 120: ...ed Depth Offset will adjust the digital depth readout to indicate depth from the waterline or boats keel Enter a positive vertical measurement from the transducer to the waterline to read the depth fr...

Page 121: ...o 10 0 degrees Default 0 0 or Off Speed Calibration Advanced with Speed paddlewheel only Speed Calibration will adjust the speed readout by the percentage entered and will appear in the menu if a Spee...

Page 122: ...dd dd mm mmm or dd mm ss Default dd mm mmm Time Format Advanced International only Time Format changes the time format used by the unit This menu choice is available only when in Advanced User Mode se...

Page 123: ...utput Advanced NMEA Output turns the NMEA output on or off This menu choice is available only when in Advanced User Mode see Setup Menu Tab User Mode The following NMEA sentences are output DPT Depth...

Page 124: ...fault On Views Menu Tab From any view press the MENU key twice to access the tabbed Main Menu System then press the RIGHT 4 WAY Cursor Control key until the Views tab is selected This menu tab allows...

Page 125: ...o change the status of the view from Hidden to Visible or vice versa Bird s Eye View Chart Bird s Eye Combo View Chart Chart Combo View Chart View Chart Sonar Combo View Chart Side Combo View Side Ima...

Page 126: ...tomatically Once you have created a screen capture a screen capture thumbnail is added to the Snapshot and Recording View and is available to view at a later date See the full sized image by highlight...

Page 127: ...o To view screen snapshots 1 Make sure that the optional purchase MMC SD card used to capture the screen is installed in your card slot 2 Press the VIEW key until you see the Snapshot and Recording Vi...

Page 128: ...orrosion from the battery terminals or wiring or actually replacing the battery if necessary 900 Series Defaults to Simulator with a Transducer Attached A connected and functioning transducer will cau...

Page 129: ...x of air and water flowing around the transducer cavitation may be interfering with the interpretation of sonar data See your Installation Guide for suggestions on adjusting the transducer position El...

Page 130: ...ears To determine whether the boat s engine is the source of the noise increase the RPMs while the boat is in neutral and stationary to see if the noise increases proportionately if noise appears when...

Page 131: ...BE THE CUSTOMER S EXCLUSIVE REMEDY EXCEPT FOR ANY APPLICABLE IMPLIED WARRANTIES UNDER STATE LAW WHICH ARE HEREBY LIMITED IN DURATION TO ONE YEAR FROM THE DATE OF ORIGINAL PURCHASE IN NO EVENT WILL HUM...

Page 132: ...r your e mail subject header You should include your Repair Authorization Number in all subsequent communications about your unit For IN WARRANTY service complete the following steps Obtain a Repair A...

Page 133: ...ble Purchase the PC Connect Cable to connect the 900 Series Fishing System to a PC in order to upload product software updates and new features obtained from www humminbird com This accessory requires...

Page 134: ...l fishing and navigation information Plus daisy chain InterLink with other System Modules and you ll have a network that lets you share digital data around the boat It s a simply clearly better networ...

Page 135: ...ste from their products to achieve environmentally responsible disposal during the product life cycle WEEE compliance may not be required in your location for electrical electronic equipment EEE nor m...

Page 136: ...ker and less black It is important to note that a sonar return from a sloping bottom can have the appearance of a softer bottom Cavitation Cavitation is the effect of air bubbles created as the propel...

Page 137: ...Frame is a Humminbird feature that pauses the sonar scrolling so that the image on screen can be studied with greater detail See Instant Image Update Frequency Frequency is a measure of the number of...

Page 138: ...horizontal number i e 640 V x 320 H this key specification typically indicates the quality of resolution In fishfinders the total resolution vertical multiplied by horizontal is often less important...

Page 139: ...rgy bouncing off the bottom once rebounding to the water surface and then traveling back down to the bottom to be reflected again Second returns are more common in shallow water and over hard bottoms...

Page 140: ...flected off of tiny objects near the surface of the water including algae and even air bubbles Typically saltwater environments have significantly greater surface clutter than freshwater due to contin...

Page 141: ...signal overwhelming the weak signal See Transducer and Noise TripLog TripLog is a Humminbird feature that provides an on screen counter for Elapsed Time Average Speed and Total Distance traveled and...

Page 142: ...ne a position from at least three satellites Humminbird GPS receivers provide very fast acquisition times under one minute permitting users to get out on the water faster Alarm Arrival The audible ale...

Page 143: ...To Go See Time to Go and Speed Over Ground Estimated Position Error EPE Estimated Position Error is a calculation that indicates the potential position inaccuracy the user may experience due to a var...

Page 144: ...mpass uses Magnetic North Humminbird GPS units provide the option of selecting True or Magnetic readouts by using the North Reference menu See Magnetic North Present Position Present Position is the c...

Page 145: ...ents the most efficient path between the two points because it is a straight line The TRK is measured in degrees i e 321 where 000 is North 090 East 180 is South 270 is West See Cross Track Error and...

Page 146: ...symbol to the saved location Depth Date and Time of Day when the waypoint was created is also saved Waypoint Target Waypoint Target is a Humminbird feature that displays a precise bull s eye around a...

Page 147: ...Notes 139...

Page 148: ...Notes 140...

Page 149: ...Notes 141...

Page 150: ...Notes 142...

Page 151: ...By Telephone Monday Friday 8 00 a m to 4 30 p m Central Standard Time 1 800 633 1468 By e mail typically we respond to your e mail within three business days cservice johnsonoutdoors com For direct sh...

Reviews: