background image

3

4

Installing a Cantilever

5

Installing Cameras and Cables

Installing Cameras

5.1

For the  camera  installation  method,  see the  camera  document.

Installing Camera Cables

5.2

For the  cable  connections  at the  camera  side,  see the camera  document.  Reserve  the other  ends  of cables.

6

(Optional) Installing the CPE

For the  CPE installation  method,  see  the CPE document.

7

Installing PV Modules and Cables (Solar Hybrid Scenario)

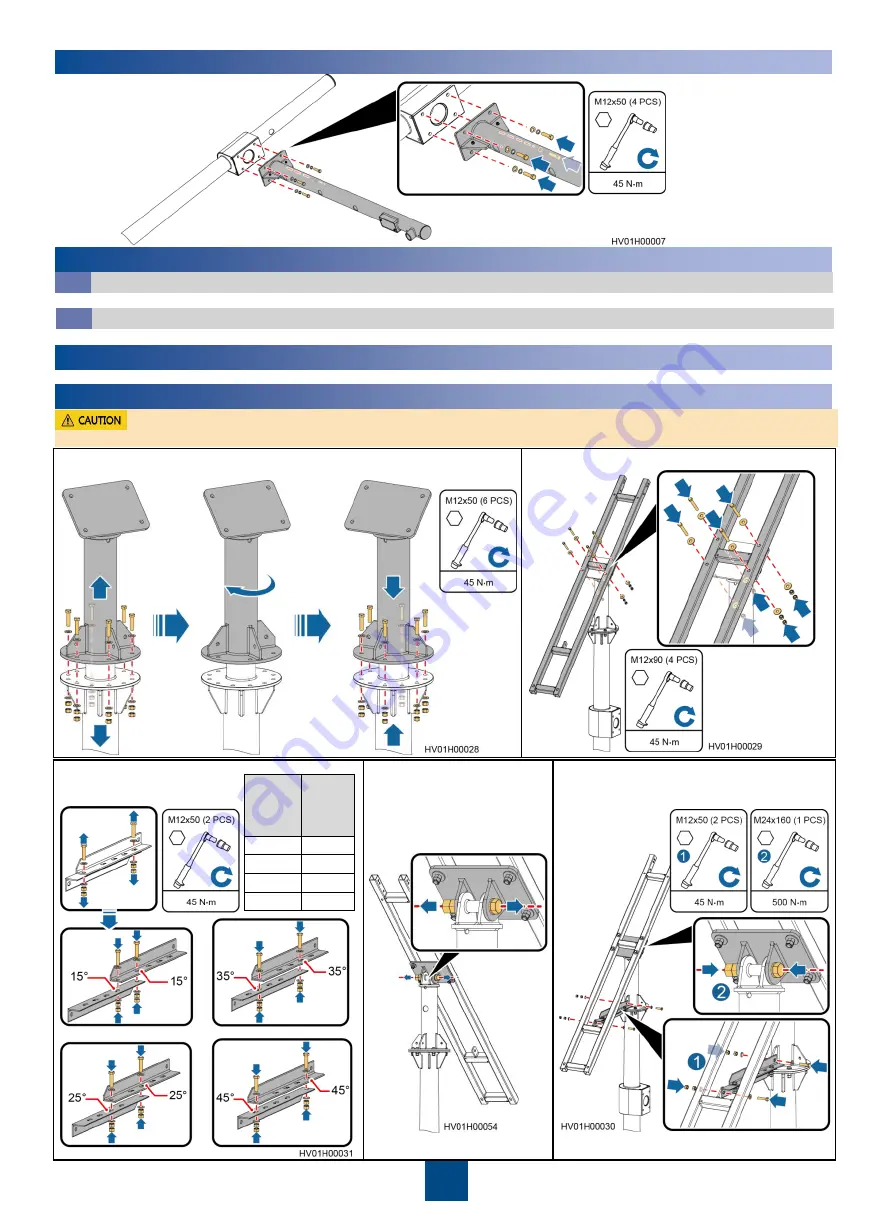
1. Remove  the connective  kit, adjust  the PV module  direction  based  on the 

PV module  direction  principles,  and  then  reinstall  the  connective  kit.

2. Install  the PV module  support.

3. Adjust the tilt angle  of the PV 

module  support  based  on the 
site latitude.

4. Loosen  the bolt  at the base 

of the PV module  support.

5. Install  the angle  adjustment  bracket  and 

tighten  the  bolt at the base  of the PV module 
support.

or

or

or

In the northern  hemisphere,  PV modules  face due  south.  In the southern  hemisphere,  PV modules  face due  north.

Site 
Latitude

PV 
Module 
Tilt 
Angle

0

–15

°

15

°

16

–25

°

25

°

26

–30

°

35

°

31

–45

°

45

°

Summary of Contents for PowerCube 500 V200R001C10

Page 1: ...itoring equipment Alarm indicator ALM Red Off There is no alarm Steady on The lithium battery has generated a fault alarm and needs to be replaced Blinking slowly 0 5 Hz The lithium battery has generated a protection alarm which can be cleared Function Module Indicator Color Status Meaning Run indicator Green Off The function module has no power input or is faulty Blinking slowly 0 5 Hz The functi...

Page 2: ...cable alarm cable and ground cable Routing Cables Through the Cantilever Camera ground cable Routing Cables Through the Solar Hybrid Pole Mains AC cable and optical fiber Module ground cable Mains AC cable module ground cable optical fiber camera cable CPE cable and PV cable CPE cable Camera signal cable power cable and alarm cable PV DC input cable CPE cables can be used only in scenarios where C...

Page 3: ...ybrid Scenario 1 Remove the connective kit adjust the PV module direction based on the PV module direction principles and then reinstall the connective kit 2 Install the PV module support 3 Adjust the tilt angle of the PV module support based on the site latitude 4 Loosen the bolt at the base of the PV module support 5 Install the angle adjustment bracket and tighten the bolt at the base of the PV...

Page 4: ...9 Install spacing shims for the PV modules Spacing shim Raking strut beam Keep the slots of horizontal beams facing inwards for installing PV modules Partially tighten the bolts so that PV modules can be adjusted during installation NOTE Ensure that the junction boxes on the rear of PV modules are positioned consistently NOTE Ensure that the openings of the raking strut beams face outwards Partial...

Page 5: ... on the site latitude Wear protective gloves during installation Do not place a module with its bottom against the ground Never install a module with power on Ensure that the angle between a module and the line vertical to the ground is within 10 degrees The paint on the module exterior should be intact If paint has flaked off repaint the area to avoid corrosion Ensure that the arrow on the top of...

Page 6: ... No lithium battery is required in the grid only scenario NOTE If two lithium batteries are required install one above the other Install the pole mounting kit after using a positioning sticker at the cable hole in the upper part of the pole to mark its installation position For the method see steps 1 and 2 NOTE The wall must be made of reinforced concrete and be able to bear at least 800 N The wal...

Page 7: ... kit 7 Install a function module onto the wall 8 Install the lithium battery hanging kit Level Marker One wall mounting kit A and one wall mounting kit B are used for each module Determine the number of wall mounting kits based on the number of modules to be installed NOTE The option to install a lithium battery depends on the scenario No lithium battery is required in the grid only scenario NOTE ...

Page 8: ...red install them onto two adjacent wall hanging kits NOTE Route inter device cables through the pole NOTE Module ground cable 2 Connect the other end of the module ground cable to the pole ground bar Pole ground bar function module Lithium battery Lithium battery Cable Hole Diameter Requirements No Cable Hole Silk Screen Cable Type Cable Outer Diameter 1 GE PoE network cable optical fiber 6 8 0 3 ...

Page 9: ...ution terminal The power cable for the dome camera can only be connected to the 24VAC port Use waterproof tape to protect the cable distribution terminal and put it inside the pole 6 Optional Install the door status sensor 7 Optional Install the dome camera alarm linkage cable Dome camera alarm cable Installation Procedure Cables for the dome camera can only be connected to the PoE 0 1 ports Bulle...

Page 10: ...f connectors may be exposed to water leakage Before assembling cables with waterproof connectors ensure that the connections between the cables and terminals are secure and reliable Negative blue Positive red PE green N L2 blue L L1 brown Cable Type Core Cross Sectional Area Cable Outer Diameter Battery cable 2 core 3 3 6 mm2 9 0 14 5 mm PV input cable 2 core 1 5 4 mm2 AC input cable 3 core 1 5 4 ...

Page 11: ...m Flat head screwdriver Scale line Installing an RJ45 Communications Cable for a Lithium Battery Ensure that caps and waterproof connectors are installed at all idle ports on the modules Connecting Cables Between the Function Module and Lithium Batteries PV input AC input Function module Lithium battery Lithium battery ...

Page 12: ...cting the Solar Hybrid Pole 1 Check whether the pole needs to be repainted Repaint the damaged area of the pole and then use the crane to hoist the pole to the foundation 2 Secure the pole to the foundation 1 Check whether the pole needs to be repainted Repaint the damaged area of the pole and then use the crane to hoist the pole to the foundation 2 Secure the pole to the foundation ...

Page 13: ...ystems view the port information in Device Manager and select the connected port Ensure that communications parameter settings on the terminal emulation software are the same as the default values on the device transmission rate 9600 bit s 8 data bits 1 stop bit no parity check and no traffic control Parameter Default Value Transmission rate 9600 bit s Traffic control No Parity check No Stop bit 1...

Page 14: ...un the ip address 10 0 0 1 255 255 255 0 command to set the IP address for the VLANIF interface 12 Run the quit command to exit the VLANIF interface view 13 Run the interface gigabitethernet 0 0 0 command to set a service interface Access the 0 0 0 interface view and set other service ports by referring to this interface setting The value of interface number depends on the interface number For exa...

Page 15: ...enable command to enable the RAW service function The information displayed in the following figure is for reference only 6 Run the quit command In the system view run the following commands Check the configuration result and verify that the server can receive data collected by the function module Run the display transport info command to check the serial port service configuration Run the display...

Page 16: ...Huawei Technologies Co Ltd Huawei Industrial Base Bantian Longgang Shenzhen 518129 People s Republic of China e huawei com ...

Reviews: