background image

Connecting the Monitor to a Device Such
as a Computer to Use the Microphone

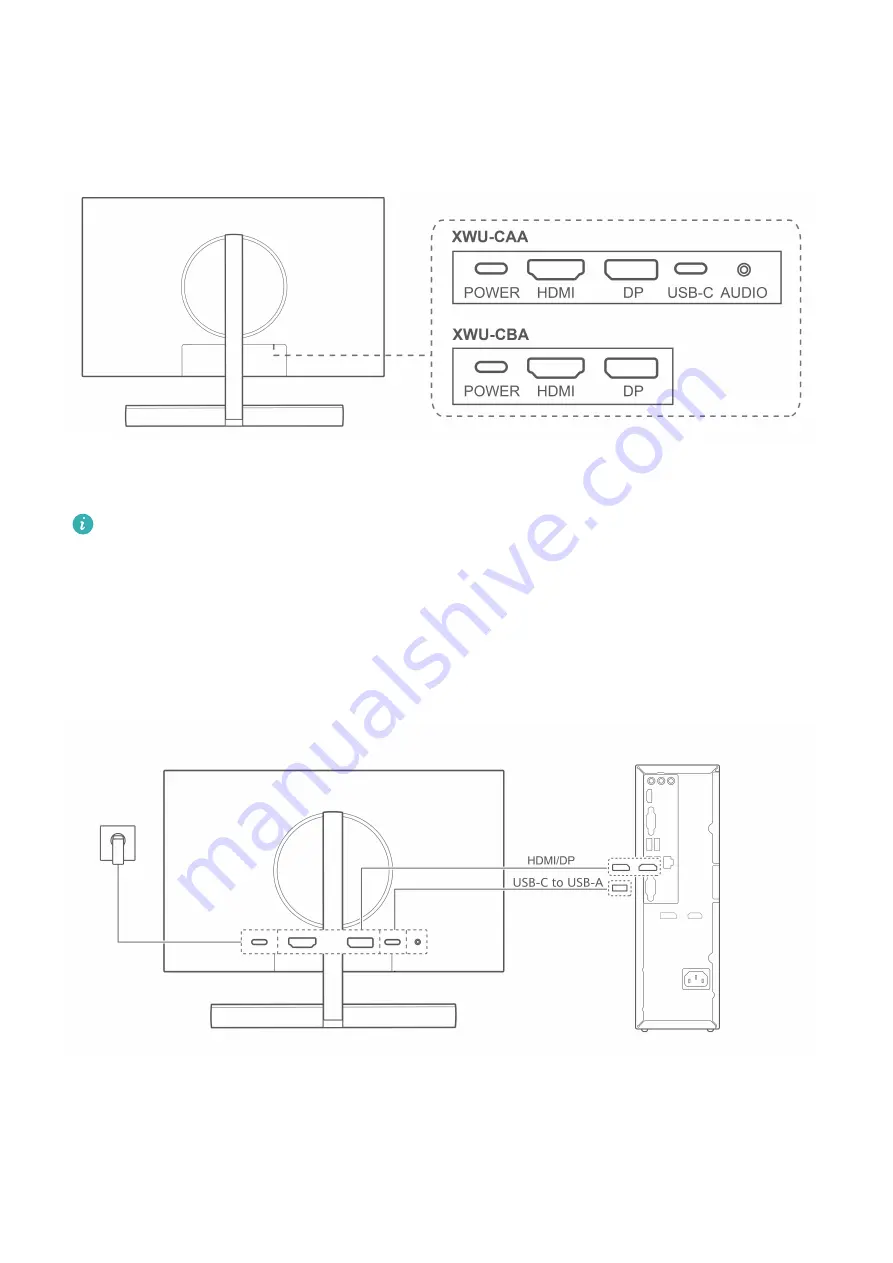
Open the protective cover on the bottom part of the monitor rear to view the ports. You can
connect the monitor to a device such as a computer based on the cable type.

You will see a monitor nameplate attached under the ports and information such as
S/N on the nameplate.

After the cables are connected, we recommend that you arrange the cables neatly and
reinstall the protective cover to prevent dust from entering the ports.

You can adjust the tilting angle and height of the monitor as required.

DP or HDMI cable connection

1

Connect one end of a DP or HDMI cable to the DP or HDMI port on the monitor, and

connect the other end to the DP or HDMI port on a computer.

9

Summary of Contents for Huawei MateView GT

Page 1: ...User Guide ...

Page 2: ...g Connecting the Monitor to a Device Such as a Computer to Use the Microphone Using the Five Way Joystick to Power on off and Configure the OSD Settings OSD Menu Options of the Monitor Using the SoundBar to Display Lighting Effects and Adjust the Volume Safety information Legal Notice i ...

Page 3: ...may not be included with the device and you need to purchase them separately Some features described in this document are only available when they are used together with other components The figures and Graphical User Interfaces GUIs in this document may be different from the actual ones and all figures are for reference only 1 ...

Page 4: ...Appearance and Ports The configuration varies depending on the monitor model 2 ...

Page 5: ...vice Press it upwards when the device is powered on to open the OSD menu Press it forwards backwards leftwards or rightwards to configure the OSD settings Press it forwards for more than five seconds when the device is powered on and the OSD menu is not being displayed to lock or unlock the joystick For details refer to Using the Five Way Joystick to Power on off and Configure the OSD Settings 3 S...

Page 6: ...ected to a mobile phone or laptop through the USB C to USB C cable that comes with the mobile phone or laptop This component is only available with XWU CAA monitors 8 Headset jack Connects to a headset This component is only available with XWU CAA monitors Appearance and Ports 4 ...

Page 7: ...at the rear of the monitor then press the base support downwards until you hear a clicking sound which indicates that the base support has been set up correctly 3 Hold the assembled monitor with both hands and place it on a flat desk To avoid damaging the screen do not press the screen when holding it Removing the monitor from the base support Disconnect the monitor from its power supply place the...

Page 8: ...Before installing the base support ensure that there are no objects made of iron attached to the support at the rear of the monitor otherwise a short circuit may occur Setting Up the Monitor 6 ...

Page 9: ... dissipation Disconnect the power before moving or installing the device Failing to do so may result in electric shocks Remove the stand before installing the device on a wall mount by following the steps for stand attachment in reverse If you install the device on a ceiling or slanted wall it may fall and result in severe injury Use an authorised wall mount and contact your local dealer or qualif...

Page 10: ...A B Wall Mounting 8 ...

Page 11: ...plate attached under the ports and information such as S N on the nameplate After the cables are connected we recommend that you arrange the cables neatly and reinstall the protective cover to prevent dust from entering the ports You can adjust the tilting angle and height of the monitor as required DP or HDMI cable connection 1 Connect one end of a DP or HDMI cable to the DP or HDMI port on the m...

Page 12: ...r Otherwise some functions may be unavailable The USB C port of a connected device such as a laptop phone or tablet must be a multifunction port that supports display data transmission and charging This connection supports charging connected devices and some apps of connected devices can use the microphone of the monitor If none of the apps can use the microphone of the monitor check whether the m...

Page 13: ...t will enter standby state and the indicator will blink Powering off Press and hold the joystick upwards for more than three seconds The indicator will be off and the monitor will then turn off Configuring the OSD settings 1 With the monitor powered on press the five way joystick upwards when facing the monitor to open the OSD menu 2 On the OSD menu screen operate the five way joystick as instruct...

Page 14: ...g that the joystick is locked After the joystick is locked you will not be able to press it to power on or off the monitor or configure the OSD settings Unlocking the joystick With the monitor powered on press and hold the joystick forwards when facing the monitor until a message is displayed indicating that the joystick is unlocked Using the Five Way Joystick to Power on off and Configure the OSD...

Page 15: ...ture mode as required We recommend that you Select Scenery when browsing landscape images Select Movie when watching films Select SRGB when browsing images on your computer Select RTS when playing real time strategy games Select FPS when playing first person shooting games Select MOBA when playing Multiplayer Online Battle Arena games Select Custom if you want to adjust more items Select P3 when b...

Page 16: ...can select the corresponding input source based on the cable connecting the monitor and other devices HDMI DP System settings Volume You can set the speaker volume to a level between 0 and 100 Sound mode You can select an appropriate sound mode based on the application scenario This feature only takes effect for the built in speaker of the monitor When a connected device such as a headset is conne...

Page 17: ...creen when the monitor is powered on and the OSD menu is not displayed and then press the 5 way joystick when facing the screen until a message is displayed Information You can view information such as the device model ECO Mode You can enable or disable the mode This feature is disabled by default Enabling this feature will reduce power consumption When this mode is enabled you will not be able to...

Page 18: ...SoundBar will be able to play sound If sound cannot be played check whether the speaker of the monitor is configured as the sound output device in the connected device s system The SoundBar has a touch area for you to quickly adjust the volume Tapping or sliding with one finger When the monitor is powered on tap the SoundBar touch area with one finger to open the speaker volume settings screen In ...

Page 19: ...nterfere with the operation of your medical device Protecting your hearing when using a headset To prevent possible hearing damage do not listen at high volume levels for long periods Using a headset at high volumes may damage your hearing To reduce this risk lower the headset volume to a safe and comfortable level Areas with flammables and explosives Do not use the device in environments where fl...

Page 20: ...stop using it power it off and remove all cables connected to it Then contact a Huawei authorised service centre Place this device in a place where it can be kept stable at all times Otherwise the device may fall over and may cause serious personal injury or death Child s safety Keep the device and its accessories away from children and take all necessary precautions to ensure their safety The dev...

Page 21: ... cables connected to it Do not use chemical detergents powders or other agents such as alcohol or benzene to clean the device or accessories These substances may cause damage to parts or present a fire hazard Use a clean soft and dry cloth to clean the device and accessories Do not dismantle or remanufacture the device and its accessories This voids the warranty and releases the manufacturer from ...

Page 22: ... on the restriction of the use of certain hazardous substances in electrical and electronic equipment such as EU REACH regulation RoHS and Batteries where included directive For declarations of conformity about REACH and RoHS please visit the website https consumer huawei com certification Safety information 20 ...

Page 23: ...vice providers Therefore the descriptions herein may not exactly match the purchased product or its accessories Huawei reserves the right to change or modify any information or specifications contained in this document at any time without prior notice and without any liability DISCLAIMER ALL CONTENTS OF THIS DOCUMENT ARE PROVIDED AS IS EXCEPT AS REQUIRED BY APPLICABLE LAWS NO WARRANTIES OF ANY KIN...

Page 24: ...erstand how we protect your personal information please see our privacy policy at https consumer huawei com privacy policy For More Help Visit https consumer huawei com en support for the most up to date contact information for your country or region ALL PICTURES AND ILLUSTRATIONS IN THIS GUIDE INCLUDING BUT NOT LIMITED TO THE DEVICE COLOUR SIZE AND DISPLAY CONTENT ARE FOR YOUR REFERENCE ONLY THE ...

Reviews: