9
10
11
x4
EN
KO
ZHCN
ZHTW
JP
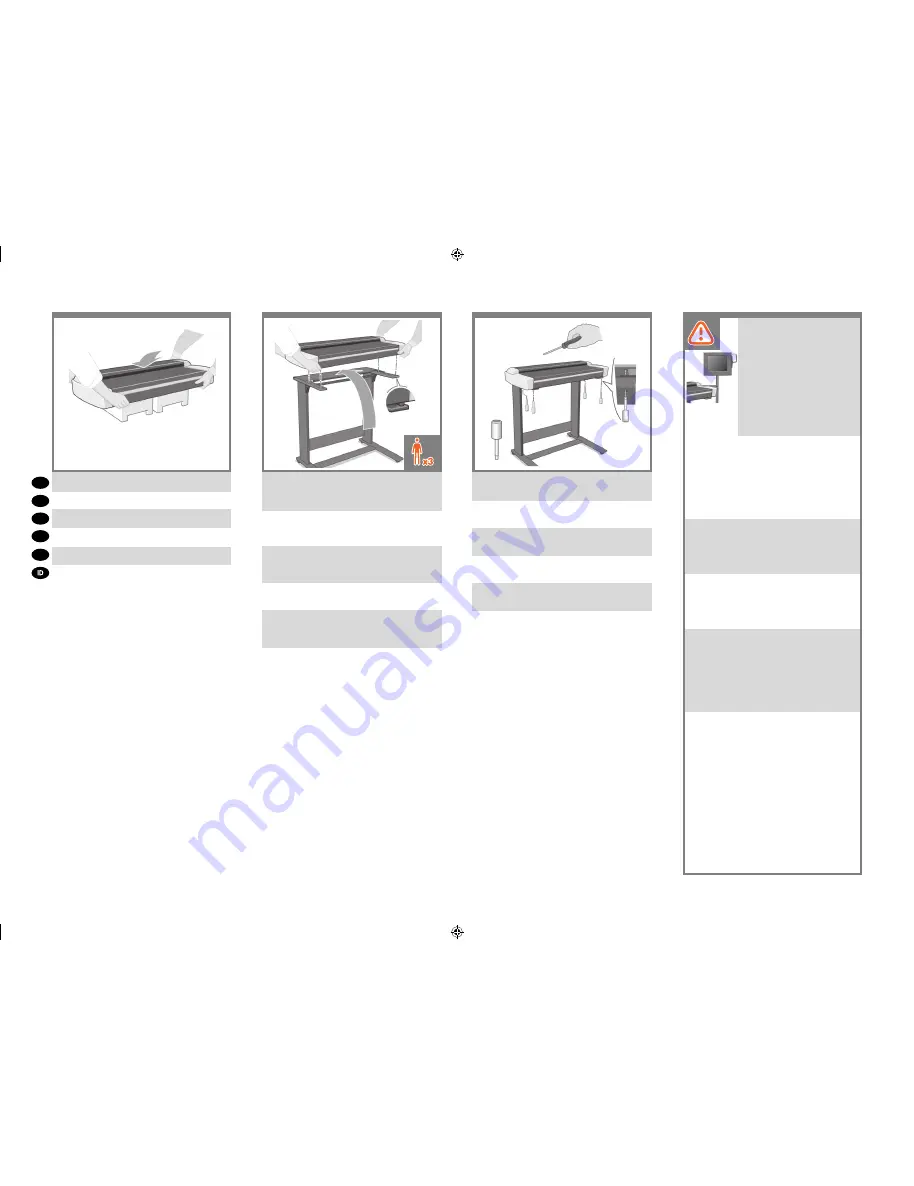
Place the scanner onto the packaging boxes.
スキャナを梱包材の上に置きます。
将扫描仪放在包装材料上。
裝掃瞄器置於包裝箱上。
스캐너를 포장 상자 위에 놓습니다.
Letakkan pemindai ke dalam kotak kemasan.
Using three people; two to lift, and one to position,
lift the scanner into place locating the rubber feet in
the holes indicated.
この作業は 3 人で行う必要があります。2 人がス
キャナを持ち上げ、残る 1 人がスキャナをトップ
バーの所定の穴の位置に合わせます。
需要三个人;两个人抬起扫描仪,另一个
人帮助放置扫描仪,应将扫描仪抬到适当
位置以使橡胶支脚插入所示的孔中。
使用三名人員,兩位人員負責抬起,而另一名則將
其對準抬放至所指出之圍有橡皮的洞內。
세 사람 중 두 사람이 스캐너를 들어올리고 나머지
한 사람은 위치를 잡아 고무 발이 지정된 구멍에
오도록 둡니다.
Dengan bantuan 3 orang (2 untuk mengangkat
dan 1 untuk meletakkan), angkat pemindai untuk
meletakkannya di dasar kaki berkaret pada lubang
yang ditunjukkan.
Fix with the four special screws using the T-handle
hex driver 2.5mm.
2.5mm の T ハンドル六角ドライバを使用して、4
本のスキャナ専用ネジでスキャナを固定します。
使用四个特制螺钉固定,并用 2.5 毫米 T 型手柄六
角螺丝刀拧紧。
利用 T 型把手的六角型 2.5mm 起子, 用四個特殊
的螺絲固定。
T-핸들 헥스 드라이버 2.5mm를 사용하여특수 나사
4개로 고정합니다.
Kencangkan dengan 4 sekrup khusus menggunakan
obeng T-handle hex 2,5 mm.
At this point you must decide on
which side you are going to fit the
touch screen assembly. This can
be fitted on the left or right side
of the stand. The next steps, 12
to 19, explain how to fit the touch
screen assembly to the right side
of the stand. To fit the touch screen
assembly to the left side of the
stand, using the same parts, just
‘mirror’ the assembly procedure
described here.
この時点で、タッチ スクリーンをどちら側に設置
するかを決める必要があります。 タッチスクリ
ーンは、スタンドの左右どちら側にも設置できま
す。次の 12 から 19 の手順では、タッチ スクリ
ーンをスタンドの右側に取り付ける手順を説明し
ます。左側に取り付ける場合は「右側」という説
明を「左側」に置き換えてください。それ以外は
使用する部品も手順も同じです。
此时,您必须确定要将触摸屏组件安装在哪 一侧。
可以将其安装在机架左侧或右侧。下面的步骤 12
至 19 说明了如何将触摸屏组件安装在机架右侧。
要使用相同零件将触摸屏组件安装在机架左侧,仍
可使用此处介绍的组装过程,但需要调转方向。
此時您必須決定要於哪一側固定觸控螢幕組件。其
可置於機架的左側或右側。接下來的步驟 12 到 19
會解說如何將觸控螢幕組件裝於機架的右側。若要
將觸控螢幕組件裝於機架左側,請使用相同的零
件,只要將此處所述組裝程序方向相反即可。
이 지점에서, 어느 쪽에 터치 스크린 어셈블리를
맞출 것인지 결정해야 합니다. 스탠드의 왼쪽
또는 오른쪽에 맞출 수 있습니다. 다음 12 ~ 19
단계에서는 터치 스크린 어셈블리를 스탠드의
오른쪽에 맞추는 방법에 대해 설명합니다. 터치
스크린 어셈블리를 스탠드의 왼쪽에 맞추려면
동일한 부품을 사용하여 여기에 나와 있는조립
절차를‘그대로’따르면 됩니다.
Pada tahap ini, Anda harus menentukan sisi
pemasangan unit layar sentuh, yakni sisi kiri atau
kanan dudukan. Langkah berikutnya (12 hingga 19)
akan menjelaskan cara memasang unit layar sentuh
di sisi kanan dudukan. Untuk memasang unit layar
sentuh di sisi kiri dudukan menggunakan komponen
yang sama, cukup lakukan prosedur pemasangan
yang sama seperti dijelaskan di sini.
AP.indd 6
28/01/2010 9:57:13
All manuals and user guides at all-guides.com
all-guides.com


